
Popular categories
Looking for a yarn?


|
||||||||||||||||
Family Fun |
||||||||||||||||
|
|
||||||||||||||||
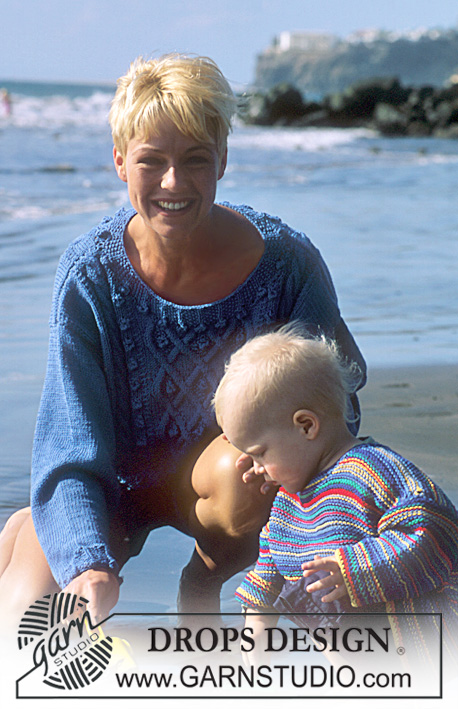
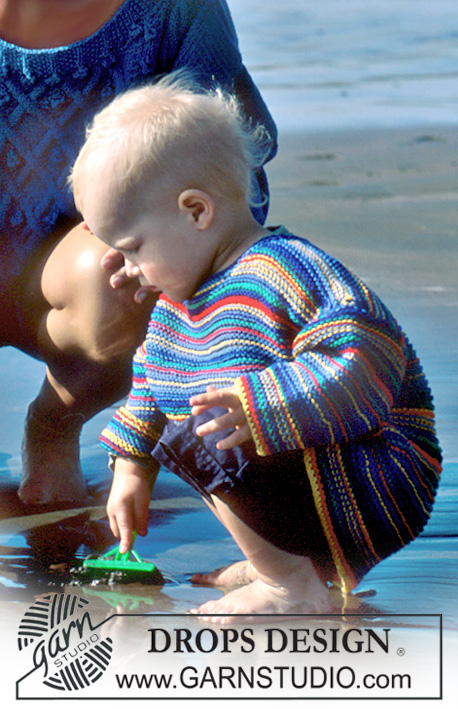
DROPS Jacket in Paris with texture pattern
DROPS 41-4 |
||||||||||||||||
|
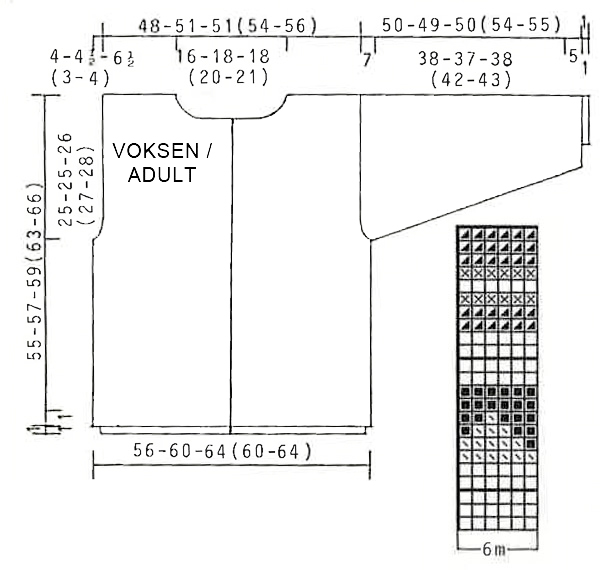
Gauge: 17 sts x 22 rows in stockinette sts = 10 x 10 cm = 4" x 4". Remember needle sizes are guidelines only! Pattern: See diagram (1 diagram = 1 pattern repeat) Diagrams are seen from RS. Knit entire pattern in stockinette sts. Ridge (back and forth on needle): 1 ridge = 2 rows 1st row: K, 2nd round: K Ridge (on circular needles): 1 ridge = 2 rounds 1st round: K, 2nd round: P. Buttonhole: Bind off for buttonhole on right (left) front piece as follows: Bind off 3rd and 4th sts and cast on 2 new sts over bind off sts on next row when piece measures: 1-1-1 (2-0,5) cm = ⅜"-⅜"-⅜" (3/4"-½"), 10-10-10,5 (11-10) cm = 4"-4"-4⅛" (4⅜"-4"), 19-19-20 (20-19,5) cm = 7½"-7½"-8" (8"-7¾"), 28-28-29,5 (29-29) = 11"-11"-11½" (11⅜"-11⅜"), 37-37-39 (38-38,5) = 14½"-14½"-15¼" (15"-15⅛"), 46-46-48 (47-48) cm = 18"-18"-19" (18½"-19") and - - -(56-57) cm = - - - (22"-22½"). Body: Figures in () = Gent size. Knit jacket back and forth on circular needles. Cast on 200-212-224 (212-224) sts on circular needles size 5 mm = US 8 with blue (navy) and knit 1 ridge. Remember buttonholes on right (left) side – see explanation above. Continuing knit Pattern with 1 sts ridge on each side mid front which is knit in base color of pattern and start at the right most of diagram after ridge. Remember knitting gauge. When piece measures 30-32-33 (36-38) cm = 11¾"-12½"-13" (14¼"-15") knit next row as follows: 50-53-56 (53-56) sts front piece, bind off 4 sts for armhole, 92-98-104 (98-104) sts back piece, bind off 4 sts for armhole, 50-53-56 (53-56) sts front piece. Complete each piece separately. Front piece: = 50-53-56 (53-56) sts. Continuing bind off for armhole on every other row: 2 sts -2-2-2 (1-1) times, 1 st 1-2-3 (1-2) times = 45-47-47 (50-52) sts. When piece measures 47-47-49 (57-58) cm = 18½"-18½"-19¼" (22½"-22¾") bind off to shape neckline on every other row: 6-6-6 (10-10) sts 1 time, 3 sts 2 times, 2 sts 2 times, 1 st 2-3-3 (1-2) times. Bind off when piece measures 55-57-59 (63-66) cm = 21⅝"-22½"-23¼" (24¾"-26") Back piece: = 92-98-104 (98-104) sts. Continuing bind off for armhole like front piece = 82-86-86 (92-96) sts. When piece measures 53-55-57 (61-64) cm = 21"-21⅝"-22½" (24"-25¼") bind off middle 24-26-26 (30-32) sts to shape neckline. Then bind off 2 sts on each side on next row to shape neckline. Bind off when piece measures 55-57-59 (63-66) cm = 21⅝"-22½"-23¼" (24¾"-26") Sleeve: Cast on 38-38-38 (40-40) sts on double pointed needles size 5 mm = US 8 with blue (navy) and knit 1 ridge. Continuing, knit Pattern (ensure to place pattern repeat mid sleeve). At the same time when piece measures 5-5-5 (5-5) cm = 2"-2"-2" (2"-2") inc mid under arm: 2 sts 24-24-25 (26-28) times on every 3rd round = 86-86-88 (92-96) sts. When piece measures 43-42-43 (47-48) cm = 17"-16½"-17" (18½"-19") bind off 6 sts mid under arm and complete knitting back and forth on needle. Continuing bind off to shape sleeve cap on every other row: 4 sts 6 times, bind off. Piece now measures approx 50-49-50 (54-55) cm = 19¾"-19¼"-19¾" (21¼"-21⅝"). Assembly: Sew shoulder seams. Pick up approx 100-104 sts round neck line on circular needles size 5 mm = US 8 with blue (navy) and knit 1 ridge back and forth on needle, bind off. Crochet edge: Crochet with double yarn from RS with blue (navy) and crochet hook size 5 mm = US H/8: 1 row sc around ridge edge along bottom of body, up along front bad and around neck distributed as follows: 110-120 sc around body, 50 (60) sc along each front band, 50 (50) sc around neckline. Then crochet a row from RS as follows: * Pick yarn under through sc, loosen sts slightly, (approx 2 cm = ¾" high), now twist crochet hook 360 degrees anti clock wise, make a new loop on crochet hook and pull this through both sts on hook *. Repeat from *-*. Repeat both rows along bottom sleeve edge, approx 22-24 sc. Alternatively crochet as follows: Crochet one row sc as explained above. Crochet a row of sc the opposite way, i.e. from left to right without twisting piece. Crochet sc from RS in each sc from previous row. Sew in sleeves and buttons. CHILDREN: SIZES: 2 - 3/4 - 5/6 (7/8 - 9/10 - 11/12) years Finished measurements: Chest measurements: 74-78-84 (92-98-106) cm = 29⅛"-30¾"-33" (36¼"-38½"-41¾") Full length: 36-39-42 (46-48-50) cm = 14¼"-15¼"-16½" (18"-19"-19¾") All measurements in charts are in cm. MATERIALS: DROPS Paris from Garnstudio (belongs to yarn group C): 150-200-200 (250-250-300) color no. 28, navy blue 50- 50-100 (100-100-100) color no. 37, bordeaux 50- 50- 50 ( 50-100-100) color no. 30, jeans blue 50- 50- 50 ( 50- 50-100) color no. 43, forest green 50- 50- 50 ( 50- 50- 50) color no. 46, rust DROPS Circular needle and Double pointed needles size 5 MM = US H/8. DROPS Cable needle size 4 MM = US 6. DROPS Buttons: 4 items. KNITTING GAUGE: 17 stitches x 22 rows with needle size 5 MM = US H/8 and stockinette stitch = 10 x 10 cm = 4" x 4". Remember needle size is only a guide! PATTERN: See the diagram (1 diagram = 1 repeat). The pattern is shown from the right side. The whole pattern is worked in stockinette stitch. RIDGE/GARTER STITCH (worked back and forth): Knit all rows. 1 ridge = knit 2 rows. RIDGE/GARTER STITCH (worked in the round): 1 ridge in height = 2 rounds; Knit 1 round and purl 1 round. BUTTONHOLES: The buttonholes are worked on the right front piece as follows: Bind off the 4th and 5th stitch and increase 2 new stitches over these stitches on the next row. Work the buttonholes when the piece measures: 1-1-2 (1-0,5-2) cm = ⅜"-⅜"-¾" (3/8"-⅛"-¾"), 6,5-7-8,5 (8,5-8,5-10) cm = 2½"-2¾"-3¼" (3¼"-3¼"-4"), 12-13-15 (16-16,5-18) cm = 4¾"-5⅛"-6" (6¼"-6⅜"-7"), 17,5-19 21,5 (23,5-24,5-26) cm = 6⅞"-7½"-8⅜" (9⅛"-9⅝"-10¼"), 23-25-28 (31-32,5-34) cm = 9"-9¾"-11" (12¼"-12⅜"-13⅜") and 28-31-34 (38-40-42) cm = 11"-12¼"-13⅜" (15"-15¾"-16½"). BODY: The jacket is worked back and forth with circular needle. Cast on 132-138-150 (162-174-186) stitches with circular needle size 5 MM = US H/8 and navy blue and work 1 ridge. REMEMBER THE BUTTONHOLES – see description above. Work according to the diagram with 1 edge stitch in garter stitch on each side towards mid-front. REMEMBER THE KNITTING GAUGE. When the piece measures 21-20-22 (24-25-26) cm = 8¼"-8"-8¾" (9½"-9¾"-10¼") work the next row as follows: Work 32-34-37 (40-43-46) stitches on the front piece, bind off 4 stitches for the armhole, work 60-62-68 (74-80-86) stitches on the back piece, bind off 4 stitches for the armhole, work 32-34-37 (40-43-46) stitches on the front piece. The front and back pieces and the sleeves are finished separately. FRONT PIECES: = 32-34-37 (40-43-46) stitches. Bind off for the armhole on every 2nd row: 2 stitches x 3-2-2 (2-3-4), 1 stitch x 2-2-3 (3-3-2) = 24-28-30 (33-34-36) stitches. When the piece measures 29-32-35 (39-41-43) cm = 11⅜"-12½"-13¾" (15¼"-16⅛"-17") bind off for the neck every 2nd row: 8-11-11 (11-12-12) stitches x 1, 2 stitches x 2, 1 stitch x 2. Bind off when the piece measures 36-39-42 (46-48-50) cm = 14¼"-15¼"-16½" (18"-19"-19¾"). BACK PIECE: = 60-62-68 (74-80-86) stitches. Bind off for the armholes as for the front pieces = 44-50-54 (60-62-66) stitches. When the piece measures 34-37-40 (44-46-48) cm = 13⅜"-14½"-15¾" (17¼"-18"-19") bind off the middle 22-26-26 (26-28-28) stitches for the neck and each shoulder is finished separately. Then bind off 1 stitch on the next row from the neck. Bind off when the piece measures 36-39-42 (46-48-50) cm = 14¼"-15¼"-16½" (18"-19"-19¾"). Work the other shoulder in the same way. SLEEVE: Cast on 28-28-32 (36-36-38) stitches with double pointed needles size 5 MM = US H/8 and navy blue and work 1 ridge. Work in the round according to the diagram, making sure you have a repeat mid-top of the sleeve. AT THE SAME TIME when the piece measures 3-3-3 (3-3-3) cm = 1⅛"-1⅛"-1⅛" (1⅛"-1⅛"-1⅛") increase under the sleeve 2 stitches x 12-18-18 (19-21-22) as follows: Sizes 2+3/4+5/6 years: Every 2nd round, Sizes 7/8+9/10 years: Alternately every 2nd and 3rd round, Size 11/12 years: Every 3rd round = 52-64-68 (74-78-82) stitches. When the piece measures 16-21-24 (28-32-35) cm = 6¼"-8¼"-9½" (11"-12½"-13¾") bind off 6 stitches under the sleeve and finish working back and forth. Bind off on each side for the sleeve cap every 2nd row: 2 stitches x 7, bind off. The piece measures approx. 23-28-31 (35-39-42) cm = 9"-11"-12¼" (13¾"-15¼"-16½"). ASSEMBLY: Sew the shoulder seams. Pick up 80-90 stitches around the neck with circular needle size 5 MM = US H/8 and navy blue and work 1 ridge back and forth, bind off. CROCHETED EDGE: Crochet from the right side with navy blue and hook size 4 MM = US 6 as follows: Work 1 row of single crochets around the edge of the ridge at the bottom of the body, up the band, round the neck and then down the other band, with the number of stitches divided as follows: 90-100 single crochets around the bottom edge, 30-40 single crochets along the bands, 50-60 single crochets around the neck. Then crochet a row of half-double crochets in the opposite direction – from left to right without turning the piece, working the half-double crochets from the right side, with 1 stitch in each single crochet. Repeat both rows at the bottom of each sleeve with 16-22 stitches. Sew in the sleeves and sew on the buttons. |
||||||||||||||||
Diagram explanations |
||||||||||||||||
|
||||||||||||||||
|
||||||||||||||||

|
||||||||||||||||
|
Have you made this or any other of our designs? Tag your pictures in social media with #dropsdesign so we can see them! Do you need help with this pattern?You'll find tutorial videos, a Comments/Questions area and more by visiting the pattern on garnstudio.com. © 1982-2024 DROPS Design A/S. We reserve all rights. This document, including all its sub-sections, has copyrights. Read more about what you can do with our patterns at the bottom of each pattern on our site. |
||||||||||||||||


With over 40 years in knitting and crochet design, DROPS Design offers one of the most extensive collections of free patterns on the internet - translated to 17 languages. As of today we count 304 catalogs and 11422 patterns - 11417 of which are translated into English (US/in).
We work hard to bring you the best knitting and crochet have to offer, inspiration and advice as well as great quality yarns at incredible prices! Would you like to use our patterns for other than personal use? You can read what you are allowed to do in the Copyright text at the bottom of all our patterns. Happy crafting!
Comments / Questions (5)
Bonjour. Je suis en train de finir le gilet pour enfant, et je suis désolée de ne pas pouvoir me faire une idée de la bordure. Je n'ai pas trouvé de vidéo à ce sujet. Est-ce qu'il en existe une ? Merci
07.11.2022 - 16:24DROPS Design answered:
Bonjour Mme Laustriat, on doit d'abord faire une bordure de mailles serrées tout autour de l'ouverture du gilet - cette vidéo montre comment faire des mailles serrées et des mailles en l'air (ne crochetez que des mailles serrées dans ce cas); puis au tour suivant, crochetez un point écrevisse à base de demi-brides au lieu des mailles serrées. Bonnes finitions!
08.11.2022 - 08:54Hei. Skal strikke denne i jordfarger og tenker at den blir superkul og oppdatert. Men jeg får det ikke helt til å stemme når jeg ser på bildet at denne er i glattstrikk, det ser mere ut som en annen teknikk... Har jeg misforstått/oversett noe? Blir takknemlig for svar, mvh.
19.01.2022 - 00:29DROPS Design answered:
Hei Strikker, Plagget er strikket i glattstrikk. Det er kanskje farge-mønster som gjør at det ser litt annerledes ut. God fornøyelse!
19.01.2022 - 08:00Bonjour, il y a les diagrammes enfant mais pas les explications, où peut on les trouver?
07.06.2021 - 13:23DROPS Design answered:
Bonjour Mme Rousseau et désolée pour la réponse tardive, la version enfant est désormais disponible sur la même page. Bon tricot!
05.07.2021 - 13:39Jag kan skicka beskrivningen till dig per brev om du prompt vill sticka just detta mönster. Det finns i häftet, men dom har glömt att översätta till nätet. Behöver dock din adress.
25.04.2016 - 19:03Hej! Hittar inte barnbeskrivningen? Är jag blind eller är den bortglömd? Jag ser endast beskrivning för dam och herr. Måttbild för barntröja finns dock. Mvh Maud
23.04.2016 - 09:30DROPS Design answered:
Hej. Det ser dessvärre ut som om barnmönstret är borttaget från beskrivningen på alla språk, du kan alltid leta bland våra barnmönster för att se om du hittar ett liknande. Mvh DROPS Design
29.04.2016 - 10:03