DROPS Paris
DROPS Paris
100% Cotton
from 1.25 € /50g
Get the yarn to make this pattern from 18.75€.

The yarn cost is calculated from the pattern’s smallest size and the yarn’s cheapest product type. Looking for an even better price? You might find it on the DROPS Deals!

DROPS SS24
DROPS 46-22
Size: Small/medium (Medium/large)

Materials: DROPS Paris from Garnstudio
750 (800) g colour no 41, yellow

DROPS circular needles and double pointed needles size 3.5 mm and 5 mm.
DROPS dark nut buttons: 5 pcs (Button no 514)

-------------------------------------------------------

Alternative Yarn – See how to change yarns here
Yarn Groups A to F – Use the same pattern and change the yarn here
Yarn usage using an alternative yarn – Use our yarn converter here

-------------------------------------------------------

DROPS Paris
DROPS Paris
100% Cotton
from 1.25 € /50g
Get the yarn to make this pattern from 18.75€.

The yarn cost is calculated from the pattern’s smallest size and the yarn’s cheapest product type. Looking for an even better price? You might find it on the DROPS Deals!

Pattern instructions

NOTE: This pattern is written in British English. All measurements in charts are in cm. For conversion from cm to inches - click here. There are different terms for crocheting in British and American English. If this pattern includes crochet, click for "crochet terms" here. For this pattern in American English, please click here.
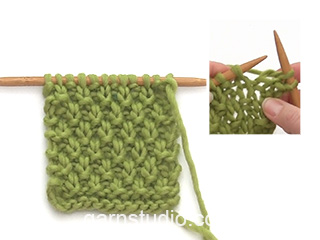
Knitting tension: 17 sts x 22 rows on needle size 5 mm and double moss sts = 10 x 10 cm Remember needle sizes are guidelines only!

Rib: * K1, P1 *, Repeat from *-*.

Double moss sts: 1st row: * K1, P1 *, 2nd row: Knit K over K and P over P. 3rd row: K over P and P over K. 4th row: Knit P over P and K over K. Repeat 1st to 4th rows continuously.

Ridge (back and forth on needle): 1 ridge = 2 rows 1st row: K, 2nd round: K

BODY
Knit jacket back and forth on circular needles. Cast on 172 (184) sts (includes 1 edge sts on each side mid front) on circular needles size 3.5 mm with yellow and knit 2 cm rib – finish rib on RS and knit 1 row garter st on RS and 1 row garter sts on WS, at the same time inc as follows: 12 sts evenly over first 34 sts, 14 sts evenly over middle 40 sts back and 12 sts evenly over last 34 sts = 210 (222) sts. Change to circular needle size 5 mm and knit pattern on row as follows (1st row = RS): 1 edge st, M.1, M.2, M.1, M.3, 20 (23) sts double moss sts, P1, 29 (32) sts double moss sts, M.1, M.3, M.2, M.1, M.3, 29 (32) sts double moss sts, P1, 20 (23) sts double moss sts, M.1, M.3, M.2, M.1, 1 edge sts. Continue knitting pattern at the same time inc on each side of purl sts as follows: 1 sts 2 (3) times every 17 (12) rows (first inc after 17 (12) rows) = 218 (234) sts (knit inc sts in double moss sts after each). Remember knitting tension. When piece measures 23 (24) cm knit next row as follows: 56 (60-56) sts front piece, cast off 3 sts for armhole, 100 (108) sts back piece, cast off 3 sts for armhole, 56 (60) sts front piece. Complete each piece separately.

Front piece: = 56 (60) sts. Continuing cast off for armhole on every other row: 2 sts 1 (2) times, 1 st 0 (1) times = 54 (55) sts.
When piece measures 31 (33) cm cast on 5 sts for collar towards mid front and continue the new collar sts in double moss sts with 1 edge st in ridge.
At the same time inc for collar and shape neckline as follows:
Collar: Within edge sts (= 1st st of the new 5) inc alternating on every other row: Alternating 1 st and 2 sts 4 times (= 12 new sts) – inc 2 sts by inc 1 st on each side of stitch next to the edge st – and then 1 st 5 times. Knit inc sts in double moss sts.
Neck: Dec within 5th sts (= last st of the inc sts): 1 st 10 times on every row and then 1 st 12 times on every other row = 54 (55) sts.

When piece measures 47.5 (49.5) cm knit ridge on shoulder sts at the same time as casting off 4 sts evenly on M.1 and M.3 = 28 (29) sts for shoulder.
Cast off shoulder sts after ridge, piece measures approx 48 (50) cm. Continue knitting with double moss sts on remaining 22 (22) sts (measure collar from here). When collar measures 7 (7.5) cm cast off from shoulder mid front on every other row: 4 sts 2 times, 5 sts 2 times – at the same time cast off on opposite side 1 st 4 times. All sts should be cast off now.

Back piece: = 100 (108) sts. Continuing cast off for armhole like front piece = 96 (98) sts. When piece measures 46 (48) cm cast off middle 36 (36) sts for neck and then cast off 2 sts on each side on next row to shape neckline. When piece measures 47.5 (49.5) cm knit one ridge. Cast off remaining 28 (29) sts on each shoulder after ridge, piece measures approx 48 (50) cm.

Sleeve: Cast on 38 (38-46) sts on double pointed needles size 3.5 mm with yellow and knit 2 cm rib. Change to circular needle size 5 mm and knit pattern as follows: 12 (12) sts double moss sts, M.1, M.3, 12 (12) sts double moss sts. Continuing knit pattern. At the same time when piece measures 5 (5) cm inc mid under arm: 2 sts 26 (27-29) times on every 3rd round (knit inc sts in double moss sts after each) = 90 (92) sts. When piece measures 46 (44) cm cast off 3 sts mid under arm and complete knitting back and forth on needle. Continuing cast off to shape sleeve cap on every other row: 7 (5) sts 4 (6) times, cast off. Piece measures approx 51 (51) cm.

Assembly: Sew shoulder seams. Pick up approx 60-66 sts along left front piece on circular needles size 3.5 mm with yellow and knit 3 cm rib back and forth on row. Repeat along right front piece but after 1 cm knit 5 buttonholes distributed evenly on row - 1 buttonhole = cast off 2 sts and cast on 2 new sts over cast off sts on next row. Sew on collar from front piece along neckline of back piece. Sew on collar mid back. Sew in sleeves and buttons.

Diagram

symbols = K
symbols = P
symbols = slip 2 sts on cable needle to front, K2, K2 from cable needle
symbols = slip 3 sts on cable needle to front, K3, K3 from cable needle
symbols = slip 3 sts on cable needle to back, K3, K3 from cable needle
diagram

Each of our patterns has specific tutorial videos to help you.

Do you have a question? See a list of frequently asked questions (FAQ)

Knitting tension is what determines the final measurements of your work, and is usually measured per 10 x 10 cm. It is provided like so: number of stitches in width x number of rows in height - eg: 19 stitches x 26 rows = 10 x 10 cm.

The knitting tension is very individual; some people knit/crochet loosely while others work tightly. You adjust the knitting tension with the needle size, which is why the suggested needle size is only meant as a guide! You need to adjust this (up or down) to ensure that YOUR knitting tension matches the knitting tension provided in the pattern. If you work with a different knitting tension than provided you will have a different yarn consumption, and your work will have different measurements than what the pattern suggests.

The knitting tension also determines which yarns can replace each other. As long as you achieve the same knitting tension you can replace one yarn with another.

See DROPS lesson: How to measure your tension/gauge

See DROPS video: How to make a gauge tension swatch

The required amount of yarn is provided in grams, eg: 450 g. To calculate how many balls you’ll need you first need to know how many grams are in 1 ball (25g, 50g or 100g). This information is available if you click on the individual yarn quality on our pages. Divide the amount required with the amount of each ball. For example, if each ball is 50g (the most common amount), the calculation will be as follows: 450 / 50 = 9 balls.

The important thing when changing from one yarn to another is that the knitting/crochet tension remains the same. This is so that the measurements of the finished piece will be the same as on the sketch provided. It is easier to achieve the same knitting tension using yarns from the same yarn group. It is also possible to work with multiple strands of a thinner yarn to achieve the knitting tension of a thicker one. Please try our yarn converter. We recommend you to always work a test swatch.

Please NOTE: when changing yarn the garment might have a different look and feel to the garment in the photo, due to individual properties and qualities of each yarn.

See DROPS lesson: Can I use a different yarn than the one mentioned in the pattern?

All our yarns are categorised into yarn groups (from A to F) according to thickness and knitting tension – group A contains the thinnest yarns and group F the thickest. This makes it easier for you to find alternative yarns to our patterns, should you wish to switch yarn. All yarns within the same group have a similar knitting tension and can easily replace each other. However, different yarn qualities have different structures and properties which will give the finished work a unique look and feel.

Click here for an overview of the yarns in each yarn group

At the top of all our patterns you’ll find a link to our yarn calculator, which is a helpful tool should you wish to use a different yarn than suggested. By filling in the yarn quality you wish to replace, the amount (in your size) and number of strands, the calculator will present good alternative yarns with the same knitting tension. Additionally it will tell you how much you’ll require in the new qualities and whether you’ll need to work with multiple strands. Most skeins are 50g (some are 25g or 100g).

If the pattern is worked with multiple colours, every colour will have to be calculated separately. Similarly, if the pattern is worked with several strands of different yarns (for example 1 strand Alpaca and 1 strand Kid-Silk) you will have to find alternatives for each, individually.

Click here to see our yarn calculator

Since different yarns have different qualities and textures we have chosen to keep the original yarn in our patterns. However, you can easily find options among our available qualities by using our yarn calculator, or simply pick a yarn from the same yarn group.

It is possible that some retailers still have discontinued yarns in stock, or that someone has a few skeins at home that they would like to find patterns for.

The yarn calculator will provide both alternative yarn as well as required amount in the new quality.

If you think it's hard to decide what size to make, it can be a good idea to measure a garment you own already and like the size of. Then you can pick the size by comparing those measures with the ones available in the pattern's size chart.

You'll find the size chart at the bottom of the pattern.

See DROPS lesson: How to read size chart

The needle size provided in the pattern serves only as a guide, the important thing is to follow the knitting tension. And since knitting tension is very individual, you will have to adjust the needle size to ensure that YOUR tension is the same as in the pattern – maybe you’ll have to adjust 1, or even 2 needle sizes, up or down to achieve the correct tension. For this, we recommend that you work test swatches.

Should you work with a different knitting tension than the one provided, the measurements of the finished garment might deviate from the measurement sketch.

See DROPS lesson: How to measure your tension/gauge

See DROPS video: How to make a tension/gauge swatch

Working a garment top-down provides more flexibility and room for personal adjustment. For example it is easier to try the garment on while working, as well as making adjustments to length of yoke and shoulder caps.

The instructions are carefully explaining every step, in the correct order. Diagrams are adjusted to the knitting direction and are worked as usual.

The diagram depicts all rows/rounds, and every stitch seen from the right side. It is read from bottom to top, from right to left. 1 square = 1 stitch.

When working back and forth, every other row is worked from the right side and every other row is worked from the wrong side. When working from the wrong side, the diagram will have to be worked reversed: from left to right, knit stitches are purled, purl stitches are knit etc.

When working in the round every round is worked from the right side and the diagram are worked from right to left on all rounds.

See DROPS lesson: How to read knitting diagrams

The diagram depicts all rows/rounds, and every stitch seen from the right side. It is worked from bottom to top, from right to left.

When working back and forth every other row is worked from the right side: from right to left and every other row is worked from the wrong side: from left to right.

When working in the round, every row in the diagram are worked from the right side, from right to left.

When working a circular diagram you start in the middle and work your way outwards, counter clockwise, row by row.

The rows usually start with a given number of chain stitches (equivalent to the height of the following stitch), this will either be depicted in the diagram or explained in the pattern.

See DROPS lesson: How to read crochet diagrams

Instructions for working several diagrams after each other on the same row/round, will often be written like so: “work A.1, A.2, A.3 a total of 0-0-2-3-4 times". This means you work A.1 once, then A.2 is worked once, and A.3 is repeated (in width) the number of times provided for your size – in this case like so: S = 0 times, M = 0 times, L=2 times, XL= 3 times and XXL = 4 times.

The diagrams are worked as usual: begin with the first row in A.1, then work the first row in A.2 etc.

See DROPS lesson: How to read knitting diagrams

See DROPS lesson: How to read crochet diagrams

The total width of the garment (from wrist-to-wrist) will be larger in the larger sizes, despite the actual sleeves being shorter. The larger sizes have longer sleeve caps and wider shoulders, so there will be a good fit in all sizes.

The measurement sketch/schematic drawing provides information regarding the full length of the garment. If it’s a jumper or a jacket the length is measured from the highest point on the shoulder closest to the neckline, and straight down to the bottom of the garment. It is NOT measured from the tip of shoulder. Similarly, the length of yoke is measured from the highest point on the shoulder and down to where yoke is split into body and sleeves.

On a jacket measures are never taken along bands, unless specifically stated. Always measure inside band stitches when measuring the length.

See DROPS lesson: How to read a schematic drawing

Diagrams are often repeated on the round or in height. 1 repeat is the diagram the way it appears in the pattern. If it says to work 5 repeats of A.1 in the round, then you work A.1 a total of 5 times after/next to each other in the round. If it says to work 2 repeats of A.1 vertically/in height you work the entire diagram once, then begin again at the start and work the entire diagram one more time.

Chain stitches are slightly narrower than other stitches and to avoid working the cast-on edge too tight, we simply chain more stitches to begin with. The stitch count will be adjusted on the following row to fit the pattern and measurement sketch.

The rib edge is more elastic and will contract slightly compared to, for example, stocking stitch. By increasing before the rib edge, you avoid a visible difference in width between the rib edge and the rest of the body.

It’s very easy to cast off too tightly, and by making yarn overs while casting off (and simultaneously casting these off) you avoid a too tight cast off edge.

See DROPS video: How to bind off with yarn overs (yo)

To achieve an even increase (or decrease) you can increase on, for example: every 3rd and 4th row alternately, like so: work 2 rows and increase on the 3rd row, work 3 rows and increase on the 4th. Repeat this until the increase is complete.

See DROPS lesson: Increase or decrease 1 st on every 3rd and 4th row alternately

Should you prefer to work in the round instead of back and forth, you may of course adjust the pattern. You’ll need to add steeks mid-front (usually 5 stitches), and follow the instructions. When you would normally turn and work from the wrong side, simply work across the steek and continue in the round. At the end you’ll cut the piece open, pick up stitches to work bands, and cover the cut edges.

See DROPS video: How to knit steeks and cut open

Should you prefer to work back and forth instead of in the round, you may of course adjust the pattern so you work the pieces separately and then assemble them at the end. Divide the stitches for the body in 2, add 1 edge stitch in each side (for sewing) and work the front and back pieces separately.

See DROPS lesson: Can I adapt a pattern for circular needles into straight needles?

Pattern repeats can vary slightly in the different sizes, in order to get the correct proportions. If you’re not working the exact same size as the garment in the photo, yours might deviate slightly. This has been carefully developed and adjusted so that the complete impression of the garment is the same in all sizes.

Make sure to follow instructions and diagrams for your size!

If you have found a pattern you like which is available in women’s size it’s not very difficult to convert it to men’s size. The biggest difference will be the length of sleeves and body. Start working on the women size that you think would fit across the chest. The additional length will be worked right before you cast off for the armhole/sleeve cap. If the pattern is worked top-down you can add the length right after the armhole or before the first decrease on sleeve.

Regarding additional yarn amount, this will depend on how much length you add, but it is better with a skein too many than too few.

All yarns will have excess fibres (from production) that might come off as lint or shedding. Brushed yarns (ie hairier yarns) have more of these loose, excess fibres, causing more shedding.

Shedding also depends on what is worn under or over the garment, and whether this pulls at the yarn fibres. It’s therefore not possible to guarantee that there will be no shedding

Below are some tips on how to get the best result when working with hairier yarns:

1. When the garment is finished (before you wash it) shake it vigorously so the looser hairs come off. NOTE: do NOT use a lint roller, brush or any method that pulls at the yarn.

2. Place the garment in a plastic bag and put it in your freezer - the temperature will cause the fibres to become less attached to each other, and excess fibres will come off easier.

3. Leave in the freezer for a few hours before taking it out and shaking it again.

4. Wash the garment according to the instructions on the yarn label.

Pilling is a natural process that happens to even the most exclusive of fibers. It's a natural sign of wear and tear that is hard to avoid, and that is most visible in high friction areas of your garment like a sweater's arms and cuffs.

You can make your garment look as new by removing the pilling, using a fabric comb or a pill/lint remover.

Still can't find the answer you need? Then scroll down and leave your question so one of our experts can try to help you. This will be done normally within 5 to 10 working days.
In the meantime, you can read the questions and answers that others have left to this pattern or join the DROPS Workshop on Facebook to get help from fellow knitters/crocheters!

You might also like...

Post a comment to pattern DROPS 46-22

We would love to hear what you have to say about this pattern!

If you want to leave a question, please make sure you select the correct category in the form below, to speed up the answering process. Required fields are marked *.

Comments / Questions (8)

country flag Ineke wrote:

Mouw 46 st. Boord Nld 5. 12 st. D. Gerstekorrel m1 m3 dan 12 d. Gerstekorrel. 12 + 8 + 6 + 12 : 38 steken maar er zijn dus 46 st.

24.10.2023 - 14:12

country flag Janetta Bouwmeester wrote:

Waar moet het minderen voor de mouwkop plaatsvinden? Middenonder, of verdeeld over de naald?

21.07.2023 - 11:08

DROPS Design answered:

Dag Janetta,

Je kant af in de zijnaad midden onder van de mouw, zodat je echt een ronding krijgt aan de bovenkant van de mouw.

24.07.2023 - 20:11

country flag Janetta Bouwmeester wrote:

Begrijp ik het goed dat je na de laatste meerderingen van de kraag, meteen begint met de minderingen van de hals

04.05.2023 - 23:22

DROPS Design answered:

Dag Janetta,

Nee, je doet dit niet na elkaar, maar tegelijkertijd. Dus aan de ene kant meerder je steken voor de kraag en naast de kraagsteken minder je steken voor de ronding van de hals.

08.05.2023 - 21:08

country flag Angelika wrote:

Die Anleitung stimmt hinten und vorne nicht. Die Anzahl der angegebenen Maschen stimmen nicht überein. Rechne ich die Anzahl der Maschen mit der Maschenprobe um, ist die Breit der Jacke um vieles größer. Gibt es eine korregierte Anleitung ??? Bin etwas ärgerlich darüber, da es nicht das erstemal ist....

15.02.2023 - 20:40

DROPS Design answered:

Liebe Angelika, für die Zöpfe braucht man mehr Maschen als fürs Glattrechts stricken, aber sollte Ihre Maschenprobe in der Breite stimmen (= 17 Maschen = 10 cm), dann sollten Sie genau die gleichen Maßnahamen wie bei der Maßskizze haben; Viel Spaß beim stricken!

16.02.2023 - 14:06

country flag Nadia wrote:

Pas de réponse au post de Karen ? J'en suis au même point... le col. Les explications ne sont pas claires (je suis pourtant une tricoteuse confirmée ). Pourriez-vous me confirmer qu'il faut en tout augmenter 17 m. de chaque côté ? Merci d'avance.

28.11.2022 - 10:44

DROPS Design answered:

Bonjour Nadia, pour le col, vous montez d'abord 5 mailles puis vous augmentez 4 fois alternativement 1 m et 2 m (= 12 m au total) puis vous augmentez 5 fois 1 m (= vous avez augmenté 5+12+5=22 m au total), ces mêmes 22 mailles que vous tricoterez au point de riz après avoir rabattu les mailles de l'épaule.. Bon tricot!

29.11.2022 - 11:08

country flag Chantal PICHON wrote:

Que signifie M1, M2... dans cette phrase : 1 m lis, M1, M2, M1, M3, 20-23 m double point de riz, 1 m env, 29-32 m double point de riz, M1,M3, M2, M1, M3, 29-32 m double point de riz, 1m env, 20-23 m double point de riz, M1, M3, M2, M1, 1 m lis. Je vous remercie

01.10.2022 - 16:41

DROPS Design answered:

Bonjour Mme Pichon, M.1 et M.2 correspondent aux diagrammes des différents points fantaisie que vous trouverez en bas de page, à droite du schéma des mesures. Découvrez plus d'infos sur ces diagrammes ici. Bon tricot!

03.10.2022 - 08:42

country flag Kathryn Reynolds wrote:

Would it be possible to have this pattern to knit on two needles?

31.03.2020 - 13:28

DROPS Design answered:

Dear Mrs Reynolds, you will find here how to adapt a pattern for straight needles. Happy knitting!

31.03.2020 - 13:52

country flag Karen wrote:

Hi, I'm currently at the point of doing the collar and really not understanding it. Could you please clarify in simpler terms. Thanks.

05.01.2009 - 13:29