DROPS Kid
DROPS Kid
42% Alpaca, 35% Mohair, 18% Wool, 5% Nylon
Discontinued
find alternatives
DROPS SS24

Above Deck

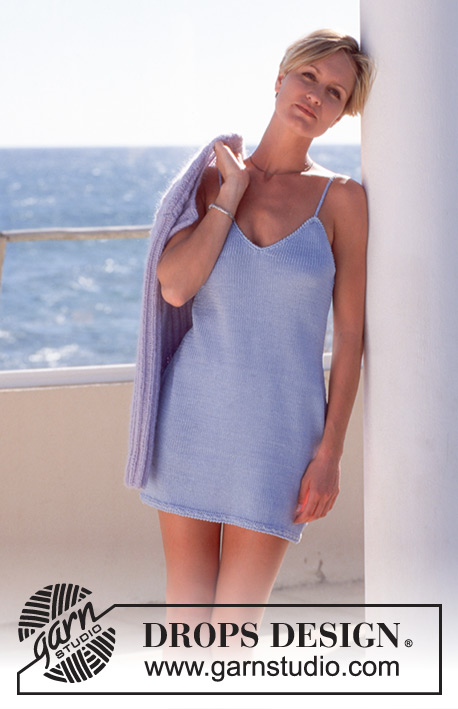
Knitted Jacket in DROPS Kid or DROPS Brushed Alpaca Silk with structure. Knitted Dress in DROPS Muskat.

DROPS 46-14
JACKET
Size: Small/medium (Medium/large)
Note! Measurements on diagram shows piece worked in rib texture. Body is narrow due to pattern.

Materials: DROPS Kid from Garnstudio
450 (500) g color no 9, light blue

Or use: DROPS Brushed Alpaca Silk
175-200 g colour no 17 light lavender

DROPS circular needle and double pointed needles size 5 mm / US 8.
DROPS mother-of-pearl buttons no 523: 8 pcs.
--------------------------------------------

DRESS

Size: Small (Medium -Large)

Materials: DROPS Muskat from Garnstudio
300 (350-400) g color no 1, light blue

DROPS CIRCULAR NEEDLES size 3 mm / US 2.5 and 3.5 mm/US 4
DROPS CROCHET HOOK size 3.5 mm/E/4 and 4 mm

-------------------------------------------------------

Alternative Yarn – See how to change yarns here
Yarn Groups A to F – Use the same pattern and change the yarn here
Yarn usage using an alternative yarn – Use our yarn converter here

-------------------------------------------------------

DROPS Kid
DROPS Kid
42% Alpaca, 35% Mohair, 18% Wool, 5% Nylon
Discontinued
find alternatives

Pattern instructions

NOTE: This pattern is written in American English. All measurements in charts are in cm. For conversion from inches to cm - click here. There are different terms for crocheting in American and British English. If this pattern includes crochet, click for "crochet terms" here. For this pattern in British English, please click here.
Knitting gauge: 17 sts x 22 rows on needle size 5 mm / US 8 and stockinette sts = 10 x 10 cm / 4" x 4". Remember needle sizes are guidelines only! See Note! Above under Size.

Pattern: * K2, P3 *, repeat from *-*.

Buttonholes:
When piece measures 1 (1), 7.5 (7.5), 13.5 (14), 20 (20.5), 26 (27.5), 32.5 (34), 38.5 (40.5) and 45 (47) cm bind off for buttonhole on right front piece as follows:
K 3rd and 4th sts tog and P 7th and 8th sts tog and cast on 1 new st over each of the bind off sts on next row.

Ridge (back and forth on row): 1 ridge = 2 rows. 1st row: K, 2nd row: K.

Body:
Knit jacket back and forth on circular needles. Cast on 195 (210) sts on circular needle size 5 mm / US 8 and work as follows: K6, P3 (= 9 sts front band), 177 (192) sts of pattern – see explanation above, P3, K6 (= 9 sts front band). Remember button hole on right side – see explanation above.
Remember knitting gauge. When piece measures 29 (31) cm work next row as follows: 51 (55) sts front piece, bind off 4 sts for armhole, 85 (92) sts back piece, bind off 4 sts for armhole, 51 (55) sts front piece.
Complete each part separately.

Front pieces: = 51 (55) sts. Continuing bind off for armhole on every other row: 2 sts 1 (2) times, 1 sts 1 time = 48 (50) sts. When piece measures 46 (48) cm bind off to shape neckline on every other row: 14 (15) sts 1 time, 3 sts 1 time, 2 sts 2 times, 1 st 3 times. Bind off when piece measures 54 (56) cm.

Back piece: = 85 (92) sts. Continuing bind off for armhole as front piece = 79 (82) sts. When piece measures 52 (54) cm bind off middle 27 (28) sts for neck.
Then bind off 2 sts on next row each side at neckline.
Bind off when piece measures 54 (56) cm.

Sleeve:
Cast on 37 (37) sts on double pointed needles size 5 mm / US 8 with light blue and work pattern, see explanation above (ensure to place 3 P sts mid sleeve).
At the same time when piece measures 5 (5) cm inc 2 sts mid under sleeve 24 (24) times alternating on every 3rd and 4th row = 85 (85) sts (work inc sts into pattern after each). When piece measures 46 (46) cm bind off 4 sts mid under sleeve and complete piece knitting back and forth on needle.
Continuing, bind off for sleeve cap on each side on every other row: 5 sts 5 times, bind off. Piece measures approx 52 (52) cm.

Assembly:
Sew shoulder seams. Fold in outermost 5.5 sts on each side at mid front (= front band) and sew.
Pick up approx 80-84 sts round neckline on circular needle size 5 mm / US 8 with light blue and work 1 ridge back and forth on needle, bind off. Sew in sleeves and buttons.

________________________________________


DRESS

Knitting gauge: 21 sts x 28 rows on needle size 3.5 mm / US 4 and stockinette sts = 10 x 10 cm / 4" x 4". Remember needle sizes are guidelines only!

Crochet gauge: 16 sc in width with single yarn and crochet hook size 3.5 mm/E/4= 10 cm / 4".

Ridge (on circular needle):
1 ridge = 2 rounds.
1st round: K, 2nd round: P.

Dress:
Cast on 202 (218-234) sts on circular needles size 3 mm / US 2.5 and work 2 ridges. Change to circular needle 3.5 mm/ US 6 and continue in stockinette. Remember knitting gauge.
When piece measures 27 (30-30) cm bind off 12 (14-15) times on each side: Slip side st as if to knit, K st before and st after side sts tog, psso on:
Size S: Alternate every 2nd and 3rd round
Size M+L: Every other row
= 154 (162-174) sts.
Continuing, when piece measures 55 (58-60) cm bind off all 77 (81-87) sts on back piece and 2 sts on each side of front piece = 73 (77-83) sts.
Complete front piece as follows: bind off middle 3 (3-1) sts for neck and bind off on each side at neckline and armhole as follows: 1 sts 16 (17-19) times alternating on every and every other row = 3 sts on each shoulder. Bind off remaining 3 sts in one.
Piece measures approx 63.5 (67-70) cm.

Crochet edge:
Crochet with single yarn from RS with light blue on crochet hook size 3.5 mm/E/4 as follows:
1 round sc approx 154 (166-180) sts round ridge edge at bottom edge of dress.
Then crochet a row of sc the opposite way, i.e. from left to right without turningthe piece. Crochet sc from RS in each sc from previous row.
Repeat both rows at top of dress over back and front pieces approx 150 (158-168) sc.
Crochet a row of ch in double yarn with crochet hook size 4 mm / G/6 from each point of front piece approx 40 cm / 15¾" – adjust to desired length = shoulder strap.
Pull straps through crochet edge on back piece where points on front pieces end and tie a knot at the desired length.
Repeat on other front piece.

Diagram

All measurements in charts are in cm.

diagram measurements

Each of our patterns has specific tutorial videos to help you.

Do you have a question? See a list of frequently asked questions (FAQ)

Knitting tension is what determines the final measurements of your work, and is usually measured per 10 x 10 cm. It is provided like so: number of stitches in width x number of rows in height - eg: 19 stitches x 26 rows = 10 x 10 cm.

The knitting tension is very individual; some people knit/crochet loosely while others work tightly. You adjust the knitting tension with the needle size, which is why the suggested needle size only serve as a guide! You need to adjust this (up or down) to ensure that YOUR knitting tension matches the knitting tension provided in the pattern. If you work with a different knitting tension than provided you will have a different yarn consumption, and your work will have different measurements than what the pattern suggests.

The knitting tension also determines which yarns can replace each other. As long as you achieve the same knitting tension you can replace one yarn with another.

See DROPS lesson: How to measure your tension/gauge

See DROPS video: How to make a gauge tension swatch

The required amount of yarn is provided in grams, eg: 450 g. To calculate how many balls you’ll need you first need to know how many grams are in 1 ball (25g, 50g or 100g). This information is available if you click on the individual yarn quality on our pages. Divide the amount required with the amount of each ball. For example, if each ball is 50g (the most common amount), the calculation will be as follows: 450 / 50 = 9 balls.

The important thing when changing from one yarn to another is that the knitting/crochet tension remains the same. This is so that the measurements of the finished piece will be the same as on the sketch provided. It is easier to achieve the same knitting tension using yarns from the same yarn group. It is also possible to work with multiple strands of a thinner yarn to achieve the knitting tension of a thicker one. Please try our yarn converter. We recommend you to always work a test swatch.

Please NOTE: when changing yarn the garment might have a different look and feel to the garment in the photo, due to individual properties and qualities of each yarn.

See DROPS lesson: Can I use a different yarn than the one mentioned in the pattern?

All our yarns are categorised into yarn groups (from A to F) according to thickness and knitting tension – group A contains the thinnest yarns and group F the thickest. This makes it easier for you to find alternative yarns to our patterns, should you wish to switch yarn. All yarns within the same group have a similar knitting tension and can easily replace each other. However, different yarn qualities have different structures and properties which will give the finished work a unique look and feel.

Click here for an overview of the yarns in each yarn group

At the top of all our patterns you’ll find a link to our yarn converter, which is a helpful tool should you wish to use a different yarn than suggested. By filling in the yarn quality you wish to replace, the amount (in your size) and number of strands, the converter will present good alternative yarns with the same knitting tension. Additionally it will tell you how much you’ll require in the new qualities and whether you’ll need to work with multiple strands. Most skeins are 50g (some are 25g or 100g).

If the pattern is worked with multiple colours, every colour will have to be converted separately. Similarly, if the pattern is worked with several strands of different yarns (for example 1 strand Alpaca and 1 strand Kid-Silk) you will have to find alternatives for each, individually.

Click here to see our yarn converter

Since different yarns have different qualities and textures we have chosen to keep the original yarn in our patterns. However, you can easily find options among our available qualities by using our yarn converter, or simply pick a yarn from the same yarn group.

It is possible that some retailers still have discontinued yarns in stock, or that someone has a few skeins at home that they would like to find patterns for.

The yarn converter will provide both alternative yarn as well as required amount in the new quality.

If you think it's hard to decide what size to make, it can be a good idea to measure a garment you own already and like the size of. Then you can pick the size by comparing those measures with the ones available in the pattern's size chart.

You'll find the size chart at the bottom of the pattern.

See DROPS lesson: How to read size chart

The needle size provided in the pattern serves only as a guide, the important thing is to follow the knitting tension. And since knitting tension is very individual, you will have to adjust the needle size to ensure that YOUR tension is the same as in the pattern – maybe you’ll have to adjust 1, or even 2 needle sizes, up or down to achieve the correct tension. For this, we recommend that you work test swatches.

Should you work with a different knitting tension than the one provided, the measurements of the finished garment might deviate from the measurement sketch.

See DROPS lesson: How to measure your tension/gauge

See DROPS video: How to make a gauge tension swatch

Working a garment top-down provides more flexibility and room for personal adjustment. For example it is easier to try the garment on while working, as well as making adjustments to length of yoke and shoulder caps.

The instructions are carefully explaining every step, in the correct order. Diagrams are adjusted to the knitting direction and are worked as usual.

The diagram depicts all rows/rounds, and every stitch seen from the right side. It is read from bottom to top, from right to left. 1 square = 1 stitch.

When working back and forth, every other row is worked from the right side and every other row is worked from the wrong side. When working from the wrong side, the diagram will have to be worked reversed: from left to right, knit stitches are purled, purl stitches are knit etc.

When working in the round every round is worked from the right side and the diagram are worked from right to left on all rounds.

See DROPS lesson: How to read knitting diagrams

The diagram depicts all rows/rounds, and every stitch seen from the right side. It is worked from bottom to top, from right to left.

When working back and forth every other row is worked from the right side: from right to left and every other row is worked from the wrong side: from left to right.

When working in the round, every row in the diagram are worked from the right side, from right to left.

When working a circular diagram you start in the middle and work your way outwards, counter clockwise, row by row.

The rows usually start with a given number of chain stitches (equivalent to the height of the following stitch), this will either be depicted in the diagram or explained in the pattern.

See DROPS lesson: How to read crochet diagrams

Instructions for working several diagrams after each other on the same row/round, will often be written like so: “work A.1, A.2, A.3 a total of 0-0-2-3-4 times". This means you work A.1 once, then A.2 is worked once, and A.3 is repeated (in width) the number of times provided for your size – in this case like so: S = 0 times, M = 0 times, L=2 times, XL= 3 times and XXL = 4 times.

The diagrams are worked as usual: begin with the first row in A.1, then work the first row in A.2 etc.

See DROPS lesson: How to read knitting diagrams

See DROPS lesson: How to read crochet diagrams

The total width of the garment (from wrist-to-wrist) will be larger in the larger sizes, despite the actual sleeves being shorter. The larger sizes have longer sleeve caps and wider shoulders, so there will be a good fit in all sizes.

The measurement sketch/schematic drawing provides information regarding the full length of the garment. If it’s a jumper or a jacket the length is measured from the highest point on the shoulder (usually closest to the neckline), and straight down to the bottom of the garment. It is NOT measured from the tip of shoulder. Similarly, the length of yoke is measured from the highest point on the shoulder and down to where yoke is split into body and sleeves.

See DROPS lesson: How to read a schematic drawing

Diagrams are often repeated on the round or in height. 1 repeat is the diagram the way it appears in the pattern. If it says to work 5 repeats of A.1 in the round, then you work A.1 a total of 5 times after/next to each other in the round. If it says to work 2 repeats of A.1 vertically/in height you work the entire diagram once, then begin again at the start and work the entire diagram one more time.

Chain stitches are slightly narrower than other stitches and to avoid working the cast-on edge too tight, we simply chain more stitches to begin with. The stitch count will be adjusted on the following row to fit the pattern and measurement sketch.

The rib edge is more elastic and will contract slightly compared to, for example, stocking stitch. By increasing before the rib edge, you avoid a visible difference in width between the rib edge and the rest of the body.

It’s very easy to cast off too tightly, and by making yarn overs while casting off (and simultaneously casting these off) you avoid a too tight cast off edge.

See DROPS video: How to bind off with yarn overs (yo)

To achieve an even increase (or decrease) you can increase on, for example: every 3rd and 4th row alternately, like so: work 2 rows and increase on the 3rd row, work 3 rows and increase on the 4th. Repeat this until the increase is complete.

See DROPS lesson: Increase or decrease 1 st on every 3rd and 4th row alternately

Should you prefer to work in the round instead of back and forth, you may of course adjust the pattern. You’ll need to add steeks mid-front (usually 5 stitches), and follow the instructions. When you would normally turn and work from the wrong side, simply work across the steek and continue in the round. At the end you’ll cut the piece open, pick up stitches to work bands, and cover the cut edges.

See DROPS video: How to knit steeks and cut open

Should you prefer to work back and forth instead of in the round, you may of course adjust the pattern so you work the pieces separately and then assemble them at the end. Divide the stitches for the body in 2, add 1 edge stitch in each side (for sewing) and work the front and back pieces separately.

See DROPS lesson: Can I adapt a pattern for circular needles into straight needles?

Pattern repeats can vary slightly in the different sizes, in order to get the correct proportions. If you’re not working the exact same size as the garment in the photo, yours might deviate slightly. This has been carefully developed and adjusted so that the complete impression of the garment is the same in all sizes.

Make sure to follow instructions and diagrams for your size!

If you have found a pattern you like which is available in women’s size it’s not very difficult to convert it to men’s size. The biggest difference will be the length of sleeves and body. Start working on the women size that you think would fit across the chest. The additional length will be worked right before you cast off for the armhole/sleeve cap. If the pattern is worked top-down you can add the length right after the armhole or before the first decrease on sleeve.

Regarding additional yarn amount, this will depend on how much length you add, but it is better with a skein too many than too few.

All yarns will have excess fibres (from production) that might come off as lint or shedding. Brushed yarns (ie hairier yarns) have more of these loose, excess fibres, causing more shedding.

Shedding also depends on what is worn under or over the garment, and whether this pulls at the yarn fibres. It’s therefore not possible to guarantee that there will be no shedding

Below are some tips on how to get the best result when working with hairier yarns:

1. When the garment is finished (before you wash it) shake it vigorously so the looser hairs come off. NOTE: do NOT use a lint roller, brush or any method that pulls at the yarn.

2. Place the garment in a plastic bag and put it in your freezer - the temperature will cause the fibres to become less attached to each other, and excess fibres will come off easier.

3. Leave in the freezer for a few hours before taking it out and shaking it again.

4. Wash the garment according to the instructions on the yarn label.

Pilling is a natural process that happens to even the most exclusive of fibers. It's a natural sign of wear and tear that is hard to avoid, and that is most visible in high friction areas of your garment like a sweater's arms and cuffs.

You can make your garment look as new by removing the pilling, using a fabric comb or a pill/lint remover.

Still can't find the answer you need? Then scroll down and leave your question so one of our experts can try to help you. This will be done normally within 5 to 10 working days.
In the meantime, you can read the questions and answers that others have left to this pattern or join the DROPS Workshop on Facebook to get help from fellow knitters/crocheters!

You might also like...

Post a comment to pattern DROPS 46-14

We would love to hear what you have to say about this pattern!

If you want to leave a question, please make sure you select the correct category in the form below, to speed up the answering process. Required fields are marked *.

Comments / Questions (7)

country flag Skyler Slater wrote:

I have read through the pattern several times and I don’t quit understand how the dress connects all the way around

13.01.2023 - 16:10

DROPS Design answered:

Dear Mrs Slater, dress is worked from the bottom up, first in the round until piece measures 55-58-60 cm then cast off the stitches for back piece and armholes and finish front piece back and forth in two pieces (left and front piece). Hope it can help. Happy knitting!

13.01.2023 - 16:38

country flag Roswitha Gerlach wrote:

Liebes Drops-Team, \r\nwas heißt:\" ...gegen den Hals abketten...\"? Werden die Maschen an der Außenseite des Rückenteils abgekettet? Betrifft Modell 46-14. Vielen Dank und freundliche Grüße, Roswitha Gerlach

20.03.2022 - 20:22

DROPS Design answered:

Liebe Frau Gerlach, diese 2 Maschen ketten Sie am Anfang der nächsten Reihe ab den Hals ab; dh bei einer Rückreihe für rechte Schulter und bei einer Hinreihe für linke Schulter. Viel Spaß beim stricken!

21.03.2022 - 08:51

country flag Pietsje wrote:

Hallo team Drops, ik wil dit vestje 10 cm langer maken. Kunt u zeggen hoeveel meer wol nodig is? Ik ben van plan drops Air te gebruiken. vriendelijk dank voor uw antwoord, ik hoop snel te kunnen beginnen!

02.06.2020 - 17:13

DROPS Design answered:

Dag Pietsje,

Voor een indicatie van de hoeveelheid benodigde garen, zou even kunnen kijken bij vergelijkbare vesten in Air. Het hangt er ook van je maat is.

18.06.2020 - 13:50

country flag Sarah wrote:

Hello, am I missing something in the jacket pattern? I don’t see how many to cast on.

03.09.2019 - 19:04

DROPS Design answered:

Dear Sarah, see the paragraph Body: you have to cast on 195 sts for S/M and 210 for size M/L. Happy knitting!

03.09.2019 - 19:09

country flag Vasilisa wrote:

Hi! I'm knitting the dress. Help me please! I can't get how to decrease 14 times for size M, when piece measures 30 cm. Should I decrease every row 4 st? Or every 2nd row 4 st? Thank you very much!

11.06.2019 - 15:06

DROPS Design answered:

Dear Vasilisa, in size M you will decrease as in size L, ie every other round. Happy knitting!

11.06.2019 - 15:34

country flag Celina wrote:

Hvis man nu ønsker at strikke denne kjole længere ca 115 cm, hvad skal man så gøre anderledes og hvor meget garn skal man så bruge i alt?

01.10.2016 - 22:24

DROPS Design answered:

Hej Celine. Jeg ville strikke laengere för jeg tager ind. Jeg ved ikke hvor meget garn du mere skal bruge, ser jeg paa tegningen, saa er det naesten dobbelt saa langt (str. S 63,5 cm), dvs, ca. 127 cm dobbelt saa langt), saa ud fra det ville jeg tage ca. dobbelt maengde minus 1-2 nögler - men jeg er ikke sikker. Pröv at spörg i din butik.

03.10.2016 - 10:55

country flag Marcia Martin wrote:

I have been knitting this jacket pattern and thought I was nearly finished with the 2 front pieces. However, I now believe there is an error in your directions stating you must bind off one stitch every other row, 48 times. I believe that should read 48 stitches. I will have to rip out most of the armhole area on both pieces because of this error. Please correct it for future knitters. Thanks.

29.09.2013 - 22:36

DROPS Design answered:

Dear Mrs Martin, you are correct it was a typo and it should have been : Front piece: ... 48 (50) sts. Pattern has been edited thank you. Happy knitting!

30.09.2013 - 09:16