
Popular categories
Looking for a yarn?


|
||||||||||
Catch of the Day |
||||||||||
 |
 |
|||||||||
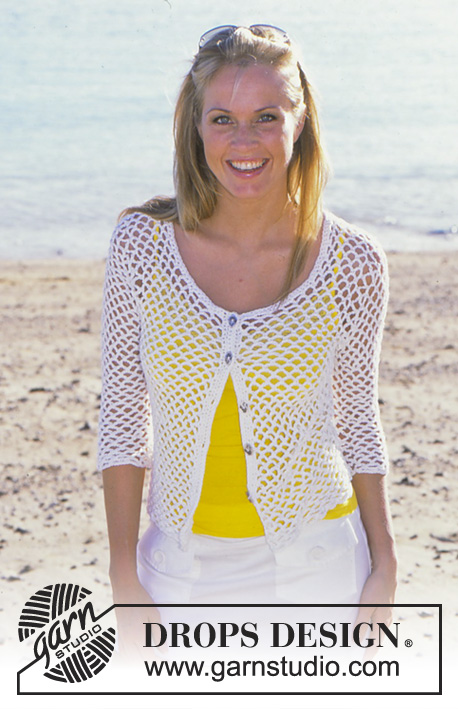
DROPS Crocheted Top and Cardigan in Muskat
DROPS 82-6 |
||||||||||
|
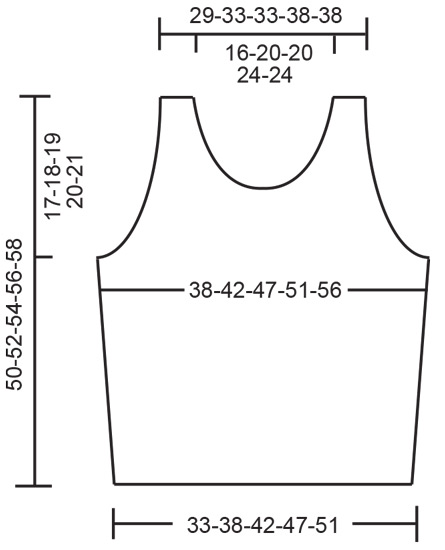
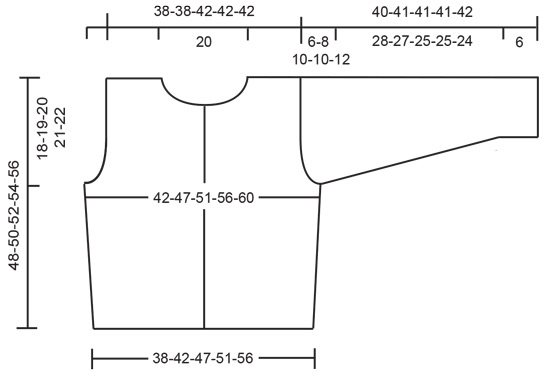
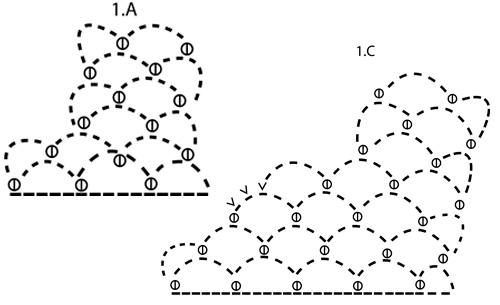
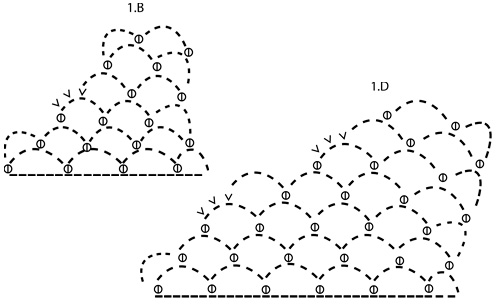
TOP: Crochet gauge: 4.5 ch-loops x 10 rows = 10 x 10 cm. Crochet tips for binding off: See diagrams. Front: Ch 91-103-115-127-139. Crochet the first row as follows: 1 sc in 7th ch from hook, * ch 5, skip over 5 ch, 1 sc in the next ch *, repeat from * - * = 15-17-19-21-23 ch-loops, turn the work. Crochet the 2nd row as follows: ch 6, 1 sc in first ch-loop , * ch 5, 1 sc in the next ch-loop *, repeat from * - * across row and turn the work. Repeat 2nd row until the piece measures 15 cm. Now inc 1 loop at each side by crochet 1 extra ch-loop in the next to last ch-loop at each side = 17-19-21-23-25 ch-loops. Armhole: When the piece measures 33-34-35-36-37 cm bind off for armhole as follows: Size S + M: Crochet until last ch-loop, turn the work, sl st to center of 1st ch-loop, continue with ch-loops and repeat bind off at the other side – see diagr 1B. Size L + XL: Follow bind off instructions for size S + M 1 time, turn the piece and crochet back to last ch-loop, turn the work, continue with ch-loops and repeat bind off at the other side – see diagr. 1C. Size XXL: Follow bind off for size S + M: 2 times– see diagr 1D. You have now bound off 2-2-3-3-4 ch-loops at each side = 13-15-15-17-17 ch-loops remain on row. Crochet as before until the piece measures 36-38-40-42-44 cm, then bind off for the neck as follows: 4 ch-loops, turn the work, sl st to center of first ch-loop and continue with ch-loops = 3 ch-loops on shoulder. Continue as before until the piece measures 50-52-54-56-58 cm. Repeat at the other side of neck. Back: Crochet the same as the front. Bind off for armholes as on front. When the piece measures 48-50-52-54-56 cm bind off all sts for the neck by crocheting 2 rows over only 3 ch-loops each shoulder (do not crochet over the center 7-9-9-11-11 ch-loops). The piece measures approx. 50-52-54-56-58 cm, cut yarn. Assembly: Crochet shoulders together as follows: 1 sl st in first ch-loop on back, ch 3, 1 sc in first ch-loop on front, ch 3, 1 sc in the next ch-loop on back, and so on. Crochet sides together in the same manner. Neckband and armhole: Crochet 1 row of hdc around the neck and both armholes as follows: * 1 hdc in sc, 2 hdc in ch-loop *, repeat from * - * and finish with 1 sl st in first hdc on row. CARDIGAN: Sizes: S - M - L - XL - XXL Finished measurements: Bust: 84-94-102-112-120 cm [33" - 37" - 40-⅛" - 44" - 47.25"] Hem: 76-84-94-102-112 cm [29-⅞" - 33" - 37" - 40-⅛" - 44"] Materials: DROPS MUSKAT from Garnstudio 300-350-350-400-450 gr nr 18, white DROPS 4.5 mm [US G] crochet hook, or size needed to obtain correct gauge. 5 DROPS Silver buttons, nr 534 Crochet gauge: 4.5 ch-loops x 10 rows = 10 x 10 cm. Crochet tips for binding off: See the diagrams. Back: Ch 103-115-127-139-151. Crochet the first row as follows: 1 sc in 7th ch from hook, * ch 5, skip over 5 ch, 1 sc in the next ch *, repeat from * - * = 17-19-21-23-25 ch-loops, turn the work. Crochet the next row as follows: ch 6, 1 sc in first ch-loop, * ch 5, 1 sc in the next ch-loop *, repeat from * - * across the row and turn the work. Repeat second row until the piece measures 15 cm, then inc 1 loop at each side by crocheting 1 extra ch-loop in the next to last loop at each side = 19-21-23-25-27 ch-loops. Armholes: When the piece measures 30-31-32-33-34 cm bind off for armholes as follows: Size S: Crochet to last ch-loop, turn the work, continue with ch-loops and repeat bind off at the other side – see diagr 1A. Size M + L: Crochet until last ch-loop, turn the work, sl st to center of 1st ch-loop, continue with ch-loops and repeat bind off at the other side – see diagr 1B. Size XL: Follow bind off for size M + L: 1 time and then bind off for size S: 1 time – see diagr 1C. Size XXL: Follow bind off for size M + L: 2 times– see diagr 1D. You have now bound off 1-2-2-3-4 ch-loops at each side = 17-17-19-19-19 ch-loops remain on row. Continue as before until the piece measures 46-48-50-52-54 cm, then bind off for the neck by crocheting 2 rows over only 4-4-5-5-5 ch-loops for each shoulder (do not crochet over the center 9 ch-loops). The piece measures approx. 48-50-52-54-56 cm, cut yarn. Right front: Ch 55-61-67-73-79, then crochet as on back = 9-10-11-12-13 ch-loops. When the piece measures 15 cm inc 1 ch-loop at the side as on back = 10-11-12-13-14 ch-loops. When the piece measures 30-31-32-33-34 cm bind off for armhole at side as on back = 9-9-10-10-10 ch-loops. When the piece measures 34-36-38-40-42 cm bind off for the neck as follows: Follow armhole bind off on diagr 1D 1 time and diagr 1A 1 time. You have now bound off 5 loops and 4-4-5-5-5 loops remain on shoulder. Continue until the piece measures 48-50-52-54-56 cm, cut yarn. Left front: Crochet the same as the right, reversing shaping. Sleeve: Ch 67-73-73-79-85, then crochet as on Body = 11-12-12-13-14 ch-loops. When the piece measures 6 cm inc by crocheting 1 extra ch-loop in the next to outermost loop at one side, then crochet 5 rows and inc on the other side. Repeat inc at each side 1 time with 5 rows between each inc = 15-16-16-17-18 ch-loops on row. Continue until the piece measures 34-33-31-31-30 cm. Now bind off for sleeve cap by crocheting 6-8-10-10-12 rows with 1 ch-loop less at the end of every row, cut yarn. The piece measures approx. 40-41-41-41-42 cm. Assembly: Crochet together the shoulders as follows: 1 sl st in first ch-loop on back, ch 3, 1 sc in first ch-loop on front, * ch 3, 1 sc in the next ch-loop on back, ch 3, 1 sc in the next ch-loop on front *, repeat * - *. Crochet the sleeve and side seams in the same manner. Then crochet in the sleeves in the same manner. Neckband: Crochet 2 rows sc around the neck – crochet approx. 3 sc in each ch-loop – be sure that the edge is neither too tight nor too loose. Left button band: Crochet 4 rows sc over all sts along left front (incl. over neckband) – crochet approx. 3 sc in each ch-loop = approx. 102-126 sc, turn each row with ch 1. Right button band: Crochet the same as the left, but after the 2nd row make 5 buttonhole evenly spaced along buttonband. The bottom buttonhole should be approx. 10 cm from lower edge and the top one 2 sts from top edge.1 buttonhole = ch 2, skip over 2 sc, 1 sc in the next st. On the next row 2 sc in the ch 2 from previous row. Sew on buttons. |
||||||||||
Diagram explanations |
||||||||||
|
||||||||||
|
||||||||||
|
||||||||||
|
||||||||||
|
||||||||||
|
Have you made this or any other of our designs? Tag your pictures in social media with #dropsdesign so we can see them! Do you need help with this pattern?You'll find tutorial videos, a Comments/Questions area and more by visiting the pattern on garnstudio.com. © 1982-2024 DROPS Design A/S. We reserve all rights. This document, including all its sub-sections, has copyrights. Read more about what you can do with our patterns at the bottom of each pattern on our site. |
||||||||||


With over 40 years in knitting and crochet design, DROPS Design offers one of the most extensive collections of free patterns on the internet - translated to 17 languages. As of today we count 304 catalogs and 11422 patterns - 11417 of which are translated into English (US/in).
We work hard to bring you the best knitting and crochet have to offer, inspiration and advice as well as great quality yarns at incredible prices! Would you like to use our patterns for other than personal use? You can read what you are allowed to do in the Copyright text at the bottom of all our patterns. Happy crafting!
Comments / Questions (91)
...zelfs met pen 3 wordt mn proeflapje veel te groot. Ik was van plan om met pen 3.5 maat L te haken ipv met pen 4.5 maat XL/XXL maar ik vraag me af of dat helpt...
17.05.2019 - 15:34DROPS Design answered:
Dag Laura,
Het is in principe het handigst dat je proeflapje klopt, zodat je gewoon het patroon kan volgen in jouw maat. Als dit op een of andere manier onmogelijk lijkt, dan kan je ook een andere maat nemen, maar ik zou dan wel even omrekenen op basis van het resultaat van je proeflapje of dit uitkomt in de breedte.
22.05.2019 - 13:22Ik heb n proeflapje gemaakt met pen 4.5, 5 boogjes (zodat ik 4.5 boogje kon opmeten); 31L opgezet + 6 "keerlosse". Na opzet + 10 toeren meet dit 13cm hoog (incl.opzet) en 4.5 boogjes is 13cm breed. Ik heb pen 3.5 gepakt, 5 boogjes breed en 10 toeren hoog.Raar maar waar:dit is nauwlijks kleiner dan het proeflapje met pen 4.5. Wat kan ik hiermee?Nog een pen kleiner haakt niet prettig en zal ook niet in eens 3 cm verschil maken. Als 10cm 13cm wordt,wordt 47cm 61cm, dat gaat niet goed..
16.05.2019 - 19:16Ik wil een proeflapje maken (top): 4.5 l-boogjes x 10 nld met naald 4.5 = 10x10cm. Ik wilde tellen hoeveel l ik voor het proeflapje moet opzetten. Bij naald 1 staat: * 5 l, 5 l overslaan en 1 v in de volgende l *. Maar als je bij afbeelding 1A kijkt, worden er maar 4 lossen overgeslagen en zit de 1V in de 5e losse. Als ik 5 l-boogjes voor het proeflapje wil opzetten, begin ik dan met 26 losse + 6 om te keren? of met 31 losse + 6 om te keren? Bij 1B worden er wel 5 l overgeslagen...
16.05.2019 - 16:15DROPS Design answered:
Dag Laura,
Voor een relevant proeflapje gaat het erom dat je ruim 4,5 boogjes hebt. Bij het maken van de lossenketting hoef je niet precies het juiste aantal op te zetten, want je kunt de overgebleven lossen gewoon laten hangen (dit geldt dus alleen voor het proeflapje). Dus haak een royaal aantal lossen waar je in de volgende toer een royaal aantal boogjes op kunt haken.
22.05.2019 - 13:48When measuring for the length of the item, do you stretch it or leave it scrunched???
04.05.2019 - 19:05DROPS Design answered:
Hi Laura, measuring is done with only slightly stretched garment. Happy crocheting!
05.05.2019 - 19:39If I’m between a xl and xxl, which size should I make???
02.05.2019 - 16:51DROPS Design answered:
Dear Laura, see the measurements in cm and make size which will better match your gauge. Happy crafting!
02.05.2019 - 17:30Bedankt voor de reacties! Is het een idee als ik volgens maat XL 127+6 losse opzet, en dan niet meerder, maar op 42cm hoogte volgens maat L afkant? Ik heb zelf toch al eerder een appel-figuur dan een zandloper 😉.... dit voelt wel als een enorme uitdaging overigens haha
30.04.2019 - 15:29DROPS Design answered:
Dag Laura,
Dat is inderdaad ook een idee. De 127 lossen is trouwens al inclusief de 6 lossen om mee te keren, dus je hoeft dan maar 127 lossen op te zetten ipv 133.
05.05.2019 - 19:09Ook voor mij de eerste keer dat ik een kledingstuk ga haken, hoewel ik al 5 jaar haak.... Voor ik ga beginnen met maat L zou ik eerst willen weten hoe ik met de lengte van dit patroon om kan gaan. Ik zou nl de bovenste helft 23cm willen maken ipv 19cm en de onderste helft 42 cm ipv 35 cm. Ik zit een beetje met waar/wanneer ik moet meerderen en minderen.
29.04.2019 - 12:41DROPS Design answered:
Dag Laura,
Als je de onderkant, dus vanaf de opzetrand tot de oksel, langer wilt maken, moet je de meerderingen over een grotere lengte verdelen, dus je zou dan minder vaak moeten meerderen. Houd er wel rekening mee dat de onderkant van dit patroon ongeveer op de taille valt (of net daaronder) en als je hem langer maakt, dat je hem, vanwege de heupbreedte, misschien ook breder moet maken.
30.04.2019 - 11:18Ik wil graag deze top gaan haken,maar ik zou er een soort van bloesend effect bij willen hebben aan de onderkant. Is het een idee als ik na de opzet aan de onderkant een toer stokjes haak en daar achteraf elastiek doorheen weef?
29.04.2019 - 10:29DROPS Design answered:
Dag laura,
Ja, dat is een goed idee. Evt. maak je even een proeflapje om te kijken wat voor elastiek je kunt gebruiken. Misschien is het nodig om dubbele stokjes te maken.
30.04.2019 - 11:14Ich komme, beim Top, beim Punkt Hals / Schulterstück nicht weiter. Wenn ich das erste Schulterstück (3 Bögen) bis auf die 50cm gehäkelt habe, wie komme ich dann zur anderen Seite um das zweite Stück zu häkeln? Da es mein erstes Oberteil wird, fehlt mir jegliche Erfahrung. Eine Häkelschrift oder Bilder zu dem Abschnitt wären toll für Anfänger.
07.04.2019 - 20:01DROPS Design answered:
Liebe Frau Küthe, wenn die 1. Schulter fertig ist, häkeln Sie Diagram 1.B spiegelverkehr auf die andere Seite, so daß die Abnahme gegen Halsauschnitt sind. Viel Spaß beim häkeln!
08.04.2019 - 10:15Hoe meerder je een boogje. Is daar ook een getekend patroontje van?
23.02.2019 - 15:24DROPS Design answered:
Dag Ina,
Helaas is hier geen tekening van maar dit doe je door een extra boogje te haken in het tweedelaatste boogje aan weerskanten.
26.02.2019 - 09:35