
Popular categories
Looking for a yarn?


|
||||||||||
Catch of the Day |
||||||||||
 |
 |
|||||||||
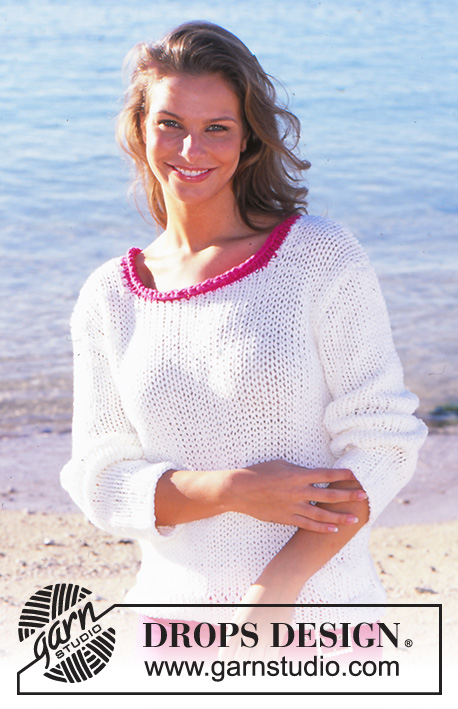
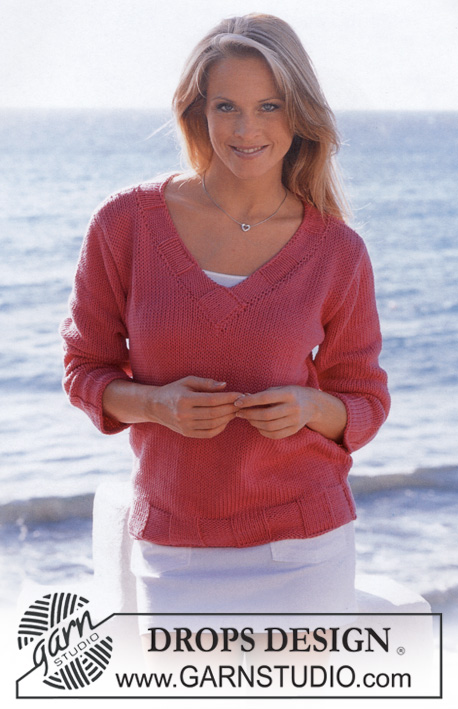
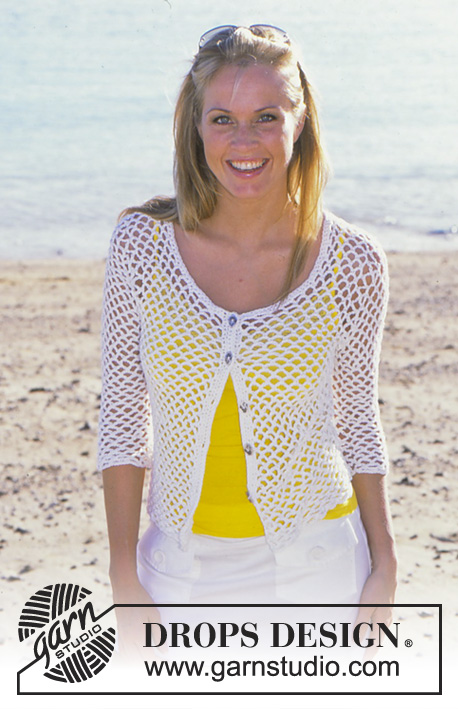
DROPS Crocheted Top and Cardigan in Muskat
DROPS 82-6 |
||||||||||
|
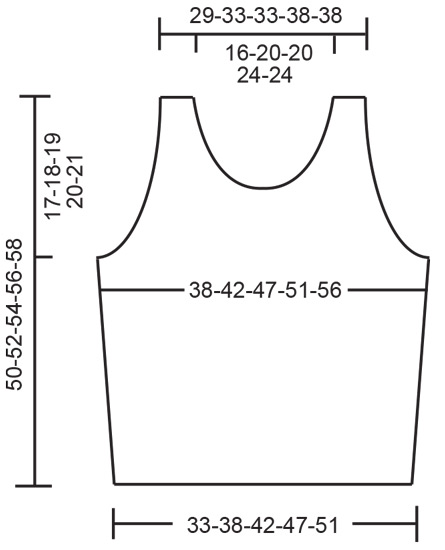
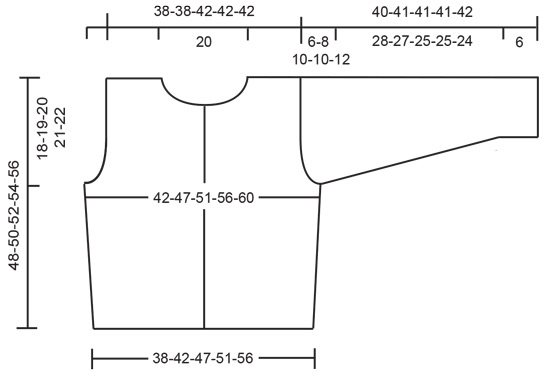
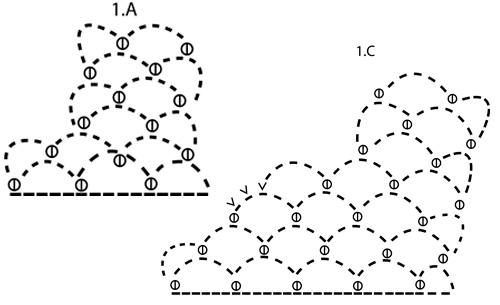
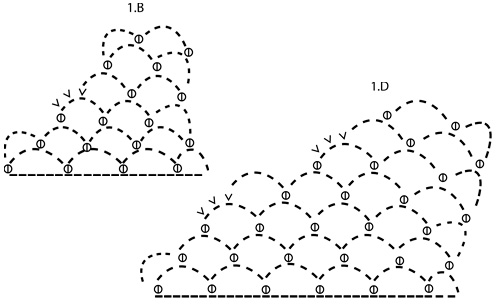
TOP: Crochet gauge: 4.5 ch-loops x 10 rows = 10 x 10 cm. Crochet tips for binding off: See diagrams. Front: Ch 91-103-115-127-139. Crochet the first row as follows: 1 sc in 7th ch from hook, * ch 5, skip over 5 ch, 1 sc in the next ch *, repeat from * - * = 15-17-19-21-23 ch-loops, turn the work. Crochet the 2nd row as follows: ch 6, 1 sc in first ch-loop , * ch 5, 1 sc in the next ch-loop *, repeat from * - * across row and turn the work. Repeat 2nd row until the piece measures 15 cm. Now inc 1 loop at each side by crochet 1 extra ch-loop in the next to last ch-loop at each side = 17-19-21-23-25 ch-loops. Armhole: When the piece measures 33-34-35-36-37 cm bind off for armhole as follows: Size S + M: Crochet until last ch-loop, turn the work, sl st to center of 1st ch-loop, continue with ch-loops and repeat bind off at the other side – see diagr 1B. Size L + XL: Follow bind off instructions for size S + M 1 time, turn the piece and crochet back to last ch-loop, turn the work, continue with ch-loops and repeat bind off at the other side – see diagr. 1C. Size XXL: Follow bind off for size S + M: 2 times– see diagr 1D. You have now bound off 2-2-3-3-4 ch-loops at each side = 13-15-15-17-17 ch-loops remain on row. Crochet as before until the piece measures 36-38-40-42-44 cm, then bind off for the neck as follows: 4 ch-loops, turn the work, sl st to center of first ch-loop and continue with ch-loops = 3 ch-loops on shoulder. Continue as before until the piece measures 50-52-54-56-58 cm. Repeat at the other side of neck. Back: Crochet the same as the front. Bind off for armholes as on front. When the piece measures 48-50-52-54-56 cm bind off all sts for the neck by crocheting 2 rows over only 3 ch-loops each shoulder (do not crochet over the center 7-9-9-11-11 ch-loops). The piece measures approx. 50-52-54-56-58 cm, cut yarn. Assembly: Crochet shoulders together as follows: 1 sl st in first ch-loop on back, ch 3, 1 sc in first ch-loop on front, ch 3, 1 sc in the next ch-loop on back, and so on. Crochet sides together in the same manner. Neckband and armhole: Crochet 1 row of hdc around the neck and both armholes as follows: * 1 hdc in sc, 2 hdc in ch-loop *, repeat from * - * and finish with 1 sl st in first hdc on row. CARDIGAN: Sizes: S - M - L - XL - XXL Finished measurements: Bust: 84-94-102-112-120 cm [33" - 37" - 40-⅛" - 44" - 47.25"] Hem: 76-84-94-102-112 cm [29-⅞" - 33" - 37" - 40-⅛" - 44"] Materials: DROPS MUSKAT from Garnstudio 300-350-350-400-450 gr nr 18, white DROPS 4.5 mm [US G] crochet hook, or size needed to obtain correct gauge. 5 DROPS Silver buttons, nr 534 Crochet gauge: 4.5 ch-loops x 10 rows = 10 x 10 cm. Crochet tips for binding off: See the diagrams. Back: Ch 103-115-127-139-151. Crochet the first row as follows: 1 sc in 7th ch from hook, * ch 5, skip over 5 ch, 1 sc in the next ch *, repeat from * - * = 17-19-21-23-25 ch-loops, turn the work. Crochet the next row as follows: ch 6, 1 sc in first ch-loop, * ch 5, 1 sc in the next ch-loop *, repeat from * - * across the row and turn the work. Repeat second row until the piece measures 15 cm, then inc 1 loop at each side by crocheting 1 extra ch-loop in the next to last loop at each side = 19-21-23-25-27 ch-loops. Armholes: When the piece measures 30-31-32-33-34 cm bind off for armholes as follows: Size S: Crochet to last ch-loop, turn the work, continue with ch-loops and repeat bind off at the other side – see diagr 1A. Size M + L: Crochet until last ch-loop, turn the work, sl st to center of 1st ch-loop, continue with ch-loops and repeat bind off at the other side – see diagr 1B. Size XL: Follow bind off for size M + L: 1 time and then bind off for size S: 1 time – see diagr 1C. Size XXL: Follow bind off for size M + L: 2 times– see diagr 1D. You have now bound off 1-2-2-3-4 ch-loops at each side = 17-17-19-19-19 ch-loops remain on row. Continue as before until the piece measures 46-48-50-52-54 cm, then bind off for the neck by crocheting 2 rows over only 4-4-5-5-5 ch-loops for each shoulder (do not crochet over the center 9 ch-loops). The piece measures approx. 48-50-52-54-56 cm, cut yarn. Right front: Ch 55-61-67-73-79, then crochet as on back = 9-10-11-12-13 ch-loops. When the piece measures 15 cm inc 1 ch-loop at the side as on back = 10-11-12-13-14 ch-loops. When the piece measures 30-31-32-33-34 cm bind off for armhole at side as on back = 9-9-10-10-10 ch-loops. When the piece measures 34-36-38-40-42 cm bind off for the neck as follows: Follow armhole bind off on diagr 1D 1 time and diagr 1A 1 time. You have now bound off 5 loops and 4-4-5-5-5 loops remain on shoulder. Continue until the piece measures 48-50-52-54-56 cm, cut yarn. Left front: Crochet the same as the right, reversing shaping. Sleeve: Ch 67-73-73-79-85, then crochet as on Body = 11-12-12-13-14 ch-loops. When the piece measures 6 cm inc by crocheting 1 extra ch-loop in the next to outermost loop at one side, then crochet 5 rows and inc on the other side. Repeat inc at each side 1 time with 5 rows between each inc = 15-16-16-17-18 ch-loops on row. Continue until the piece measures 34-33-31-31-30 cm. Now bind off for sleeve cap by crocheting 6-8-10-10-12 rows with 1 ch-loop less at the end of every row, cut yarn. The piece measures approx. 40-41-41-41-42 cm. Assembly: Crochet together the shoulders as follows: 1 sl st in first ch-loop on back, ch 3, 1 sc in first ch-loop on front, * ch 3, 1 sc in the next ch-loop on back, ch 3, 1 sc in the next ch-loop on front *, repeat * - *. Crochet the sleeve and side seams in the same manner. Then crochet in the sleeves in the same manner. Neckband: Crochet 2 rows sc around the neck – crochet approx. 3 sc in each ch-loop – be sure that the edge is neither too tight nor too loose. Left button band: Crochet 4 rows sc over all sts along left front (incl. over neckband) – crochet approx. 3 sc in each ch-loop = approx. 102-126 sc, turn each row with ch 1. Right button band: Crochet the same as the left, but after the 2nd row make 5 buttonhole evenly spaced along buttonband. The bottom buttonhole should be approx. 10 cm from lower edge and the top one 2 sts from top edge.1 buttonhole = ch 2, skip over 2 sc, 1 sc in the next st. On the next row 2 sc in the ch 2 from previous row. Sew on buttons. |
||||||||||
Diagram explanations |
||||||||||
|
||||||||||
|
||||||||||
|
||||||||||
|
||||||||||
|
||||||||||
|
Have you made this or any other of our designs? Tag your pictures in social media with #dropsdesign so we can see them! Do you need help with this pattern?You'll find tutorial videos, a Comments/Questions area and more by visiting the pattern on garnstudio.com. © 1982-2024 DROPS Design A/S. We reserve all rights. This document, including all its sub-sections, has copyrights. Read more about what you can do with our patterns at the bottom of each pattern on our site. |
||||||||||


With over 40 years in knitting and crochet design, DROPS Design offers one of the most extensive collections of free patterns on the internet - translated to 17 languages. As of today we count 304 catalogs and 11422 patterns - 11417 of which are translated into English (US/in).
We work hard to bring you the best knitting and crochet have to offer, inspiration and advice as well as great quality yarns at incredible prices! Would you like to use our patterns for other than personal use? You can read what you are allowed to do in the Copyright text at the bottom of all our patterns. Happy crafting!
Comments / Questions (91)
What do the v’s mean in the diagram? I don’t understand the diagrams and I’ve read all the previous questions and I still don’t know how to bind off for the armholes. Please and thank you.
24.02.2020 - 23:20DROPS Design answered:
Dear Dawné. the little v's represent slip stitches, the stitch where you insert the crochet hook into the first chain stitch that was made. Then grab the working yarn(long tail) and pull it straight through the stich. Then, continue by pulling the yarn through the stitch that is on the needle. I hope this helps. Happy Crafting!
25.02.2020 - 07:07Molto bello e spiegazioni facili da seguire
03.09.2019 - 17:24I do not understand the diagram for the neck bind off st all. Please help
19.08.2019 - 03:45DROPS Design answered:
Dear Deborah, you will work diagram 1.D one time in height and then 1.A one time in height on the stitches towards neck - on right front piece, work the last 6 chain spaces on shoulder as shown in 1.D starting reading diagram with first row from WS (= left towards the right) and on left front piece you will work 1.D with first row from RS (= right towards front). Happy crocheting!
19.08.2019 - 11:30Oh yes it helped me a lot to have those stitch markers in the front half of the tank top I’d just lay backside on that and know where to increase or decrease without having to measure not knowing how much I stretched out the front I recommend doing stitch markers
05.08.2019 - 00:51I think I’ve figured it out when I’m binding off the neck I read the cardigan instructions they helped I think I would cut yarn after getting the desired length then cut yarn and attach to the opposite soo and do the same it might not be what you did but I think it’ll work
04.08.2019 - 21:31I don’t know if this will be helpful or not I’m working this top now I’m placing stitch markers on the front you work first at the places you increase and decrease just in case I stretch the project differently for the back piece I can just lay it against the front and see where it’s been increased easily and that the pieces are stretched the same just what I’m doing maybe it’ll help me and maybe others I’ll let you know when I get to the back piece increase
04.08.2019 - 20:51I don’t understand thrust the tank top shoulder I know I’m going down to 3 chain 5 spaces am I to do one side and then cut yarn to do the other shoulder since the back piece begins I’d be cutting my yarn for it or am I slip stitching across in those stitches until I get to the last four on the other side?
04.08.2019 - 20:38DROPS Design answered:
Dear Deanna, each shoulder is worked separately after neck, ie when 3 chain-spaces are left for shoulder, continue over these chain spaces as before until finished length, then cut the yarn and work over the 3 chain-spaces on the other side for the 2nd shoulder. Happy crocheting!
07.08.2019 - 10:17Could locate this yarn in your store., can you please advise what ply it is and is crochet cotton compatible?
12.06.2019 - 16:40DROPS Design answered:
Dear Karen, you will find here all stores in or shipping to Canada - and more informations about the yarn there. Happy crocheting!
13.06.2019 - 08:53Ik ben er al uit! (vorige vraag over armsgaten)
31.05.2019 - 09:53I am a very experienced crocheter however I am finding this pattern extremely hard to follow. I'm making the XXL so I should make sure I have 27 chain spaces or do I need to follow the schematic and go with the measurements and then increase
26.05.2019 - 08:16DROPS Design answered:
Dear Lisa, on the jacket - back piece, crochet the 151 chains, then work Row 1 as explained = 25 ch-spaces, and repeat now Row 2 until piece measures 15 cm then increase 1 ch-space in each side = 27 ch-spaces. When piece measures34 cm, cast off the for the armholes (19 ch-spaces remain after armholes). Happy crocheting!
27.05.2019 - 10:45