
Popular categories
Looking for a yarn?


|
|||||||
DROPS 32-19 |
|||||||
 |
 |
||||||
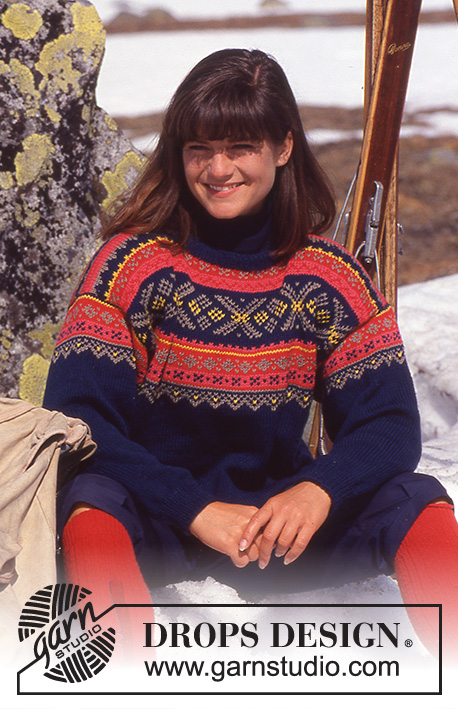
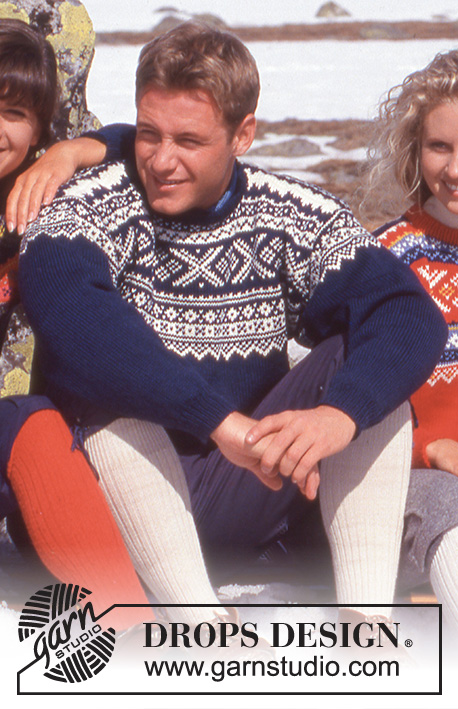
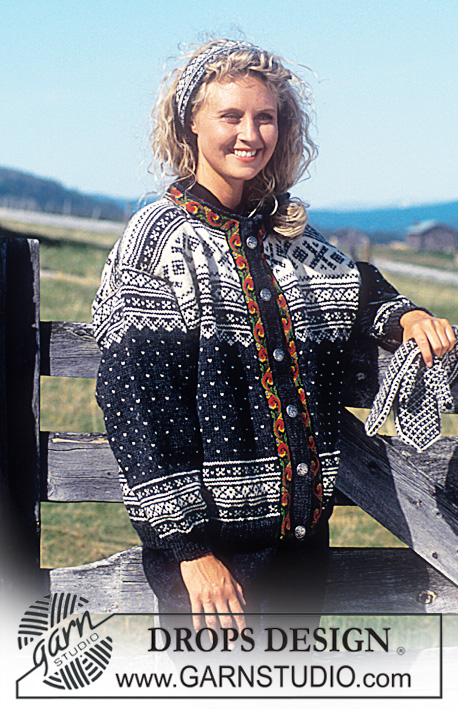
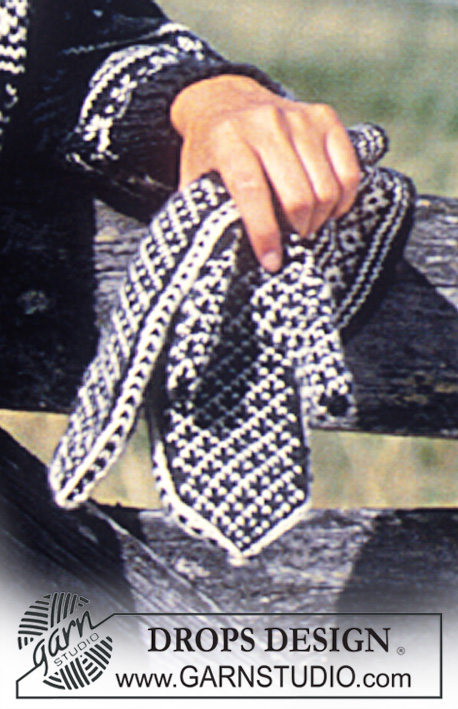
DROPS Sweater or jacket for men in Karisma Superwash with or without ribbon. Long or short model. Socks, Hat, Head band, Mittens
DROPS 32-19 |
|||||||
|
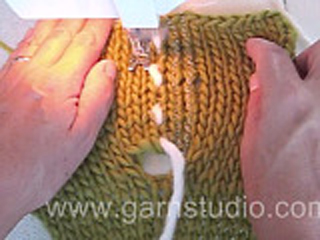
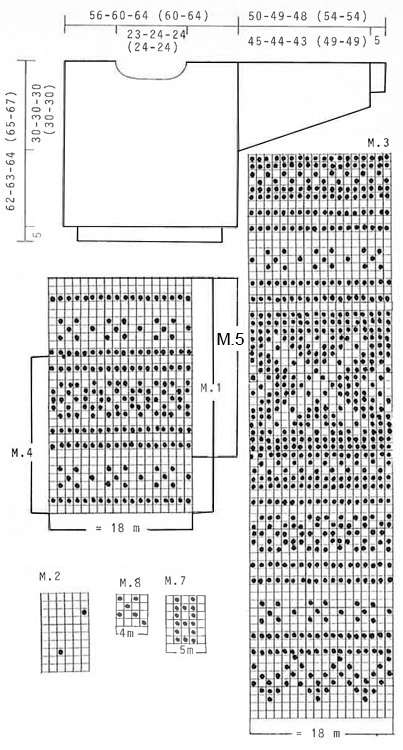
Pattern contain two items. Knitting tension: 21 sts x 26 rows on needle size 4 mm and pattern = 10 x 10 cm 23 sts on needle size 2.5 mm and stocking sts = 10 cm in width. Long model: If you are knitting long model inc measurements on body from casting on edge with 10 cm at armhole, M.3, neck and casting off. Inc yarn amount by approx 50 g grey and 50 g off white. Pattern: Knit entire pattern in stocking sts. Diagrams are seen from RS. Rib: * K1, P1 * Edge: Knit 3.5 cm stocking sts, P1 round, 3.5 cm stocking sts. ___________________________________________________________________ Jacket body: Knit jacket in the round on circular needles after ridges and cut up for armholes and mid front when knitting is completed. Figures in ( ) = Gent size. Cast on 194-202-210 (210-218) sts for Alt.1-grey or Alt.2 – off white on needle size 2.5 mm and knit 5 cm Rib back and forth on needle. Change to circular needle size 4 mm at the same time inc 5 sts mid front (these sts are for cutting afterwards and should not be knit into the pattern) knit 1 round stocking sts at the same time as inc 40-50-60 (42-52) sts evenly on 1st row = 234-252-270 (252-270) sts. Knit M.1, then continue with M.2. Remember knitting tension. At the same time when piece measures 32-33-34 (35-37) cm inc 5 sts on each side (these sts are for cutting later and are not knit into pattern). When piece measures 35-36-37 (38-40) cm knit M.3. When piece measures 56-57-58 (59-61) cm cast off 35-36-37 (36-37) sts (+5 sts) mid front for neck, complete piece knitting back and forth on row. Continuing cast off to shape neckline on every other row: 3 sts 1 time, 2 sts 1 time, 1 st 2 times. At the same time when piece measures 60-61-62 (63-65) cm cast off middle 45-46-47 (46-47) sts mid back for neck and on next row cast off 2 sts on each side to shape neckline. After M.3 complete with colour from last round. Cast off when piece measures 62-63-64 (65-67) cm Sweater body: Knit sweater on circular needles and cut up for armhole afterwards. Figures in ( ) = Gent size. Cast on 180-188-196 (196-204) sts on circular needle size 2.5 mm with Alt. 1 - grey or Alt.2 off white and knit 5 cm rib. Change to circular needle size 4 mm and knit 1 round stocking sts at the same time inc 54-64-74 (56-66) sts evenly on 1st row = 234-252-270 (252-270) sts. Knit M.1 continue with M.2. Remember knitting tension. At the same time when piece measures 32-33-34 (35-37) cm inc 5 sts on each side (these sts are for cutting later and are not knit into pattern). When piece measures 35-36-37 (38-40) cm knit M.3. At the same time when piece measures 44-45-45 (47-49) cm cast off middle 13-14-15 (14-15) sts for neck and complete back and forth. When piece measures 57-58-59 (60-62) cm cast off to shape neckline on every other row 11-12-12 (12- 12) sts 1 time, 3 sts 1 time, 2 sts 1 time, 1 sts 1 time. At the same time when piece measures 60-61-62 (63-65) cm cast off middle 45-46-47 (46-47) sts mid back for neck and on next row cast off 2 sts on each side. After M.3 complete with colour from last round. Cast off when piece measures 62-63-64 (65-67) cm Sweater and Jacket Sleeve: Cast on 48-48-50 (50-52) sts on double pointed needles size 2.5 mm with same colour as body and knit 5 cm Rib (if ribbons are to be sewn on later knit Edge in stead of Rib so ribbon is sewn on Edge). Change to double pointed needles size 4 mm and knit M.1. (place one pattern repeat mid sleeve) at the same time inc 12-14-12 (12-10) sts evenly on 1st row = 60-62-62 (62-62) sts. At the same time inc mid under arm on each side of middle sts 1 sts 32-32-32 (32-32) sts on Lady: every 3rd row. Gent: alternating every * 3rd and 4th row * = 124-126-126 (126-126). After M.1 continuing knit M.2. When piece measures 39-38-37 (43-43) cm – adjust to pattern, knit M.3 until piece measures 50-49-48 (54-54) cm, now knit 2 cm stocking sts with WS out for edge over cutting edge on body. Cast off. Sweater + Jacket Assembly: Sew in a marking thread down in middle of inc sts on each side (+ mid front on jacket). Sew two seams on sewing machine around marking threads, 1st seam = 1/2 sts from 1st st from thread, 2nd seam = 1/2 sts from 1st seam at armhole. Cut up for armhole (+ mid front at jacket). Sew shoulder seams. Jacket: Pick up approx 120 sts along left front band on needle size 2.5 mm and knit Edge (knit al edges in same colour as Rib), cast off, fold edge towards WS and sew. Repeat along right but after 1 cm cast off 6 buttonhole evenly on row - 1 buttonhole = cast off 2 sts, cast on 2 new sts on next row. Neckline Jacket: Pick up approx 114 sts around neckline on double pointed needles size 2.5 mm and knit Edge, cast off and fold edge towards WS and sew. Sew on Ribbons on front bands and along neck if desired. Sweater with split neck: Pick up approx 32 sts along left side of split on front piece on needle size 2.5 mm and knit Edge (knit all Edges in same colour as Rib), cast off. Repeat along right side. Fold edges towards WS and sew on. Pick up approx 114 sts around neckline on double pointed needles size 2.5 mm and knit Edge, cast off and fold edge towards WS and sew. Sew on Ribbon around neck and split and at bottom of sleeve if desired. Sew sleeves onto body from RS as follows: Sew alternating 1 sts in last garter st round of sleeve before folding edge and 1 sts on body after machine seam. Turn WS out on sweater and sew folding edge from sleeves over cutting edge onto body by hand. Sew 6 buttons onto Jacket or 3 claps on split neck. ________________________________________ Hat: Materials: Alt.1/ Alt.2 350-350-350 (350-350) g colour no 53, grey/ 1, off white 50-50-50 (50-50) g colour no 1, off white/ 16, grey DROPS circular needles size 2.5 mm and 4 mm and double pointed needles size 4 mm. Hat: Cast on 150 (158) sts on circular needle size 2.5 mm with grey (knit hat in colours of Alt.1) and knit 6 cm rib, change to circular needle size 4 mm and knit M.5 at the same time dec to 102 (108) sts evenly on 1st round. After M.5 complete with grey at the same time insert a stitch marker after every 6th sts. Now knit two sts after stitch marker tog. Repeat this on every 6th row until 17 sts are left. Change to double pointed needles 4 mm when needed. Pull a double thread through these sts and sew. ________________________________________ Sock: Size: Length: 58 (65) cm. - Foot: 23 (26) cm. Materials: Double pointed needles size 2.5 mm and 3 mm Knitting tension: 22 sts x 32 rows on needle size 3 mm and stocking sts = 10 x 10 cm Rib: * K1, P1 * Decrease: * slip next sts loosely off, K1 (WS = P1) psso * Heel: 1st row: (RS) Knit until 6 (7) sts re-appear on needle. Turn piece. 2nd row: (WS) Knit until 6 (7) sts re-appear on needle. Turn piece. 3rd row: Knit until 8 sts return to row, knit ankle (see explanation!). Turn piece. 4th row: Knit until 8 sts re-appear to row, knit ankle, turn piece. Then continue knitting so 1 st less on each side before ankle. Continue until 12 (14) sts re-appear. SOCK Cast on 72 (80) sts on double pointed needles size 2.5 mm with grey (knit sock on colour of Alt.1) and knit 14 (16) cm rib. Change to double pointed needles size 3 mm and knit 2 rounds stocking sts at the same time inc 0 (4) sts evenly on 1st row = 72 (84) sts. Knit M.1. Then continuing knit M.2. When piece measures 30 (32) cm begin dec for leg. Dec each side of middle sts back: Knit 2 sts before middle sts tog, (see explanation of dec above) and K2 sts tog after middle sts – repeat on every 5th row (4th row) 12 (16) times in total = 48 (52) sts. When piece measures 50 (56) cm slip middle 24 (26) sts to front on a stitch holder and complete with grey. Then knit 5 (6) cm stocking sts (heel) over the 24 (26) middle sts back, and then knit heel (see explanation above). Then pick up 12 (13) sts on each side of heel and slip all sts on same needle = 60 (66) sts. Dec continuing as follows: K2 first of uppermost 24 (26) sts tog and K2 last sts of uppermost 24 (26) sts tog on every other row 6 times in total = 48 (54) sts. Knit until foot measures approx 19 (21.5) cm. Insert a stitch marker on each side of foot and dec for toe on each side of marker as follows: K2 sts before marker tog and K2 sts after tog, repeat 3 times on every other row = 36 (42) sts. Then 7 (9) times on every row = 8 (6) sts. Pull sts tog and sow away thread well. ________________________________________ Head band Materials: Alt.1/ Alt.2 150-150-150 (150-150) g colour no 53, grey/ 1, off white 50-50-50 (50-50) g colour no 1, off white/ 16, grey Head band: Cast on 120 (126) sts on double pointed needles size 2.5 mm with same colour as rib on sweater and knit 16 rounds stocking sts, P1 round, M.4, P1 round, 2 rounds stocking sts, cast off. Sew edges and cast off edge tog with mattress sts in outermost sts to avoid a thick seam. Mitten: ________________________________________ Mittens: Materials: DROPS Double poined needles size 3 mm. Knitting tension: 22 sts x 32 rows on needle size 3 mm and stocking sts = 10 x 10 cm Rib: * K1, P1 * Hand: Figures in ( ) = Gent size. Cast on 48 (56) sts on double pointed needles size 3 mm with grey (knit mittens in Alt.1) and knit 2 cm stocking sts, P1 round, M.5. Then knit 3 cm Rib – cast off 4 (4) sts evenly on row = 44 (52) sts. Measures piece from here! Next row as follows: M.7, 17 (21) of M.8, M.7, 17 (21) sts of M.8. (insert a marking thread or stitch marker in transition from M.8 to M.7 for thumb). When piece measures 1 cm inc on each side of 1 sts with marking thread or stitch marker for thumb as follows: 1 sts 6 (6) times on every 3rd row = 56 (64) sts – knit inc sts into M.8 after each. When piece measures 6.5 (7) cm slip middle 13 (13) sts over thumb on a thread or stitch holder and on next row cast on 1 sts over these = 44 (52) sts. Continue until piece measures 17 (18) cm. Insert one marking thread or stitch marker in middle of each M.7. Now cast off on each side of marking thread on every row 1 sts (minus 4 sts per round)- repeat 10 (11) times. Pull thread through last sts and sew on. Thumb: Pick up 16 (20) sts around thumb and knit 6.5 cm M.8, then knit sts tog two by two, pull double thread through sts. |
|||||||
Diagram explanations |
|||||||
|
|||||||
|
|||||||
|
Have you made this or any other of our designs? Tag your pictures in social media with #dropsdesign so we can see them! Do you need help with this pattern?You'll find tutorial videos, a Comments/Questions area and more by visiting the pattern on garnstudio.com. © 1982-2024 DROPS Design A/S. We reserve all rights. This document, including all its sub-sections, has copyrights. Read more about what you can do with our patterns at the bottom of each pattern on our site. |
|||||||


With over 40 years in knitting and crochet design, DROPS Design offers one of the most extensive collections of free patterns on the internet - translated to 17 languages. As of today we count 304 catalogues and 11422 patterns - 11422 of which are translated into English (UK/cm).
We work hard to bring you the best knitting and crochet have to offer, inspiration and advice as well as great quality yarns at incredible prices! Would you like to use our patterns for other than personal use? You can read what you are allowed to do in the Copyright text at the bottom of all our patterns. Happy crafting!
Comments / Questions (9)
In regard to the jacket assembly, I understand the left front Edge gets folded towards the WS and sewn (which will cover the raw edge). Instructions say to repeat on right but to make buttonholes after 3/8". If you repeat the same Edge as on the left and fold edge towards towards wrong side the buttonholes will be covered up but if you simply bind off after 1 3/8' how does the raw edge get covered? Thanks for answering all my questions....this. is a first time for me knitting a Drops design.
10.04.2024 - 20:29DROPS Design answered:
Dear Mrs Gowdy, buttonholes should be worked on both sides of edge, ie also on the 2nd section after the row worked in reversed stocking stitch so that they are facing when edge is folded double. Happy knitting!
11.04.2024 - 07:11I am just about to start the steeking for the armholes and front of jacket. There are instructions on how to finish the front but nothing on attaching sleeves to armholes. Help, thanks.
04.04.2024 - 22:34DROPS Design answered:
Dear Judit, you should sew in the sleeves beside the the point where you started knitting the last 2 cm-s with reverse stockinett, then fold that stockinett over the cut edge on the body, and sew down, this that edge will cover the cut up edge. I hope this helps. Happy Knitting!
05.04.2024 - 02:04On the jacket body I have reached the point where you start binding off for the neck. Instructions say to complete piece by knitting back and forth on the row. Does this mean that I will be no longer knitting in the round but knitting and then purling back in the pattern until the the final bind off for neck back? Thx for clearing this up for me.
07.03.2024 - 14:28DROPS Design answered:
Dear Mrs Gowdy, correct you will now first work back and forth from mid front (knitting from RS and purling from WS) casting off stitches at the beg of every row on each side for neckline; at the same time, you will cast off the middle stitches on back piece and finish each shoulder separately, back and forth on needle casting off 2 sts at the beg of next row from neck /back piece. Happy knitting!
07.03.2024 - 15:41Am getting started on Drops jacket 32-19 It calls for US 6 needles for the pattern and US 1.5 for the ribbing. I have 2 questions: I can get gauge for the larger size needle but way off on the smaller needle. I don't understand why you would use such a small (1.5 )needle with this yarn. I look forward to your reply. Thx
15.02.2024 - 15:09DROPS Design answered:
Dear Mrs Gowdy, tension was wrong and has now been fixed, you should have 23 sts with smaller needles. Read more about tension here. Happy knitting!
15.02.2024 - 15:40Want to knit DROPS 32-19 jacket but decided to practice with the mittens. I cast on 56 sts, knit 3/4" in stockinette sts, P1 round, but do not understand, M5. followed by 1" of rib. When I look at the pictures of the mittens at the cuff, one shows the rib with no proceeding pattern and the other shows no rib at all, just pattern. Thx for helping me to understand.
31.01.2024 - 17:31DROPS Design answered:
Dear Mrs Gowdy, for these mittens you will have a folded edge at the bottom/on cuff, after the folding round (purled round) you work the pattern M.5 all the round, then ca 1" rib, then work the different patterns/diagrams for the hand; Happy knitting!
01.02.2024 - 08:12Hvor mange masker er det på forpartene og hvor mange masker er det i ryggen? På denne modellen 32-19
13.12.2023 - 16:19DROPS Design answered:
Hej, hvilken størrelse strikker du?
14.12.2023 - 08:17Avec quelle laine, plus fine (mon gendre a toujours chaud) pourrais-je confectionner ce gilet norvégien si magnifique ? merci
03.10.2023 - 21:37DROPS Design answered:
Bonjour Mme Fayard, si vous choisissez une laine plus fine, votre échantillon sera aussi différent et vous devrez tout recalculer les explications - vous pouvez choisir une autre alternative du groupe B - essayez notre convertisseur pour voir la liste et les nouvelles quantités; votre magasin saura vous conseiller la qualité la plus adaptée (même par mail ou téléphone). Bon tricot!
04.10.2023 - 08:02What are the main differences between the "jacket" and the "sweater?" Thanks!!
03.05.2023 - 23:05Hvordan eller hvor får jeg fat i DROPS bånd??
29.03.2018 - 12:49DROPS Design answered:
Hej Tina, Vi fører desværre ikke bånd mere, men du kan helt sikkert finde dem på nettet. God fornøjelse!
04.04.2018 - 12:12