DROPS Muskat uni colour 100% Cotton |
2.80 $ /50g |
Order |
Clicking the ORDER button will redirect you to Wool Warehouse Direct Ltd website
The yarn cost is calculated from the pattern’s smallest size and the yarn’s cheapest product type. Looking for an even better price? You might find it on the DROPS Deals!
-------------------------------------------------------
Alternative Yarn – See how to change yarns here
Yarn Groups A to F – Use the same pattern and change the yarn here
Yarn usage using an alternative yarn – Use our yarn converter here
-------------------------------------------------------
DROPS Muskat uni colour 100% Cotton 2.80 $ /50g Order |
Clicking the ORDER button will redirect you to Wool Warehouse Direct Ltd website
The yarn cost is calculated from the pattern’s smallest size and the yarn’s cheapest product type. Looking for an even better price? You might find it on the DROPS Deals!
All measurements in charts are in cm.
= knit | |
= purl | |
= put 3 sts on a cable needle behind the work, knit 3 sts, knit 3 sts from the cable needle | |
= put 3 sts on a cable needle in front of the work, knit 3 sts, knit 3 sts from the cable needle | |
= put 2 sts on a cable needle in front of the work, knit 2 sts, knit 2 sts from the cable needle | |
= put 1 st on a cable needle behind the work, knit 2 sts, purl 1 st from the cable needle | |
= put 2 sts on a cable needle in front of the work, purl 1 st, knit 2 sts from the cable needle | |
= Braid: Knit the second stitch first without lifting stitch off the needle and then knit the first stitch. Then lift both sts off the left needle. |
Each of our patterns has specific tutorial videos to help you.
These step-by-step tutorials might also help you:
Why is the knitting/crochet tension so important?
Knitting tension is what determines the final measurements of your work, and is usually measured per 10 x 10 cm. It is provided like so: number of stitches in width x number of rows in height - eg: 19 stitches x 26 rows = 10 x 10 cm.
The knitting tension is very individual; some people knit/crochet loosely while others work tightly. You adjust the knitting tension with the needle size, which is why the suggested needle size only serve as a guide! You need to adjust this (up or down) to ensure that YOUR knitting tension matches the knitting tension provided in the pattern. If you work with a different knitting tension than provided you will have a different yarn consumption, and your work will have different measurements than what the pattern suggests.
The knitting tension also determines which yarns can replace each other. As long as you achieve the same knitting tension you can replace one yarn with another.
See DROPS lesson: How to measure your tension/gauge
See DROPS video: How to make a gauge tension swatch
How do I know how many balls of yarn I need?
The required amount of yarn is provided in grams, eg: 450 g. To calculate how many balls you’ll need you first need to know how many grams are in 1 ball (25g, 50g or 100g). This information is available if you click on the individual yarn quality on our pages. Divide the amount required with the amount of each ball. For example, if each ball is 50g (the most common amount), the calculation will be as follows: 450 / 50 = 9 balls.
Can I use a different yarn than what the pattern suggests?
The important thing when changing from one yarn to another is that the knitting/crochet tension remains the same. This is so that the measurements of the finished piece will be the same as on the sketch provided. It is easier to achieve the same knitting tension using yarns from the same yarn group. It is also possible to work with multiple strands of a thinner yarn to achieve the knitting tension of a thicker one. Please try our yarn converter. We recommend you to always work a test swatch.
Please NOTE: when changing yarn the garment might have a different look and feel to the garment in the photo, due to individual properties and qualities of each yarn.
See DROPS lesson: Can I use a different yarn than the one mentioned in the pattern?
What are the yarn groups?
All our yarns are categorised into yarn groups (from A to F) according to thickness and knitting tension – group A contains the thinnest yarns and group F the thickest. This makes it easier for you to find alternative yarns to our patterns, should you wish to switch yarn. All yarns within the same group have a similar knitting tension and can easily replace each other. However, different yarn qualities have different structures and properties which will give the finished work a unique look and feel.
How do I use the yarn converter?
At the top of all our patterns you’ll find a link to our yarn converter, which is a helpful tool should you wish to use a different yarn than suggested. By filling in the yarn quality you wish to replace, the amount (in your size) and number of strands, the converter will present good alternative yarns with the same knitting tension. Additionally it will tell you how much you’ll require in the new qualities and whether you’ll need to work with multiple strands. Most skeins are 50g (some are 25g or 100g).
If the pattern is worked with multiple colours, every colour will have to be converted separately. Similarly, if the pattern is worked with several strands of different yarns (for example 1 strand Alpaca and 1 strand Kid-Silk) you will have to find alternatives for each, individually.
Why do you show discontinued yarns in the patterns?
Since different yarns have different qualities and textures we have chosen to keep the original yarn in our patterns. However, you can easily find options among our available qualities by using our yarn converter, or simply pick a yarn from the same yarn group.
It is possible that some retailers still have discontinued yarns in stock, or that someone has a few skeins at home that they would like to find patterns for.
The yarn converter will provide both alternative yarn as well as required amount in the new quality.
What size should I knit?
If you think it's hard to decide what size to make, it can be a good idea to measure a garment you own already and like the size of. Then you can pick the size by comparing those measures with the ones available in the pattern's size chart.
You'll find the size chart at the bottom of the pattern.
See DROPS lesson: How to read size chart
Why do I get the wrong knitting tension with the suggested needle size?
The needle size provided in the pattern serves only as a guide, the important thing is to follow the knitting tension. And since knitting tension is very individual, you will have to adjust the needle size to ensure that YOUR tension is the same as in the pattern – maybe you’ll have to adjust 1, or even 2 needle sizes, up or down to achieve the correct tension. For this, we recommend that you work test swatches.
Should you work with a different knitting tension than the one provided, the measurements of the finished garment might deviate from the measurement sketch.
See DROPS lesson: How to measure your tension/gauge
See DROPS video: How to make a gauge tension swatch
Why is the pattern worked top-down?
Working a garment top-down provides more flexibility and room for personal adjustment. For example it is easier to try the garment on while working, as well as making adjustments to length of yoke and shoulder caps.
The instructions are carefully explaining every step, in the correct order. Diagrams are adjusted to the knitting direction and are worked as usual.
How do I work according to a knitting diagram?
The diagram depicts all rows/rounds, and every stitch seen from the right side. It is read from bottom to top, from right to left. 1 square = 1 stitch.
When working back and forth, every other row is worked from the right side and every other row is worked from the wrong side. When working from the wrong side, the diagram will have to be worked reversed: from left to right, knit stitches are purled, purl stitches are knit etc.
When working in the round every round is worked from the right side and the diagram are worked from right to left on all rounds.
See DROPS lesson: How to read knitting diagrams
How do I work according to a crochet diagram?
The diagram depicts all rows/rounds, and every stitch seen from the right side. It is worked from bottom to top, from right to left.
When working back and forth every other row is worked from the right side: from right to left and every other row is worked from the wrong side: from left to right.
When working in the round, every row in the diagram are worked from the right side, from right to left.
When working a circular diagram you start in the middle and work your way outwards, counter clockwise, row by row.
The rows usually start with a given number of chain stitches (equivalent to the height of the following stitch), this will either be depicted in the diagram or explained in the pattern.
See DROPS lesson: How to read crochet diagrams
How do I work several diagrams simultaneously on the same row/round?
Instructions for working several diagrams after each other on the same row/round, will often be written like so: “work A.1, A.2, A.3 a total of 0-0-2-3-4 times". This means you work A.1 once, then A.2 is worked once, and A.3 is repeated (in width) the number of times provided for your size – in this case like so: S = 0 times, M = 0 times, L=2 times, XL= 3 times and XXL = 4 times.
The diagrams are worked as usual: begin with the first row in A.1, then work the first row in A.2 etc.
See DROPS lesson: How to read knitting diagrams
See DROPS lesson: How to read crochet diagrams
Why are the sleeves shorter in larger sizes?
The total width of the garment (from wrist-to-wrist) will be larger in the larger sizes, despite the actual sleeves being shorter. The larger sizes have longer sleeve caps and wider shoulders, so there will be a good fit in all sizes.
Where on the garment is the length measured?
The measurement sketch/schematic drawing provides information regarding the full length of the garment. If it’s a jumper or a jacket the length is measured from the highest point on the shoulder (usually closest to the neckline), and straight down to the bottom of the garment. It is NOT measured from the tip of shoulder. Similarly, the length of yoke is measured from the highest point on the shoulder and down to where yoke is split into body and sleeves.
See DROPS lesson: How to read a schematic drawing
What is a repeat?
Diagrams are often repeated on the round or in height. 1 repeat is the diagram the way it appears in the pattern. If it says to work 5 repeats of A.1 in the round, then you work A.1 a total of 5 times after/next to each other in the round. If it says to work 2 repeats of A.1 vertically/in height you work the entire diagram once, then begin again at the start and work the entire diagram one more time.
Why does the piece start with more chain stitches than it’s worked with?
Chain stitches are slightly narrower than other stitches and to avoid working the cast-on edge too tight, we simply chain more stitches to begin with. The stitch count will be adjusted on the following row to fit the pattern and measurement sketch.
Why increase before the rib edge when the piece is worked top-down?
The rib edge is more elastic and will contract slightly compared to, for example, stocking stitch. By increasing before the rib edge, you avoid a visible difference in width between the rib edge and the rest of the body.
Why increase in the cast-off edge?
It’s very easy to cast off too tightly, and by making yarn overs while casting off (and simultaneously casting these off) you avoid a too tight cast off edge.
See DROPS video: How to bind off with yarn overs (yo)
How do I increase/decrease on every 3rd and 4th row/round alternately?
To achieve an even increase (or decrease) you can increase on, for example: every 3rd and 4th row alternately, like so: work 2 rows and increase on the 3rd row, work 3 rows and increase on the 4th. Repeat this until the increase is complete.
See DROPS lesson: Increase or decrease 1 st on every 3rd and 4th row alternately
How can I work a jacket in the round instead of back and forth?
Should you prefer to work in the round instead of back and forth, you may of course adjust the pattern. You’ll need to add steeks mid-front (usually 5 stitches), and follow the instructions. When you would normally turn and work from the wrong side, simply work across the steek and continue in the round. At the end you’ll cut the piece open, pick up stitches to work bands, and cover the cut edges.
See DROPS video: How to knit steeks and cut open
Can I work a jumper back and forth instead of in the round?
Should you prefer to work back and forth instead of in the round, you may of course adjust the pattern so you work the pieces separately and then assemble them at the end. Divide the stitches for the body in 2, add 1 edge stitch in each side (for sewing) and work the front and back pieces separately.
See DROPS lesson: Can I adapt a pattern for circular needles into straight needles?
Why is the pattern slightly different than what I see in the photo?
Pattern repeats can vary slightly in the different sizes, in order to get the correct proportions. If you’re not working the exact same size as the garment in the photo, yours might deviate slightly. This has been carefully developed and adjusted so that the complete impression of the garment is the same in all sizes.
Make sure to follow instructions and diagrams for your size!
How do I make a women’s size garment into a men’s size one?
If you have found a pattern you like which is available in women’s size it’s not very difficult to convert it to men’s size. The biggest difference will be the length of sleeves and body. Start working on the women size that you think would fit across the chest. The additional length will be worked right before you cast off for the armhole/sleeve cap. If the pattern is worked top-down you can add the length right after the armhole or before the first decrease on sleeve.
Regarding additional yarn amount, this will depend on how much length you add, but it is better with a skein too many than too few.
How do I prevent a hairy garment from shedding?
All yarns will have excess fibres (from production) that might come off as lint or shedding. Brushed yarns (ie hairier yarns) have more of these loose, excess fibres, causing more shedding.
Shedding also depends on what is worn under or over the garment, and whether this pulls at the yarn fibres. It’s therefore not possible to guarantee that there will be no shedding
Below are some tips on how to get the best result when working with hairier yarns:
1. When the garment is finished (before you wash it) shake it vigorously so the looser hairs come off. NOTE: do NOT use a lint roller, brush or any method that pulls at the yarn.
2. Place the garment in a plastic bag and put it in your freezer - the temperature will cause the fibres to become less attached to each other, and excess fibres will come off easier.
3. Leave in the freezer for a few hours before taking it out and shaking it again.
4. Wash the garment according to the instructions on the yarn label.
Why does my garment pill?
Pilling is a natural process that happens to even the most exclusive of fibers. It's a natural sign of wear and tear that is hard to avoid, and that is most visible in high friction areas of your garment like a sweater's arms and cuffs.
You can make your garment look as new by removing the pilling, using a fabric comb or a pill/lint remover.
DROPS 50-23 |
|||||||||||||||||||||||||
|
|||||||||||||||||||||||||
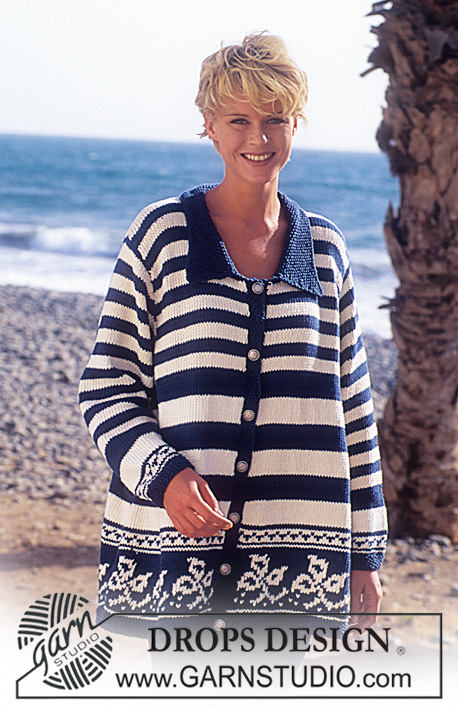
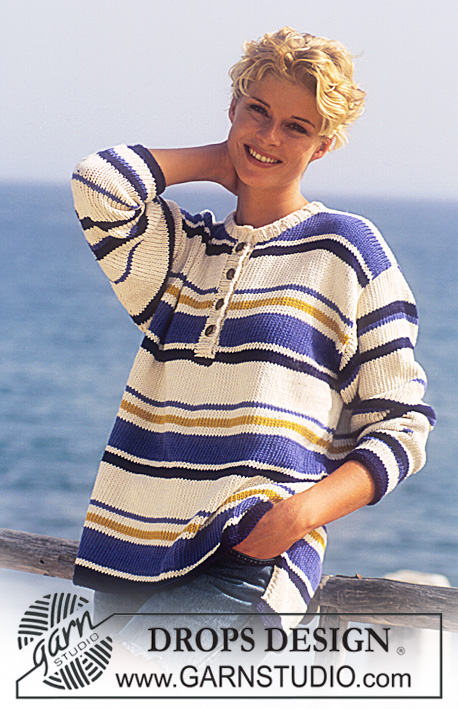
DROPS Sweater in Muskat with cables
DROPS 50-23 |
|||||||||||||||||||||||||
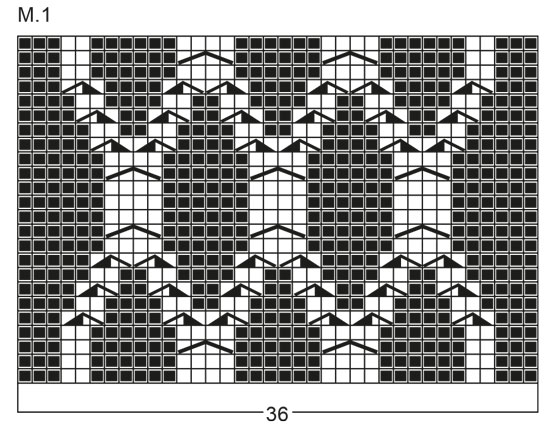
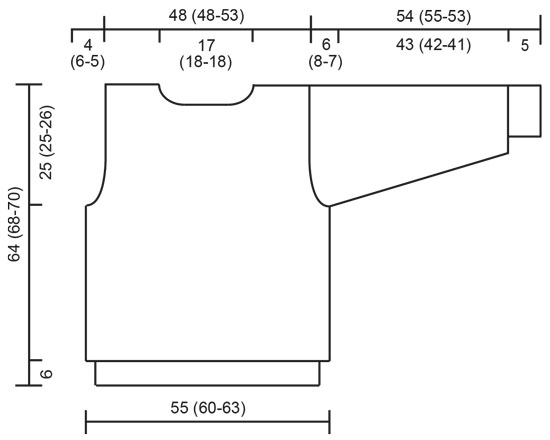
Gauge: 20 sts and 26 rows on larger needles in stockinette stitch = 10 x 10 cm [4»x4»] Rib: * K 2, P 2 *. Repeat from * - *. Pattern: See chart. One chart equals one repeat of the pattern. Front: Worked back and forth on a circular needle. Cast on 114 (124-128) sts (includes 1 edge st on each side for seam - not knitted into the pattern) on smaller circular needles and knit in rib for 6 cm [2-⅜"]. Change to larger circular needles and knit 1 row stockinette stitch and inc 32 (32-34) sts evenly distributed on the row. 146 (156-162) sts. Knit the next row from the right side as follows: 1 edge st, 15 (20-23) sts of Pattern 4 Sizes S+M - start at arrow B. Size L - start at arrow D), Pattern 3, Pattern 2, Pattern 1, Pattern 2, Pattern 3, 15 (20-23) sts of Pattern 4 (start at the first square of the diagram), 1 edge st. When the work measures 39 (43-44) cm [15-⅜" (16-⅞"-17-⅜")], bind off for armholes on each side of every other row: 3 sts 1 (1-1) time, 2 sts 1 (3-2) times, 1 st 3 (4-4) times. 130 (130-140) sts. When the work measures 56 (60-62) cm [22» (23-⅝"-24-⅜")], bind off the center 20 (22-22) sts for the front neck. Then bind off at the neck edge every other row: 3 sts 2 times, 2 sts 2 times, 1 st 2 times. 43 (42-47) sts on the shoulder. When the work measures 63.5(67.5-69.5) cm [24-⅞" (26.5»-27.25")], knit a row of stockinette stitch and, at the same time, bind off 11 (11-12) sts evenly distributed on the row, but do not bind off sts over Pattern 4. 32 (31-35) sts on the shoulder. Bind off when the work measures 64 (68-70) cm [25.25" (26.75"-27.5»)]. Back: Worked back and forth on a circular needle. Cast on 114 (124-128) sts (includes 1 edge st on each side for seam - these are not knitted into the pattern) on smaller circular needles and knit in rib for 6 cm [2-⅜"]. Change to larger circular needles , knit 1 row stockinette stitch and inc 10 (10-10) sts evenly distributed on the row. Then knit Pattern 4 as follows: 1 edge st, 122 (132-136) sts of Pattern 4 Sizes S+M - start at arrow A, Size L - start at arrow C, 1 edge st. When the work measures 39 (43-44) cm [15-⅜" (16-⅞"-17-⅜")], bind off for armholes as on the front. 108 (108-116) sts. When the work measures 62 (66-68) cm [24-⅜" (26»-26.75")], bind off the center 30 (32-32) sts in the back for the neck. Then bind off 2 sts on each side of the neck edge on the next row. 37 (36-40) sts on the shoulder. When the work measures 63.5 (67.5-69.5) cm [24-⅞" (26.5»-27.25")], knit a row of stockinette stitch and at the same time bind off 5 sts evenly distributed on the row. 32 (31-35) sts on the shoulder. Bind off when the work measures 64 (68-70) cm [25.25" (26.75"-27.5»)]. Sleeves: Worked back and forth on a circular needle. Cast on 50 (50-54) sts on smaller circular needle and knit in rib for 5 cm [2»]. Change to larger circular needle and knit 1 row in stockinette stitch and at the same time inc 17 (17-19) sts evenly distributed on the 1st row. 67 (67-73) sts. Knit the next row from the right side as follows: 4 (4-7) sts of Pattern 4 Sizes S+M - start at arrow C, Size L - start at arrow A, Pattern 3, Pattern 2, Pattern 3, 4 (4-7) sts of Pattern 4 (start at the first square of the diagram). At the same time, inc 1 st at each side 26 (26-25) times. Size S: every 4th row. Sizes M+L: alternately every 3rd and 4th row. 119 (119-123) sts. When the work measures 48 (47-46) cm [18-⅞" (18.5»-18-⅛")], bind off for sleeve caps on each side every other row: 4 (3-4) sts 8 (10-9) times. Bind off all sts. The work measures approximately 54 (55-53) cm [21.25" (21-⅝"-20-⅞")]. Assembly: Sew shoulder seams. Pick up approximately 105-115 sts around the neck on smaller double pointed needles and knit 6 rows stockinette stitch. Bind off all sts. Sew on the sleeves. Sew sleeve and side seam in one. |
|||||||||||||||||||||||||
Diagram explanations |
|||||||||||||||||||||||||
|
|||||||||||||||||||||||||
Have you made this or any other of our designs? Tag your pictures in social media with #dropsdesign so we can see them! Do you need help with this pattern?You'll find tutorial videos, a Comments/Questions area and more by visiting the pattern on garnstudio.com. © 1982-2024 DROPS Design A/S. We reserve all rights. This document, including all its sub-sections, has copyrights. Read more about what you can do with our patterns at the bottom of each pattern on our site. |
With over 40 years in knitting and crochet design, DROPS Design offers one of the most extensive collections of free patterns on the internet - translated to 17 languages. As of today we count 304 catalogs and 11422 patterns - 11417 of which are translated into English (US/in).
We work hard to bring you the best knitting and crochet have to offer, inspiration and advice as well as great quality yarns at incredible prices! Would you like to use our patterns for other than personal use? You can read what you are allowed to do in the Copyright text at the bottom of all our patterns. Happy crafting!
Comments / Questions (18)
Florence Freemantle wrote:
It seems to me that, in the charts, the blank square should be described as K on the right side and P on the wrong side and, for the square with the dot in it, P on the right side and K on the wrong side. Is this correct?
17.09.2017 - 11:04DROPS Design answered:
Hi Florence, You are right that the blank square is knit from the right side and purl from the wrong side and the oppsite for the square with the dot in it. However, it does say in the pattern that the diagram shows all the rows in the pattern from the right side, so it might be confusing to others if we then said the square was knit from right side and purl from wrong side. Happy knitting!
17.09.2017 - 12:21Eileen Sterio wrote:
Love this sweater ..coming out great. Quick question -- pattern calls for binding off at either end for the armholes. How does one bind-off at the end of the row. I have been continuing with the b/o every row(r and r side) -- will this be ok?
16.02.2016 - 14:45DROPS Design answered:
Dear Mrs Sterio, you will bind off for armhole on each side, ie at the beg of each row on each side (both from RS and from WS). Happy knitting!
16.02.2016 - 15:53Linda wrote:
Are the patterns for right side rows only and the wrong side rows purl across?
26.08.2015 - 01:36DROPS Design answered:
Dear Linda, all rows are included in diagrams, ie RS and WS rows, 1 square = 1 st x 1 row - click here for more info about diagrams. Read from the right towards the left from RS (starting at the bottom corner on the right side), and from the left towards the right from WS. Happy knitting!
26.08.2015 - 10:32Ineke wrote:
-Is de "vlecht" hetzelfde als de kabel? -Bij beschrijving-Patroon: patroon staat overdwars- is dit nog steeds zo? -VP staat Patroon 4,(start bij eerste vierkant van het telpatroon) Moet ik dan niet kijken naar A,B,C, of D?
20.01.2015 - 10:04DROPS Design answered:
Hoi Ineke. Ja, Vlecht en kabeltje is hetzelfde. Ik heb dat nu ook aangepast in het patroon. Het telpatroon staat goed, dat is een fout in de tekst.
21.01.2015 - 16:02Lena wrote:
Det är ju mindre maskor på bakstycket för att det inte stickas flätmönster.
15.03.2014 - 15:38Pernilla wrote:
Jag fattar inte ska det vara mindre maskor på bakstycket än framstycket? Och inga flätmönster😳
15.03.2014 - 14:18Marja-Leena Hallio wrote:
Minulla on kysymys liittyen hihoihin.Kun lisätään silmät niin mitä neuletta neulotaan reuna lisäyssilmukoiden ja ensimmäisen M4:n väliin vai jatketaanko M4 levittämällä? Kiitos jos saisin tiedon. Muutoin puserosta on tulossa onnistunut.Yst.terveisin Marja-Leena Hallio
11.02.2012 - 23:19Marja-Leena Hallio answered:
Pistin ilmeisesti väärään kategoriaan kysymykseni, koska en saanut siihen koskaan vastausta. Ratkaisin ongelmani neulomalla kahden silmukan palmikkoa jolloin hihasta tulee oikein näyttävän näköinen. Ostin Muskat-langan sijasta Drops Karismaa joka 100% villaa.Langan laatuun en ole erityisen tyytyväinen, koska mielestäni neulelangoissa ei ole kerässä jatkettuna solmuilla. Neljässä kerässä kutomistani on lanka jatkettu solmulla. Ärsyttävää
23.02.2012 - 19:18Hanne Lis Olsen wrote:
Hvornår kommer opskriften på denne bluse kan kun se diagramet .Mvh Hannelis
03.02.2010 - 22:32