
Popular categories
Looking for a yarn?


|
|
Keel Over |
|
 |
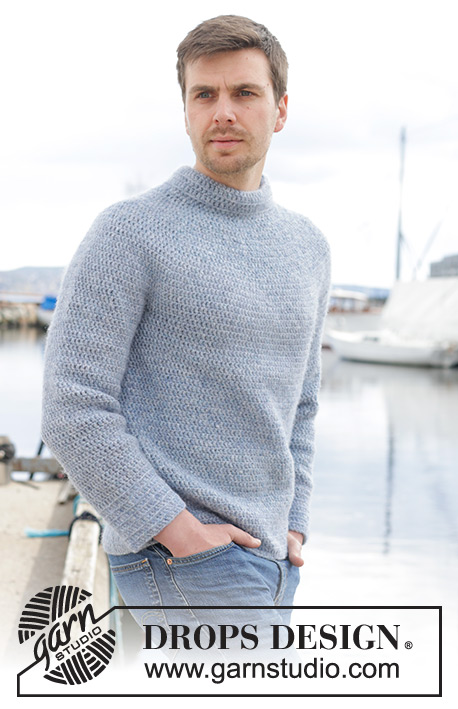 |
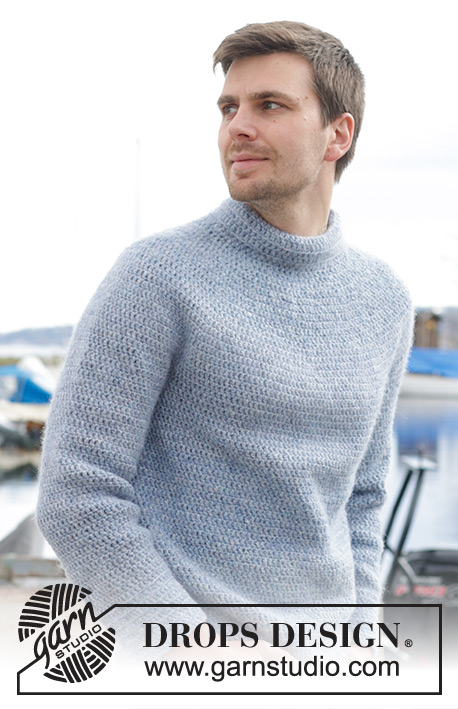
Crocheted jumper for men in DROPS Air. The piece is worked top down, with round yoke and double neck. Sizes S - XXXL.
DROPS 233-25 |
|
|
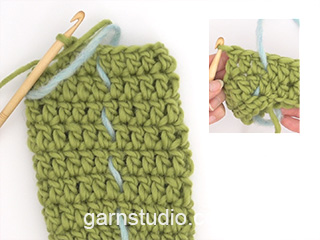
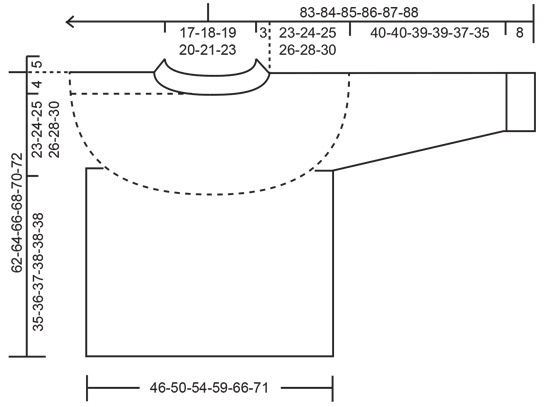
------------------------------------------------------- EXPLANATIONS FOR THE PATTERN: ------------------------------------------------------- INCREASE TIP (evenly spaced): Increase 1 treble crochet by working 2 treble crochets in the same stitch. To work out how to increase evenly, count the total number of stitches on the round (e.g. 69 stitches) and divide by the number of increases to be made (e.g. 11) = 6.27. In this example, increase by working 2 treble crochets in approx. every 6th stitch. CHAIN STITCH: If you work outermost on the hook the chain stitch will often be too tight; 1 chain stitch should be as long as 1 treble crochet is wide. CROCHET INFORMATION-1 (round and round): Work round and round without finishing each round. Insert 1 marker-thread at the beginning of the round to show where it begins. On round 2 work the first treble crochet in the 2nd chain stitch from the beginning of first round, then work in all half treble crochets from 1st round as described in the text. This round is not finished in the usual way, the first treble crochet in next round is worked in the first treble crochet from previous round. Then continue round and round with 1 treble crochet in each treble crochet. On the last round, at the bottom of the body and sleeves, work as follows to avoid a notch in the transition: Work until there are 2 treble crochets left on the round, work 1 half-treble crochet in the next treble crochet, 1 double crochet in the last treble crochet and finish with 1 slip stitch in the first treble crochet at the beginning of the round. CROCHET INFORMATION-2 (neck): At the beginning of each round of treble crochets, work 3 chain stitches which replace the first treble crochet. Finish the round with 1 slip stitch in the 3rd chain stitch at the beginning of the round. DECREASE TIP (sleeves): When working in the round, the beginning of the round will be displaced. Insert a marker-thread mid-under the sleeve between 2 stitches and allow the thread to follow your work straight down – it will need to be moved so it is kept in a straight line. Lay the sleeve flat to check that the thread is still mid-under the sleeve each time you decrease. Decrease on each side of 2 treble crochets as follows: Work until there are 3 treble crochets left before the marker-thread, work 2 treble crochets together as follows: * Make 1 yarn over, insert the hook through the next stitch, pick up the strand, make 1 yarn over and pull it through the first 2 loops on the hook *, work from *-* 1 more time, make 1 yarn over and pull it through all 3 loops on the hook (1 stitch decreased) *. Work 1 treble crochet in each of the next 2 treble crochets (marker-thread sits between these stitches) and repeat from *-* one more time. ------------------------------------------------------- START THE PIECE HERE: ------------------------------------------------------- JUMPER – SHORT OVERVIEW OF THE PIECE: The yoke is worked in the round, top down. The yoke is divided for the body and sleeves, which are continued separately in the round. The neck is worked to finish. YOKE: Work 67-70-73-77-80-84 CHAIN STITCHES – read description above, with hook size 5 mm and DROPS Air. Form them into a ring with 1 slip stitch in the first chain stitch. ROUND 1: Work 2 chain stitches (replacing the first half-treble crochet), 1 half-treble crochet in each of the remaining chain stitches, 2 half-treble crochets around the 2 chain stitches at the beginning of the round = 69-72-75-79-82-86 half-treble crochets. Insert a marker; the yoke is measured from here! Read CROCHET INFORMATION-1 in explanations above, before continuing! ROUND 2: Work 1 treble crochet in each half-treble crochet and increase 11-18-25-31-38-44 treble crochets evenly spaced - read INCREASE TIP = 80-90-100-110-120-130 stitches. ROUND 3: Work 1 treble crochet in each treble crochet. ROUND 4: Work treble crochets and increase 16-18-20-22-24-26 treble crochets evenly spaced = 96-108-120-132-144-156 treble crochets. ROUND 5: Work treble crochets and increase 16-18-20-22-24-26 treble crochets evenly spaced = 112-126-140-154-168-182 treble crochets. REMEMBER THE CROCHET TENSION! ROUND 6: Work treble crochets and increase 16-18-20-22-24-26 treble crochets evenly spaced = 128-144-160-176-192-208 treble crochets. Now continue in the different sizes as follows: SIZES S, M, L and XL: = 128-144-160-176 treble crochets. ROUND 7: Work 1 treble crochet in each treble crochets. ROUND 8: Work treble crochets and increase 16-18-20-22 treble crochets evenly spaced. Repeat rows 7-8 two more times =176-198-220-242 treble crochets. SIZES XXL and XXXL: = 192-208 treble crochets. ROUND 7: Work 1 treble crochet in each treble crochet. ROUND 8: Work 1 treble crochet in each treble crochet. ROUND 9: Work treble crochets and increase 24-26 treble crochets evenly spaced. Repeat rows 7-9 two more times = 264-286 treble crochets. ALL SIZES: = 176-198-220-242-264-286 treble crochets. Work 1 treble crochet in each treble crochet until the yoke measures 23-24-25-26-28-30 cm from the marker. Divide for the body and sleeves as follows: Work 26-28-31-35-39-43 treble crochets, 1 half-treble crochet, skip 34-40-45-49-51-54 stitches for the sleeve, work 11 chain stitches (= under sleeve), work 1 half-treble crochet, 52-57-63-70-79-87 treble crochets, 1 half-treble crochet, skip 34-40-45-49-51-54 stitches for the sleeve, work 11 chain stitches (= under sleeve), work 1 half-treble crochet, 26-29-32-35-40-44 treble crochets. Body and sleeves are finished separately. BODY: = 130-140-152-166-184-200 stitches. Continue with 1 treble crochet in each stitch (on round 1 work 1 treble crochet in each chain stitch under the sleeves) until the body measures 35-36-37-38-38-38 cm from the division - remember CROCHET INFORMATION-1 when working the last round. Cut and fasten the strand. The piece measures approx. 62-64-66-68-70-72 cm from the shoulder down. SLEEVES: Work the 34-40-45-49-51-54 skipped stitches on one side as follows: Fasten the strand with 1 double crochet in the 6th of the 11 chain stitches under the sleeve, work 1 treble crochet in each of the next 4 chain stitches, work 2 treble crochets together as follows: work 1 treble crochet in the last chain stitch, wait with the last yarn over and pull-through, work another treble crochet in the same way around the half treble crochet in the transition between the body and sleeve, make 1 yarn over and pull it through all 3 loops on the hook (this avoids a hole in the transition between the body and sleeve). Work 1 treble crochet in each stitch as far as the chain stitches on the other side of the sleeve, work 2 treble crochets together in the transition between sleeve and body, then 1 treble crochet in each of the last chain stitches = 45-51-56-60-62-65 stitches. Continue round and round, in the same way as on the body, starting the next round with the first treble crochet in the first double crochet from the previous round. Continue with 1 treble crochet in each treble crochet. When the sleeve measures 3 cm, decrease 2 treble crochets under the sleeve – read DECREASE TIP! Decrease like this every 13-8-5½-4-4-3 cm a total of 3-5-7-9-9-10 times = 39-41-42-42-44-45 stitches. Work until the sleeve measures 41-40-40-39-38-36 cm (8 cm left to finished length). On the next round work 1 treble crochet in the back loop of each treble crochet. Continue like this until the sleeve measures 49-48-48-47-46-44 cm - remember CROCHET INFORMATION-1 when finishing the final round. Cut and fasten the strand. Work the other sleeve in the same way. DOUBLE NECK: Use crochet hook size 5 mm and DROPS Air. Fasten the strand with 1 slip stitch approx. mid-back. Read CROCHET INFORMATION-2 in explanations above. ROUND 1: Work 1 treble crochet between each half-treble crochet from round 1 = 67-70-73-77-80-84 treble crochet. ROUND 2: Work 1 treble crochet in the back loop of each treble crochet. ROUND 3: Work 1 treble crochet through both loops of each treble crochet. ROUND 4: Work 1 treble crochet in the back loop of each treble crochet. ROUND 5: Work 1 treble crochet through both loops of each treble crochet. ROUND 6: Work 1 treble crochet in the back loop of each treble crochet. ROUNDS 7-9: Work 1 treble crochet through both loops of each treble crochet. Cut the strand, pull it through the last loop on the hook. Fold the neck double to the inside and fasten with a couple of small stitches. |
|
|
|
|
Have you made this or any other of our designs? Tag your pictures in social media with #dropsdesign so we can see them! Do you need help with this pattern?You'll find tutorial videos, a Comments/Questions area and more by visiting the pattern on garnstudio.com. © 1982-2024 DROPS Design A/S. We reserve all rights. This document, including all its sub-sections, has copyrights. Read more about what you can do with our patterns at the bottom of each pattern on our site. |
|


With over 40 years in knitting and crochet design, DROPS Design offers one of the most extensive collections of free patterns on the internet - translated to 17 languages. As of today we count 304 catalogues and 11422 patterns - 11422 of which are translated into English (UK/cm).
We work hard to bring you the best knitting and crochet have to offer, inspiration and advice as well as great quality yarns at incredible prices! Would you like to use our patterns for other than personal use? You can read what you are allowed to do in the Copyright text at the bottom of all our patterns. Happy crafting!
Comments / Questions (11)
Bonjour, je suis en train de réaliser ce pull. Mais je suis au tour 8 et par acquis de conscience je le fais essayer à mon fils catastrophe Il ne passe pas sa tête !! Je précise que j'ai fait 3 ou 4 échantillons et soit avec le crochet 5 l'échantillon faisait 8,5 de large soit avec le 4,5 , c'était trop large et trop long... J'ai donc finalement opté pour le 5 comme vous préconisez. Merci de votre aide !!
13.04.2024 - 19:12DROPS Design answered:
Bonjour Mme Chenebeau, la taille du crochet importe peu, ce qui compte c'est que vous ayez bien les 14 brides = 10 cm de large; ainsi, les 70 mailles en l'air en taille M vont mesurer 50 cm; si votre chaînette de base est trop serrée, essayez de les monter avec un crochet plus gros pour garder de l'élasticité au 1er rang et pensez à bien conserver votre tension au fur et à mesure que vous crochetez. Bon crochet!
15.04.2024 - 07:31Bonjour, j'ai commencé le pull en taille M. J'en suis à la partie "toutes tailles" pour la taille M "198". En contrôlant les mesures il me manque 5 cm (mesure du col). Je crochète serré ; mon échantillon était bon ; mais je pense que j'ai du tendre plus. Comment puis je rattraper cela sans devoir tout défaire la partie déjà crochetée. Merci de vos précieux conseils
09.04.2024 - 08:44DROPS Design answered:
Bonjour Mme Lacchia, si vous avez besoin de davantage de rangs pour les 10 cm de hauteur, ce n'est pas grave (il est toutefois possible que vous manquiez de laine s'il vous faut plus de rangs), lorsque vous avez vos 198 mailles continuez simplement sans augmenter jusqu'à ce que l'empiècement mesure 24 cm. Bon crochet!
09.04.2024 - 09:05Buonasera, purtroppo la parte posteriore rimane troppo larga e rende brutto il maglione.
09.03.2024 - 16:02Is the neck also worked in the same direction each round or back and forth with a turn each row?
02.01.2024 - 18:51DROPS Design answered:
Dear Raeph, the neck is worked in the round, starting with 3 chains to replace 2st stitch and ending with 1 slip stitch in the 3rd chain ,at the beg of round; see CROCHET INFORMATION-2 (neck):: at the beginning of pattern. Happy crocheting!
03.01.2024 - 08:20Hello, I was wondering if this sweater could be done joining each round with a slip stitch and then chaining for the first stitch. I would like to add color strips on my next go around. The no join method makes it a bit harder to add different colors. Thank you!
29.11.2023 - 04:43DROPS Design answered:
Dear Erin, yes probably, then maybe just adjust pattern to work back and forth (alternately from right side and from wrong side ) to avoid getting the beginning of the round going diagonnally. Happy crocheting!
29.11.2023 - 08:26Ich verstehe leider den Punkt unter „alle Größen“ nicht in dem es heißt, 45 Ständchen für den Ärmel überspringen, 11 luftmaschen. Wie überspringt man die Maschen - abnehmen? Ich bin etwas verwirrt. Danke für die Hilfe im Voraus!
01.09.2023 - 21:18DROPS Design answered:
Liebe Julia, diese 45 Stäbchen häkeln Sie einfach nicht (sie werden später für den Ärmel gehäkelt), und stattessen häkeln Sie 11 Luftmaschen (diese Luftmaschen "ersetzen" die 45 Stäbchen vom Ärmel). Viel Spaß beim häkeln!
04.09.2023 - 09:34Help mij. Ben begonnen aan gehaakte trui voor mannen van 233-25. Kan niet aan de uitleg aan uit, Ben aan rij 5. Hoeveel moet ik meerderen om de hoeveel steken, is niet juist volgens mij.
26.08.2023 - 10:40DROPS Design answered:
Dag Declerck,
Welke maat ben je aan het haken?Als ik de aangegeven aantal meerderingen optel bij het aantal steken, kom ik wel uit op de steken die je moet hebben aan het eind van toer 5.
27.08.2023 - 17:01Beste, Met hoofdomvang 58cm is 73 lossen (maat L) nog steeds te klein. Hoewel ik die lossen los gehaakt heb (met wat grotere haaknaald). Hoe kan ik deze oplossen? Overigens, zijn er niet zoveel haakpatronen voor herentrui die geschikt voor beginner.
04.08.2023 - 08:41DROPS Design answered:
Dag Fanny,
Wat je ook nog zou kunnen proberen is 11 stokjes meer opzettenen het meerderen in toer 2 overslaan. Dus je haakt wel toer 2, alleen meerder je dan niet.
05.08.2023 - 07:28Beste, De pas voor maat L is gehaakt uit 73 lossen. Dit is echt te klein als een hoofd erin moet. De pas is toch voor de hals? Of begrijp ik het verkeerd? Groeten, Fanny
02.08.2023 - 22:39DROPS Design answered:
Dag Fanny,
Ja dat klopt, die 73 lossen is voor de hals. Het is belangrijk dat je de lossen niet te strak haakt, dus neem eventueel voor deze lossen voor de hals een naald groter en/of zorg ervoor dat je niet op het uiteinde van de haaknaald haakt
03.08.2023 - 21:05Hallo, endlich mal eine Häkelpullover für Männer! Vielen Dank! Ich werde ihn auf jeden Fall häkeln. Aber warum gebt Ihr dem Pullover so einen schrecklich negativen Namen?\r\nLiebe Grüße von Berenike Wannenmacher\r\nP.s ich beschenke regelmäßig alle Bekannten mit Häkelsachen aus Euren Mustern und alle sind immer begeistert!
26.05.2023 - 12:37