
Popular categories
Looking for a yarn?


|
|||||||||||||||||||
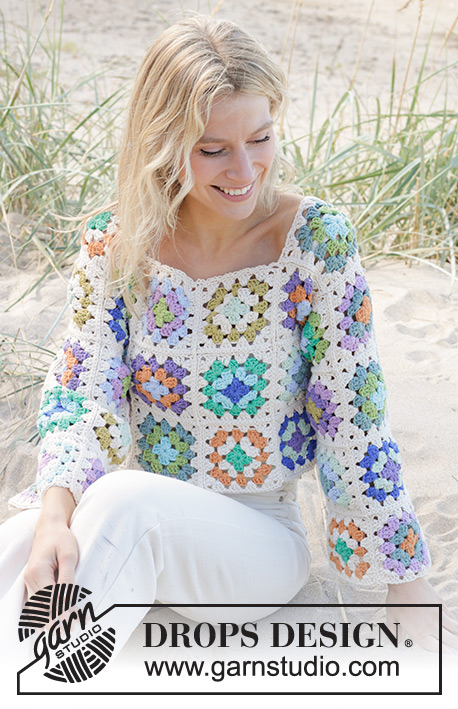
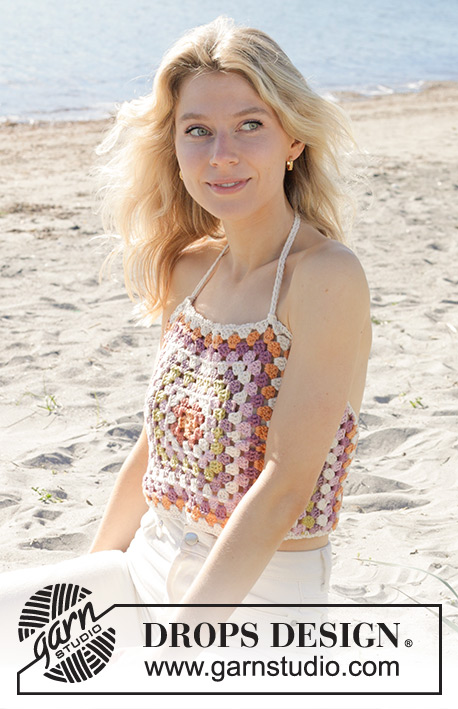
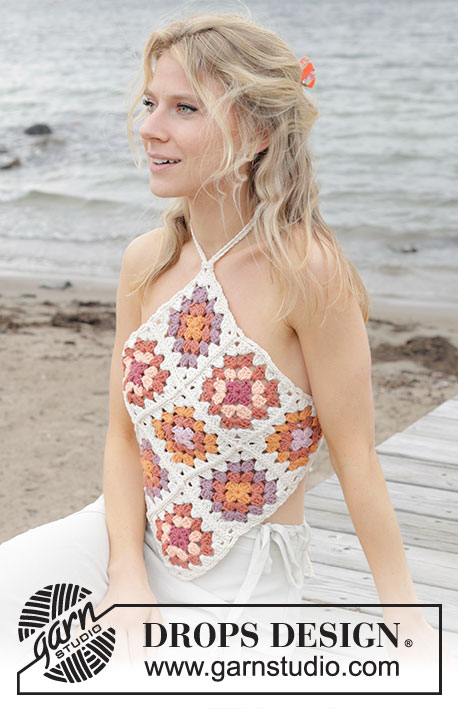
Tic Tac Toe Top |
|||||||||||||||||||
 |
 |
||||||||||||||||||
Crocheted top in DROPS Paris. The piece is worked in squares. Sizes S - XXL.
DROPS 240-31 |
|||||||||||||||||||
|
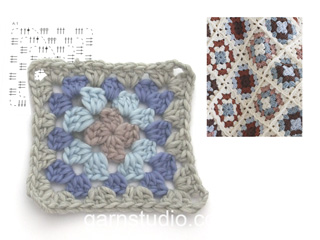
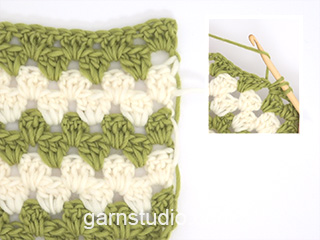
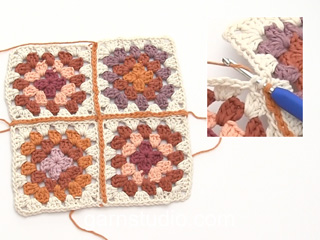
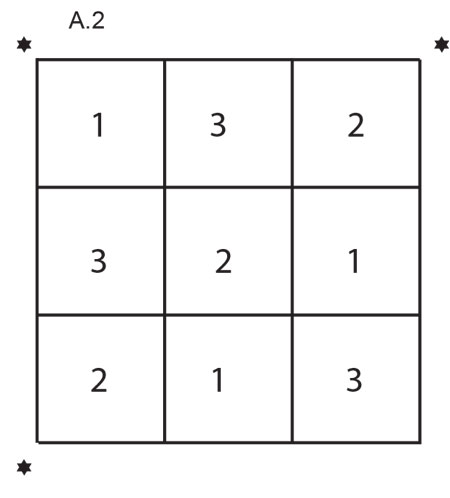
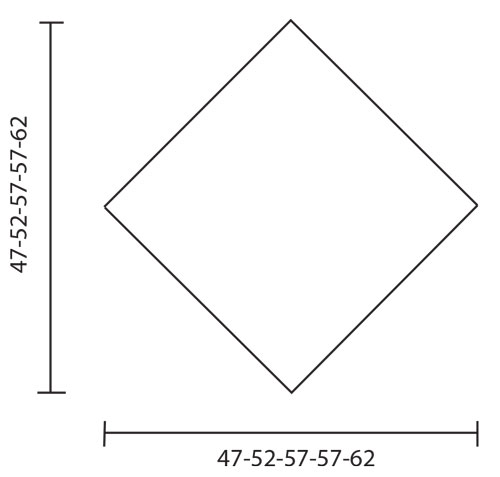
------------------------------------------------------- EXPLANATIONS FOR THE PATTERN: ------------------------------------------------------- COLOURS: Work different combinations for the different squares: Square 1: CAST ON + ROUND 1: 71, tangerine ROUND 2: 65 rust ROUND 3: 64, amethyst ROUND 4: 17, off white Square 2: CAST ON + ROUND 1: 58, powder pink ROUND 2: 65, rust ROUND 3: 71, tangerine ROUND 4: 17, off white Square 3: CAST ON + ROUND 1: 68, plum ROUND 2: 27, peach ROUND 3: 65, rust ROUND 4: 17, off white CHANGING COLOURS: For a neat transition when changing colours, work the last slip stitch on the round with the new colour. PATTERN: See diagrams A.1 and A.2. Diagram A.2 shows the positioning of the squares. ------------------------------------------------------- START THE PIECE HERE: ------------------------------------------------------- TOP - SHORT OVERVIEW OF THE PIECE: First work 9 squares in the different colour combinations. Then crochet the squares together. In the larger sizes, treble crochet groups are worked around the assembled squares. Ties are worked to finish. SQUARE: Use crochet hook size 5 mm and DROPS Paris. Read COLOURS and CHANGING COLOURS. Work squares according to diagram A.1 in the different colour combinations. 1 square measures approx. 11 x 11 cm. Work 3 squares in each colour combination. REMEMBER THE CROCHET TENSION! ASSEMBLY: Lay out the squares as shown in diagram A.2. Make sure all squares are right side up. The number in the diagram is the square-number in COLOURS. Work the squares together first width-wise then length-wise. Use hook size 5 mm and colour off white: Lay 2 squares edge-to-edge. Start in one corner and * insert the hook from the right side through the back loop on first one square then the other, pick up the strand and pull it through both loops on the hook *, work from *-* along 1 side, work 2 chain stitches and repeat from *-* along the next 2 squares. NOTE! Work 1 stitch in each corner and 1 stitch in each stitch. Work all squares together width-wise, then length-wise. Size S is finished. SIZES M, L, XL, XXL: Work an edge around the top, to make it larger. In size M work 1 round, in sizes L and XL 2 rounds, in size XXL 3 rounds as follows: Use hook size 5 mm and colour off white. ROUND 1: Start in the middle of one of the square-sides. Work 3 treble crochets and 1 chain stitch around each chain stitch along each square, in addition work 3 treble crochets and 1 chain stitch around each transition between 2 squares. In the corners of the garment, work 3 treble crochets, 3 chain stitches, 3 treble crochets and 1 chain stitch. Size M is finished. ROUND 2: Change to colour tangerine - remember COLOUR CHANGE. Work 3 treble crochets and 1 chain stitch around each chain stitch and work the corners as before. Sizes L and XL are finished. ROUND 3: Change to colour off white. Work round 2 again, finishing with 1 slip stitch in the 3rd chain stitch at the beginning of the round. Size XXL is finished. EDGE – ALL SIZES: Start in the middle of 1 side and work an edge using crochet hook size 5 mm and colour off white as follows: 1 double crochet around the first chain stitch, * 3 chain stitches, 1 double crochet around the next chain stitch *, work from *-* around the whole garment, finishing with 3 chain stitches and 1 slip stitch in the first double crochet on the round; in each corner work 1 double crochet, 3 chain stitches, 1 double crochet. Cut and fasten the strands. CORDS: Work a row of chain stitches, 100 to 120 cm in length, with hook size 5 mm and colour off white. Cut and fasten the strand. Work to cords in the same way. Lay the cords double, thread the loop through a chain-space at the top of the neck, thread the ends through the loop so the cord is fastened. Repeat on each side. The cords are tied mid-back (stars in A.2 show where to fasten the cords). |
|||||||||||||||||||
Diagram explanations |
|||||||||||||||||||
|
|||||||||||||||||||

|
|||||||||||||||||||
|
|||||||||||||||||||
|
|||||||||||||||||||
|
Have you made this or any other of our designs? Tag your pictures in social media with #dropsdesign so we can see them! Do you need help with this pattern?You'll find tutorial videos, a Comments/Questions area and more by visiting the pattern on garnstudio.com. © 1982-2024 DROPS Design A/S. We reserve all rights. This document, including all its sub-sections, has copyrights. Read more about what you can do with our patterns at the bottom of each pattern on our site. |
|||||||||||||||||||


With over 40 years in knitting and crochet design, DROPS Design offers one of the most extensive collections of free patterns on the internet - translated to 17 languages. As of today we count 304 catalogues and 11422 patterns - 11422 of which are translated into English (UK/cm).
We work hard to bring you the best knitting and crochet have to offer, inspiration and advice as well as great quality yarns at incredible prices! Would you like to use our patterns for other than personal use? You can read what you are allowed to do in the Copyright text at the bottom of all our patterns. Happy crafting!
Comments / Questions (8)
Hola Porque en las instrucciones aparece un * antes de varios de los pasos, qué significa eso?
22.01.2024 - 20:26DROPS Design answered:
Hola Melanie, puedes indicar qué patrón estás trabajando e indicar una frase de ejemplo? Normalmente los asteriscos marcan el inicio de una repetición. Por ejemplo, si pone: * 2 derechos, 2 reveses*, repetir de * a * significa que tienes que repetir los pasos entre asteriscos.
22.01.2024 - 20:38Why do you never have pictures of the back?
13.01.2024 - 17:38Bonsoir, j’ai bien reçu votre réponse et je vous en remercie, j’avais compris pour attacher les liens, mais en fait, il en faut 3 et non 2 comme stipulé dans les explications ?
04.09.2023 - 23:11DROPS Design answered:
Bonjour Isabelle, tout à fait il en faut bien 3 au total: un en haut du top, et on répète de chaque côté du top, donc 2 autres pour le dos (un de chaque côté du dos). Bon crochet!
05.09.2023 - 13:28Bonjour, je ne comprends pas comment attacher les liens pour le dos ? J’ai suivi la photo pour celui du haut. D’après les explications, il ne faut que 2 liens, alors, comment attacher l’autre ? Merci beaucoup de votre aide
26.08.2023 - 08:22DROPS Design answered:
Bonjour Isabelle, attachez les bretelles du dos et du tour de cou comme pour des franges: pliez la chaînette en double, insérer la boucle obtenue dans le top, enfiler l'extrémité des 2 chaînettes dans la boucle et serrez. Bonnes finitions!
28.08.2023 - 13:15Is er iets meer info over het haken van de rand rond de vierkanten? Ik kan er niet goed aan uit
07.06.2023 - 11:31DROPS Design answered:
Dag Caroline,
Nee, helaas niet. Deze staat alleen beschreven in het patroon. Laat maar weten waar je precies tegenaan loopt, dan kunnen we je wellicht verder helpen.
10.06.2023 - 18:43Precioso peto muy alegre y veraniego ideal para chicas jovenes, me encantaria telerlo para mis nietas.
18.01.2023 - 15:49Mermaid
18.01.2023 - 14:01Flower embrace
18.01.2023 - 11:15