
Popular categories
Looking for a yarn?


|
||||||||||||||||||||||
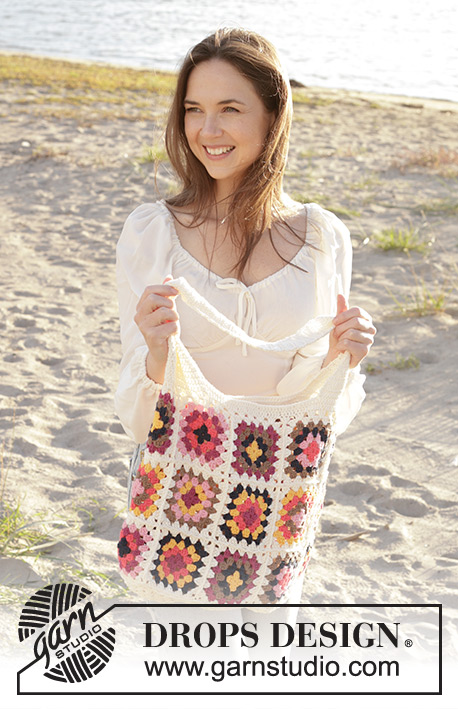
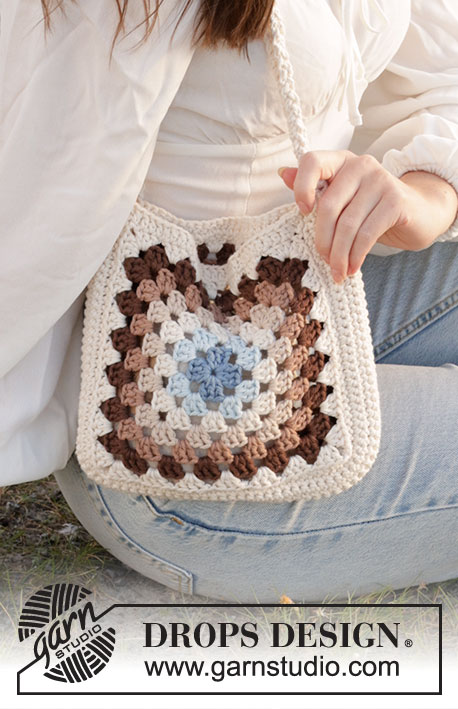
Campus Crossbody Bag |
||||||||||||||||||||||
 |
 |
|||||||||||||||||||||
Crocheted bag in DROPS Paris. The piece is worked in squares.
DROPS 238-9 |
||||||||||||||||||||||
|
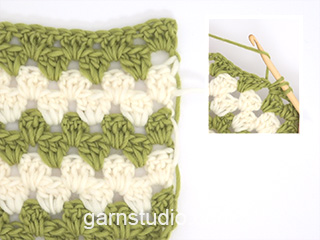
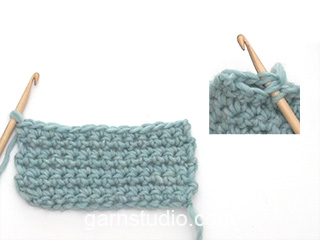
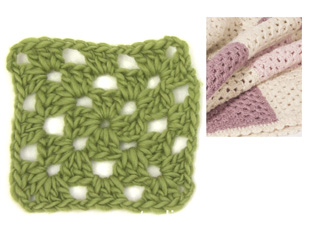
------------------------------------------------------- EXPLANATIONS FOR THE PATTERN: ------------------------------------------------------- PATTERN: See diagram A.1. COLOURS: CAST ON + ROUND 1: colour jeans blue ROUND 2: colour ice blue ROUND 3: colour off white ROUND 4: colour wheat ROUND 5: colour almond ROUND 6: colour brown ROUND 7: colour off white ROWS OF DOUBLE CROCHETS worked back and forth along 3 sides of the squares: colour off white COLOUR-CHANGE: Changing colours will be neatest if you work the last slip stitch on the round with the new colour. CHAIN STITCH: If you work outermost on the hook the chain stitch will often be too tight; 1 chain stitch should be as long as 1 double/treble/double-treble crochet is wide. ------------------------------------------------------- START THE PIECE HERE: ------------------------------------------------------- BAG - SHORT OVERVIEW OF THE PIECE: 2 similar squares are worked – see SQUARES below. An edge is worked on one square before the squares are crocheted together. Finally, a border is crocheted around the top of the bag and the strap is worked to finish. SQUARES: Work 4 chain stitches with hook size 5 mm and DROPS Paris colour jeans blue. Form them into a ring with 1 slip stitch in the first chain stitch worked. Work A.1 - read PATTERN, COLOURS and COLOUR-CHANGE. When A.1 is finished, cut and fasten the strands. Crochet another square the same way. Use colour off white and start in one of the corners on one of the squares and crochet like this: ROW 1: Join yarn with 1 slip stitch in the middle chain stitch of the corner, work 1 chain stitch (replaces the first double crochet) and work 1 double crochet in the next chain stitch in the corner (= 2 double crochets in the corner), then work 1 double crochet in each treble crochet and 1 double crochet in each chain stitch until you have crocheted double crochets along 3 sides of the bag, and finish with 1 double crochet in each of the first 2 chain stitches in the last corner. Turn piece. ROW 2: Work 1 chain stitch (replaces first double crochet), work 1 double crochet in each double crochet along the row. Turn piece. Repeat 2nd row until a total of 7 rows with double crochets has been worked, don't cut the yarn, squares are now crocheted together from the wrong side. Crochet 1 chain stitch to turn with. CROCHET TOGETHER Lay the squares together, right side to right side. Work now the squares together by crocheting the 3 sides with double crochets from the last square together with the first square. Working through both squares, crochet 1 double crochet in each double crochet/stitch. The squares are now crocheted each other. Cut and fasten the thread. Crochet now a round of treble crochets along the opening of bag as follows: TOP EDGE: Using colour off white and fasten the thread with 1 slip stitch around of the rows of double crochets on the top side of the bag. Crochet 3 chain stitches, then 1 treble crochet in each row of double crochets on the side of the bag, 1 treble crochet in each 1 treble crochet and in each chain stitch along the squares, continue in the round like this and finish with 1 slip stitch in the 3rd chain stitch at the beginning of the round. Cut and fasten the strand. The bag measures approx. 21 x 21 cm. STRAP: Using colour off white, work a cord of chain stitches approx. 110 cm. Cut the strand. Work 3 such cords. Tie the 3 cords together at one end and plait the cords tightly together = approx. 100 cm in length when finished. Tie a knot in the other end. Thread the plait through the treble crochets on each side of the bag and tie the ends of the plait together. |
||||||||||||||||||||||
Diagram explanations |
||||||||||||||||||||||
|
||||||||||||||||||||||

|
||||||||||||||||||||||
|
Have you made this or any other of our designs? Tag your pictures in social media with #dropsdesign so we can see them! Do you need help with this pattern?You'll find tutorial videos, a Comments/Questions area and more by visiting the pattern on garnstudio.com. © 1982-2024 DROPS Design A/S. We reserve all rights. This document, including all its sub-sections, has copyrights. Read more about what you can do with our patterns at the bottom of each pattern on our site. |
||||||||||||||||||||||


With over 40 years in knitting and crochet design, DROPS Design offers one of the most extensive collections of free patterns on the internet - translated to 17 languages. As of today we count 304 catalogues and 11422 patterns - 11422 of which are translated into English (UK/cm).
We work hard to bring you the best knitting and crochet have to offer, inspiration and advice as well as great quality yarns at incredible prices! Would you like to use our patterns for other than personal use? You can read what you are allowed to do in the Copyright text at the bottom of all our patterns. Happy crafting!
Comments / Questions (7)
Welche Größe (in cm) ist hat die Häkelnadel Nr. 5? Ich hab schon überall geguckt aber keine Größenangabe gefunden. LG
17.03.2024 - 13:53DROPS Design answered:
Liebe Neue, unsere Häkelnadel sind 15 cm lang (siehe hier z.B. und hier braucht man eine Häkelnadel 5 mm. Viel Spaß beim Häkeln!
18.03.2024 - 09:21Thank you for sharing this pattern. I basically already knew how to make this bag but wanted to see how you made the sides and strap. Thank you for making the directions free and easy to access. The yarn you have linked is beautiful and I will be placing an order.
17.02.2024 - 23:42Hei kjære Drops folk. Jeg er ferdig med crossbody-vesken, bare handtakene. Jeg skjønner ikke helt hvordan jeg skal feste dem til posen. Jeg forstår ikke den siste setningen i forklaringen. Hvilken side av posen skal jeg tre fletten gjennom? Masse biff? Da er ikke fletten min long nok? Pussstrenging, bind fletten sammen. Er ikke det alt for tykt? Du har sikkert all knyttet en knute i begge ender av fletten. Tusen takk for svar og et veldig fint mønster. Hilsen fra Belgia! Vera
30.07.2023 - 12:07Hej Jag undrar på kanten som ska virkas runt, stämmer det att det är på bara den ena rutan? Blir det inte svårt att virka ihop dem på ett snyggt sätt?
28.07.2023 - 10:22DROPS Design answered:
Hei Wibecke Når du skal hekle kanten på vesken er rutene allerede heklet sammen, les Sammenhekling. Kanten som skal hekles rundt er den på toppen av vesken / rundt åpningen, Den starter med 3 luftmasker om en av fasmaskeradene i siden av vesken. Deretter hekles det 1 stav om hver rad i siden av vesken og hekle 1 stav i hver stav og 1 stav i hver luftmaske langs rutene. Hekle slik omgangen rundt, og avslutt med 1 kjedemaske i den 3.luftmasken fra begynnelsen av omgangen. mvh DROPS Design
28.07.2023 - 13:49Moi kysyisin 3 kysymystä liittyen tohon laukuun. Kysymys 1: Voiko tohon käyttää 4 väriä (sellain ett siihen ruutuun tulee 2 kierrosta per väri). Kysymys 2: Voiko ne ruudut tehdä isompana esim. 8 kierrosta? Kysymys 3: Voiko sen hihnan tehdä tukevammaksi (sellain ett tekee sen ketjusilmukka ketjuun noita kiinteitä silmukoita ennenkun kiinnittää sen laukkuun)?
21.06.2023 - 14:00DROPS Design answered:
Hei, kyllä, voit virkata laukun 4 värillä (2 kerrosta per väri). Voit myös halutessasi tehdä ruudut isommiksi ja virkata niihin 8 kerrosta, tai enemmän. Halutessasi voit myös virkata hihnan ympäri yhden kerroksen kiinteitä silmukoita tai rapuvirkkausta.
22.06.2023 - 17:32Day trip
22.01.2023 - 09:41Santorini
17.01.2023 - 21:32