DROPS Flora
DROPS Flora
65% Wool, 35% Alpaca
from 3.30 $ /50g
DROPS Kid-Silk
DROPS Kid-Silk
75% Mohair, 25% Silk
from 6.75 $ /25g
Get the yarn to make this pattern from 40.20$.

The yarn cost is calculated from the pattern’s smallest size and the yarn’s cheapest product type. Looking for an even better price? You might find it on the DROPS Deals!

DROPS SS24

Swirling Sea

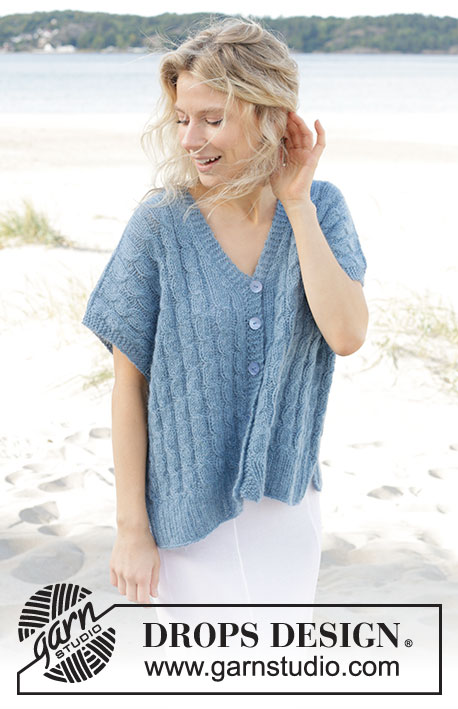
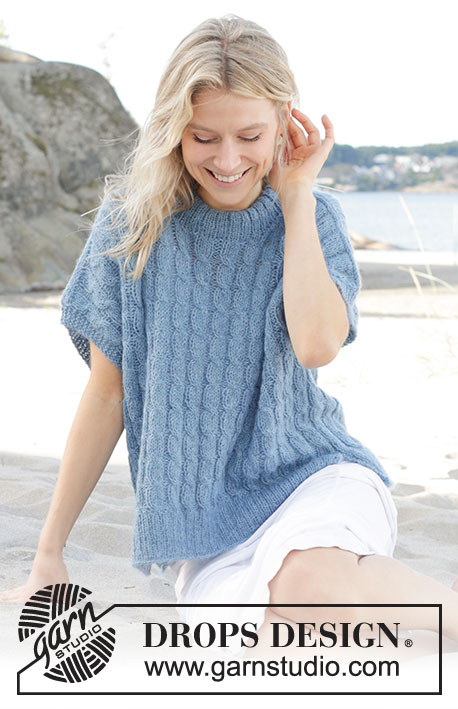
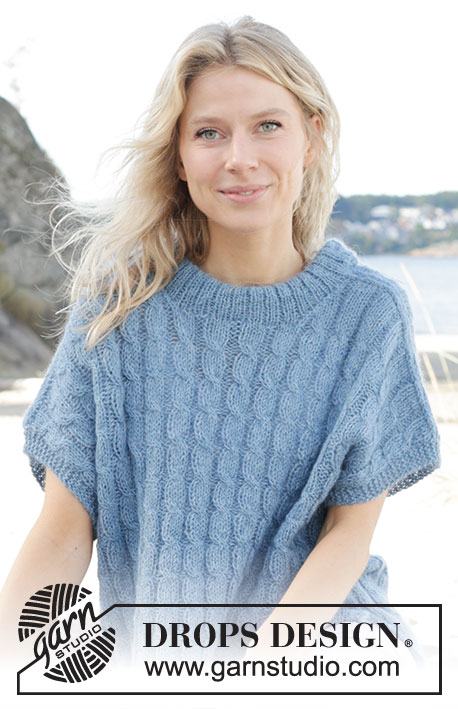
Knitted oversized vest in DROPS Flora and DROPS Kid-Silk. Piece is knitted bottom up with cables, double neck edge and vent in the side. Size XS – XXL.

DROPS 239-14
DROPS design: Pattern fl-081
Yarn group A + A or C
----------------------------------------------------------

SIZE:
XS - S - M - L - XL – XXL

Finished measurements:
Chest measurements: 100-112-112-126-138-138 cm = 39⅜"-44"-44"-49½"-54¼"-54¼"
Full length: 54-56-58-60-62-64 cm = 21¼"-22"-22¾"-23⅝"-24⅜"-25¼"
All measurements in charts are in cm.

YARN:
DROPS FLORA from Garnstudio (belongs to yarn group A)
200-200-250-250-300-300 g color 13, denim blue
And use:
DROPS KID-SILK from Garnstudio (belongs to yarn group A)
100-100-125-125-150-150 g color 08, light jeans blue

NEEDLES:
DROPS CIRCULAR NEEDLE SIZE 5 MM = US 8: Length: 80 cm = 32"
DROPS CIRCULAR NEEDLE SIZE 4 MM = US 6: Length 40 and 80 cm = 16" and 32".
DROPS CABLE NEEDLE.
The technique MAGIC LOOP can be used – you then only need circular needle of 80 cm = 32" in each size.

KNITTING GAUGE:
17 stitches in width and 22 rows vertically in stockinette stitch and 1 strand of each quality = 10 x 10 cm = 4" x 4".
19 stitches in width with cable pattern = 10 cm = 4".
NOTE! Remember that needle size is only a suggestion. If you have too many stitches on 10 cm = 4" switch to larger needles. If you have too few stitches on 10 cm = 4" switch to smaller needles.

-------------------------------------------------------

Alternative Yarn – See how to change yarns here
Yarn Groups A to F – Use the same pattern and change the yarn here
Yarn usage using an alternative yarn – Use our yarn converter here

-------------------------------------------------------

DROPS Flora
DROPS Flora
65% Wool, 35% Alpaca
from 3.30 $ /50g
DROPS Kid-Silk
DROPS Kid-Silk
75% Mohair, 25% Silk
from 6.75 $ /25g
Get the yarn to make this pattern from 40.20$.

The yarn cost is calculated from the pattern’s smallest size and the yarn’s cheapest product type. Looking for an even better price? You might find it on the DROPS Deals!

Pattern instructions

NOTE: This pattern is written in American English. All measurements in charts are in cm. For conversion from inches to cm - click here. There are different terms for crocheting in American and British English. If this pattern includes crochet, click for "crochet terms" here. For this pattern in British English, please click here.
----------------------------------------------------------

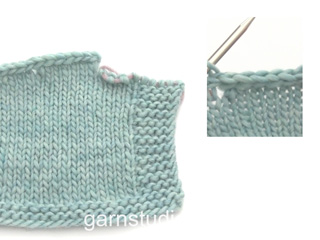
EXPLANATION FOR THE PATTERN:

----------------------------------------------------------

GARTER STITCH (back and forth):
Knit all rows.
1 ridge vertically = knit 2 rows.

PATTERN:
See diagram A.1.
Diagrams show all rows in pattern seen from the right side.

DECREASE TIP (applies to neck on front piece):
All decreases are done on a row from the right side!
DECREASE 1 STITCH AT THE BEGINNING OF ROW AS FOLLOWS: Work 1 stitch in garter stitch, slip 1 stitch knitwise, knit 1, pass slipped stitch over stitch worked
DECREASE 1 STITCH AT THE END OF ROW AS FOLLOWS: Work until 3 stitches remain, knit 2 together and 1 stitch in garter stitch.

KNITTING TOGETHER:
FROM RIGHT SIDE: Slip 1 stitch knitwise, knit 1, pass slipped stitch over stitch worked.
FROM WRONG SIDE: Purl 2 together.

STOCKINETTE STITCH:
When working from wrong side, purl and when working from right side, knit.

----------------------------------------------------------

START THE PIECE HERE:

----------------------------------------------------------

VEST – SHORT OVERVIEW OF PIECE:
Work from bottom up. Work front piece and back piece back and forth in parts. Work neck edge in the round at the end.

BACK PIECE:
Cast on 98-110-110-122-134-134 stitches on circular needle size 4 MM = US 6 with 1 strand DROPS Flora and 1 strand DROPS Kid-Silk. Purl 1 row from wrong side. Work rib, begin from right side as follows:
2 edge stitches in GARTER STITCH - read explanation above, * purl 1, knit 2 *, work from *-* until 3 stitches remain, purl 1 and 2 edge stitches in garter stitch. Continue rib like this until piece measures 8 cm = 3⅛". Switch to circular needle size 5 MM = US 8. Now work pattern as follows:
1 edge stitch in garter stitch, work A.1 16-18-18-20-22-22 times in total and 1 edge stitch in garter stitch.
Continue pattern like this. REMEMBER THE KNITTING GAUGE! When piece measures 31-32-33-34-35-36 cm = 12¼"-12½"-13"-13⅜"-13¾"-14¼", cast on 5 new stitches for sleeve edge at the end of the next 2 rows = 108-120-120-132-144-144 stitches. Work the new stitches in garter stitch until finished measurements.


When piece measures 49-51-53-55-57-59 cm = 19¼"-20"-21"-21⅝"-22½"-23¼", continue with knit over knit and purl over purl over pattern, i.e. the cables are done. When piece measures 50-52-54-56-58-60 cm = 19¾"-20½"-21¼"-22"-22¾"-23⅝", bind off the middle 20-22-22-24-24-26 stitches for neck (44-49-49-54-60-59 stitches remain on each shoulder) and finish each shoulder separately.
On next row from the side towards the neck bind off the 5 stitches in garter stitch.

On next row from the neck work as follows: Bind off 1 stitch for neck, work until 6-6-6-6-8-8 stitches remain, turn and work back. Work 6-6-6-6-8-8 stitches less on every row from the neck and bind off 1 stitch for neck on every row from the neck 4 times in total. On last row towards neck, cast on 2 new stitches at the end of row = 37-42-42-47-53-52 stitches.
Now work and bind off with an edge over shoulder stitches as follows:
Work stitches cast on with shoulder stitches as follows:
Work * 1 stitch in STOCKINETTE STITCH – read explanation above, work next stitch together with first/next stitch from shoulder – read KNITTING TOGETHER, pass the 2 stitches back on Hot pink they came from with strand on wrong side of piece, make sure not to tighten yarn too much *, work from *-* until all stitches from shoulder have been worked together with the 2 stitches that were cast on = 2 stitches remain. Bind off.
Work the other shoulder the same way.

FRONT PIECE:
Cast on and work as back piece until piece measures 46-48-48-50-50-52 cm = 18"-19"-19"-19¾"-19¾"-8¾" = 108-120-120-132-144-144 stitches. Now bind off the middle 18 stitches for neck (45-51-51-57-63-63 stitches remain on each shoulder) and finish each shoulder separately. Now decrease for neck and work diagonal shoulder, read both of the next sections before continuing.

NECK DECREASE:
Decrease 1 stitch for neck - remember DECREASE TIP, on every row from right side 5-6-6-7-7-8 times in total = 35-40-40-39-45-44 stitches.

DIAGONAL SHOULDER:
When piece measures 49-51-53-55-57-59 cm = 19¼"-20"-21"-21⅝"-22½"-23¼", continue with knit over knit and purl over purl, i.e. the cables are done.
When piece measures 50-52-54-56-58-60 cm = 19¾"-20½"-21¼"-22"-22¾"-23⅝", work diagonal shoulder as follows:
On next row from the side bind off the 5 stitches in garter stitch. On next row from the neck work as follows:
Work until 6-6-6-6-8-8 stitches remain, turn and work back. Work 6-6-6-6-8-8 stitches less on every turn from the neck. Work and turn like this on every row from the neck 4 times in total. On last row towards neck, cast on 2 new stitches at the end of row = 37-42-42-47-53-52 stitches.
Now work and bind off with an edge over shoulder stitches as follows:
Work stitches cast on with shoulder stitches as follows:
Work * 1 stitch in stockinette stitch, work next stitch together with first/next stitch from shoulder stitch - remember KNITTING TOGETHER, pass the 2 stitches back on the needle they came from with strand on wrong side of piece, make sure not to tighten yarn too much *, work from *-* until all stitches from shoulder have been worked together with the 2 stitches that were cast on = 2 stitches remain. Bind off.
Work the other shoulder the same way.

ASSEMBLY:
Sew shoulder seams inside 1 stitch. Sew side seams inside 1 edge stitch down until approx. 8 cm = 3⅛" remain (vent).

DOUBLE NECK EDGE:
Pick up 66 to 96 stitches around the neck on a short circular needle size 4 MM = US 6 with 1 strand of each quality. Number of stitches must be divisible 3.
Work rib (knit 2/purl 1) in the round over all stitches Bind off when rib measures approx. 12 cm = 4¾". Fold the rib down on inside of garment. Fasten rib to get a double neck edge. To avoid a tight neck edge that sticks out it is important to keep the seam elastic.

This pattern has been corrected.

Updated online: 19.09.2023
New measurement chart.
Updated online: 25.10.2023
Added info about knitting gauge in the cable pattern.

Diagram

All measurements in charts are in cm.

symbols = knit from the right side, purl from the wrong side
symbols = purl from the right side, knit from the wrong side
symbols = slip 2 stitches on cable needle in front of piece, knit 2, knit 2 from cable needle
diagram
diagram

Each of our patterns has specific tutorial videos to help you.

Do you have a question? See a list of frequently asked questions (FAQ)

Knitting tension is what determines the final measurements of your work, and is usually measured per 10 x 10 cm. It is provided like so: number of stitches in width x number of rows in height - eg: 19 stitches x 26 rows = 10 x 10 cm.

The knitting tension is very individual; some people knit/crochet loosely while others work tightly. You adjust the knitting tension with the needle size, which is why the suggested needle size only serve as a guide! You need to adjust this (up or down) to ensure that YOUR knitting tension matches the knitting tension provided in the pattern. If you work with a different knitting tension than provided you will have a different yarn consumption, and your work will have different measurements than what the pattern suggests.

The knitting tension also determines which yarns can replace each other. As long as you achieve the same knitting tension you can replace one yarn with another.

See DROPS lesson: How to measure your tension/gauge

See DROPS video: How to make a gauge tension swatch

The required amount of yarn is provided in grams, eg: 450 g. To calculate how many balls you’ll need you first need to know how many grams are in 1 ball (25g, 50g or 100g). This information is available if you click on the individual yarn quality on our pages. Divide the amount required with the amount of each ball. For example, if each ball is 50g (the most common amount), the calculation will be as follows: 450 / 50 = 9 balls.

The important thing when changing from one yarn to another is that the knitting/crochet tension remains the same. This is so that the measurements of the finished piece will be the same as on the sketch provided. It is easier to achieve the same knitting tension using yarns from the same yarn group. It is also possible to work with multiple strands of a thinner yarn to achieve the knitting tension of a thicker one. Please try our yarn converter. We recommend you to always work a test swatch.

Please NOTE: when changing yarn the garment might have a different look and feel to the garment in the photo, due to individual properties and qualities of each yarn.

See DROPS lesson: Can I use a different yarn than the one mentioned in the pattern?

All our yarns are categorised into yarn groups (from A to F) according to thickness and knitting tension – group A contains the thinnest yarns and group F the thickest. This makes it easier for you to find alternative yarns to our patterns, should you wish to switch yarn. All yarns within the same group have a similar knitting tension and can easily replace each other. However, different yarn qualities have different structures and properties which will give the finished work a unique look and feel.

Click here for an overview of the yarns in each yarn group

At the top of all our patterns you’ll find a link to our yarn converter, which is a helpful tool should you wish to use a different yarn than suggested. By filling in the yarn quality you wish to replace, the amount (in your size) and number of strands, the converter will present good alternative yarns with the same knitting tension. Additionally it will tell you how much you’ll require in the new qualities and whether you’ll need to work with multiple strands. Most skeins are 50g (some are 25g or 100g).

If the pattern is worked with multiple colours, every colour will have to be converted separately. Similarly, if the pattern is worked with several strands of different yarns (for example 1 strand Alpaca and 1 strand Kid-Silk) you will have to find alternatives for each, individually.

Click here to see our yarn converter

Since different yarns have different qualities and textures we have chosen to keep the original yarn in our patterns. However, you can easily find options among our available qualities by using our yarn converter, or simply pick a yarn from the same yarn group.

It is possible that some retailers still have discontinued yarns in stock, or that someone has a few skeins at home that they would like to find patterns for.

The yarn converter will provide both alternative yarn as well as required amount in the new quality.

If you think it's hard to decide what size to make, it can be a good idea to measure a garment you own already and like the size of. Then you can pick the size by comparing those measures with the ones available in the pattern's size chart.

You'll find the size chart at the bottom of the pattern.

See DROPS lesson: How to read size chart

The needle size provided in the pattern serves only as a guide, the important thing is to follow the knitting tension. And since knitting tension is very individual, you will have to adjust the needle size to ensure that YOUR tension is the same as in the pattern – maybe you’ll have to adjust 1, or even 2 needle sizes, up or down to achieve the correct tension. For this, we recommend that you work test swatches.

Should you work with a different knitting tension than the one provided, the measurements of the finished garment might deviate from the measurement sketch.

See DROPS lesson: How to measure your tension/gauge

See DROPS video: How to make a gauge tension swatch

Working a garment top-down provides more flexibility and room for personal adjustment. For example it is easier to try the garment on while working, as well as making adjustments to length of yoke and shoulder caps.

The instructions are carefully explaining every step, in the correct order. Diagrams are adjusted to the knitting direction and are worked as usual.

The diagram depicts all rows/rounds, and every stitch seen from the right side. It is read from bottom to top, from right to left. 1 square = 1 stitch.

When working back and forth, every other row is worked from the right side and every other row is worked from the wrong side. When working from the wrong side, the diagram will have to be worked reversed: from left to right, knit stitches are purled, purl stitches are knit etc.

When working in the round every round is worked from the right side and the diagram are worked from right to left on all rounds.

See DROPS lesson: How to read knitting diagrams

The diagram depicts all rows/rounds, and every stitch seen from the right side. It is worked from bottom to top, from right to left.

When working back and forth every other row is worked from the right side: from right to left and every other row is worked from the wrong side: from left to right.

When working in the round, every row in the diagram are worked from the right side, from right to left.

When working a circular diagram you start in the middle and work your way outwards, counter clockwise, row by row.

The rows usually start with a given number of chain stitches (equivalent to the height of the following stitch), this will either be depicted in the diagram or explained in the pattern.

See DROPS lesson: How to read crochet diagrams

Instructions for working several diagrams after each other on the same row/round, will often be written like so: “work A.1, A.2, A.3 a total of 0-0-2-3-4 times". This means you work A.1 once, then A.2 is worked once, and A.3 is repeated (in width) the number of times provided for your size – in this case like so: S = 0 times, M = 0 times, L=2 times, XL= 3 times and XXL = 4 times.

The diagrams are worked as usual: begin with the first row in A.1, then work the first row in A.2 etc.

See DROPS lesson: How to read knitting diagrams

See DROPS lesson: How to read crochet diagrams

The total width of the garment (from wrist-to-wrist) will be larger in the larger sizes, despite the actual sleeves being shorter. The larger sizes have longer sleeve caps and wider shoulders, so there will be a good fit in all sizes.

The measurement sketch/schematic drawing provides information regarding the full length of the garment. If it’s a jumper or a jacket the length is measured from the highest point on the shoulder (usually closest to the neckline), and straight down to the bottom of the garment. It is NOT measured from the tip of shoulder. Similarly, the length of yoke is measured from the highest point on the shoulder and down to where yoke is split into body and sleeves.

See DROPS lesson: How to read a schematic drawing

Diagrams are often repeated on the round or in height. 1 repeat is the diagram the way it appears in the pattern. If it says to work 5 repeats of A.1 in the round, then you work A.1 a total of 5 times after/next to each other in the round. If it says to work 2 repeats of A.1 vertically/in height you work the entire diagram once, then begin again at the start and work the entire diagram one more time.

Chain stitches are slightly narrower than other stitches and to avoid working the cast-on edge too tight, we simply chain more stitches to begin with. The stitch count will be adjusted on the following row to fit the pattern and measurement sketch.

The rib edge is more elastic and will contract slightly compared to, for example, stocking stitch. By increasing before the rib edge, you avoid a visible difference in width between the rib edge and the rest of the body.

It’s very easy to cast off too tightly, and by making yarn overs while casting off (and simultaneously casting these off) you avoid a too tight cast off edge.

See DROPS video: How to bind off with yarn overs (yo)

To achieve an even increase (or decrease) you can increase on, for example: every 3rd and 4th row alternately, like so: work 2 rows and increase on the 3rd row, work 3 rows and increase on the 4th. Repeat this until the increase is complete.

See DROPS lesson: Increase or decrease 1 st on every 3rd and 4th row alternately

Should you prefer to work in the round instead of back and forth, you may of course adjust the pattern. You’ll need to add steeks mid-front (usually 5 stitches), and follow the instructions. When you would normally turn and work from the wrong side, simply work across the steek and continue in the round. At the end you’ll cut the piece open, pick up stitches to work bands, and cover the cut edges.

See DROPS video: How to knit steeks and cut open

Should you prefer to work back and forth instead of in the round, you may of course adjust the pattern so you work the pieces separately and then assemble them at the end. Divide the stitches for the body in 2, add 1 edge stitch in each side (for sewing) and work the front and back pieces separately.

See DROPS lesson: Can I adapt a pattern for circular needles into straight needles?

Pattern repeats can vary slightly in the different sizes, in order to get the correct proportions. If you’re not working the exact same size as the garment in the photo, yours might deviate slightly. This has been carefully developed and adjusted so that the complete impression of the garment is the same in all sizes.

Make sure to follow instructions and diagrams for your size!

If you have found a pattern you like which is available in women’s size it’s not very difficult to convert it to men’s size. The biggest difference will be the length of sleeves and body. Start working on the women size that you think would fit across the chest. The additional length will be worked right before you cast off for the armhole/sleeve cap. If the pattern is worked top-down you can add the length right after the armhole or before the first decrease on sleeve.

Regarding additional yarn amount, this will depend on how much length you add, but it is better with a skein too many than too few.

All yarns will have excess fibres (from production) that might come off as lint or shedding. Brushed yarns (ie hairier yarns) have more of these loose, excess fibres, causing more shedding.

Shedding also depends on what is worn under or over the garment, and whether this pulls at the yarn fibres. It’s therefore not possible to guarantee that there will be no shedding

Below are some tips on how to get the best result when working with hairier yarns:

1. When the garment is finished (before you wash it) shake it vigorously so the looser hairs come off. NOTE: do NOT use a lint roller, brush or any method that pulls at the yarn.

2. Place the garment in a plastic bag and put it in your freezer - the temperature will cause the fibres to become less attached to each other, and excess fibres will come off easier.

3. Leave in the freezer for a few hours before taking it out and shaking it again.

4. Wash the garment according to the instructions on the yarn label.

Pilling is a natural process that happens to even the most exclusive of fibers. It's a natural sign of wear and tear that is hard to avoid, and that is most visible in high friction areas of your garment like a sweater's arms and cuffs.

You can make your garment look as new by removing the pilling, using a fabric comb or a pill/lint remover.

Still can't find the answer you need? Then scroll down and leave your question so one of our experts can try to help you. This will be done normally within 5 to 10 working days.
In the meantime, you can read the questions and answers that others have left to this pattern or join the DROPS Workshop on Facebook to get help from fellow knitters/crocheters!

You might also like...

Post a comment to pattern DROPS 239-14

We would love to hear what you have to say about this pattern!

If you want to leave a question, please make sure you select the correct category in the form below, to speed up the answering process. Required fields are marked *.

Comments / Questions (26)

country flag Camilla wrote:

När jag maskat av axlarna i icord, hur ska jag sy ihop dem för att det ska bli snyggt? Vilken teknik? Jag får inte till det.

02.11.2023 - 16:36

DROPS Design answered:

Hei Camilla. Vi har dessverre ingen video på hvordan sy to avfellingskanter i icord sammen, men takk for ditt innspill. Vi legger det på vår video-ønske-lista. I mellom tiden ta en titt på: Hvordan montere med mattrass søm eller Hvordan montere med usynlig maskesting . mvh DROPS Design

06.11.2023 - 13:35

country flag Camilla wrote:

Jag försöker maska av axeln enligt beskrivning. Första axeln, den högra, blir bra men den vänstra förstår jag inte hur den ska göras. Den kommer ju avmaskas från avigan om de två upplagda maskorna ska läggas upp mot halsen. Och det står att man ska sticka i slätstickning och med hoptagning från avigsidan enligt beskrivning ovan blir resultatet inte alls likadant som den högra axeln. Vad gör jag för fel?

21.10.2023 - 14:42

DROPS Design answered:

Hej Camilla, du strikker ret over ret og vrang over vrang (som du har gjort hele vejen), du strikker vendepindene fra halssiden så du får flere pinde nærmere halsen og færre mod ærmegabet :)

24.10.2023 - 09:03

country flag Lüscher Iris wrote:

Bonjour, je suis en train de faire mon échantillon et je remarque que je vais devoir tricoter en 6 au lieu de 4 pour avoir les 17mailles= 10cm. Comme c’était recommandé de tricoter en 4mm et 5mm, je dois faire 6 à la place de 4 je fais 7 à la place de 5? Merci

08.10.2023 - 15:56

DROPS Design answered:

Bonjour Mme Lüscher, si vous avez l'échantillon avec des aiguilles 6, utilisez des aiguilles 5 pour les côtes (au lieu des 4). Bon tricot!

09.10.2023 - 09:06

country flag Britt wrote:

När jag ska göra halsen för framstyckets förstår jag inte. Efter 48 cm ska jag maska av 18 maskor i mitten för hals o sen sticka var sida för sig. Ok fattar Men när ska jag börja minskningen av övriga 6 maskor vid halsen? Direkt eller efter 54 cm som på bakstycket? Blev konstigt när jag gjorde som jag trodde o nu sitter jag fast här. Tycker det är otydligt i mönstret o skulle behöva ett förtydligande. Tack på förhand!

20.09.2023 - 17:22

DROPS Design answered:

Hej Britt, Du börjar minskningen mod halsen direkt. Og til skrå skulder som på bagstykket (så de bliver lige lange)

26.09.2023 - 15:12

country flag Mina K wrote:

"På siste pinne mot halsen legges det opp 2 nye masker på slutten av pinnen = 37-42-42-47-53-52 masker" Betyr det at disse to maskene skal være på halssiden eller skuldersiden?

29.08.2023 - 09:12

DROPS Design answered:

Hej Mina, det er mod halsen :)

13.09.2023 - 15:22

country flag Tricoteuse wrote:

Bonjour, je ne comprends pas pourquoi les 2 plus grandes tailles (XL et XXL) sont identiques (même nombre de mailles, mêmes mensurations) sauf pour les mesures tout en haut du graphique où ce sont les tailles L et XL qui sont identiques?

29.07.2023 - 20:50

DROPS Design answered:

Bonjour Tricoteuse, merci pour votre retour et désolée pour le retard, un nouveau schéma va être publié pour remplacer celui-ci; Bon tricot!

18.09.2023 - 15:34

country flag Susana Araujo wrote:

While making front piece and casting off 18 stitched for the neck we have 51 stitches in each shoulder. After having decreased 6 times for the neck we should have 45 in the needle and not 40 but pattern says 40?? Should I keep decreasing until 40 or move on to diagonal shoulder?

28.05.2023 - 17:50

DROPS Design answered:

Dear Susana, you have to work the neck and diagonal shoulder at the same time. You will have short rows, for the diagonal shoulder and the decreases for the neck at the same time. After finishing the decreases for the neck and finishing the diagonal shoulder decreases, you should have 40 stitches; then you cast on 2 stitches and you will have the 42 stitches needed for casting off with an edge over the shoulder stitches. Happy knitting!

28.05.2023 - 19:45

country flag Christina wrote:

Den ser rigtig sød ud, men er Alpaca ikke for varmt til sommertøj? Jeg kender ikke garnet endnu ;-)

02.05.2023 - 19:37

DROPS Design answered:

Hej Christina, den er perfekt til en god dansk sommeraften :)

03.05.2023 - 07:50

country flag Susana Araujo wrote:

DIAGONAL SHOULDER: When piece measures 49-51-53-55-57-59 cm, continue with knit over knit and purl over purl, i.e. the cables are done. When piece measures 50-52-54-56-58-60 cm, work diagonal shoulder as follows: On next row from the (????) side cast off the 5 stitches in garter stitch Q: What side should this be??

30.04.2023 - 14:26

DROPS Design answered:

Dear Susana, it's not referring to the right and wrong sides, but rather to a row that starts from the side of the piece, where the shoulders/sleeves are (as opposed to the center of the front piece, where the neck is). Happy knitting!

30.04.2023 - 20:25

country flag Susana Araujo wrote:

"Work * 1 stitch in STOCKING STITCH – read explanation above, work next stitch together with first/next stitch from shoulder – read KNITTING TOGETHER, pass the 2 stitches back on Hot pink they came from with strand on wrong side of piece, make sure not to tighten yarn too much " Q: What is a Hot pink???

30.04.2023 - 14:09

DROPS Design answered:

Dear Susana, there seems to be a typo in the pattern, we will correct it as soon as possible. The right words are: "back on the needle they came from". Happy knitting!

30.04.2023 - 20:19