
Popular categories
Looking for a yarn?


|
|||||||||||||||||||||||||||||||||||||
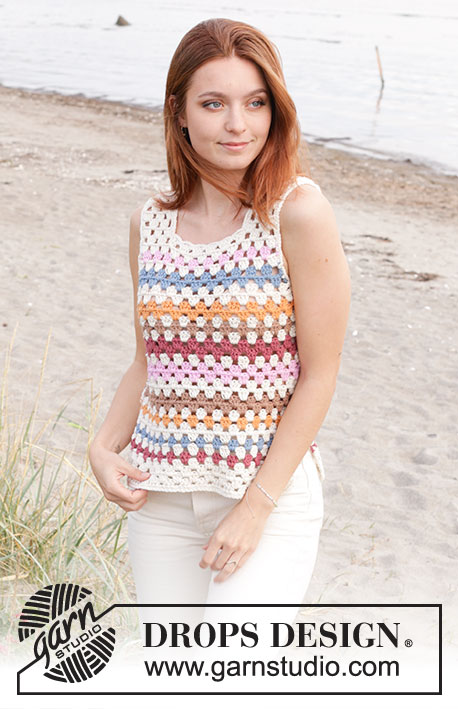
Beach Glass Top |
|||||||||||||||||||||||||||||||||||||
 |
 |
||||||||||||||||||||||||||||||||||||
Crocheted top in DROPS Paris. Piece is crocheted from bottom up with stripes and vents in the sides. Size XS – XXL.
DROPS 240-9 |
|||||||||||||||||||||||||||||||||||||
|
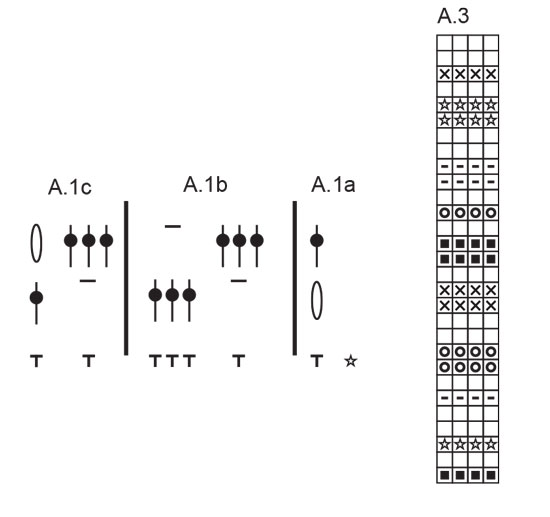
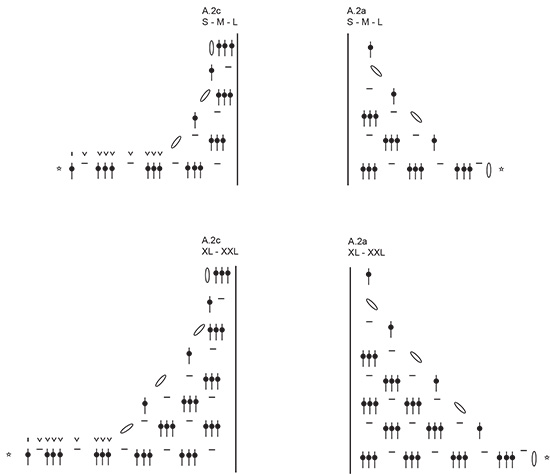
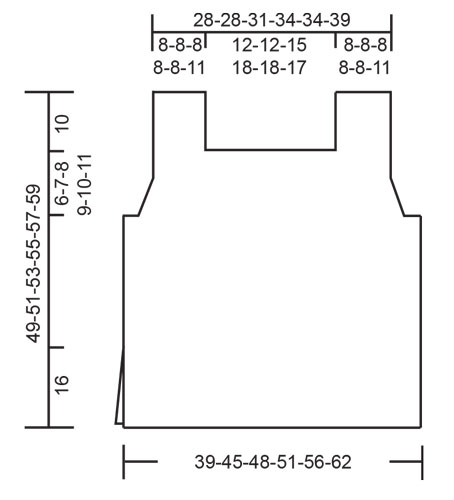
---------------------------------------------------------- EXPLANATION FOR THE PATTERN: ---------------------------------------------------------- CHAIN STITCHES: If you work at the end of crochet hook the chain stitch will often be too tight. 1 chain stitch should be just as long as 1 double crochet/treble crochet is wide. PATTERN: See diagrams A.1 and A.2. Diagrams show all rows in pattern seen from the right side. A.1 shows pattern with treble crochet groups. A.2 shows decreases for armhole. Choose diagram for your size. STRIPES: See diagram A.3. 1 row in A.3 = 1 row in A.1/A.2. Work A.3 until piece measures approx. 37-39-41-41-43-45 cm, then continue with colour off white until finished measurements. Cut the yarn at the end of row when needed to work alternately 1 row from right side and 1 row from wrong side CROCHET INFORMATION: Begin every row with treble crochets with 3 chain stitches. Finish row with 1 treble crochet in 3rd chain stitch from beginning of previous row – NB: make sure that the yarn ends are long enough at every colour change so that yarn ends can be used to sew with when the garment is assembled. ---------------------------------------------------------- START THE PIECE HERE: ---------------------------------------------------------- TOP - SHORT OVERVIEW OF THE PIECE: Work front piece and back piece back and forth, bottom up. Sew piece together in the sides and on shoulders. BACK PIECE: Work 56-64-68-72-80-88 CHAIN STITCHES - read explanation above, on hook size 5 mm with colour off white in DROPS Paris. Turn piece, work 1 double crochet in 2nd chain stitch from hook, then work 1 double crochet in every chain stitch = 55-63-67-71-79-87 double crochets (this row is from wrong side). Work next row as follows from right side: Work A.1a in first double crochet, work A.1b 13-15-16-17-19-21 times in total, work A.1c in the last 2 double crochets. Continue pattern back and forth like this. REMEMBER THE CROCHET TENSION! When 4-4-4-5-6-6 rows with treble crochet groups in colour off white have been worked, work STRIPES - read explanation above (continue treble crochet groups as before). When piece measures approx. 33-34-35-36-37-38 cm and next row is worked from wrong side, cast off for armholes as follows – NB: Start with 2nd row in the diagrams: Work A.2c, continue A.1b until 2-3-3-3-4-4 treble crochet groups remain on row, work A.2a over the last stitches. Then work as explained below. SIZE XS: Continue decrease back and forth like this until the last 2 rows in A.2 remain. Switch to colour off white and work the last 2 rows in A.2, piece measures approx. 39 cm and 2 treble crochet groups have been decreased in each side for armhole. Fasten off. SIZE S - M - L - XL - XXL: Continue decrease back and forth like this. AT THE SAME TIME when piece measures 39-41-41-43-45 cm, finish stripes and continue to work with colour off white until finished measurements. When A.2 has been worked vertically, piece measures approx. 40-41-42-45-46 cm and 3-3-3-4-4 treble crochet groups have been decreased in each side for armholes. Continue back and forth with treble crochet groups as before, i.e. work next row as follows from right side: Work A.1a in first stitch, work A.1b 9-10-11-11-13 times in total, work A.1c over the last stitches. Work until piece measures 41-43-43-45-49 cm. Fasten off. FRONT PIECE: Work the same way as on back. When front piece has been worked the same way as back piece, piece measures approx. 39-41-43-45-47-49 cm. Do not fasten the yarns. Now work STRAP in each side as explained below: STRAP: Begin from the side and work as follows: IF THE ROW BEGINS FROM RIGHT SIDE: Work A.1a, work A.1b 2-2-2-2-2-3 times in total, work A.1c. IF THE ROW BEGINS FROM WRONG SIDE: Work A.1c, work A.1b 2-2-2-2-2-3 times in total, work A.1a. Continue pattern back and forth like this until strap measures approx. 20 cm in all sizes (strap should be placed over the shoulder and sewn to back piece - try the top on and adjust the length of strap). Fasten off. Work a similar strap in the other side. ASSEMBLY: Sew straps to back piece at the edge in each side. Sew side seams - sew top down edge to edge, and sew with the colour of every stripe. Finish the seam when approx. 14 cm remain at the bottom in each side (vents). EDGE AROUND NECK: Begin mid on top of one shoulder, and work on hook size 5 mm with colour off white as follows: 1 double crochet around first treble crochet, * 4 chain stitches, skip 1 treble crochet/treble crochet group (approx. 2 cm), 1 double crochet around next treble crochet/chain stitch *, work from *-* along the straps and around the neck, and finish round with 4 chain stitches and 1 slip stitch in first double crochet. Cut and fasten the yarn. EDGE AROUND ARMHOLES: Begin the side under sleeve, and work on hook size 5 mm with colour off white as follows: 1 double crochet in side seam, * 4 chain stitches, skip approx. 2 cm), 1 double crochet around next treble crochet/chain stitch *, work from *-* around the entire armhole, and finish round with 4 chain stitches and 1 slip stitch in first double crochet. Cut and fasten the yarn. |
|||||||||||||||||||||||||||||||||||||
Diagram explanations |
|||||||||||||||||||||||||||||||||||||
|
|||||||||||||||||||||||||||||||||||||
|
|||||||||||||||||||||||||||||||||||||

|
|||||||||||||||||||||||||||||||||||||
|
|||||||||||||||||||||||||||||||||||||
|
|||||||||||||||||||||||||||||||||||||
|
Have you made this or any other of our designs? Tag your pictures in social media with #dropsdesign so we can see them! Do you need help with this pattern?You'll find tutorial videos, a Comments/Questions area and more by visiting the pattern on garnstudio.com. © 1982-2024 DROPS Design A/S. We reserve all rights. This document, including all its sub-sections, has copyrights. Read more about what you can do with our patterns at the bottom of each pattern on our site. |
|||||||||||||||||||||||||||||||||||||


With over 40 years in knitting and crochet design, DROPS Design offers one of the most extensive collections of free patterns on the internet - translated to 17 languages. As of today we count 304 catalogues and 11422 patterns - 11422 of which are translated into English (UK/cm).
We work hard to bring you the best knitting and crochet have to offer, inspiration and advice as well as great quality yarns at incredible prices! Would you like to use our patterns for other than personal use? You can read what you are allowed to do in the Copyright text at the bottom of all our patterns. Happy crafting!
Comments / Questions (12)
Hej igen, Tack för uppdaterat diagram. Stämmer det alltså att jag inte ska virka några smygmaskor på ena sidan, dvs A.2a? Allt väl :)
05.04.2024 - 12:48DROPS Design answered:
Hei Heléne. Ja, det stemmer :) mvh DROPS Design
15.04.2024 - 07:41Hej, likt flera andra förstår jag inte A.2c och A.2a. Om det ska bli jämt måste jag börja (A.2a) och sluta (A.2c) samma varv (2:a varvet) med smygmaskor. Hur gör jag då med varv 3, fäster jag och börjar om med ny tråd/garn efter smygmaskorna? Förstår inte? Tacksam för hjälp :)
31.03.2024 - 14:46DROPS Design answered:
Hej Helene, diagram A.2 er nu opdateret :)
05.04.2024 - 12:10You have lovely patterns and some one is selling many on ebay co uk ( perhaps the original designer? ) this pattern is listed as Item number 385584358366 Seller lithiumsmummy
12.09.2023 - 01:41DROPS Design answered:
Dear Patricia, thanks for noticing, please help us reporting the sale of our patterns to Ebay. Thank you.
12.09.2023 - 09:27Hi, Many thanks for your reply! I have worked mine, and they do look different & it's why I asked the question. One side has 7 stitches bound off as a lead in, the other side has only 4 stitches bound off as a lead in (on size 'M')? That's where my both sides don't match??? What am I doing wrong?!
30.07.2023 - 10:27DROPS Design answered:
Dear Jay, yes, they each look different, but since as you join this piece with the front piece both of them will complement each other, making an armhole with 11 stitches on each side. So just continue as usual. Happy crochetting!
31.07.2023 - 18:48Hi, I'm really confused with the armhole shaping and am stuck! Why is the armhole shaping different on the lefthand and righthand side - the shaping (as per the diagram A.2c & A.2a) are different shapes both sides? I must be missing something, but can't work out what??? HELP would be much appreciated as I'm at a standstill! Thanks in advance.
28.07.2023 - 13:56DROPS Design answered:
Dear Jay, the shaping is not different, A.2a simply includes some of the A.1b repeats so it seems bigger. Meanwhile A.2c only has the stitches to bind-off so it seems smaller. The armholes, once worked, will look the same, don't worry about it. Happy crochetting!
29.07.2023 - 17:02Vychází mi jedna strana vyšší než druhá. Návodu nerozumím. Když vlevo háčkuju krátké sloupky (A2c a A2a) a ve stejné řadě na konci háčkuju dlouhé sloupky, nemůžu mít obě strany stejně vysoké. Prosím o vysvětlení. Dekuji
08.07.2023 - 21:01Moi kysyisin tälläistä ett voiko ton topin tehdä jämä-langoista, joita on jäänyt edellisistä virkkuu töistä? Kun multa löytyy sellainen iso kerä, johon oon kerinnyt jämä Paris langat yhteen niin ajattelin kysyä tälläistä ett voiko ton topin L-kokoiseksi käyttäen sitä lankakerää, koska tulisi käytettyä ne jämä langat johonkin.
20.06.2023 - 17:25DROPS Design answered:
Voit tehdä topin jäännöslangoista, kunhan sinulla on riittävästi lankaa. Toppiin menee n. 450-500 grammaa lankaa, kun teet sen L-kokoiseksi.
20.06.2023 - 18:36How much yarn would I need use if I only used one colour. For an xs and s.
26.05.2023 - 15:54DROPS Design answered:
Dear Jillian, for sizes XS/S you would need approx. 250-300gr of one colour. Happy crocheting!
28.05.2023 - 17:00Now I get it!Thanks
20.04.2023 - 13:49My Question is ,is the pattern right if i work two different armholes on the Back part A2c and A2a are differently shaped they are armholes right?
19.04.2023 - 08:41DROPS Design answered:
Dear Mrs Vranic, armholes will be right when working A.2a on one side and A.2c on the other side, both diagrams are decreasing the same number of stitches on each side but due to the pattern, they are worked a different way at the beginning and at the end of the row. Happy crocheting!
19.04.2023 - 10:48