
Popular categories
Looking for a yarn?


|
|||||||
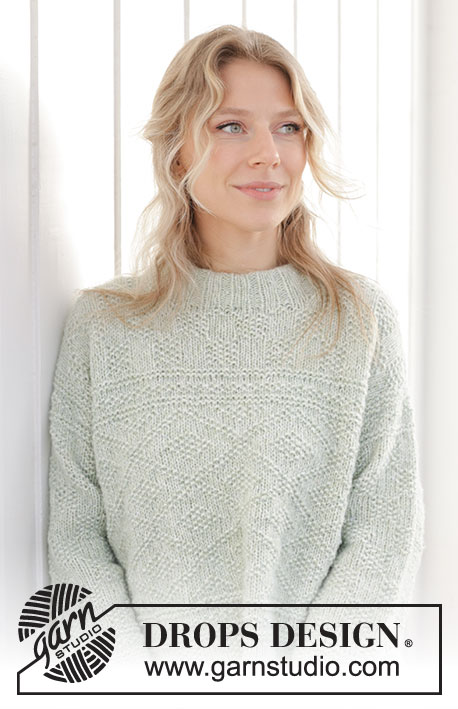
Mint Dream Sweater |
|||||||
 |
 |
||||||
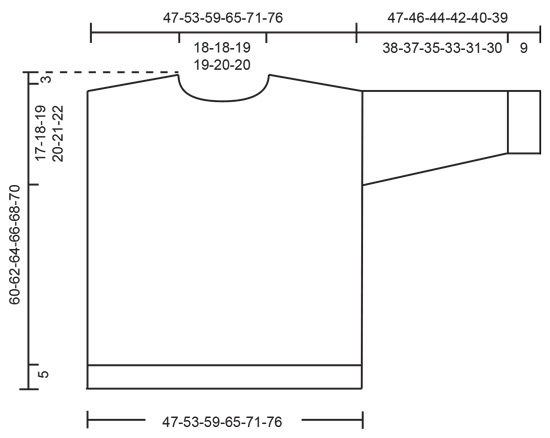
Knitted sweater in DROPS Air. The piece is worked bottom up with relief-pattern, diagonal shoulders and double neck. Sizes XS - XXXL.
DROPS 241-36 |
|||||||
|
------------------------------------------------------- EXPLANATIONS FOR THE PATTERN: ------------------------------------------------------- MOSS STITCH (in the round): Round 1: * Knit 1, purl 1 *, work from *-*. Round 2: Knit over purl and purl over knit. Repeat round 2 onwards. PATTERN: See diagrams A.1 to A.4. The diagrams show all rows in the pattern from the right side. DECREASE TIP-1: All decreases are worked from the right side. At the beginning of a row from the neck: Knit 2, slip 1 stitch as if to knit, knit 1 and pass the slipped stitch over. At the end of a row towards the neck: Work until there are 4 stitches left, knit 2 together, knit 2. DECREASE TIP-2 (for sleeves): Decrease 1 stitch on either side of the marker-stitch as follows: Work until there are 2 stitches left before the marker-stitch, knit 2 together, knit 1 (marker-stitch), slip 1 stitch as if to knit, knit 1 and pass the slipped stitch over the knitted stitch. ------------------------------------------------------- START THE PIECE HERE: ------------------------------------------------------- SWEATER – SHORT OVERVIEW OF THE PIECE: The body is worked in the round, bottom up as far as the armholes. The piece is then divided and the back and front pieces finished separately, back and forth. The sleeves are worked in the round with short circular needle/double pointed needles. The neck is worked to finish. BODY: Cast on 180-204-222-246-270-288 stitches with DROPS Air and circular needle size 4 MM = US 6. Work rib in the round (knit 3 / 3 MOSS STITCHES – read description above) for 5 cm = 2". Knit 1 round and decrease 20-24-22-26-30-28 stitches evenly spaced = 160-180-200-220-240-260 stitches. Change to circular needle size 5 MM = US 8. Work diagram A.1. When A.1 is finished work A.2, which is then repeated in height. REMEMBER THE KNITTING GAUGE! When the body measures 40-41-42-43-44-45 cm = 15¾"-16⅛"-16½"-17"-17¼"-17¾", divide for the armholes. Place 80-90-100-110-120-130 stitches on a thread for the front piece – adjust so the middle of the front piece is the middle of a repeat of A.2 in width. There are 80-90-100-110-120-130 stitches left on the needle for the back piece. BACK PIECE: Continue A.2 until the piece measures 43-43-43-48-48-48 cm = 17"-17"-17"-19"-19"-19" (or to desired height, finishing after a half or complete repeat in height). Work A.3. When A.3 is finished repeat A.4 to finished length. When the piece measures 57-59-61-63-65-67 cm = 22½"-23¼"-24"-24¾"-25½"-26⅜" work the diagonal shoulders at the same time as binding off for the neck. Read the next 2 paragraphs before continuing! DIAGONAL SHOULDERS: When the piece measures 57-59-61-63-65-67 cm = 22½"-23¼"-24"-24¾"-25½"-26⅜", place stitches on a thread on each row from the side, working them first to avoid having to cut the strand. Place 6-7-8-9-10-12 stitches on the thread 3 times. NECK: When the piece measures 58-60-62-64-66-68 cm = 22¾"-23⅝"-24⅜"-25¼"-26"-26¾" bind off the middle 28-28-30-30-32-32 stitches for the neck and finish each shoulder separately. On the next row from the neck bind off 1 stitch. When the diagonal shoulders and binding off for the neck are finished, there are 7-9-10-12-13-12 stitches left. Place all the shoulder stitches (from the thread) back on the needle and knit all 25-30-34-39-43-48 stitches – knitting up 1 stitch and knitting it together with the next stitch in each transition to avoid holes. Knit 1 row. Bind off with knit. The piece measures approx. 60-62-64-66-68-70 cm = 23⅝"-24⅜"-25¼"-26"-26¾"-27½" measured closest to the neck. Work the other shoulder in the same way. FRONT PIECE: Place the 80-90-100-110-120-130 front piece stitches back on circular needle size 5 MM = US 8. Continue A.2 until the piece measures 43-46-43-48-48-48 cm = 17"-18"-17"-19"-19"-19" – matching the back piece. Work A.3. When A.3 is finished repeat A.4 to finished length. When the piece measures 52-54-55-57-58-60 cm = 20½"-21¼"-21⅝"-22½"-22¾"-23⅝", place the middle 20-20-22-22-24-24 stitches on a thread for the neck and finish each shoulder separately. On the next row from the right side decrease for the neck - read DECREASE TIP-1. Decrease on each row from the right side a total of 5 times. When the piece measures 57-59-61-63-65-67 cm = 22½"-23¼"-24"-24¾"-25½"-26⅜", work the diagonal shoulder. DIAGONAL SHOULDER: When the piece measures 57-59-61-63-65-67 cm = 22½"-23¼"-24"-24¾"-25½"-26⅜", place stitches on a thread on each row from the side, working them first to avoid having to cut the strand. Place 6-7-8-9-10-12 stitches on the thread 3 times. Place the shoulder stitches back on the needle and knit all 25-30-34-39-43-48 stitches – knitting up 1 stitch and knitting it together with the next stitch in each transition to avoid holes. Knit 1 row. Bind off with knit. Work the other shoulder in the same way. The piece measures approx. 60-62-64-66-68-70 cm = 23⅝"-24⅜"-25¼"-26"-26¾"-27½" measured closest to the neck. ASSEMBLY: Sew the shoulder seams inside the bind-off edge. SLEEVES: Knit up 57-61-65-69-71-75 stitches with short circular needle size 5 MM = US 8, inside 1 stitch around the armhole (stitch-number must be divisible by 2 + 1). Work in the round according to diagram A.3 with 1 stockinette stitch mid-under the sleeve (insert a marker-thread in this stitch). NOTE! On the last round in A.3 decrease 1-0-4-3-0-4 stitches evenly spaced = 56-61-61-66-71-71 stitches. When A.3 is finished, repeat A.4 to finished length (marker-stitch worked in stockinette stitch as before). When the sleeve measures 6 cm = 2⅜", decrease under the sleeve - read DECREASE TIP-2. Repeat this decrease every 9-5-6-3½-3-3 cm = 3½"-2"-2⅜"-1¼"-1⅛"-1⅛" a total of 4-6-5-7-7-7 times = 48-49-51-52-57-57 stitches. Work until the sleeve measures 33-32-30-28-26-25 cm = 13"-12½"-11¾"-11"-10¼"-9¾"; there is 14 cm = 5½" left to finished length. Work A.3 (marker-stitch worked in stockinette stitch as before) and increase 6-5-3-8-3-3 stitches evenly spaced on the last round = 54-54-54-60-60-60 stitches. Change to double pointed needles size 4 MM = US 6. Work rib (knit 3 / 3 moss stitches) for 9 cm = 3½". Bind off with knit. Work the other sleeve in the same way. DOUBLE NECK: Use short circular needle size 4 MM = US 6. Start from the right side on one shoulder and knit up 95 to 110 stitches around the neckline (including the stitches from the thread – number of stitches must be divisible by 5) – knit up neatly inside 1 stitch. Work rib in the round (knit 3 / purl 2) for 11 cm = 4⅜". Bind off. Fold the neck double to the inside and sew down with a couple of stitches to keep it in place. |
|||||||
Diagram explanations |
|||||||
|
|||||||

|
|||||||

|
|||||||
|
|||||||
|
Have you made this or any other of our designs? Tag your pictures in social media with #dropsdesign so we can see them! Do you need help with this pattern?You'll find tutorial videos, a Comments/Questions area and more by visiting the pattern on garnstudio.com. © 1982-2024 DROPS Design A/S. We reserve all rights. This document, including all its sub-sections, has copyrights. Read more about what you can do with our patterns at the bottom of each pattern on our site. |
|||||||


With over 40 years in knitting and crochet design, DROPS Design offers one of the most extensive collections of free patterns on the internet - translated to 17 languages. As of today we count 304 catalogs and 11422 patterns - 11417 of which are translated into English (US/in).
We work hard to bring you the best knitting and crochet have to offer, inspiration and advice as well as great quality yarns at incredible prices! Would you like to use our patterns for other than personal use? You can read what you are allowed to do in the Copyright text at the bottom of all our patterns. Happy crafting!
Comments / Questions (4)
No consigo entender cómo se hace el hombro europeo en este patrón. Muchas w
09.01.2024 - 17:28DROPS Design answered:
Hola Montse, cuando llegas al número de cm necesarios empiezas a pasar puntos al gancho auxiliar. Primero los trabajas y antes de pasarlo a la aguja derecha los deslizas al gancho auxiliar. En cada una de las siguientes 3 filas desde el lado deslizas los pts indicados (por ejemplo 6 en la talla más pequeña, 18 en total). Así queda la forma diagonal del hombro. Después pasas los puntos de vuelta y recoges los puntos, cogiendo el hilo horizontal entre los puntos y trabajándolo junto de derecho con el siguiente punto del gancho auxiliar, evitando que queden agujeros por las transiciones.
14.01.2024 - 19:58Hello there! In the "diagonal shoulders" part, what do you mean with "place stitches on a thread on each row from the side, working them first to avoid having to cut the strand. Place 6-7-8-9-10-12 stitches on the thread 3 times"? Could you please explain it to me more detailed or link me a drops video please? Thank you!!
27.10.2023 - 17:16DROPS Design answered:
Dear Mrs Fundevilla, the shoulders will be worked with short rows so that the side towards neck will be higher than the one towards armhole. Work the first 6-12 sts (see size) at the beg of a row from armhole and slip them on a thread, continue row as before, turn and work next row, repeat these 2 rows 2 more times - at the same time, cast off for neck the middle sts (finish each shoulder separately) and then the stitch at the beg of the row from neck towards armhole. Happy knitting!
28.10.2023 - 08:51Hallo liebe Strickfreunde, meine Maschenprobe stimmt nicht in der Höhe. Mehr Reihen wären ja egal. Aber ich stricke nach Strickschrift und bei den Diagrammen sind keine cm-Angaben. Kann man die Anzahl Reihen in den Diagrammen umrechnen mit der Höhenangabe der Maschenprobe? Sprich 22 Reihen sind 10 cm…….Anzahl Diagrammreihe…..wieviel? Vielleicht hat jemand einen Rat für mich. Vielen Dank vorab
23.08.2023 - 17:48DROPS Design answered:
Liebe Frau Bürgin, A.2 und A.4 sollen ca die gleiche Maschenprobe haben, bei den Diagrammen mit Krausrechte Maschen wird es etwas verschieden (Krausrippen braucht mehr Reihen als Glattrechts). Am besten stricken Sie die unterschiedlichen Diagramme als Maschenprobe so können Sie am besten umrechnen. Viel Spaß beim stricken!
24.08.2023 - 09:00This is a beautiful pattern, interesting to make, and the finished jumper feels and looks great. Drops Air is such a light and cosy yarn. I modified the neck on mine as I didn't want a roll neck - I just cast it off when it was as wide as I wanted. I also shortened the sleeves because my projects always end up too long in the arms for me. Thank you for this lovely pattern.
05.08.2023 - 03:31