DROPS Air
DROPS Air
65% Alpaca, 28% Polyamide, 7% Wool
from 4.80 £ /50g
Get the yarn to make this pattern from 28.80£.

The yarn cost is calculated from the pattern’s smallest size and the yarn’s cheapest product type. Looking for an even better price? You might find it on the DROPS Deals!

DROPS SS24

Cream Wafer

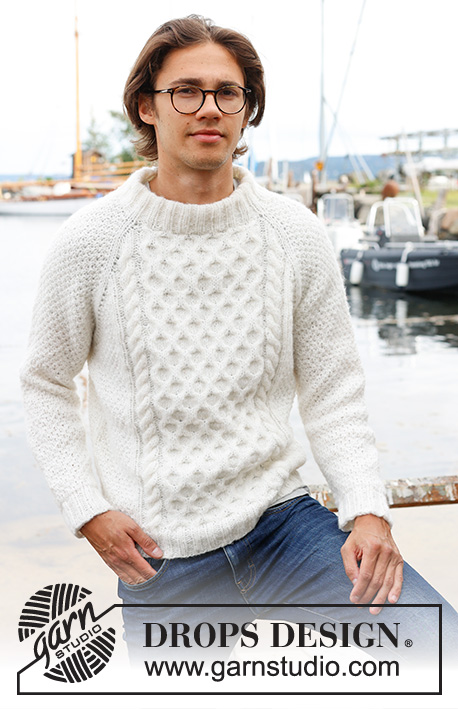
Knitted jumper for men in DROPS Air. The piece is worked top down with raglan, double neck, cables and moss stitch. Sizes S - XXXL.

DROPS 233-5
DROPS Design: Pattern ai-421
Yarn group C or A + A
-------------------------------------------------------

SIZES:
S - M - L - XL - XXL - XXXL

MATERIALS:
DROPS AIR from Garnstudio (belongs to yarn group C)
300-350-350-400-450-500 g colour 01, off white

NEEDLES:
DROPS CIRCULAR NEEDLE SIZE 5 MM: Length 40 cm and 80 cm.
DROPS CIRCULAR NEEDLE SIZE 4 MM: Length 40 cm and 80 cm.
DROPS DOUBLE POINTED NEEDLES SIZE 5 MM.
DROPS DOUBLE POINTED NEEDLES SIZE 4 MM.
DROPS CABLE NEEDLE – for cables.
The technique MAGIC LOOP can be used – you then only need circular needle of 80 cm in each size.

KNITTING TENSION:
17 stitches in width and 22 rows in height with stocking stitch = 10 x 10 cm.
NOTE: Needle size is only a guide. If you get too many stitches on 10 cm, change to a larger needle size. If you get too few stitches on 10 cm, change to a smaller needle size.

-------------------------------------------------------

Alternative Yarn – See how to change yarns here
Yarn Groups A to F – Use the same pattern and change the yarn here
Yarn usage using an alternative yarn – Use our yarn converter here

-------------------------------------------------------

DROPS Air
DROPS Air
65% Alpaca, 28% Polyamide, 7% Wool
from 4.80 £ /50g
Get the yarn to make this pattern from 28.80£.

The yarn cost is calculated from the pattern’s smallest size and the yarn’s cheapest product type. Looking for an even better price? You might find it on the DROPS Deals!

Pattern instructions

NOTE: This pattern is written in British English. All measurements in charts are in cm. For conversion from cm to inches - click here. There are different terms for crocheting in British and American English. If this pattern includes crochet, click for "crochet terms" here. For this pattern in American English, please click here.
-------------------------------------------------------

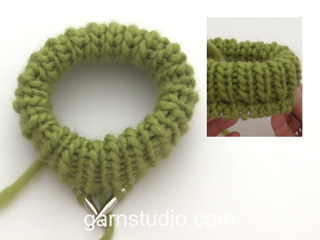
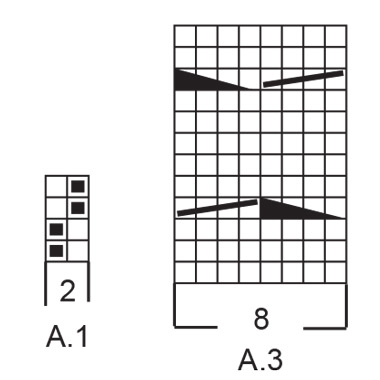
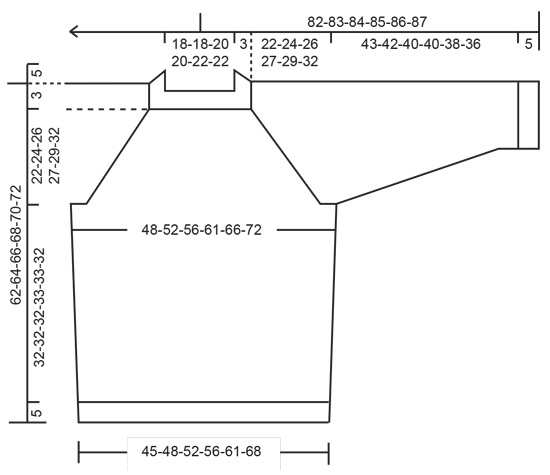
EXPLANATIONS FOR THE PATTERN:
-------------------------------------------------------

INCREASE TIP:
Increase 1 stitch by making 1 yarn over which is worked twisted on the next round to avoid a hole.

PATTERN:
See diagrams A.1 to A.6.

RAGLAN:
Increase after/before 2 stocking stitches at each marker:
AFTER MARKER THREAD:

Knit 1, 1 yarn over.
BEFORE MARKER THREAD:
Work until there is 1 stitch left before the marker thread, make 1 yarn over, knit 1. The increased stitches are worked twisted into the pattern on the next round.

DECREASE TIP (for sides of body and sleeves):
Decrease 1 stitch on either side of the marker as follows: Work until there are 2 stitches left before the marker, knit 2 together, marker, slip 1 stitch as if to knit, knit 1 and pass the slipped stitch over the knitted stitch.

-------------------------------------------------------

START THE PIECE HERE:

-------------------------------------------------------

JUMPER – SHORT OVERVIEW OF THE PIECE:
The neck and yoke are worked in the round with circular needle, from mid back and top down. The yoke is divided for body and sleeves and the body is continued in the round with circular needle. The sleeves are worked with short circular needle/double pointed needles.

DOUBLE NECK:
Cast on 80-80-88-88-96-96 stitches with DROPS Air, using short circular needles size 4 and 5 mm held together (this gives you an elastic cast-on edge). Remove the needle size 5 mm keeping the stitches on circular needle size 4 mm. Work rib in the round (knit 2, purl 2) for 11 cm.
Fold the neck double to the inside and work 1 more round of rib, working every 2nd stitch together with its corresponding stitch on the cast-on edge.
You now have a double neck of approx. 5 cm.

YOKE:
Change to circular needle size 5 mm. Insert 4 marker threads whilst working the next round and increasing as follows: Knit 1, insert marker thread-1 before the next stitch, knit 12 (sleeve), insert marker thread -2 before the next stitch, knit 1, knit 26-30-30-34-34-34 and increase 16-16-12-20-16-16 stitches evenly over these stitches - read INCREASE TIP! (= 42-42-42-50-50-50 stitches on the front piece), knit 1, insert marker thread -3 before the next stitch, knit 12 (sleeve), insert marker thread -4 before the next stitch, knit 1, knit 26-30-30-34-34-34 and increase 16-16-12-20-16-16 stitches evenly over these stitches (= 42-42-42-50-50-50 stitches on the back piece). There are now 112-112-112-128-128-128 stitches on the round. Insert a marker mid-back; the yoke is measured from this marker.

Read the next section before continuing!
You will work pattern and increase for RAGLAN – read description above.
Work the first round as follows:
Knit 2 (marker thread -1 sits between these 2 stitches), increase 1 stitch for raglan, work A.1 over the next 10 stitches, increase 1 stitch for raglan, knit 2 (marker thread-2 sits between these 2 stitches), increase 1 stitch for raglan, work A.2 over 1 stitch, A.3 over the next 40-40-40-48-48-48 stitches (5-5-5-6-6-6 repeats in width), work A.4 over 1 stitch, increase 1 stitch for raglan, knit 2 (marker thread-3 sits between these 2 stitches), make 1 yarn over, work A.1 over the next 10 stitches, increase 1 stitch for raglan, knit 2 (marker thread-4 sits between these 2 stitches), increase 1 stitch for raglan, work A.2 over 1 stitch, A.3 over 40-40-40-48-48-48 stitches (5-5-5-6-6-6 repeats in width), work A.4 over 1 stitch and increase 1 stitch for raglan. REMEMBER THE KNITTING TENSION!
Continue this pattern and increase for raglan every 2nd round (the increased stitches on the sleeves are worked into A.1 and the increased stitches on the front/back pieces are worked as shown in A.2/A.4). When diagrams A.2 and A.4 are completed 1 time in height, continue with A.5 over A.2 and A.6 over A.4, the remaining increased stitches on the body are worked into A.1 (the cables are worked on the same row in A.3 and A.5/A.6 the whole way through).
Continue to increase for raglan a total of 19-23-25-27-27-29 times on each side of all 4 markers = 264-296-312-344-344-360 stitches.
Continue to increase but now only on the body (i.e. after marker threads 2 and 4 and before marker threads 3 and 1). Increase like this 3-2-3-1-3-6 times in total; a total of 19-23-25-27-27-29 times on the sleeves and 22-25-28-28-30-35 times on the body; 276-304-324-348-356-384 stitches.
Continue with pattern but without further increases until the yoke measures 22-24-26-27-29-32 cm from the marker mid-back.
Divide for the body and sleeves:
Knit 2, place the next 48-56-60-64-64-68 stitches on a thread for the sleeve, cast on 6-6-8-8-12-12 stitches in side under sleeve, work 90-96-102-110-114-124 stitches as before, place the next 48-56-60-64-64-68 stitches on a thread for the sleeve, cast on 6-6-8-8-12-12 stitches in side under sleeve, work the last 88-94-100-108-112-122 stitches. Cut the strand. The body and sleeves are finished separately.

BODY:
= 192-204-220-236-252-272 stitches.
Insert 1 marker in each side of the body, in the middle of the cast-on stitches under each sleeve. Start the round at one marker and continue in the round with A.1 on each side of A.5, A.3 and A.6.
NOTE: A.1 will not always fit under the sleeves; knit 1 stitch on each side of both markers and the other stitches in pattern.
When the piece measures 4 cm from the division, decrease 2 stitches by each marker – read DECREASE TIP. Decrease like this every 12-12-8-8-8-12 cm a total 3-3-4-4-4-3 times = 180-192-204-220-236-260 stitches. Work until the body measures 32-32-32-33-33-32 cm from the division. Knit 1 round and decrease 8-8-8-8-4-4 stitches evenly spaced = 172-184-196-212-232-256 stitches.
Change to circular needle size 4 mm and work rib (knit 2, purl 2) for 5 cm. Loosely cast off with knit over knit and purl over purl. The jumper measures approx. 62-64-66-68-70-72 cm from the shoulder down.

SLEEVES:
Place the 48-56-60-64-64-68 stitches from the thread on the one side of the piece on short circular needle/double pointed needles size 5 mm and knit up 1 stitch in each of the new stitches cast on under the sleeve = 54-62-68-72-76-80 stitches. Insert a marker in the middle of the new stitches under the sleeve = start of the round.
Continue in the round with pattern A.1. A.1 will not always fit, so knit 1 stitch on each side of the marker, the remaining stitches are adjusted according to the pattern on the sleeve.
When the sleeve measures 4 cm decrease 2 stitches on each side of the marker – read DECREASE TIP. Decrease like this every 7-4-3-3-2-2 cm a total of 6-9-11-12-14-15 times = 42-44-46-48-48-50 stitches. Continue working until the sleeve measures 43-42-40-40-38-36 cm from the division (or to desired length. There is approx. 5 cm left). Knit 1 round and increase 2-4-6-4-8-6 stitches evenly spaced = 44-48-52-52-56-56 stitches. Change to double pointed needles size 4 mm and work rib (knit 2, purl 2) for 5 cm. Loosely cast off with knit over knit and purl over purl. The sleeve measures approx. 48-47-45-45-43-41 cm from the division.
Work the other sleeve in the same way.

Diagram

symbols = knit
symbols = purl
symbols = place 3 stitches on cable needle behind the piece, knit 3, knit 3 from cable needle
symbols = place 3 stitches on cable needle in front of piece, knit 3, knit 3 from cable needle
symbols = place 2 stitches on cable needle in front of piece, knit 2, knit 2 from cable needle
symbols = place 2 stitches on cable needle behind the piece, knit 2, knit 2 from cable needle
diagram
diagram
diagram

Each of our patterns has specific tutorial videos to help you.

Do you have a question? See a list of frequently asked questions (FAQ)

Knitting tension is what determines the final measurements of your work, and is usually measured per 10 x 10 cm. It is provided like so: number of stitches in width x number of rows in height - eg: 19 stitches x 26 rows = 10 x 10 cm.

The knitting tension is very individual; some people knit/crochet loosely while others work tightly. You adjust the knitting tension with the needle size, which is why the suggested needle size is only meant as a guide! You need to adjust this (up or down) to ensure that YOUR knitting tension matches the knitting tension provided in the pattern. If you work with a different knitting tension than provided you will have a different yarn consumption, and your work will have different measurements than what the pattern suggests.

The knitting tension also determines which yarns can replace each other. As long as you achieve the same knitting tension you can replace one yarn with another.

See DROPS lesson: How to measure your tension/gauge

See DROPS video: How to make a gauge tension swatch

The required amount of yarn is provided in grams, eg: 450 g. To calculate how many balls you’ll need you first need to know how many grams are in 1 ball (25g, 50g or 100g). This information is available if you click on the individual yarn quality on our pages. Divide the amount required with the amount of each ball. For example, if each ball is 50g (the most common amount), the calculation will be as follows: 450 / 50 = 9 balls.

The important thing when changing from one yarn to another is that the knitting/crochet tension remains the same. This is so that the measurements of the finished piece will be the same as on the sketch provided. It is easier to achieve the same knitting tension using yarns from the same yarn group. It is also possible to work with multiple strands of a thinner yarn to achieve the knitting tension of a thicker one. Please try our yarn converter. We recommend you to always work a test swatch.

Please NOTE: when changing yarn the garment might have a different look and feel to the garment in the photo, due to individual properties and qualities of each yarn.

See DROPS lesson: Can I use a different yarn than the one mentioned in the pattern?

All our yarns are categorised into yarn groups (from A to F) according to thickness and knitting tension – group A contains the thinnest yarns and group F the thickest. This makes it easier for you to find alternative yarns to our patterns, should you wish to switch yarn. All yarns within the same group have a similar knitting tension and can easily replace each other. However, different yarn qualities have different structures and properties which will give the finished work a unique look and feel.

Click here for an overview of the yarns in each yarn group

At the top of all our patterns you’ll find a link to our yarn calculator, which is a helpful tool should you wish to use a different yarn than suggested. By filling in the yarn quality you wish to replace, the amount (in your size) and number of strands, the calculator will present good alternative yarns with the same knitting tension. Additionally it will tell you how much you’ll require in the new qualities and whether you’ll need to work with multiple strands. Most skeins are 50g (some are 25g or 100g).

If the pattern is worked with multiple colours, every colour will have to be calculated separately. Similarly, if the pattern is worked with several strands of different yarns (for example 1 strand Alpaca and 1 strand Kid-Silk) you will have to find alternatives for each, individually.

Click here to see our yarn calculator

Since different yarns have different qualities and textures we have chosen to keep the original yarn in our patterns. However, you can easily find options among our available qualities by using our yarn calculator, or simply pick a yarn from the same yarn group.

It is possible that some retailers still have discontinued yarns in stock, or that someone has a few skeins at home that they would like to find patterns for.

The yarn calculator will provide both alternative yarn as well as required amount in the new quality.

If you think it's hard to decide what size to make, it can be a good idea to measure a garment you own already and like the size of. Then you can pick the size by comparing those measures with the ones available in the pattern's size chart.

You'll find the size chart at the bottom of the pattern.

See DROPS lesson: How to read size chart

The needle size provided in the pattern serves only as a guide, the important thing is to follow the knitting tension. And since knitting tension is very individual, you will have to adjust the needle size to ensure that YOUR tension is the same as in the pattern – maybe you’ll have to adjust 1, or even 2 needle sizes, up or down to achieve the correct tension. For this, we recommend that you work test swatches.

Should you work with a different knitting tension than the one provided, the measurements of the finished garment might deviate from the measurement sketch.

See DROPS lesson: How to measure your tension/gauge

See DROPS video: How to make a tension/gauge swatch

Working a garment top-down provides more flexibility and room for personal adjustment. For example it is easier to try the garment on while working, as well as making adjustments to length of yoke and shoulder caps.

The instructions are carefully explaining every step, in the correct order. Diagrams are adjusted to the knitting direction and are worked as usual.

The diagram depicts all rows/rounds, and every stitch seen from the right side. It is read from bottom to top, from right to left. 1 square = 1 stitch.

When working back and forth, every other row is worked from the right side and every other row is worked from the wrong side. When working from the wrong side, the diagram will have to be worked reversed: from left to right, knit stitches are purled, purl stitches are knit etc.

When working in the round every round is worked from the right side and the diagram are worked from right to left on all rounds.

See DROPS lesson: How to read knitting diagrams

The diagram depicts all rows/rounds, and every stitch seen from the right side. It is worked from bottom to top, from right to left.

When working back and forth every other row is worked from the right side: from right to left and every other row is worked from the wrong side: from left to right.

When working in the round, every row in the diagram are worked from the right side, from right to left.

When working a circular diagram you start in the middle and work your way outwards, counter clockwise, row by row.

The rows usually start with a given number of chain stitches (equivalent to the height of the following stitch), this will either be depicted in the diagram or explained in the pattern.

See DROPS lesson: How to read crochet diagrams

Instructions for working several diagrams after each other on the same row/round, will often be written like so: “work A.1, A.2, A.3 a total of 0-0-2-3-4 times". This means you work A.1 once, then A.2 is worked once, and A.3 is repeated (in width) the number of times provided for your size – in this case like so: S = 0 times, M = 0 times, L=2 times, XL= 3 times and XXL = 4 times.

The diagrams are worked as usual: begin with the first row in A.1, then work the first row in A.2 etc.

See DROPS lesson: How to read knitting diagrams

See DROPS lesson: How to read crochet diagrams

The total width of the garment (from wrist-to-wrist) will be larger in the larger sizes, despite the actual sleeves being shorter. The larger sizes have longer sleeve caps and wider shoulders, so there will be a good fit in all sizes.

The measurement sketch/schematic drawing provides information regarding the full length of the garment. If it’s a jumper or a jacket the length is measured from the highest point on the shoulder closest to the neckline, and straight down to the bottom of the garment. It is NOT measured from the tip of shoulder. Similarly, the length of yoke is measured from the highest point on the shoulder and down to where yoke is split into body and sleeves.

On a jacket measures are never taken along bands, unless specifically stated. Always measure inside band stitches when measuring the length.

See DROPS lesson: How to read a schematic drawing

Diagrams are often repeated on the round or in height. 1 repeat is the diagram the way it appears in the pattern. If it says to work 5 repeats of A.1 in the round, then you work A.1 a total of 5 times after/next to each other in the round. If it says to work 2 repeats of A.1 vertically/in height you work the entire diagram once, then begin again at the start and work the entire diagram one more time.

Chain stitches are slightly narrower than other stitches and to avoid working the cast-on edge too tight, we simply chain more stitches to begin with. The stitch count will be adjusted on the following row to fit the pattern and measurement sketch.

The rib edge is more elastic and will contract slightly compared to, for example, stocking stitch. By increasing before the rib edge, you avoid a visible difference in width between the rib edge and the rest of the body.

It’s very easy to cast off too tightly, and by making yarn overs while casting off (and simultaneously casting these off) you avoid a too tight cast off edge.

See DROPS video: How to bind off with yarn overs (yo)

To achieve an even increase (or decrease) you can increase on, for example: every 3rd and 4th row alternately, like so: work 2 rows and increase on the 3rd row, work 3 rows and increase on the 4th. Repeat this until the increase is complete.

See DROPS lesson: Increase or decrease 1 st on every 3rd and 4th row alternately

Should you prefer to work in the round instead of back and forth, you may of course adjust the pattern. You’ll need to add steeks mid-front (usually 5 stitches), and follow the instructions. When you would normally turn and work from the wrong side, simply work across the steek and continue in the round. At the end you’ll cut the piece open, pick up stitches to work bands, and cover the cut edges.

See DROPS video: How to knit steeks and cut open

Should you prefer to work back and forth instead of in the round, you may of course adjust the pattern so you work the pieces separately and then assemble them at the end. Divide the stitches for the body in 2, add 1 edge stitch in each side (for sewing) and work the front and back pieces separately.

See DROPS lesson: Can I adapt a pattern for circular needles into straight needles?

Pattern repeats can vary slightly in the different sizes, in order to get the correct proportions. If you’re not working the exact same size as the garment in the photo, yours might deviate slightly. This has been carefully developed and adjusted so that the complete impression of the garment is the same in all sizes.

Make sure to follow instructions and diagrams for your size!

If you have found a pattern you like which is available in women’s size it’s not very difficult to convert it to men’s size. The biggest difference will be the length of sleeves and body. Start working on the women size that you think would fit across the chest. The additional length will be worked right before you cast off for the armhole/sleeve cap. If the pattern is worked top-down you can add the length right after the armhole or before the first decrease on sleeve.

Regarding additional yarn amount, this will depend on how much length you add, but it is better with a skein too many than too few.

All yarns will have excess fibres (from production) that might come off as lint or shedding. Brushed yarns (ie hairier yarns) have more of these loose, excess fibres, causing more shedding.

Shedding also depends on what is worn under or over the garment, and whether this pulls at the yarn fibres. It’s therefore not possible to guarantee that there will be no shedding

Below are some tips on how to get the best result when working with hairier yarns:

1. When the garment is finished (before you wash it) shake it vigorously so the looser hairs come off. NOTE: do NOT use a lint roller, brush or any method that pulls at the yarn.

2. Place the garment in a plastic bag and put it in your freezer - the temperature will cause the fibres to become less attached to each other, and excess fibres will come off easier.

3. Leave in the freezer for a few hours before taking it out and shaking it again.

4. Wash the garment according to the instructions on the yarn label.

Pilling is a natural process that happens to even the most exclusive of fibers. It's a natural sign of wear and tear that is hard to avoid, and that is most visible in high friction areas of your garment like a sweater's arms and cuffs.

You can make your garment look as new by removing the pilling, using a fabric comb or a pill/lint remover.

Still can't find the answer you need? Then scroll down and leave your question so one of our experts can try to help you. This will be done normally within 5 to 10 working days.
In the meantime, you can read the questions and answers that others have left to this pattern or join the DROPS Workshop on Facebook to get help from fellow knitters/crocheters!

Post a comment to pattern DROPS 233-5

We would love to hear what you have to say about this pattern!

If you want to leave a question, please make sure you select the correct category in the form below, to speed up the answering process. Required fields are marked *.

Comments / Questions (10)

country flag Fausto wrote:

"Quando la manica misura 4 cm diminuire 2 maglie a ogni lato del segnapunti". Se il modello prevede che 68 maglie, dopo 11 diminuzioni, diventino 46 (taglia L) vuol dire che ogni diminuzione è di DUE maglie (UNA a ogni lato del segnapunti) e non 4 come è scritto

22.03.2024 - 14:59

country flag Ellen Van Der Bel-Frumau wrote:

Het patroon begint toch midden achter en niet bij de raglanmouw? Ik snap de uitleg niet goed!

14.12.2023 - 06:29

DROPS Design answered:

Dag Ellen,

Nee, het patroon begint bij de raglan, tussen het achterpand en de rechter mouw. Je breit dus eerst de rechter mouw, dan het voorpand, dan de linker mouw en tot slot het achterpand.

17.12.2023 - 17:49

country flag Leila wrote:

Hei! Jeg holder på å strikke herremodellen i str. M, men får ikke maskeantallet til å stemme når jeg skal sette merkemasker og øke etter halsen er strikket. Finnes det noen rettelser her? Prøvde å se på damemodellen, men ble ikke klokere av å se på rettelsene der.

13.11.2023 - 23:18

DROPS Design answered:

Hej Leila, vi skal se på den, så kommer vi tilbage. Hold øje her på siden :)

16.11.2023 - 11:22

country flag Maaike Joustra wrote:

Bedankt voor het snelle antwoord, het kwartje is gevallen.

07.11.2023 - 08:57

country flag Maaike Joustra wrote:

Daar moest ”tobben ” staan ipv ribben.

05.11.2023 - 08:58

country flag Maaike Joustra wrote:

Hallo, Ik zit te ribben met A2 en A4. Het lijkt mij dat A4 in het begin moet komen bij het lijf en de rug en A2 na de 40 steken. Dit lijkt beter bij het diagram te kloppen? Met vr. groet

05.11.2023 - 08:56

DROPS Design answered:

Dag Maaike,

Je leest de telpatronen van onder naar boven en A.2 en A.4 komen aan beide kanten van de panden. Je begint de naald bij de rechter mouw, wanneer je A.2 voor de eerste keer op de toer breit, dan ben je aan de rechter kant van het voorpand.

05.11.2023 - 19:31

country flag Anna wrote:

Dzień dobry, od pewnego czasu nie mogę pobrać na swój komputer niektórych wzorów bezpłatnych z Państwa strony. Nie wiem jaka jest przyczyna, Do tej pory nie miałam z tym problemów. Bardzo proszę o wyjaśnienie. Pozdrawiam Anna Chruściel

24.10.2023 - 09:35

DROPS Design answered:

Witaj Anno, spróbuj zmienić przeglądarkę. Wyślij mi proszę numer/y wzoru/ów, którego/których nie możesz pobrać i sprawdzę to u siebie. Pozdrawiamy!

24.10.2023 - 10:09

country flag Gurli Skattum wrote:

Det gjelder cream wafer 236-15 modell ai-398: Etter aa ha strikket. den dibble halskant og Skal sette inn merketraader, stemmer ikke masketallet med moensteret. Hvor og hvornaar faar Jeg en rettelse?

06.05.2023 - 19:16

DROPS Design answered:

Hei Gurli Rettelsen på oppskrift 236-15 kom i november 2022, se rød link under selve oppskriften eller se hva vi har svart deg under oppskrift 236-15. mvh DROPS Design

08.05.2023 - 13:38

country flag Linnea Johansen wrote:

Heisann, jeg begynte på denne oppskriften i kveld og sliter litt med å forstå den. Jeg har økt første runde med raglan og skal begynne med runde nr 2 hvor man skal strikke kastene vridd. Det jeg lurer på er om det blir sånn her på fks forsiden: 2. merketråd, 1 rett, to vrang inkludert kastet (A2), 48 rett (A3), to vrang inkludert kastet (A4), en rett, 3. merketråd, 1 rett, A1 inkludert kastet frem til det er 1 maske igjen, 1 rett, 4. merketråd Håper det ga mening haha:-)

30.04.2023 - 10:55

DROPS Design answered:

Hei Linnea. Etter 2. merketråd, strikkes det slik: 1 rett, kastet (strikkes vridd), A2 (1 vrang)), 48 rett (A3), A4 (1 vrang), kastet (strikkes vridd), 1 rett, 3. merketråd, 1 rett, kastet (strikkes vridd), A1 over de 10 neste maskene, kastet (strikkes vridd), 1 rett, 4. merketråd. mvh DROPS Design

02.05.2023 - 13:12

country flag Caroline wrote:

Tak for de fine opskrifter. Jeg kunne godt bruge at bare et af billederne viser modellen bagfra.

17.03.2023 - 19:26