
Popular categories
Looking for a yarn?


|
|||||||||||||||||||
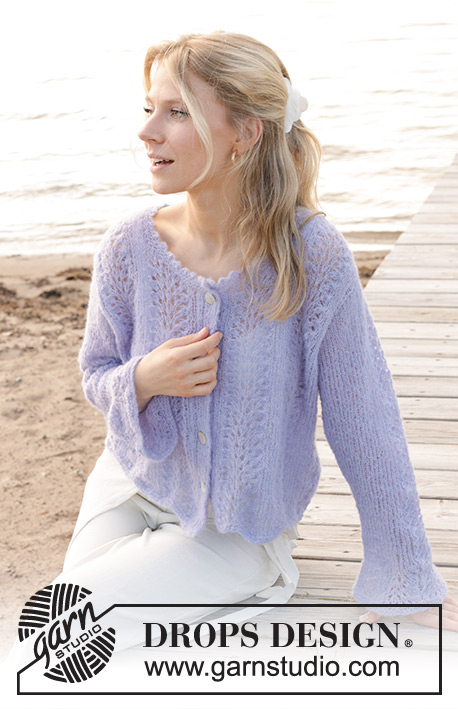
Trip to Provence Cardigan |
|||||||||||||||||||
 |
 |
||||||||||||||||||
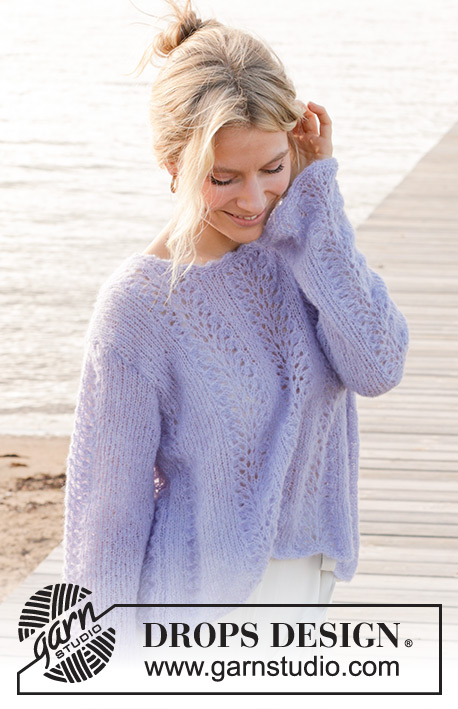
Knitted jacket in DROPS Brushed Alpaca Silk. Piece is knitted bottom up with wave pattern, double knitted band and trumpet sleeves. Size
DROPS 241-30 |
|||||||||||||||||||
|
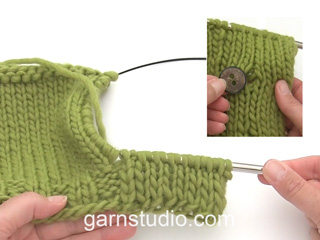
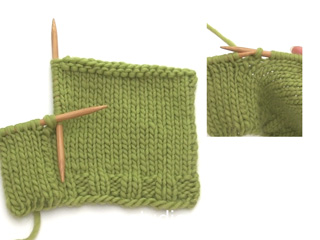
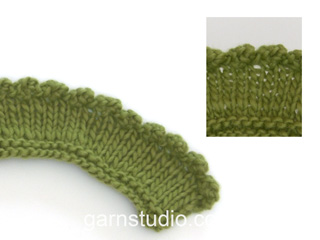
---------------------------------------------------------- EXPLANATION FOR THE PATTERN: ---------------------------------------------------------- GARTER STITCH (worked in the round): 1 ridge vertically = 2 rounds, i.e. knit 1 round and purl 1 round. GARTER STITCH (back and forth): Knit all rows. 1 ridge vertically = knit 2 rows. PATTERN: See diagrams A.1 to A.6. Diagrams show all rows in pattern seen from the right side. DECREASE TIP: Decrease 1 stitch on each side of marker thread as follows: Work until 3 stitches remain before marker thread, knit 2 together, knit 2 (marker thread is between these 2 stitches), slip 1 stitch knitwise, knit 1, pass slipped stitch over stitch worked (2 stitches decreased). BUTTONHOLES: Work buttonholes on right band, begin from right side as follows: Work the first 6 stitches as before, turn and work over the 6 stitches as before, turn and work over the 6 stitches as before from right side. Cut the yarn. Work 4 rows in total as before over the remaining 6 band stitches (work first row from right side) and work last stitch from right side together with next stitch along edge of jacket as before. On last row from wrong side work as before over all band stitches and continue as before over all band stitches. Work buttonholes when band measures: S: 6, 14, 22, 30 and 38 cm = 2⅜", 5½", 8¾", 11¾" and 15" M: 6, 14, 23, 31 and 40 cm = 2⅜", 5½", 9", 12¼" and 15¾" L: 6, 13, 20, 27, 34 and 41 cm = 2⅜", 5⅛", 8", 10⅝", 13⅜" and 16⅛" XL: 6, 13, 21, 28, 36 and 43 cm = 2⅜", 5⅛", 8¼", 11", 14¼" and 17" XXL: 6, 13, 21, 28, 36 and 44 cm = 2⅜", 5⅛", 8¼", 11", 14¼" and 17¼" XXXL: 6, 14, 22, 30, 38 and 46 cm = 2⅜", 5½", 8¾", 11¾", 15" and 18" ---------------------------------------------------------- START THE PIECE HERE: ---------------------------------------------------------- JACKET - SHORT OVERVIEW OF THE PIECE: Work back piece and front pieces back and forth on circular needle, bottom up. Work sleeves in the round on double pointed needles/a short circular needle, top down. Assemble garment as explained in pattern. Then work a double knitted band and a neck edge and bind off with picot. BACK PIECE: Cast on 103-111-117-129-139-149 stitches on circular needle size 5 MM = US 8 with DROPS Brushed Alpaca Silk. Work 2 ridges in GARTER STITCH - read explanation above. Knit 1 row from right side while decreasing 8-8-8-10-10-10 stitches evenly = 95-103-109-119-129-139 stitches. Purl 1 row from wrong side with 1 stitch in garter stitch in each side. Work next row as follows from right side: S, M and L: 1 stitch in garter stitch, 3-5-5 stitches in stockinette stitch, A.1, work 5-6-7 stitches in stockinette stitch, * A.2, work 12-13-15 stitches in stockinette stitch *, work from *-* 2 times in total, A.2, work 5-6-7 stitches in stockinette stitch, A.3, work 3-5-5 stitches in stockinette stitch, 1 stitch in garter stitch. XL, XXL and XXXL: 1 stitch in garter stitch, 5-7-11 stitches in stockinette stitch, A.2, work 7-8-9 stitches in stockinette stitch, * A.2, work 14-16-16 stitches in stockinette stitch *, work from *-* 2 times in total, A.2, work 7-8-9 stitches in stockinette stitch, A.2, work 5-7-11 stitches in stockinette stitch, 1 stitch in garter stitch. Continue pattern back and forth like this. REMEMBER THE KNITTING GAUGE! When piece measures 28-29-30-31-32-33 cm = 11"-11⅜"-11¾"-12¼"-12½"-13" - measured from cast-on edge where the curve goes down (all length measurements are done from here), bind off for armholes at beginning of every row in each side as follows: Bind off 3 stitches 1-1-1-1-2-2 times, 2 stitches 2-3-3-4-4-6 times and 1 stitch 4-4-4-6-6-6 times = 73-77-83-85-89-91 stitches remain – NOTE: work stitches that do not fit the pattern in stockinette stitch. When piece measures 45-47-49-51-53-55 cm = 17¾"-18½"-19¼"-20"-21"-21⅝", bind off the middle 29-29-31-31-33-33 stitches for neck and finish each shoulder separately. NOTE! When decrease hits A.2 work the rest of repetition in stockinette stitch. Then bind off 2 stitches for neck on next row from neck = 20-22-24-25-26-27 stitches remain for shoulder. When piece measures 46-48-50-52-54-56 cm = 18"-19"-19¾"-20½"-21¼"-22", work in stockinette stitch back and forth over all stitches. Bind off somewhat loosely when piece measures 48-50-52-54-56-58 cm 19"-19¾"-20½"-21¼"-22"-22¾". Work the other shoulder the same way. RIGHT FRONT PIECE: Cast on 54-58-60-67-71-77 stitches on circular needle size 5 MM = US 8 with DROPS Brushed Alpaca Silk. Work 2 ridges. Knit 1 row from right side while decreasing 5-5-5-6-6-6 stitches evenly = 49-53-55-61-65-71 stitches. Purl 1 row from wrong side with 1 stitch in garter stitch in each side. Work next row as follows from right side: S, M and L: 1 stitch in garter stitch, 1 stitch in stockinette stitch, * A.2, work 5-6-7 stitches in stockinette stitch *, work from *-* 2 times in total, A.3, work 3-5-5 stitches in stockinette stitch, 1 stitch in garter stitch. XL, XXL and XXXL: 1 stitch in garter stitch, 1 stitch in stockinette stitch, * A.2, work 7-8-9 stitches in stockinette stitch *, work from *-* 2 times in total, A.2, work 5-7-11 stitches in stockinette stitch, 1 stitch in garter stitch. Continue pattern back and forth like this. When piece measures 28-29-30-31-32-33 cm = 11"-11⅜"-11¾"-12¼"-12½"-13" - measured from cast-on edge where the curve goes down (all length measurements are done from here), bind off for armholes at beginning of every row from the side as follows: Bind off 3 stitches 1-1-1-1-2-2 times, 2 stitches 2-3-3-4-4-6 times and 1 stitch 4-4-4-6-6-6 times = 38-40-42-44-45-47 stitches remain – NOTE: work stitches that do not fit the pattern in stockinette stitch. When piece measures 39-41-42-44-45-47 cm = 15¼"-16⅛"-16½"-17¼"-17¾"-18½", slip the outermost 11 stitches towards mid front on 1 thread for neck, work them before slipping them on thread to avoid cutting the yarn. Continue to bind off for neck at beginning of every row from neck as follows: Bind off 2 stitches 2 times and 1 stitch 3-3-3-4-4-5 times = 20-22-24-25-26-27 stitches remain on shoulder. NOTE! When decrease hits A.2 work the rest of repetition in stockinette stitch. When piece measures 46-48-50-52-54-56 cm = 18"-19"-19¾"-20½"-21¼"-22", work in stockinette stitch back and forth over all stitches. Bind off somewhat loosely when piece measures 48-50-52-54-56-58 cm = 19"-19¾"-20½"-21¼"-22"-22¾". LEFT FRONT PIECE: Cast on 54-58-60-67-71-77 stitches on circular needle size 5 MM = US 8 with DROPS Brushed Alpaca Silk. Work 2 ridges. Knit 1 row from right side while decreasing 5-5-5-6-6-6 stitches evenly = 49-53-55-61-65-71 stitches. Purl 1 row from wrong side with 1 stitch in garter stitch in each side. Work next row as follows from right side: S, M and L: 1 stitch in garter stitch, 3-5-5 stitches in stockinette stitch, A.1, * work 5-6-7 stitches in stockinette stitch, A.2 *, work from *-* 2 times in total, 1 stitch in stockinette stitch, 1 stitch in garter stitch. XL, XXL and XXXL: 1 stitch in garter stitch, 5-7-11 stitches in stockinette stitch, * A.2, work 7-8-9 stitches in stockinette stitch *, work from *-* 2 times in total, A.2, work 1 stitch in stockinette stitch, 1 stitch in garter stitch. Continue pattern back and forth like this. When piece measures 28-29-30-31-32-33 cm = 11"-11⅜"-11¾"-12¼"-12½"-13" - measured from bottom curve, bind off for armholes at the beginning of every row in the side as follows: Bind off 3 stitches 1-1-1-1-2-2 times, 2 stitches 2-3-3-4-4-6 times and 1 stitch 4-4-4-6-6-6 times = 38-40-42-44-45-47 stitches remain – NOTE: work stitches that do not fit the pattern in stockinette stitch. When piece measures 39-41-42-44-45-47 cm = 15¼"-16⅛"-16½"-17¼"-17¾"-18½", slip the outermost 11 stitches towards mid front on 1 thread for neck, work them before slipping them on thread to avoid cutting the yarn. Continue to bind off for neck at beginning of every row from neck as follows: Bind off 2 stitches 2 times and 1 stitch 3-3-3-4-4-5 times = 20-22-24-25-26-27 stitches remain on shoulder. NOTE! When decrease hits A.2 work the rest of repetition in stockinette stitch. When piece measures 46-48-50-52-54-56 cm = 18"-19"-19¾"-20½"-21¼"-22", work in stockinette stitch back and forth over all stitches. Bind off somewhat loosely when piece measures 48-50-52-54-56-58 cm = 19"-19¾"-20½"-21¼"-22"-22¾". SLEEVES: Worked top down. Cast on somewhat loosely 23-25-25-25-27-27 stitches on circular needle size 5 MM = US 8 with DROPS Brushed Alpaca Silk. Work first row as follows from right side: 5-6-6-6-7-7 stitches in stockinette stitch, A.2, 5-6-6-6-7-7 stitches on stockinette stitch. Continue pattern back and forth like this while at the same time casting on new stitches for sleeve cap at the end of every row in each side as follows (work the new stitches in stockinette stitch): Cast on 3 stitches 1 time in each side, 2 stitches 3-3-3-4-4-4 times in each side, 1 stitch 2-3-2-2-2-4 times in each side, 2 stitches 3-3-3-3-4-4 times in each side and then 3 stitches 1-1-2-2-2-2 times in each side = 63-67-71-75-81-85 stitches. Piece measures approx. 9-10-10-11-12-14 cm = 3½"-4"-4"-4⅜"-4¾"-5½" from cast-on edge. Now put piece together on a short circular needle size 5 MM = US 8 - work the rest of sleeve in the round as explained below. Insert 1 marker thread at the beginning of round, mid under sleeve. Continue in stockinette stitch and A.2 over the middle 13 stitches. When piece measures 4-4-4-2-2-1 cm = 1½"-1½"-1½"-¾"-¾"-⅜" from where piece was put together, decrease 2 stitches mid under sleeve - read DECREASE TIP. Decrease like this every 4-3½-3-2½-2-2 cm = 1½"-1¼"-1⅛"-1"-¾"-¾" 9-10-11-12-14-15 times in total = 45-47-49-51-53-55 stitches. When sleeve measures 47-47-47-44-44-44 cm = 18½"-18½"-18½"-17¼"-17¼"-17¼" from cast-on edge (at the top of sleeve cap), increase 12-12-12-14-14-14 stitches evenly (increase 6-6-6-7-7-7 stitches evenly on each side of A.2) = 57-59-61-65-67-69 stitches. Work next round as follows: S, M and L: 2-3-4 stitches in stockinette stitch, A.1, work A.2 3 times in total, A.3 work 2-3-4 stitches on stockinette stitch. Continue pattern like this. When A.1 to A.3 has been worked 1 time vertically, work next round as follows: 2-3-4 stitches in stockinette stitch, A.4, work A.5 3 times in total, A.6, work 2-3-4 stitches in stockinette stitch. When A.4 to A.6 have been worked vertically, work the first 2 rounds in A.4b, A.5b and A.6b = 65-67-69 stitches. XL, XXL and XXXL: 0-1-2 stitches in stockinette stitch, work A.2 5 times in total, 0-1-2 stitches in stockinette stitch. Continue pattern like this. When A.2 has been worked 1 time vertically, work next round as follows: 0-1-2 stitches in stockinette stitch, work A.5 5 times in total, 0-1-2 stitches on stockinette stitch. When A.5 has been worked vertically, work the first 2 rounds in A.5b = 75-77-79 stitches. ALL SIZES: Work 2 ridges in the round over all stitches. Bind off somewhat loosely by knitting. Sleeve measures approx. 55 cm = 21⅝" in all sizes - measured from cast-on edge at the top of sleeve cap. Work another sleeve the same way. ASSEMBLY: Sew the shoulder seams. Sew the side seams inside 1 stitch in garter stitch. Sew in sleeves inside 1 edge stitch. RIGHT BAND: Work band from bottom up towards the neck. Pick up stitches along right front piece, skip 90 to 120 cm = 35½" to 47¼" in on thread and use yarn end to pick up stitches with (that way you can continue to work with the ball without cutting the yarn afterwards) as follows: Begin pick up at the bottom of front piece and pick up 1 stitch in every knitted row along the entire front piece inside 1 edge stitch, use circular needle size 4.5 MM = US 7 and DROPS Brushed Alpaca Silk. Now continue piece at the end of row where ball is = at the bottom of front piece. Cast on 12 stitches for band as an exgauge of the stitches pick up at the bottom of front piece (cast on stitches from wrong side). Work band over the 12 stitches at the same time as band is knitted together with stitches picked up along the front piece as follows: ROW 1 (= right side): Slip first stitch on to right needle purlwise with strand in front of piece, * knit 1, slip 1 stitch on to right needle purlwise with strand in front of piece *, work from *-* until 1 stitch remains of the 12 band stitches, slip last stitch on to right needle knitwise, with strand behind piece, knit next stitch (stitch from front piece), pass slipped stitch over stitch worked, turn. ROW 2 (= wrong side): * Slip first/next stitch on to right needle purlwise with strand in front of piece, knit 1 *, work from *-* over all the 12 band stitches, turn. Repeat rows 1 and 2. Work BUTTONHOLES - read explanation above. When all stitches from front piece have been worked together with band, knit all stitches together 2 by 2 and bind off. LEFT BAND: Work band bottom up. Pick up stitches at the top by shoulder on front piece, pick up 1 stitch in every knitted row down along the entire front piece inside 1 edge stitch, use circular needle size 4.5 MM = US 7 and DROPS Brushed Alpaca Silk. After the pick up cast on 12 stitches for band (= at the bottom of front piece). Work band over the 12 stitches at the same time as band is knitted together with stitches picked up along the front piece as follows: ROW 1 (= wrong side): Knit 1, * slip 1 stitch on to right needle purlwise with strand in front of piece, knit 1 *, work from *-* until 1 stitch remains of the 12 band stitches, slip the next 2 stitches (last stitch from band and first/next stitch from front piece) on to right needle purlwise with strand in front of piece, turn. ROW 2 (= right side): Knit 2 together, *, slip 1 stitch on to right needle purlwise with strand in front of piece, knit 1 *, work from *-* until 1 stitch remains, slip last stitch on to right needle purlwise with strand in front of piece, turn. Repeat rows 1 and 2. When all stitches from front piece have been worked together with band, knit all stitches together from right side as follows: Slip 1 stitch on to right needle knitwise, knit 1, pass slipped stitch over stitch. Sew buttons onto the left band. NECK EDGE WITH PICOT: Begin from right side and pick up approx. 85 to 95 stitches around the neck (including stitches on threads at the front) circular needle size 4.5 MM = US 7. Knit 1 row from wrong side, knit 1 row from right side, knit 1 row from wrong side, knit 1 row from right side and knit 1 row from wrong side. Bind off with picot as follows: Knit 1, * insert right needle between the first 2 stitches on left needle (i.e. between stitches on needle, not through stitches), make 1 yarn over on right needle, pull yarn over forward between the stitches and slip yarn over on to left needle *, work from *-* 3 times in total (= 3 new stitches on left needle), knit and bind off at the same time off 6 stitches (= 1st stitch on right needle + 3 yarn overs + 2 stitches). Now continue to work from *-* + bind off 6 stitches the same way along the entire bind-off until there are no stitches left to make a new picot. Bind off the remaining stitches, cut the yarn and pull yarn through remaining stitch. |
|||||||||||||||||||
Diagram explanations |
|||||||||||||||||||
|
|||||||||||||||||||

|
|||||||||||||||||||
|
|||||||||||||||||||
|
Have you made this or any other of our designs? Tag your pictures in social media with #dropsdesign so we can see them! Do you need help with this pattern?You'll find tutorial videos, a Comments/Questions area and more by visiting the pattern on garnstudio.com. © 1982-2024 DROPS Design A/S. We reserve all rights. This document, including all its sub-sections, has copyrights. Read more about what you can do with our patterns at the bottom of each pattern on our site. |
|||||||||||||||||||


With over 40 years in knitting and crochet design, DROPS Design offers one of the most extensive collections of free patterns on the internet - translated to 17 languages. As of today we count 304 catalogs and 11422 patterns - 11417 of which are translated into English (US/in).
We work hard to bring you the best knitting and crochet have to offer, inspiration and advice as well as great quality yarns at incredible prices! Would you like to use our patterns for other than personal use? You can read what you are allowed to do in the Copyright text at the bottom of all our patterns. Happy crafting!
Comments / Questions (16)
Ich habe 3 Fragen: Aus welchem Grund werden nach den Krausrippen (Bündchen) 8 Maschen bzw. 5 Maschen wieder abgenommen? Kommt so das Wellen-Bündchen zustande? Oder entsteht das Wellen-Bündchen lediglich durch das Lochmuster?
29.02.2024 - 22:25DROPS Design answered:
Liebe Yvonne, es wird Maschen nach den Krausrippen abgenommen, um die richtige Breite zu behalten, wenn man dann das Muster strickt. Viel Spaß beim stricken!
01.03.2024 - 08:08Bonjour, pour ce modèle combien faut-il de pelotes pour une taille XL. Merci de votre réponse
25.05.2023 - 21:14DROPS Design answered:
Bonjour Mme Arvieux, vous trouverez la quantité requise pour chaque taille dans l'en-tête, en haut de la page, autrement dit, il faut en XL 200 g DROPS Brushed Alpaca Silk / 25 g la pelote = 8 pelotes. Bon tricot!
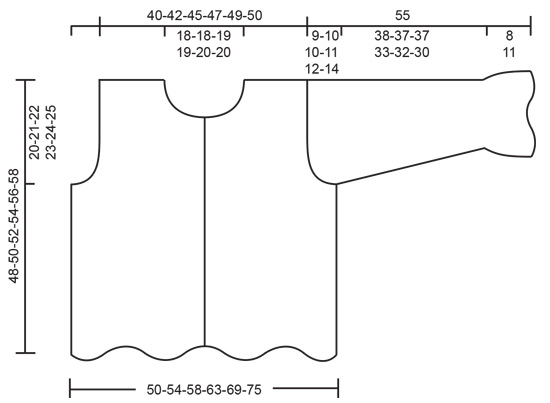
26.05.2023 - 10:05Currantly kniting trip to provence cardigan and have got a wee bit stuck. It says slip outermost 11 sts towards mid front, work them which makes sense. Then continue to cast off for neck edge, im thinking the neck edge is straight. My brain is thinking it should say armhole edge and not neck edge. Please please help as i thought that this cardigan pattern was the easiest as the others have raglan shaping or short rows which confuse me.
30.03.2023 - 12:38DROPS Design answered:
Dear Nicola, you can see in the schematic under the pattern instructions that the neck edge is slightly shaped, since it's a round neck. So the decreases are for this round neck edge. On the other hand, the armholes are straight and have no decreases. Happy knitting!
02.04.2023 - 16:44Buongiorno sto cercando di realizzare questo cardigan ma non capisco perch il davanti dx riporta 2 volte il pattern di 13 maglie A2 ed una volta il pattern A3mentre nella spiegazione del mezzo davanti sx il pattern A2 non è menzionato ma viene indicato solo A 1 per 2 volte . Cosa non ho capito? O c’è un errore? Grazie
16.03.2023 - 17:04DROPS Design answered:
Buongiorno Cinzia, grazie per la segnalazione, abbiamo corretto le spiegazioni per il davanti sinistro. Buon lavoro!
18.03.2023 - 15:19Tender Lavender
22.01.2023 - 19:27Lavender Dream
21.01.2023 - 11:01Une touche de la Provence
21.01.2023 - 01:52Lavender Flair
21.01.2023 - 01:48Lavanda
20.01.2023 - 16:04Lil a ripples
19.01.2023 - 03:05