
Popular categories
Looking for a yarn?


|
|||||||||||||||||||||||||||||||
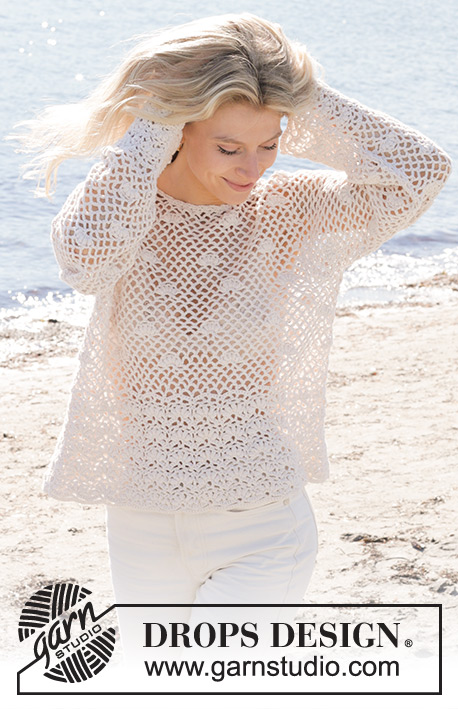
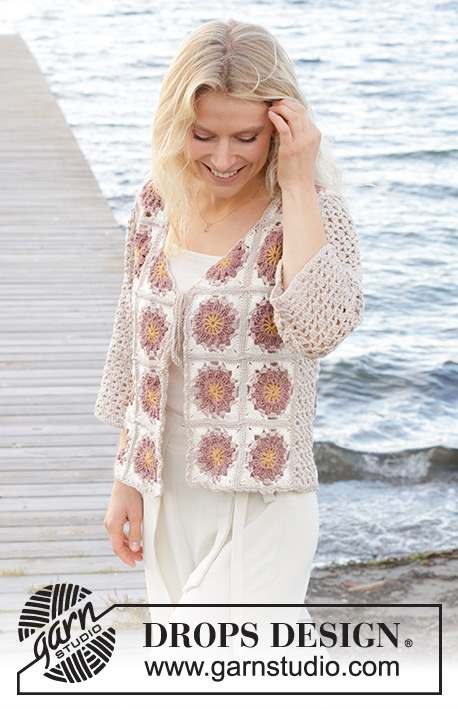
Shell Seeker Cardigan |
|||||||||||||||||||||||||||||||
 |
 |
||||||||||||||||||||||||||||||
Crocheted jacket in DROPS Belle. The piece is worked bottom up with lace pattern and bobbles. Sizes S - XXXL.
DROPS 240-4 |
|||||||||||||||||||||||||||||||
|
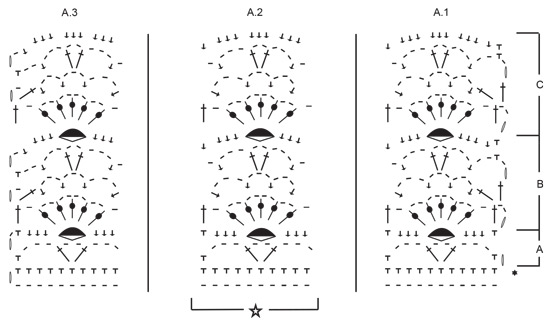
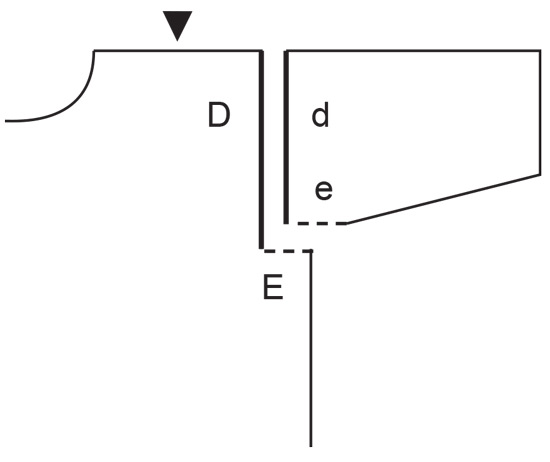
------------------------------------------------------- EXPLANATIONS FOR THE PATTERN: ------------------------------------------------------- CHAIN STITCH: If you work outermost on the hook the chain stitch will often be too tight; 1 chain stitch should be as long as 1 double/treble crochet is wide. CROCHET INFORMATION: Each row starts with 1 chain stitch, which does not replace the first stitch. PATTERN: See diagrams A.1 to A.9. A.5/A.7 show how A.6 starts/ends on body in sizes M, L and XXXL. A.4/A.8 show how A.6 starts/ends on body in sizes S, XL and XXL. A.9 shows neck-line on front pieces. MEASURING TIP: All measurements should be taken while holding the piece up as the garment will stretch when worn. ------------------------------------------------------- START THE PIECE HERE: ------------------------------------------------------- JACKET – SHORT OVERVIEW OF THE PIECE: The body is worked back and forth, bottom up as far as the armholes. Then the front and back pieces are finished separately. The sleeves are worked back and forth, bottom up. The piece is assembled, an edge worked around the opening and 4 ties worked to finish. BODY: Work 202-242-242-282-282-322 CHAIN STITCHES – read description above, with hook size 4 mm and DROPS Belle. Work 1 double crochet in the 2nd chain stitch from the hook, then 1 double crochet in each chain stitch = 201-241-241-281-281-321 double crochets + 1 chain stitch – read CROCHET INFORMATION. Work the next row as follows from the right side: Work A.1 over the first 11 double crochets, A.2 18-22-22-26-26-30 times, A.3 over the last 10 double crochets. Continue this pattern back and forth. REMEMBER THE CROCHET TENSION! When the first 2 rows (A) in A.1/A.2/A.3 are finished, work the 4 rows (B) 4 times in height then 4 rows (C) 1 time. This pattern is now finished and the piece measures approx. 18 cm from the cast-on edge. Work the next row as follows from the right side: SIZES S, XL and XXL: Work A.4 over A.1, A.6 2-3-3 times (make sure the pattern matches A.2), insert 1 marker-thread, work A.6 5-7-7 times, insert 1 marker-thread, work A.6 2-3-3 times (A.6 has now been worked a total of 9-13-13 times and 1 marker-thread inserted in each side of the body), work A.8 over A.3. Continue this pattern back and forth. SIZES M, L and XXXL: Work A.5, A.6 3-3-4 times (make sure the pattern matches A.2), insert 1 marker-thread, work A.6 6-6-8 times, insert 1 marker-thread, work A.6 3-3-4 times (A.6 has now been worked a total of 12-12-16 times and 1 marker-thread inserted in each side of the body), work A.7. Continue this pattern back and forth. ALL SIZES: When the piece measures 28-30-30-32-31-33 cm – read MEASURING TIP, and you are on a row of only chain-spaces and double crochets, work the armholes and finish each piece separately. RIGHT FRONT PIECE: Continue the pattern back and forth, turning for the armhole when there are 3 chain-spaces left by the armhole (armhole = 6 chain-spaces) = 12-15-15-18-18-21 chain-spaces (start and finish the row as before). When the piece measures 38-40-41-43-44-46 cm, work chain-spaces/double crochets back and forth as before over all stitches, without working bobbles. AT THE SAME TIME work the neck as follows: Start from the wrong side and work the first 10-13-12-15-14-17 chain-spaces as shown in A.9 (2-2-3-3-4-4 chain-spaces left mid-front), turn and work back (A.9 only shows size S, but the decreases are the same in all sizes, work the correct number of chain-spaces for your size and follow A.9 for decreasing the neck). I.e. you work 1 less chain-space at the end of every 2nd row 3 times as shown in A.9 = 7-10-9-12-11-14 chain-spaces on the shoulder. Work chain-spaces until the piece measures 48-50-52-54-56-58 cm – remember MEASURING TIP. Cut and fasten the strand. LEFT FRONT PIECE: Work in the same way as the right front piece, but in reverse. When working the neck, start from the right side and follow A.9. BACK PIECE: Start the pattern after 3 chain-spaces after the marker-thread, continue A.6 back and forth over 24-30-30-36-36-42 chain-spaces (start and finish the pattern as shown in A.5/A.7), turn - leaving 3 chain-spaces before the marker-thread on the other side. When the piece measures 38-40-41-43-44-46 cm – adjust to match the front pieces, work chain-spaces/double crochets back and forth as before over all stitches, without working bobbles. When the piece measures 45-47-49-51-53-55 cm and the next row is from the right side, work the shoulders as follows: Work back and forth as before over the first 7-10-9-12-11-14 chain-spaces (start and finish the row with A.5/A.7 as before). Cut and fasten the strand when the piece measures 48-50-52-54-56-58 cm. Turn, start from the wrong side and work the other shoulder in the same way (do not work the middle 10-10-12-12-14-14 chain-spaces = neck). SLEEVES: Work 82-82-82-82-102-102 chain stitches with hook size 4 mm and DROPS Belle. Work 1 double crochet in the 2nd chain stitch from the hook, then 1 double crochet in each chain stitch = 81-81-81-81-101-101 double crochets + 1 chain stitch. Work the next row as follows from the right side: Work A.1 over the first 11 stitches, A.2 6-6-6-6-8-8 times, A.3 over the last 10 stitches. Continue this pattern back and forth. When the first 2 rows (A) in A.1/A.2/A.3 are finished, work the 4 rows (B) 2 times in height then 4 rows (C) 1 time. This pattern is now finished and the piece measures approx. 11 cm from the cast-on edge. Work the next row as follows from the right side: Work A.5, A.6 4-4-4-4-5-5 times (make sure the pattern matches A.2), work A.7 = 24-24-24-24-30-30 chain-spaces. Continue this pattern back and forth. SIZES S, M, XXL and XXXL: When the piece measures 47-43-41-37 cm, work chain-spaces/double crochets back and forth over all stitches without working bobbles. Work until the sleeve measures 52-48-46-42 cm. Cut and fasten the strand. Work the other sleeve in the same way. SIZES L and XL: When the piece measures 14 cm, increase 1 chain-space on one side of the piece by working 1 chain-space + 1 double crochet extra in the first chain-space on the row. Repeat this increase in the last chain-space on the row when the sleeve measures 28 cm = 26-26 chain-spaces. When the piece measures 44-40 cm, work chain-spaces/double crochets back and forth over all stitches without working bobbles. Work until the sleeve measures 49-45 cm. Cut and fasten the strand. Work the other sleeve in the same way. ASSEMBLY: Lay the front and back pieces together, wrong side to wrong side and work one shoulder seam as follows: * 1 double crochet around the first/next chain-space on the front piece, 1 chain stitch, 1 double crochet around the first/next chain-space on the back piece, 1 chain stitch *, work from *-* along the shoulder, finish with 1 double crochet in the last stitch. Cut and fasten the strand. Work the other shoulder seam in the same way. Work the sleeve seams from the bottom as follows: 1 double crochet in the first stitch on one side of the sleeve, 2 chain stitches, 1 double crochet in the first stitch on the other side of the sleeve, * 2 chain stitches, skip 1 cm, 1 double crochet in the next stitch on one side of the sleeve, 2 chain stitches, skip 1 cm, 1 double crochet in the next stitch on the other side of the sleeve *, work from *-* until there is 5 cm left at the top of the sleeve. Cut and fasten the strand. Work the sleeve cap to the armhole as follows: * 1 double crochet around the first/next chain-space on front/back piece, 2 chain stitches, 1 double crochet around the first/next chain-space on sleeve cap, 2 chain stitches *, work from *-* around the armhole. Then work the split at the top of the sleeve to the bottom of the armhole – see sketch. EDGE: Start from the right side at the bottom of the right front piece, work 1 double crochet in the first stitch, * 3 chain stitches, skip 1½ cm, 1 double crochet around the next stitch/chain-space *, work from *-* up the front piece, around the neck and down the left front piece. Cut and fasten the strand. TIES: Work a row of chain stitches 60 cm in length. Cut the strand, pull it through the stitch and tie a knot in each end of the cord. Work 3 more cords. Lay one cord double – thread the loop through the outermost chain-space at the top of the right front piece, thread the ends through the loop and pull tight. Fasten another cord in the same way, 10 - 12 cm below the first one. Fasten 2 cords to the left front piece. |
|||||||||||||||||||||||||||||||
Diagram explanations |
|||||||||||||||||||||||||||||||
|
|||||||||||||||||||||||||||||||
|
|||||||||||||||||||||||||||||||

|
|||||||||||||||||||||||||||||||

|
|||||||||||||||||||||||||||||||
|
|||||||||||||||||||||||||||||||

|
|||||||||||||||||||||||||||||||
|
Have you made this or any other of our designs? Tag your pictures in social media with #dropsdesign so we can see them! Do you need help with this pattern?You'll find tutorial videos, a Comments/Questions area and more by visiting the pattern on garnstudio.com. © 1982-2024 DROPS Design A/S. We reserve all rights. This document, including all its sub-sections, has copyrights. Read more about what you can do with our patterns at the bottom of each pattern on our site. |
|||||||||||||||||||||||||||||||


With over 40 years in knitting and crochet design, DROPS Design offers one of the most extensive collections of free patterns on the internet - translated to 17 languages. As of today we count 304 catalogues and 11422 patterns - 11422 of which are translated into English (UK/cm).
We work hard to bring you the best knitting and crochet have to offer, inspiration and advice as well as great quality yarns at incredible prices! Would you like to use our patterns for other than personal use? You can read what you are allowed to do in the Copyright text at the bottom of all our patterns. Happy crafting!
Comments / Questions (21)
I’m not sure about the crochet information does every row start with a chain stitch or just the first two rows? Regards Marianne
02.03.2024 - 04:44DROPS Design answered:
Dear Marianne, all rows start with a chain stitch, which is used to turn the piece as you work back and forth. Happy crochetting!
03.03.2024 - 19:37I am starting row 8 of A.8 I have completed the Turing chain and chained 4. Where does the first 1 single chain around chain space go? Is it around the chain space between the first and second bobble stitch? Then chain 5 and complete the second single crochet around the chain space between the 4 th and 5 th bobble stitch? Or is the symbol a 1 single crochet in bobble stitch?
21.02.2024 - 18:28DROPS Design answered:
Dear Tracey, the single crochets should be worked around the chain stitches, ie edit in the 1st and in the 4th ch-space, ie between 1st and 2nd boble + between 4th and 5th boble. Happy crocheting!
22.02.2024 - 08:52Working on the body, i am starting row 1 of A.4, A.6 and A.8. This row indicates T symbol which is a single crochet in stitch but I am unsure which stitch to do the single crochet into as the pattern indicates an empty space below and is unclear.
17.02.2024 - 01:59DROPS Design answered:
Dear Leslie, the row with only T symbols is the row that has already been worked (see charts A.1, A.2 and A.3 and the black asterisk at the beginning of the rows). You start the new charts with the chain spaces over the single crochet row. Happy crochetting!
18.02.2024 - 22:16I am working on the swatch gauge A2. Only one side of the pattern shows what to do when finished one row and turning to start the next. Start with chain 10 , row 1 - single crochet across. Row 3 left side of pattern reads a single crochet , ch 3 dc, ch 2, dc chain 3 then it repeat until end of row. Now what do I do to turn to start next row?
05.01.2024 - 22:55DROPS Design answered:
Dear Leslie, remember that you don't work just A.2. You work A.1, A.2 and A.3 together. A.1 shows the beginning of the rows from the right side and A.3 the beginning of the rows from the wrong side. A.2 is the middle repeat, so there are no starting/finishing stitches in it. Row 4 begins with 1 chain stitch and 1 chain stitch for the pattern. Happy crocheting!
07.01.2024 - 23:55I am planning on making this in a large but am concerned the sleeves will be too long as the sleeve will stretch. How can I shorten the sleeve length while remaining it to fit into the large armhole?
31.12.2023 - 15:06DROPS Design answered:
Dear Leslie, if your tension is right the sleeve should fit perfectly the armholes. You can also try on the jacket and adjust the length if needed. Happy crocheting!
02.01.2024 - 11:03Liebes Drops-Team Erst einmal Kompliment, dieser Cardigan ist wunderschön gearbeitet! Ich habe eine Frage zu A.2: Wird in der Reihe nach den Noppen (bspw. 6) das Stäbchen (in der Reihe der Noppen) einfach übersprungen? D.h. nach der letzten festen Masche um den Luftmaschenbogen einer Noppe wird das Stäbchen darunter übersprungen und gleich eine feste Masche um den nächsten Luftmaschenbogen der nächsten Noppe gehäkelt? Besten Dank und herzliche Grüsse Iseult Holman
14.07.2023 - 06:56DROPS Design answered:
Liebe Frau Holman, ja genau, dieses Stäbchen wird übersprungen. Viel Spaß beim häkeln!
27.07.2023 - 10:44I’ve just begun this project. My gauge is 18 stitches per 10 cm. I cast on 202 stitches and my starting piece is now 45 inches long…. Which makes sense with the math but not with the provided measurements of this garment. It’s way too big. Am I doing something wrong or are these numbers wrong? Thank you! Alyssa
06.07.2023 - 20:40Werden in der Reihe nach den Noppen zwischen A1 und A2 und A2 und A3 wirklich keine Luftmaschen gearbeitet. Es müssen immerhin 3 Maschen von der darunter liegenden Noppenreihe überbrückt werden. Die letzte feste Masche in A1 ist zwischen Noppe 4 und Noppe 5 und dann ohne Luftmaschen weiter zwischen Noppe 1 und 2? Danke!
01.07.2023 - 22:16DROPS Design answered:
Liebe Elsa, ja ganz genau so soll man diese Reihe häkeln. Viel Spaß beim häkeln!
03.07.2023 - 10:21Bonjour Mon échantillon de 2X A2 mesure : 11 cm . J 'utilise un crochet 3,5 et le fil belle comme indiqué. Du coup mon ouvrage sera beaucoup trop grand. J'ai recommencé plusieurs fois et mon échantillon est toujours trop grand ? Que puis je faire ? Merci Cordialement
14.06.2023 - 22:45DROPS Design answered:
Bonjour Mme Stachnick, avez-vous essayé avec un crochet plus petit? 3 ou même 2,5 si besoin? N'hésitez pas à bloquer votre échantillon pour vérifier si vous avez bien la taille finale. Bon crochet!
15.06.2023 - 09:14Anleitung DROPS 240-4 Da kann bei der Maschenanzahl etwas nicht stimmen: 18 feste Maschen in der Breite und in der Höhe ergeben bei mir 10 x 10 cm (wie in der Anleitung erwähnt). 2 Rapporte A.2 ergeben bei mir 12 cm. Gemäss Anleitung sollten es 8.5 cm sein. 1 Rapport A.2 basiert auf 10 festen Maschen, 2 Rapporte folglich basieren folglich auf 20 festen Maschen. Und 20 feste Maschen ergeben (siehe oben) 12 cm und nicht 8.5 cm. Können sie mir helfen? Danke.
09.03.2023 - 10:56DROPS Design answered:
Liebe Angelika, Verzeihung für späte Antwort; Maschenprobe ist hier richtig, beide Muster sind verschieden und beim A.2 wird die Arbeit enger als mit A.6 , das mehr elastisch ist. Viel Spaß beim häkeln!
18.04.2023 - 10:21