DROPS Belle
DROPS Belle
53% Cotton, 33% Viscose, 14% Linen
from 3.05 $ /50g
Get the yarn to make this pattern from 33.55$.

The yarn cost is calculated from the pattern’s smallest size and the yarn’s cheapest product type. Looking for an even better price? You might find it on the DROPS Deals!

DROPS SS24

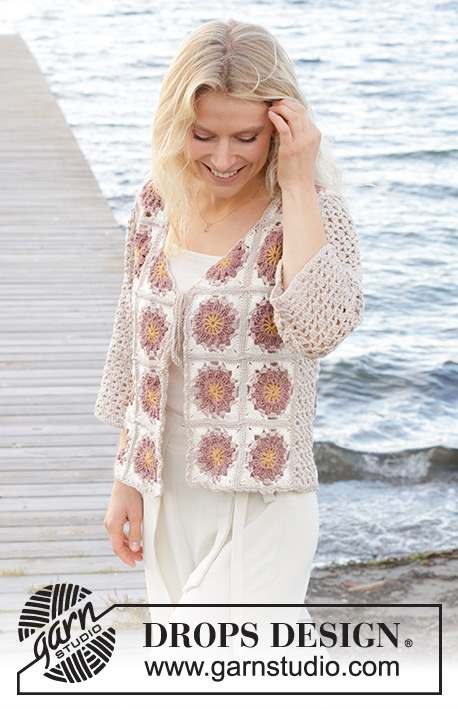
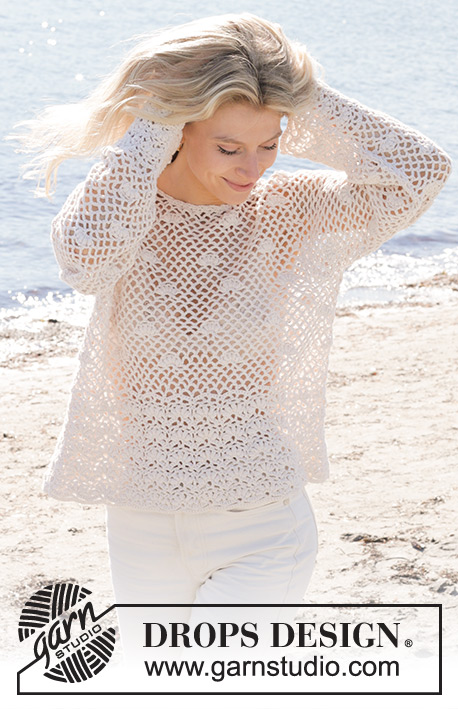
Shell Seeker Sweater

Crocheted sweater in DROPS Belle. The piece is worked bottom up with lace pattern and bobbles. Sizes S - XXXL.

DROPS 240-3
DROPS Design: Pattern vs-103
Yarn group B
-------------------------------------------------------

SIZES:
S - M - L - XL - XXL – XXXL

Finished measurements:
Chest measurements: 100-120-120-140-140-160 cm = 39⅜"-47¼"-47¼"-55"-55"-63"
Full length: 48-50-52-54-56-58 cm = 19"-19¾"-20½"-21¼"-22"-22¾"
All measurements in charts are in cm.

YARN:
DROPS BELLE from Garnstudio (belongs to yarn group B)
550-600-650-700-750-850 g color 26, pearl

CROCHET HOOK:
DROPS CROCHET HOOK SIZE 4 MM = US 6.

CROCHET GAUGE:
2 repeats of A.2 = 8½ cm = 3¼" in width.
1 repeat of A.5 = 10 cm = 4" in width.
18 single crochets in width and 18 rows in height = 10 x 10 cm = 4" x 4".
Hook size is only a guide. If you get too many stitches on 10 cm = 4", change to a larger hook size. If you get too few stitches on 10 cm = 4", change to a smaller hook size.

-------------------------------------------------------

Alternative Yarn – See how to change yarns here
Yarn Groups A to F – Use the same pattern and change the yarn here
Yarn usage using an alternative yarn – Use our yarn converter here

-------------------------------------------------------

DROPS Belle
DROPS Belle
53% Cotton, 33% Viscose, 14% Linen
from 3.05 $ /50g
Get the yarn to make this pattern from 33.55$.

The yarn cost is calculated from the pattern’s smallest size and the yarn’s cheapest product type. Looking for an even better price? You might find it on the DROPS Deals!

Pattern instructions

NOTE: This pattern is written in American English. All measurements in charts are in cm. For conversion from inches to cm - click here. There are different terms for crocheting in American and British English. If this pattern includes crochet, click for "crochet terms" here. For this pattern in British English, please click here.
-------------------------------------------------------

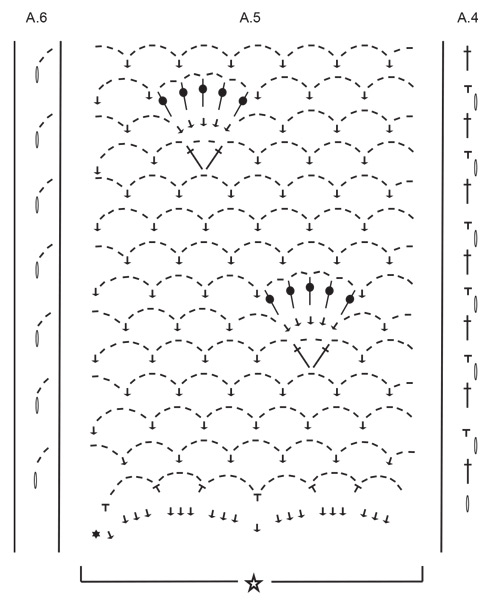
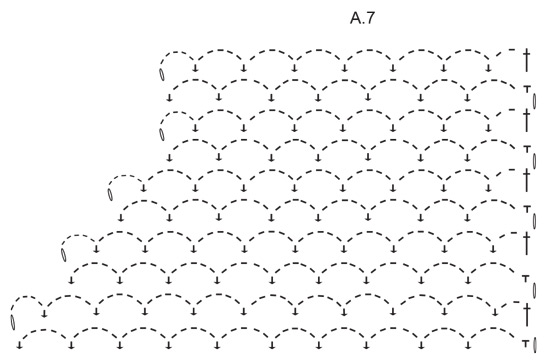
EXPLANATIONS FOR THE PATTERN:

-------------------------------------------------------

CHAIN STITCH:
If you work outermost on the hook the chain stitch will often be too tight; 1 chain stitch should be as long as 1 single/douvle crochet is wide.

CROCHET INFORMATION:
Each row starts with 1 chain stitch, which does not replace the first stitch.

PATTERN:
See diagrams A.1 to A.7.

MEASURING TIP:
All measurements should be taken while holding the piece up as the garment will stretch when worn.

-------------------------------------------------------

START THE PIECE HERE:

-------------------------------------------------------

SWEATER – SHORT OVERVIEW OF THE PIECE:
The back, front and sleeves are worked separately, back and forth and bottom up. The piece is assembled and the neck worked to finish.

BACK PIECE:
Work 102-122-122-142-142-162 CHAIN STITCHES – read description above, with hook size 4 MM = US 6 and DROPS Belle. Work 1 single crochet in the 2nd chain stitch from the hook, then 1 single crochet in each chain stitch = 101-121-121-141-141-161 single crochets + 1 chain stitch – read CROCHET INFORMATION.
Work the next row as follows from the right side: Work A.1 over the first 11 single crochets, A.2 8-10-10-12-12-14 times, A.3 over the last 10 single crochets. Continue this pattern back and forth. REMEMBER THE CROCHET GAUGE!
When the first 2 rows (A) in A.1/A.2/A.3 are finished, work the 4 rows (B) 4 times in height then 4 rows (C) 1 time. This pattern is now finished and the piece measures approx. 18 cm = 7" from the cast-on edge.
Work the next row as follows from the right side: Work A.4, A.5 5-6-6-7-7-8 times (make sure the pattern matches the stitches below), A.6. Continue this pattern back and forth.
When the piece measures 28-30-30-32-31-33 cm = 11"-11¾"-11¾"-12½"-12¼"-13" – read MEASURING TIP, and you are on a row of only chain-spaces and single crochets, work the armholes on each side as follows: Cut the strand, turn, skip the first 3 chain-spaces (3 chain-spaces + 3 single crochets) (= 1/2 a repeat of A.5), work A.5 over the next 24-30-30-36-36-42 chain-spaces (start and finish the row with A.4/A.6 as before), do not work the last 3 chain-spaces on the row (= 1/2 repeat of A.5). Continue this pattern back and forth.
When the piece measures 42-44-45-47-48-50 cm = 16½"-17¼"-17¾"-18½"-19"-19¾", work chain-spaces/single crochets back and forth as before over all stitches, without working bobbles.
When the piece measures 45-47-49-51-53-55 cm = 17¾"-18½"-19¼"-20"-21"-21⅝" and the next row is from the right side – remember MEASURING TIP, work the shoulders as follows: Work back and forth as before over the first 7-10-9-12-11-14 chain-spaces (start and finish the row with A.4/A.6 as before). Cut and fasten the strand when the piece measures 48-50-52-54-56-58 cm = 19"-19¾"-20½"-21¼"-22"-22¾". Turn, start from the wrong side and work the other shoulder in the same way (do not work the middle 10-10-12-12-14-14 chain-spaces = neck).

FRONT PIECE:
Work in the same way as the back until the front piece measures 42-44-45-47-48-50 cm = 16½"-17¼"-17¾"-18½"-19"-19¾". Now work chain-spaces/single crochets back and forth over all stitches, without working bobbles. In addition, work the neck as follows: Start from the right side and work the first 10-13-12-15-14-17 chain-spaces as shown in A.7, turn and work back (A.7 only shows size S, but the decreases are the same in all sizes, work the correct number of chain-spaces for your size and follow A.7 for working the neck). You work 1 less chain-space at the end of every 2nd row 3 times as shown in A.7 = 7-10-9-12-11-14 chain-spaces on the shoulder. Work chain-spaces until the piece measures 48-50-52-54-56-58 cm = 19"-19¾"-20½"-21¼"-22"-22¾". Cut and fasten the strand.
Turn, start from the wrong side and work the other shoulder in the same way.

SLEEVES:
Work 82-82-82-82-102-102 chain stitches with hook size 4 MM = US 6 and DROPS Belle. Work 1 single crochet in the 2nd chain stitch from the hook, then 1 single crochet in each chain stitch = 81-81-81-81-101-101 single crochets + 1 chain stitch.
Work the next row as follows from the right side: Work A.1 over the first 11 stitches, A.2 6-6-6-6-8-8 times, A.3 over the last 10 stitches. Continue this pattern back and forth.
When the first 2 rows (A) in A.1/A.2/A.3 are finished, work the 4 rows (B) 2 times in height then 4 rows (C) 1 time. This pattern is now finished and the piece measures approx. 11 cm = 4⅜" from the cast-on edge.
Work the next row as follows from the right side:
Work A.4, A.5 4-4-4-4-5-5 times (make sure the pattern matches A.2), work A.6 = 24-24-24-24-30-30 chain-spaces. Continue this pattern back and forth.

SIZES S, M, XXL and XXXL:
When the piece measures 47-43-41-37 cm = 18½"-17"-16⅛"-14½", work chain-spaces/single crochets back and forth over all stitches without working bobbles. Work until the sleeve measures 52-48-46-42 cm = 20½"-19"-18"-16½". Cut and fasten the strand. Work the other sleeve in the same way.

SIZES L and XL:
When the piece measures 14 cm = 5½", increase 1 chain-space on one side of the piece by working 1 chain-space + 1 single crochet extra in the first chain-space on the row. Repeat this increase in the last chain-space on the row when the sleeve measures 28 cm = 11" = 26-26 chain-spaces.
When the piece measures 44-40 cm = 17¼"-15¾", work chain-spaces/single crochets back and forth over all stitches without working bobbles. Work until the sleeve measures 49-45 cm = 19¼"-17¾". Cut and fasten the strand. Work the other sleeve in the same way.

ASSEMBLY:
Lay the front and back pieces together, wrong side to wrong side and work one shoulder seam as follows: * 1 single crochet around the first/next chain-space on the front piece, 1 chain stitch, 1 single crochet around the first/next chain-space on the back piece, 1 chain stitch *, work from *-* along the shoulder, finish with 1 single crochet in the last stitch. Cut and fasten the strand. Work the other shoulder seam in the same way.

Work the side seams as follows: 1 single crochet in the first stitch on the front piece, 2 chain stitches, 1 single crochet in the first stitch on the back piece, * 2 chain stitches, skip 1 cm = ⅜", 1 single crochet around the next stitch on the front piece, 2 chain stitches, skip 1 cm = ⅜", 1 single crochet around the next stitch on the back piece *, work from *-* along the side.

Work the sleeve seams from the bottom as follows: 1 single crochet in the first stitch on one side of the sleeve, 2 chain stitches, 1 single crochet in the first stitch on the other side of the sleeve, * 2 chain stitches, skip 1 cm = ⅜", 1 single crochet in the next stitch on one side of the sleeve, 2 chain stitches, skip 1 cm = ⅜", 1 single crochet in the next stitch on the other side of the sleeve *, work from *-* until there is 5 cm = 2" left at the top of the sleeve. Cut and fasten the strand.

Work the sleeve cap to the armhole as follows: * 1 single crochet around the first/next chain-space on front/back piece, 2 chain stitches, 1 single crochet around the first/next chain-space on sleeve cap, 2 chain stitches *, work from *-* around the armhole. Then work the split at the top of the sleeve to the bottom of the armhole – see sketch.

NECK:
Start from the right side on one shoulder, work 1 single crochet in the first stitch, * 3 chain stitches, skip 1½ cm = ½", 1 single crochet around the next stitch/chain-space *, work from *-* around the neck. Finish with 3 chain stitches and 1 slip stitch in the first single crochet on the round. Cut and fasten the strand.

Diagram

All measurements in charts are in cm.

symbols = 1 chain stitch
symbols = 1 single crochet in stitch
symbols = 1 chain stitch to turn
symbols = 1 douvle crochet in stitch/around chain-space
symbols = 1 single crochet around chain-space
symbols = 5 single crochets around chain-space
symbols = 1 bobble in stitch worked as follows: * Make 1 yarn over, insert the hook into the single crochet, make 1 yarn over and pull it through the stitch (both yarn overs are pulled as far as they go = approx. 1.5 cm = ½") *, repeat from *-* 2 more times = 6 loops + 1 stitch on hook. Make 1 yarn over and pull it through all loops + stitch (= 1 stitch left on hook)
symbols = this row is already worked; it shows how the next row is worked in/around the stitches
symbols = 1 repeat
symbols = work d to D and e to E
diagram
diagram
diagram
diagram
diagram
Do you have a question? See a list of frequently asked questions (FAQ)

Knitting tension is what determines the final measurements of your work, and is usually measured per 10 x 10 cm. It is provided like so: number of stitches in width x number of rows in height - eg: 19 stitches x 26 rows = 10 x 10 cm.

The knitting tension is very individual; some people knit/crochet loosely while others work tightly. You adjust the knitting tension with the needle size, which is why the suggested needle size only serve as a guide! You need to adjust this (up or down) to ensure that YOUR knitting tension matches the knitting tension provided in the pattern. If you work with a different knitting tension than provided you will have a different yarn consumption, and your work will have different measurements than what the pattern suggests.

The knitting tension also determines which yarns can replace each other. As long as you achieve the same knitting tension you can replace one yarn with another.

See DROPS lesson: How to measure your tension/gauge

See DROPS video: How to make a gauge tension swatch

The required amount of yarn is provided in grams, eg: 450 g. To calculate how many balls you’ll need you first need to know how many grams are in 1 ball (25g, 50g or 100g). This information is available if you click on the individual yarn quality on our pages. Divide the amount required with the amount of each ball. For example, if each ball is 50g (the most common amount), the calculation will be as follows: 450 / 50 = 9 balls.

The important thing when changing from one yarn to another is that the knitting/crochet tension remains the same. This is so that the measurements of the finished piece will be the same as on the sketch provided. It is easier to achieve the same knitting tension using yarns from the same yarn group. It is also possible to work with multiple strands of a thinner yarn to achieve the knitting tension of a thicker one. Please try our yarn converter. We recommend you to always work a test swatch.

Please NOTE: when changing yarn the garment might have a different look and feel to the garment in the photo, due to individual properties and qualities of each yarn.

See DROPS lesson: Can I use a different yarn than the one mentioned in the pattern?

All our yarns are categorised into yarn groups (from A to F) according to thickness and knitting tension – group A contains the thinnest yarns and group F the thickest. This makes it easier for you to find alternative yarns to our patterns, should you wish to switch yarn. All yarns within the same group have a similar knitting tension and can easily replace each other. However, different yarn qualities have different structures and properties which will give the finished work a unique look and feel.

Click here for an overview of the yarns in each yarn group

At the top of all our patterns you’ll find a link to our yarn converter, which is a helpful tool should you wish to use a different yarn than suggested. By filling in the yarn quality you wish to replace, the amount (in your size) and number of strands, the converter will present good alternative yarns with the same knitting tension. Additionally it will tell you how much you’ll require in the new qualities and whether you’ll need to work with multiple strands. Most skeins are 50g (some are 25g or 100g).

If the pattern is worked with multiple colours, every colour will have to be converted separately. Similarly, if the pattern is worked with several strands of different yarns (for example 1 strand Alpaca and 1 strand Kid-Silk) you will have to find alternatives for each, individually.

Click here to see our yarn converter

Since different yarns have different qualities and textures we have chosen to keep the original yarn in our patterns. However, you can easily find options among our available qualities by using our yarn converter, or simply pick a yarn from the same yarn group.

It is possible that some retailers still have discontinued yarns in stock, or that someone has a few skeins at home that they would like to find patterns for.

The yarn converter will provide both alternative yarn as well as required amount in the new quality.

If you think it's hard to decide what size to make, it can be a good idea to measure a garment you own already and like the size of. Then you can pick the size by comparing those measures with the ones available in the pattern's size chart.

You'll find the size chart at the bottom of the pattern.

See DROPS lesson: How to read size chart

The needle size provided in the pattern serves only as a guide, the important thing is to follow the knitting tension. And since knitting tension is very individual, you will have to adjust the needle size to ensure that YOUR tension is the same as in the pattern – maybe you’ll have to adjust 1, or even 2 needle sizes, up or down to achieve the correct tension. For this, we recommend that you work test swatches.

Should you work with a different knitting tension than the one provided, the measurements of the finished garment might deviate from the measurement sketch.

See DROPS lesson: How to measure your tension/gauge

See DROPS video: How to make a gauge tension swatch

Working a garment top-down provides more flexibility and room for personal adjustment. For example it is easier to try the garment on while working, as well as making adjustments to length of yoke and shoulder caps.

The instructions are carefully explaining every step, in the correct order. Diagrams are adjusted to the knitting direction and are worked as usual.

The diagram depicts all rows/rounds, and every stitch seen from the right side. It is read from bottom to top, from right to left. 1 square = 1 stitch.

When working back and forth, every other row is worked from the right side and every other row is worked from the wrong side. When working from the wrong side, the diagram will have to be worked reversed: from left to right, knit stitches are purled, purl stitches are knit etc.

When working in the round every round is worked from the right side and the diagram are worked from right to left on all rounds.

See DROPS lesson: How to read knitting diagrams

The diagram depicts all rows/rounds, and every stitch seen from the right side. It is worked from bottom to top, from right to left.

When working back and forth every other row is worked from the right side: from right to left and every other row is worked from the wrong side: from left to right.

When working in the round, every row in the diagram are worked from the right side, from right to left.

When working a circular diagram you start in the middle and work your way outwards, counter clockwise, row by row.

The rows usually start with a given number of chain stitches (equivalent to the height of the following stitch), this will either be depicted in the diagram or explained in the pattern.

See DROPS lesson: How to read crochet diagrams

Instructions for working several diagrams after each other on the same row/round, will often be written like so: “work A.1, A.2, A.3 a total of 0-0-2-3-4 times". This means you work A.1 once, then A.2 is worked once, and A.3 is repeated (in width) the number of times provided for your size – in this case like so: S = 0 times, M = 0 times, L=2 times, XL= 3 times and XXL = 4 times.

The diagrams are worked as usual: begin with the first row in A.1, then work the first row in A.2 etc.

See DROPS lesson: How to read knitting diagrams

See DROPS lesson: How to read crochet diagrams

The total width of the garment (from wrist-to-wrist) will be larger in the larger sizes, despite the actual sleeves being shorter. The larger sizes have longer sleeve caps and wider shoulders, so there will be a good fit in all sizes.

The measurement sketch/schematic drawing provides information regarding the full length of the garment. If it’s a jumper or a jacket the length is measured from the highest point on the shoulder (usually closest to the neckline), and straight down to the bottom of the garment. It is NOT measured from the tip of shoulder. Similarly, the length of yoke is measured from the highest point on the shoulder and down to where yoke is split into body and sleeves.

See DROPS lesson: How to read a schematic drawing

Diagrams are often repeated on the round or in height. 1 repeat is the diagram the way it appears in the pattern. If it says to work 5 repeats of A.1 in the round, then you work A.1 a total of 5 times after/next to each other in the round. If it says to work 2 repeats of A.1 vertically/in height you work the entire diagram once, then begin again at the start and work the entire diagram one more time.

Chain stitches are slightly narrower than other stitches and to avoid working the cast-on edge too tight, we simply chain more stitches to begin with. The stitch count will be adjusted on the following row to fit the pattern and measurement sketch.

The rib edge is more elastic and will contract slightly compared to, for example, stocking stitch. By increasing before the rib edge, you avoid a visible difference in width between the rib edge and the rest of the body.

It’s very easy to cast off too tightly, and by making yarn overs while casting off (and simultaneously casting these off) you avoid a too tight cast off edge.

See DROPS video: How to bind off with yarn overs (yo)

To achieve an even increase (or decrease) you can increase on, for example: every 3rd and 4th row alternately, like so: work 2 rows and increase on the 3rd row, work 3 rows and increase on the 4th. Repeat this until the increase is complete.

See DROPS lesson: Increase or decrease 1 st on every 3rd and 4th row alternately

Should you prefer to work in the round instead of back and forth, you may of course adjust the pattern. You’ll need to add steeks mid-front (usually 5 stitches), and follow the instructions. When you would normally turn and work from the wrong side, simply work across the steek and continue in the round. At the end you’ll cut the piece open, pick up stitches to work bands, and cover the cut edges.

See DROPS video: How to knit steeks and cut open

Should you prefer to work back and forth instead of in the round, you may of course adjust the pattern so you work the pieces separately and then assemble them at the end. Divide the stitches for the body in 2, add 1 edge stitch in each side (for sewing) and work the front and back pieces separately.

See DROPS lesson: Can I adapt a pattern for circular needles into straight needles?

Pattern repeats can vary slightly in the different sizes, in order to get the correct proportions. If you’re not working the exact same size as the garment in the photo, yours might deviate slightly. This has been carefully developed and adjusted so that the complete impression of the garment is the same in all sizes.

Make sure to follow instructions and diagrams for your size!

If you have found a pattern you like which is available in women’s size it’s not very difficult to convert it to men’s size. The biggest difference will be the length of sleeves and body. Start working on the women size that you think would fit across the chest. The additional length will be worked right before you cast off for the armhole/sleeve cap. If the pattern is worked top-down you can add the length right after the armhole or before the first decrease on sleeve.

Regarding additional yarn amount, this will depend on how much length you add, but it is better with a skein too many than too few.

All yarns will have excess fibres (from production) that might come off as lint or shedding. Brushed yarns (ie hairier yarns) have more of these loose, excess fibres, causing more shedding.

Shedding also depends on what is worn under or over the garment, and whether this pulls at the yarn fibres. It’s therefore not possible to guarantee that there will be no shedding

Below are some tips on how to get the best result when working with hairier yarns:

1. When the garment is finished (before you wash it) shake it vigorously so the looser hairs come off. NOTE: do NOT use a lint roller, brush or any method that pulls at the yarn.

2. Place the garment in a plastic bag and put it in your freezer - the temperature will cause the fibres to become less attached to each other, and excess fibres will come off easier.

3. Leave in the freezer for a few hours before taking it out and shaking it again.

4. Wash the garment according to the instructions on the yarn label.

Pilling is a natural process that happens to even the most exclusive of fibers. It's a natural sign of wear and tear that is hard to avoid, and that is most visible in high friction areas of your garment like a sweater's arms and cuffs.

You can make your garment look as new by removing the pilling, using a fabric comb or a pill/lint remover.

Still can't find the answer you need? Then scroll down and leave your question so one of our experts can try to help you. This will be done normally within 5 to 10 working days.
In the meantime, you can read the questions and answers that others have left to this pattern or join the DROPS Workshop on Facebook to get help from fellow knitters/crocheters!

You might also like...

Post a comment to pattern DROPS 240-3

We would love to hear what you have to say about this pattern!

If you want to leave a question, please make sure you select the correct category in the form below, to speed up the answering process. Required fields are marked *.

Comments / Questions (30)

country flag Ms Debora Pultrone wrote:

I’m not understanding the assembly of the sweater very well. Is it possible to do a video of assembling or a video that has the type of assembling that is the same so I can watch and follow

27.10.2023 - 11:16

DROPS Design answered:

Dear Mrs Pultrone, this video we show how to crochet two pieces together almost the same way as explained in this pattern, expect crocheting in the stitches from previous row crochet in the chain spaces as explained in this pattern and crochet only 2 chains instead of 4 here. Happy crocheting!

28.10.2023 - 08:13

country flag Manu wrote:

Hallo ich habe schon mehrere Anleitungen von Drops Design gehäkelt, immer mit Erfolg. Bei dieser sieht das anders aus wie auf den Bildern, ab A4, 5,6, wird das Teil viel weiter, die Luftmaschenbögen stimmen aber mit der Vorlage überein, ist das normal??? Grüße von Manu

15.09.2023 - 13:37

DROPS Design answered:

Liebe Manu, die ersten Diagramme A.1, A.2 und A.3 werden etwas fester gehäkelt - A.5 x 1 Mal in der Breite muss ca 10 cm sein,benutzen Sie eine kleinere Häkelnadel dafür wenn es nötig ist. Viel Spaß beim häkeln!

15.09.2023 - 15:53

country flag Liliane wrote:

Bonjour, J'ai fait le dos et le devant sans soucis. Je cherche une vidéo pas a pas pour faire les augmentations des manches Merci de me dire s'il existe un lien

14.07.2023 - 16:24

DROPS Design answered:

Bonjour Liliane, nous n'avons pas de video correspondante. Les augmentations des manches ne sont realisees que dans les tailles L et XL - vous devez augmenter 1 arceau d'un côté de l'ouvrage en crochetant 1 arceau + 1 maille serrée en plus dans le premier arceau au début du rang. Répéter cette augmentation dans le dernier arceau du rang quand la manche mesure 28 cm. Bon crochet!

17.07.2023 - 23:20

country flag Gitte wrote:

Hallo! Muss nochmal nachfragen. Habe Rücken- und Vorderteil fertig. Auf dem Foto sieht man 5 x Noppen in der Höhe, also A5. Ich komme beim Rücken auf 4 x Noppen und beim Vordergeil nur auf 3 x Noppen in der Höhe. Die Maße passen aber, also Gesamtlänge ca. 50 cm. Kann das sein? LG

22.06.2023 - 17:51

DROPS Design answered:

Liebe Gitte, es kann wegen Maschenprobe sein, aber so wichtig ist es aber nicht, das wichtigste ist, daß die Maßen richtig sind. Viel Spaß beim häkeln!

23.06.2023 - 07:34

country flag Gitte wrote:

Hallo zusammen. Habe schon einige Anleitungen von Euch gehäkelt. Aber bei dieser habe ich irgendwie Schwierigkeiten. Lt. Anleitung sollen ab ca. 44 cm keine Noppen mehr gehäkelt werden. Wenn ich das Foto ansehe, gehen diese aber bis oben hin. Muss ich nicht im Musterverlauf bleiben? Arbeite mit Nadelstärke 3. Bei 4 kamen die Maße nicht hin. Danke im Voraus. LG

20.06.2023 - 15:05

DROPS Design answered:

Liebe Gitte, so wird es gehäkelt, damit man keine unfertige Noppen bei den Schultern hat, so sind die 6 letzten centimers bei den Schultern ohne Noppen - dh genauso wie beim Foto. Viel Spaß beim häkeln!

20.06.2023 - 15:43

country flag Diane wrote:

Goedemiddag ik ben bij het rugpand en nu moet ik beginnen aan het armsgat maar snap het niet.Moet ik opnieuw opstarten aan de kant waar ik geeindigt ben(heb draad afgeknipt).en moet ik dan in een lus beginnen of in de 4de vaste?

29.05.2023 - 12:14

DROPS Design answered:

Dag Diane,

Je knipt inderdaad de draad af en keert het werk. Dan sla je de eerste 3 lossenlussen over en hecht je aan met een halve vaste in de vaste. Je haakt nu ook weer A.4 en A.6 aan het begin/einde van de toer en in plaats van 1 stokje haak je nu 3 lossen aan het begin om het stokje te vervangen.

01.06.2023 - 13:04

country flag Els wrote:

Hoe komt het dat bij de mouwen l meer toeren nodig heeft dan xl dat lijkt mij onlogisch

28.05.2023 - 12:33

DROPS Design answered:

Dag Els,

Dat komt omdat maat xl een grotere pas heeft, waardoor de mouwen korter zijn.

29.05.2023 - 15:41

country flag Els wrote:

Je zegt proeflap 18 vasten op 18 toeren is 10 cm op 10 cm en voor maat xxl heb ik 141 vasten nodig voor de rug jullie zeggen dat ik dan op 60 cm moet uitkomen maar ik kom op 78 cm uit ook als ik het uitreken op mijn rekenmachine en voor maat s kom ik uit op 56cm in plaats van 40cm wat doe ik mis gelieve mij de helpen bedankt

24.05.2023 - 18:32

DROPS Design answered:

Dag Els,

Wanneer je begint met het haken van de telpatronen, krimpt het werk een beetje in elkaar omdat er boogjes ontstaan aan de onderkant. Op die manier kom je, als het goed is, alsnog op de juiste maat uit.

24.05.2023 - 21:08

country flag Goullier wrote:

Pour la mesure du dos c’est 28cm à partir de la chaînette de base ou après les 18 cm merci

20.05.2023 - 21:19

DROPS Design answered:

Bonjour Mme Goullier, les 28 cm pour l'emmanchure en taille S se mesurent à partir de la chaînette de base. Bon crochet!

22.05.2023 - 08:20

country flag Danielle Goullier wrote:

Pouvez vous me dire à quel tour de poitrine correspond la taille s je suis perdue merci

10.05.2023 - 09:41

DROPS Design answered:

Bonjour Mme Goullier, pour trouver votre taille, mesurez un vêtement similaire que vous avez et dont vous aimez la forme, et comparez ces mesures à celles du schéma du bas de page; vous pourrez ainsi choisir l'ampleur nécessaire en fonction de vos propres mesures. Retrouvez plus d'infos ici. Bon crochet!

10.05.2023 - 16:32