
Popular categories
Looking for a yarn?


|
||||||||||||||||||||||
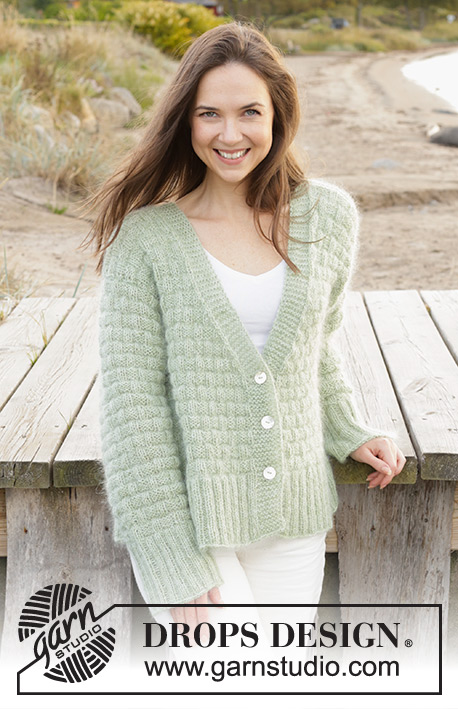
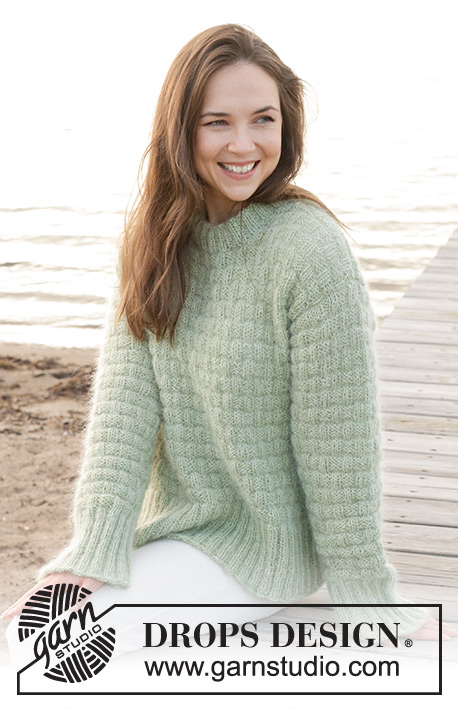
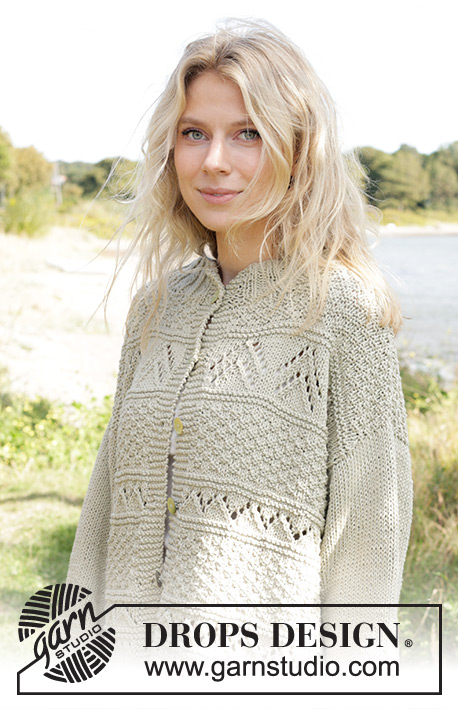
Mossy Mingle Cardigan |
||||||||||||||||||||||
 |
 |
|||||||||||||||||||||
Knitted jacket in DROPS Paris. The piece is worked bottom up, with lace and relief pattern. Sizes XS - XXL.
DROPS 241-25 |
||||||||||||||||||||||
|
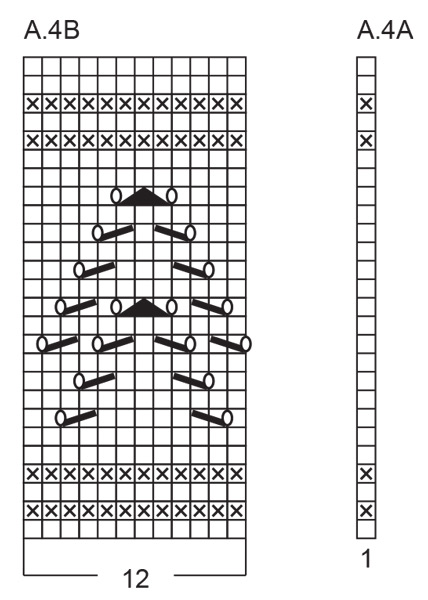
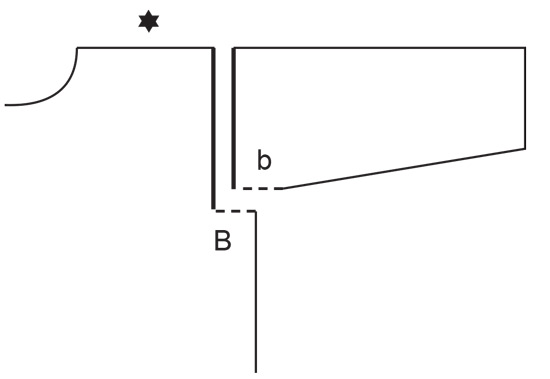
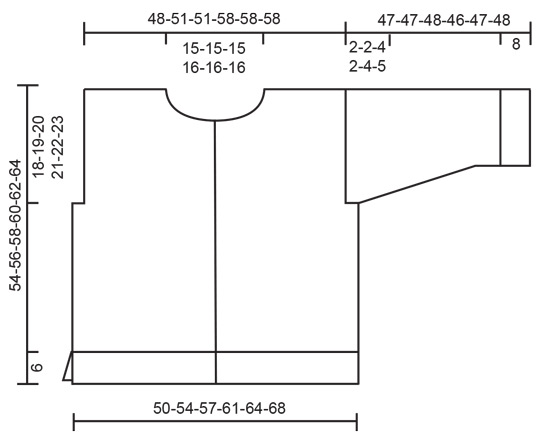
------------------------------------------------------- EXPLANATIONS FOR THE PATTERN: ------------------------------------------------------- RIDGE/GARTER STITCH (worked back and forth): Knit all rows. 1 ridge = knit 2 rows. PATTERN: See diagrams A.1 to A.4. The diagrams show all rows in the pattern from the right side. BUTTONHOLES: Work the buttonholes on the right band. 1 BUTTONHOLE = Knit together the 3rd and 4th stitch from the edge, make 1 yarn over which is knitted on the next row to leave a hole. Work the buttonholes when the piece measures: XS: 8, 17, 25, 33, 41 and 49 cm = 3⅛", 6¾", 9¾", 13", 16⅛" and 19¼" S: 8, 17, 26, 34, 42 and 50 cm = 3⅛", 6¾", 10¼", 13⅜", 16½" and 19¾" M: 8, 17, 26, 35, 44 and 52 cm = 3⅛", 6¾", 10¼", 13¾", 17¼" and 20½" L: 8, 17, 26, 35, 44 and 53 cm = 3⅛", 6¾", 10¼", 13¾", 17¼" and 21" XL: 8, 17, 26, 35, 45 and 55 cm = 3⅛", 6¾", 10¼", 13¾", 17¾" and 21⅝" XXL: 8, 17, 27, 37, 47 and 57 cm = 3⅛", 6¾", 10⅝", 14½", 18½" and 22½" DECREASE TIP (for sleeves): Decrease 1 stitch on each side of the marker-thread as follwos: Work until 3 stitches before the marker-thread, knit 2 together, knit 2 (marker-thread sits between these 2 stitches), slip 1 stitch as if to knit, knit 1 and pass the slipped stitch over the knitted stitch. ------------------------------------------------------- START THE PIECE HERE: ------------------------------------------------------- JACKET – SHORT OVERVIEW OF THE PIECE: The back and front pieces are worked separately back and forth, bottom up. The piece is sewn together. Stitches are knitted up around each armhole and the sleeves first worked back and forth, then in the round with short circular needle/double pointed needles. The neck is worked to finish. BACK PIECE: Cast on 104-108-116-124-132-140 stitches with circular needle size 4 MM = US 6 and DROPS Paris. Purl 1 row from the wrong side, then work from the right side as follows: 1 stitch in GARTER STITCH – read description above, * knit 2, purl 2 *, work from *-* until there are 3 stitches left, knit 2 and 1 stitch in garter stitch. Continue this rib for 6 cm = 2⅜". Knit 1 row from the right side and decrease 17-15-17-19-21-23 stitches evenly spaced = 87-93-99-105-111-117 stitches. Change to circular needle size 5 MM = US 8. Work stockinette stitch with 1 garter stitch on each side. REMEMBER THE KNITTING GAUGE! When the piece measures 8-7-7-8-8-8 cm = 3⅛"-2¾"-2¾"-3⅛"-3⅛"-3⅛", work as follows from the right side: 1 garter stitch, A.1A, work A.1B until there is 1 stitch left, 1 garter stitch. When A.1 is finished in height, work as follows: 1 garter stitch, A.2B, A.2C until there is 1 stitch left, 1 garter stitch. (In diagram A.2C work the last stitch in row 7 together with the next stitch). Continue this pattern – AT THE SAME TIME on the last row in A.2 adjust the stitch-number to 86-94-98-106-110-118 stitches. When A.2 is finished in height, work A.3 with 1 garter stitch on each side until the piece measures 24-24-25-26-27-28 cm = 9½"-9½"-9¾"-10¼"-10⅝"-11" (finish after a row from the wrong side). Now work A.2 one more time in the same way – AT THE SAME TIME on the first row adjust the stitch-number to 87-93-99-105-111-117 stitches. Then work A.3 with 1 garter stitch on each side – AT THE SAME TIME on the first row adjust the stitch-number to 86-94-98-106-110-118 stitches. When the piece measures 37-37-38-39-40-41 cm = 14½"-14½"-15"-15¼"-15¾"-16⅛", bind off 2-4-5-4-5-10 stitches for the armholes at the beginning of the next 2 rows = 82-86-88-98-100-98 stitches. Continue A.3 with 1 garter stitch on each side until the piece measures 38-39-41-42-44-46 cm = 15"-15¼"-16⅛"-16½"-17¼"-18" from the cast-on edge and adjust the stitch-number to 80-88-88-100-100-100 stitches on the last row. Work as follows from the right side: 1 garter stitch, A.4A over the next 3-1-1-1-1-1 stitches, work A.4B until there are 4-2-2-2-2-2 stitches left, A.4A over the next 3-1-1-1-1-1 stitches and 1 garter stitch. When A.4 is finished in height, work A.3 with 1 garter stitch on each side to finished length. At the same time, when the piece measures 52-54-56-58-60-62 cm = 20½"-21¼"-22"-22¾"-23⅝"-24⅜", bind off the middle 24-24-24-26-26-26 stitches for the neck and finish each shoulder separately. On the next row bind off 1 stitch from the neck = 27-31-31-36-36-36 stitches on the shoulder. Work until the piece measures 54-56-58-60-62-64 cm = 21¼"-22"-22¾"-23⅝"-24⅜"-25¼". Bind off slightly loosely with knit from the right side. Work the other shoulder in the same way. RIGHT FRONT PIECE: Cast on 57-61-65-69-73-77 stitches with circular needle size 4 MM = US 6 and DROPS Paris. Purl 1 row from the wrong side, then work from the right side (from mid-front) as follows: 6 garter stitches (band), * knit 2, purl 2 *, work from *-* until there are 3 stitches left, knit 2 and 1 garter stitch. Continue this rib for 6 cm = 2⅜". Knit 1 row from the right side and decrease 7-8-9-10-11-12 stitches evenly spaced (do not decrease over the band) = 50-53-56-59-62-65 stitches. Change to circular needle size 5 MM = US 8. Work stockinette stitch with 6 band stitches in garter stitch mid-front and 1 edge stitch in garter stitch towards the side. When the piece measures 8-7-7-8-8-8 cm = 3⅛"-2¾"-2¾"-3⅛"-3⅛"-3⅛", work from the right side as follows: 6 garter stitches, A.1A, work A.1B until there are 1-2-1-2-1-2 stitches left, A.1a over the next 0-1-0-1-0-1 stitch and 1 garter stitch. When A.1 is finished in height, work as follows: 6 garter stitches, A.2A over the next 3-1-0-1-0-1 stitches, A.2B, work A.2C until there are 4-3-1-3-1-3 stitches left, A.2A over the next 3-2-0-2-0-2 stitches, 1 garter stitch. On the next-to-last row in A.2 adjust the stitch-number to 51-55-55-59-63-67 stitches. When A.2 is finished in height, work A.3 with 6 garter stitches mid-front and 1 garter stitch towards the side until the piece measures 24-24-25-26-27-28 cm = 9½"-9½"-9¾"-10¼"-10⅝"-11" – match the length to the back piece. Work A.2 one more time in the same way – AT THE SAME TIME on the first row adjust the stitch-number to 50-53-56-59-62-65 stitches. Continue with A.3, 6 garter stitches mid-front and 1 garter stitch towards the side – AT THE SAME TIME on the first row adjust the stitch-number to 51-55-55-59-63-67 stitches. When the piece measures 37-37-38-39-40-41 cm = 14½"-14½"-15"-15¼"-15¾"-16⅛", bind off 2-4-5-4-5-10 stitches at the beginning of the next row from the side = 49-51-50-55-58-57 stitches. Continue A.3 with 6 garter stitches mid-front and 1 garter stitch towards the side until the piece measures 38-39-41-42-44-46 cm = 15"-15¼"-16⅛"-16½"-17¼"-18" from the cast-on edge – match the height to the back piece. Work the next row from the right side as follows: 6 garter stitches, A.4A over the next 3-5-3-1-1-2 stitches, work A.4B until there are 3-5-4-1-2-2 stitches left, A.4A over the next 2-4-3-0-1-1 stitches, 1 garter stitch. On the next-to-last row in A.4 adjust the stitch-number to 49-51-51-57-57-57 stitches. When A.4 is finished in height, work A.3 with 6 garter-stitches mid-front and 1 garter stitch towards the side to finished length. When the piece measures 48-50-52-53-55-57 cm = 19"-19¾"-20½"-21"-21⅝"-22½", place the 11-11-11-12-13-13 outermost stitches towards mid-front on a thread for the neck; to avoid cutting the strand, work these stitches first. Continue the pattern and bind off at the beginning of each row from the neck as follows: 3 stitches 1 time, 2 stitches 4-3-3-2-2-2 times and 1 stitch 0-0-0-2-1-1 times = 27-31-31-36-36-36 stitches on the shoulder. Work until the piece measures 54-56-58-60-62-64 cm = 21¼"-22"-22¾"-23⅝"-24⅜"-25¼". Bind off slightly loosely with knit from the right side. LEFT FRONT PIECE: Cast on 57-61-65-69-73-77 stitches with circular needle size 4 MM = US 6 and DROPS Paris. Purl 1 row from the wrong side, then work from the right side (from the side) as follows: 1 garter stitch, * knit 2, purl 2 *, work from *-* until there are 8 stitches left, knit 2 and 6 garter stitches (band). Continue this rib for 6 cm = 2⅜". Knit 1 row from the right side and decrease 7-8-9-10-11-12 stitches evenly spaced (do not decrease over the bands) = 50-53-56-59-62-65 stitches. Change to circular needle size 5 MM = US 8. Work stockinette stitch with 1 edge stitch in garter stitch towards the side and 6 band stitches in garter stitch. When the piece measures 8-7-7-8-8-8 cm = 3⅛"-2¾"-2¾"-3⅛"-3⅛"-3⅛", work from the right side as follows: 1 garter stitch, A.1A over the next 0-1-0-1-0-1 stitch, work A.1B until there are 7 stitches left, A.1a and 6 garter stitches. When A.1 is finished in height, work A.2 as follows: 1 garter stitch, A.2A over the next 3-2-0-2-0-2 stitches, work A.2C until there are 10-8-7-8-7-8 stitches left, A.2B, A.2A over the next 3-1-0-1-0-1 stitches, 6 garter stitches. On the next-to-last row in A.2 adjust the stitch-number to 51-55-55-59-63-67 stitches. When A.2 is finished in height, work A.3 (starting with the last 2 stitches in diagram so you end up with knit by the band), with 1 garter stitch towards the side and 6 garter stitches towards mid-front until the piece measures 24-24-25-26-27-28 cm = 9½"-9½"-9¾"-10¼"-10⅝"-11". Work A.2 one more time in the same way – AT THE SAME TIME on the first row adjust the stitch-number to 50-53-56-59-62-65 stitches. Continue with A.3, 6 garter stitches mid-front and 1 garter stitch towards the side – AT THE SAME TIME on the first row adjust the stitch-number to 51-55-55-59-63-67 stitches. When the piece measures 37-37-38-39-40-41 cm = 14½"-14½"-15"-15¼"-15¾"-16⅛", bind off 2-4-5-4-5-10 stitches at the beginning of the next row from the side = 49-51-50-55-58-57 stitches. Continue A.3 with 1 garter stitch towards the side and 6 garter stitches mid-front until the piece measures 38-39-41-42-44-46 cm = 15"-15¼"-16⅛"-16½"-17¼"-18" from the cast-on edge – match the height to the back piece. Work the next row from the right side as follows: 1 garter stitch, A.4A over the next 2-4-3-0-1-1 stitches, work A.4B until there are 9-11-9-7-7-8 stitches left, A.4A over the next 3-5-3-1-1-2 stitches, 6 garter stitches. On the next-to-last row in A.4 adjust the stitch-number to 49-51-51-57-57-57 stitches. When A.4 is finished in height, work A.3 with 1 garter stitch towards the side and 6 garter-stitches mid-front to finished length. When the piece measures 48-50-52-53-55-57 cm = 19"-19¾"-20½"-21"-21⅝"-22½", place the 11-11-11-12-13-13 outermost stitches towards mid-front on a thread for the neck; to avoid cutting the strand, work these stitches first. Continue the pattern and bind off at the beginning of each row from the neck as follows: 3 stitches 1 time, 2 stitches 4-3-3-2-2-2 times and 1 stitch 0-0-0-2-1-1 times = 27-31-31-36-36-36 stitches on the shoulder. Work until the piece measures 54-56-58-60-62-64 cm = 21¼"-22"-22¾"-23⅝"-24⅜"-25¼". Bind off slightly loosely with knit from the right side. ASSEMBLY: Sew the shoulder seams. SLEEVES: Use circular needle size 5 MM = US 8 and knit up from the right side 61-65-68-71-75-78 stitches inside the 1 edge stitch around the armhole (do not knit up stitches in the bind-off stitches under the sleeve). Insert 1 marker in the middle of the row – the sleeve is measured from here. Work stockinette stitch back and forth for 2-2-4-2-4-5 cm = ¾"-¾"-1½"-¾"-1½"-2". Join the sleeve together and continue in the round with short circular needle/double pointed needles size 5 MM = US 8. Insert 1 marker-thread at the beginning of the round and allow it to follow your work onwards. Start at the marker-thread and work stockinette stitch. When the sleeve measures 6-6-8-6-8-8 cm = 2⅜"-2⅜"-3⅛"-2⅜"-3⅛"-3⅛" from the marker on top of the sleeve, decrease 2 stitches under the sleeve – read DECREASE TIP. Decrease like this every 4-3½-3-3-2½-2½ cm = 1½"-1¼"-1⅛"-1⅛"-1"-1" a total of 8-9-10-11-12-13 times = 45-47-48-49-51-52 stitches. Continue working until the sleeve measures 39-39-40-38-39-40 cm = 15¼"-15¼"-15¾"-15"-15¼"-15¾" from the marker. Knit 1 round and increase 7-9-8-11-13-12 stitches evenly spaced = 52-56-56-60-64-64 stitches. Change to double pointed needles size 4 MM = US 6. Work rib (knit 2, purl 2) for 8 cm = 3⅛". Bind off slightly loosely. The sleeve measures approx. 47-47-48-46-47-48 cm = 18½"-18½"-19"-18"-18½"-19". Work the other sleeve in the same way. ASSEMBLY: Sew the bottom of the armholes together – see sketch. Sew the side seams inside the 1 edge stitch – start at the armhole and sew as far as the rib at the bottom, leaving a split in the sides. NECK: Knit up from the right side 78 to 86 stitches around the neck (including the stitches on the threads) with circular needle size 4 MM = US 6 and DROPS Paris. The stitch-number should be divisible by 4+2. Work as follows from mid-front: 6 garter stitches, * knit 2, purl 2 *, work from *-* until there are 8 stitches left, knit 2, 6 garter stitches. Continue this rib for 6 cm = 2⅜". Bind off slightly loosely. |
||||||||||||||||||||||
Diagram explanations |
||||||||||||||||||||||
|
||||||||||||||||||||||

|
||||||||||||||||||||||
|
||||||||||||||||||||||
|
||||||||||||||||||||||
|
||||||||||||||||||||||
|
Have you made this or any other of our designs? Tag your pictures in social media with #dropsdesign so we can see them! Do you need help with this pattern?You'll find tutorial videos, a Comments/Questions area and more by visiting the pattern on garnstudio.com. © 1982-2024 DROPS Design A/S. We reserve all rights. This document, including all its sub-sections, has copyrights. Read more about what you can do with our patterns at the bottom of each pattern on our site. |
||||||||||||||||||||||


With over 40 years in knitting and crochet design, DROPS Design offers one of the most extensive collections of free patterns on the internet - translated to 17 languages. As of today we count 304 catalogs and 11422 patterns - 11417 of which are translated into English (US/in).
We work hard to bring you the best knitting and crochet have to offer, inspiration and advice as well as great quality yarns at incredible prices! Would you like to use our patterns for other than personal use? You can read what you are allowed to do in the Copyright text at the bottom of all our patterns. Happy crafting!
Comments / Questions (18)
Im Diagramm A2C sind dort zwischen Umschlag sowie Abnahme jeweils 4 Maschen oder 5 Maschen rechts ? Am Anfang der Reihe 1M Kraus rechts durch A2B Umschlag und Abnahme, dann 4 rechts und dann wieder Umschlag und Abnahme und bei allen anderen 5 Maschen rechts dazwischen?
21.04.2024 - 13:15DROPS Design answered:
Liebe Julia, es sind jeweils nur 4 M rechts zwischen Abnahmen in A.2B/A.2C und dem Umschlag/der Abnahmen nächsten A.2C. Viel Spaß beim Stricken!
22.04.2024 - 08:40Buongiorno, sto facendo il dietro e sono confusa fra A2B e A2C, sono un totale di 7 maglie per riga. Quando arrivo alla riga 7 faccio un gettato, poi una maglia accavallata e poi devo fare 3 o 4 maglie diritte prima della prossima gettata? Se devo mantenere 7 maglie per riga dovrei farne 3, è giusto? Grazie
18.10.2023 - 21:44DROPS Design answered:
Buonasera Silvia, nel diagramma A.2C deve lavorare l'ultima maglia del ferro 7 insieme alla maglia successiva. Buon lavoro!
29.10.2023 - 23:18Good time of the day! Half-way through this beautiful knit. Could you please kindly confirm if the back should be 7 stitches narrower than the front with overlapped bands ? Like, size XS is 50 st wide after the rib decrease for both left and front pieces, and the back piece is 87 st wide. My maths are (50+50)-6 =94 st in total for the buttoned up front. Am I making an error it should be this way? Thank you in advance!
14.10.2023 - 16:42DROPS Design answered:
Hi Elena, Yes, your maths is correct. The shape of the jacket means that the difference in stitch number on the front and back pieces will not be visible in the finished garment. The stitch numbers are important for the pattern on each piece. Happy knitting!
16.10.2023 - 08:51Mod. 241-25. Delantero derecho. Cuando la labor mida 50 cm se “colocan 11 puntos más externos hacia centro delantero en gancho auxiliar” luego cerrar 3 puntos 1 vez, 2 puntos 3 veces y 1 punto= 31 puntos hombro. (51+11-3-2-2-2-1=52). No entiendo toda esta explicación para que salgan 31 puntos y cómo se tejen los 11 puntos, no hay vídeo de la explicación. Gracias
06.07.2023 - 00:39DROPS Design answered:
Hola Dolores, los 11 puntos más externos en el centro del delantero están incluidos en los 51. Estos 11 puntos del centro del delantero se trabajan e inmediatamente se deslizan y dejan en espera en un gancho auxiliar o hilo; puedes ver el vídeo en el siguiente enlace: https://www.garnstudio.com/video.php?id=301&lang=en. Por lo tanto, tendremos 40 puntos en la aguja. Después de esto, cerramos 1 punto 1 vez y 2 puntos 3 veces (1 punto sería 0 veces, por lo que lo puedes ignorar). Así te quedan 31 puntos para el hombro.
10.07.2023 - 15:25Thank you for your response to my question about row7 A2B & A2C chart but it still did not come out right for me. I had a very experienced knitter try it and she thought the stitch count was off. Was the garment test knitted ? Thank you.
09.06.2023 - 22:40I am making Mossy Mingle cardigan and am confused by A2C row seven. I am making size M. You knit A2B ( y/o sl1,k1, PSSO ) So you end up with the y/o and 1 stitch ? Then it says to work the last stitch in row 7 together with the next stitch. I am confused how to do that. Can you help please.
01.06.2023 - 15:16DROPS Design answered:
Dear Mrs Roberts, on this row, work A.2B as follows: 1 yarn over (= this is now the stitch of A.2B), knit together the next stitch (the one from A.2B) + the first stitch in A.2C (= this is now the new first stitch of A.2C, and repeat for next repeat: at th end ofA.2, make 1 yarn over (= new last stitch of A.2C), knit the last stitch A.2c together with the first stitch next A.2C (= new first stitch next A.2C) and so on. Happy knitting!
01.06.2023 - 16:48I am making the Mossy Mingle Cardigan and about to start the A4 section of the right front in size M. I have 50 stitches but when you start the first row of that section doing 6 garter, 3 A4A, and three repeats of A4B, A4A again you end up with an extra stitch ?
20.05.2023 - 19:18DROPS Design answered:
Dear Joan, you work three repeats of A.4B and 1 more stitch, which is worked as the first stitch in A.4B. Then, you will have 4 stitches left, which are worked as explained in the pattern. Happy knitting!
21.05.2023 - 19:08I am making the Mossy Mingle Cardigan and about to start the A4 section of the right front in size M. I have 50 stitches but when you start the first row of that section doing 6 garter, 3 A4A, and three repeats of A4B, A4A again you end up with an extra stitch ?
20.05.2023 - 18:51DROPS Design answered:
Dear Joan, you work three repeats of A.4B and 1 more stitch, which is worked as the first stitch in A.4B. Then, you will have 4 stitches left, which are worked as explained in the pattern. Happy knitting!
21.05.2023 - 19:08My question is about the A.1B chart, do you yarn over and knit one stitch ? Thanks
15.05.2023 - 23:02DROPS Design answered:
Dear Mrs Roberts, when working A.1, you first start working the stitch in A.1A, then repeat the 2 stitches A.1B (= yarn over, knit 2 together) until 1 stitch remain. Happy knitting!
16.05.2023 - 09:06You are very helpful. Thank you for your prompt answer.
02.05.2023 - 18:09