
Popular categories
Looking for a yarn?


|
||||||||||||||||||||||||||||||||||||||||
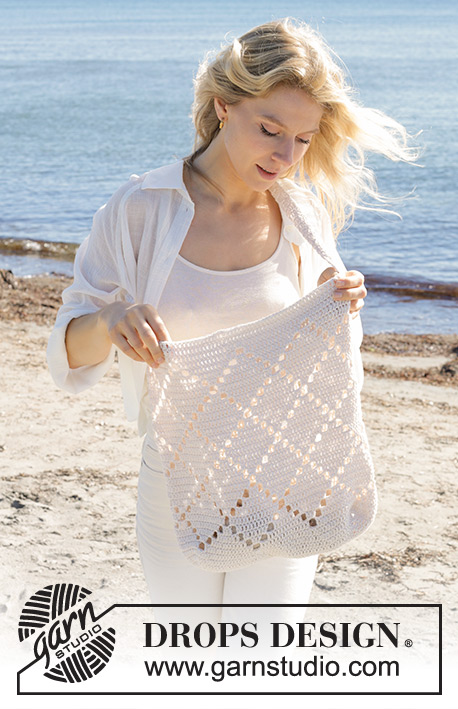
Daisy Daze Bag |
||||||||||||||||||||||||||||||||||||||||
 |
 |
|||||||||||||||||||||||||||||||||||||||
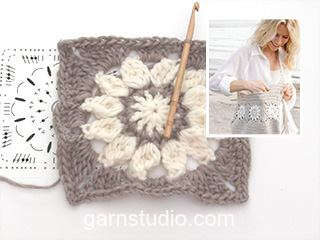
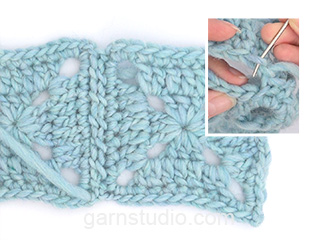
Crocheted bag in DROPS Bomull-Lin or DROPS Paris. The piece is worked in squares, with treble crochets and double crochets.
DROPS 238-12 |
||||||||||||||||||||||||||||||||||||||||
|
------------------------------------------------------- EXPLANATIONS FOR THE PATTERN: ------------------------------------------------------- PATTERN: See diagram A.1. CHAIN STITCH: If you work outermost on the hook the chain stitch will often be too tight; 1 chain stitch should be as long as 1 double/treble/double-treble crochet is wide. CROCHET INFORMATION (for the bag itself, not the squares): At the beginning of each round of double crochets work 1 chain stitch, which does NOT replace the first double crochet. The round finishes with 1 slip stitch in the first chain stitch. Turn and work the next round from the right side. At the beginning of each round of treble crochets work 3 chain stitches, which do NOT replace the first treble crochet. The round finishes with 1 slip stitch in the 3rd chain stitch at the beginning of the round. Turn and work the next round from the wrong side. When working the sides and strap back and forth, replace the first treble crochet on the row with 3 chain stitches and the first double crochet with 1 chain stitch. DECREASE TIP-1: Decrease 2 treble crochets by working 3 treble crochets together: Start 1 stitch before the marker-stitch, work 1 treble crochet, but wait with the last yarn over and pull-through, work 1 treble crochet in the marker-stitch but wait with the last yarn over and pull-through, work 1 treble crochet in the next stitch and pull the last yarn over through all 4 loops on the hook (2 stitches decreased). Move the marker to the top of this stitch. DECREASE TIP-2: Decrease 2 treble crochets by working 3 treble crochets together: BEGINNING OF ROW: Work 1 treble crochet in the first stitch, then work 3 treble crochets together as follows: work 1 treble crochet in each of the next 2 stitches, but wait with the last yarn over and pull-through on both these treble crochets, work 1 treble crochet in the next stitch and pull the last yarn over through all 4 loops on the hook. END OF ROW: Work until there are 4 stitches left on the row, work 1 treble crochet in each of the next 2 stitches, but wait with the last yarn over and pull-through on both these treble crochets, work 1 treble crochet in the next stitch and pull the last yarn over through all 4 loops on the hook. Work 1 treble crochet in the last stitch. DECREASE TIP-3: Decrease 1 treble crochet by working 2 treble crochets together: BEGINNING OF ROW: Work 1 treble crochet in the first stitch, then work 2 treble crochets together as follows: work 1 treble crochet in the next stitch but wait with the last yarn over and pull-through, work 1 treble crochet in the next stitch and pull the last yarn over through all 3 loops on the hook. END OF ROW: Work until there are 3 stitches left on the row, work 1 treble crochet in the next stitch but wait with the last yarn over and pull-through, work 1 treble crochet in the next stitch and pull the last yarn over through all 3 loops on the hook , work 1 treble crochet in the last stitch. ------------------------------------------------------- START THE PIECE HERE: ------------------------------------------------------- BAG – SHORT OVERVIEW OF THE PIECE: Start by working 6 squares which are then sewn together in a strip. Continue along the bottom edge of the strip, working down the bag and decreasing for the bottom. The bag is sewn together mid-bottom. Then work the other side of the band, up to the strap, which is worked on one side and sewn to the other. SQUARE: Work 4 chain stitches with hook size 4 mm and colour off white DROPS Bomull-Lin or DROPS Paris. Form them into a ring with 1 slip stitch in the first chain stitch. Work PATTERN in the round – read description above (rounds 1 and 3 are worked in colour off white Bomull-Lin or Paris, rounds 2, 4 and 5are worked with colour sand Bomull-Lin or colour wheat Paris). Cut and fasten the strands when A.1 is finished. Work 6 squares. Sew the squares together to form a band – sew with colour sand/wheat and make sure the beginning of the round on each square faces the same way and towards the seam. Sew the first and last squares together to form a ring. LOWER SECTION: Work along the bottom edge of the band with colour sand DROPS Bomull-Lin or colour wheat DROPS Paris. Start from the right side with 1 slip stitch around the chain-space in the corner of a square, work 3 chain stitches, then 1 treble crochet in each double crochet and 1 treble crochet around each chain-space in the corners of the squares = 22 stitches along each square = 132 treble crochets and + 3 chain stitches, finish the round with 1 slip stitch in the 3rd chain stitch at the beginning of the round. Read CROCHET INFORMATION and work alternately 1 round of double crochets from the wrong side and 1 round of treble crochets from the right side (with 1 stitch in each stitch) for 7 cm, finishing with a round of double crochets from the wrong side. BOTTOM: Lay the bag flat, with 3 squares in front and 3 squares behind – insert 1 marker-thread in each side = 66 stitches between the threads. Insert now 4 markers – each one inserted in a stitch; they are used when decreasing the bottom: Count 5 stitches out from each side of both marker-threads and insert 1 marker in the 6th stitch (4 markers with 10 stitches between them on the short sides and 54 stitches on the long sides). Work in the round, back and forth as before, but on each round of treble crochets decrease 2 treble crochets at each marker – read DECREASE TIP-1 (8 stitches decreased on the round). Decrease like this on each treble crochet round 3 more times = 100 stitches. Cut the strand and pull it through the stitch. Lay the bag flat and sew the bottom together, with 1 stitch in each of the 50 stitches, sewing through both layers. TOP SECTION: Work around the top edge of the band with hook size 4 mm and colour sand DROPS Bomull-Lin or colour wheat DROPS Paris. Start from the right side with 1 slip stitch in the seam between 2 squares in the side of the bag, work 3 chain stitches, then 1 treble crochet in each double crochet and 1 treble crochet around each chain-space in the corners of the squares = 22 stitches along each square = 132 treble crochets and + 3 chain stitches, finish the round with 1 slip stitch in the 3rd chain stitch at the beginning of the round. Remember CROCHET INFORMATION and work alternately 1 round of double crochets from the wrong side and 1 round of treble crochets from the right side (with 1 stitch in each stitch) for 5 cm, finishing with a round of double crochets from the wrong side. Now work the side-sections: Lay the bag flat and insert 1 marker in each side = 66 stitches between the markers. You do not work the middle 32 stitches on the front and back of the bag; work only the 34 stitches on each side (the markers sit in the middle of these 34 stitches). Cut the strand. SIDE-SECTION 1: Start 17 stitches before the marker on one side of the bag, using colour sand/wheat, and work 1 treble crochet in each of the next 34 stitches – AT THE SAME TIME decrease 2 treble crochets on each side – read DECREASE TIP-2. Continue back and forth with 1 row double crochets from the wrong side and 1 row treble crochets from the right side and decrease 2 treble crochets on each row of treble crochets 4 more times each side. Then decrease 1 treble crochet on each row of treble crochets 3 times on each side – read DECREASE TIP-3 = 8 stitches. Cut and fasten the strand. SIDE-SECTION 2: Work in the same way as the first side-section. When finished, do not cut the strand. Insert 1 marker in the row and continue back and forth with alternate rows of double and treble crochets until the strap measures 50 cm from the marker (or to desired length). Sew the strap to the other side of the bag, with 1 stitch in each of the 8 stitches. |
||||||||||||||||||||||||||||||||||||||||
Diagram explanations |
||||||||||||||||||||||||||||||||||||||||
|
||||||||||||||||||||||||||||||||||||||||

|
||||||||||||||||||||||||||||||||||||||||
|
Have you made this or any other of our designs? Tag your pictures in social media with #dropsdesign so we can see them! Do you need help with this pattern?You'll find tutorial videos, a Comments/Questions area and more by visiting the pattern on garnstudio.com. © 1982-2024 DROPS Design A/S. We reserve all rights. This document, including all its sub-sections, has copyrights. Read more about what you can do with our patterns at the bottom of each pattern on our site. |
||||||||||||||||||||||||||||||||||||||||


With over 40 years in knitting and crochet design, DROPS Design offers one of the most extensive collections of free patterns on the internet - translated to 17 languages. As of today we count 304 catalogues and 11422 patterns - 11422 of which are translated into English (UK/cm).
We work hard to bring you the best knitting and crochet have to offer, inspiration and advice as well as great quality yarns at incredible prices! Would you like to use our patterns for other than personal use? You can read what you are allowed to do in the Copyright text at the bottom of all our patterns. Happy crafting!
Comments / Questions (9)
Jeg kjøpte 50 g av drops Paris farge nr 27 og 250g av fargen 17 som det stod i oppskriften. Men ble skuffet da det ikke ble nok av garnet nr 27. jeg har kjøpt mange forskjellige farger av dere og har heklet dette mønsteret flere ganger men aldri opplevd at det har blitt for lite garn.
03.04.2024 - 21:25Bonjour, pour le bas du sac, si un rang est fait à l'endroit et un sur l'envers, il va donc falloir faire une couture ou est-ce que je peux crocheter le long de la bande en rond ? Merci de votre réponse
11.03.2023 - 19:18DROPS Design answered:
Bonjour Angélique, vous pouvez, mais on crochète ici en allers et retours en joignant à la fin de chaque tour pour crocheter alternativement sur l'endroit (brides) et sur l'envers (mailles serrées), si vous restez toujours sur l'endroit, le visuel sera automatiquement différent - vous n'aurez pas de couture car vous terminez chaque rang/tour par 1 maille coulée - cf INFO CROCHET. Bon crochet!
13.03.2023 - 09:39Kan jag beställa detta möstret för jag har ingen möjlighet att skriva ut det? Mönster heter 238-12
25.02.2023 - 18:42DROPS Design answered:
Hei Marie. Beklager, men en slik tjeneste har vi ikke. Men noe nettbutikker (muligens vanlige butikker) kan du få bestilt / skrevet ut oppskriften når du kjøper garn. mvh DROPS Design
27.02.2023 - 13:36Sacochique
20.01.2023 - 09:05Summer feeling
18.01.2023 - 18:38Margritli
18.01.2023 - 13:25Vintage
18.01.2023 - 08:48Edelweiß
17.01.2023 - 21:48Name Suggestion: Daisies
17.01.2023 - 16:52