
Popular categories
Looking for a yarn?


|
|||||||||||||
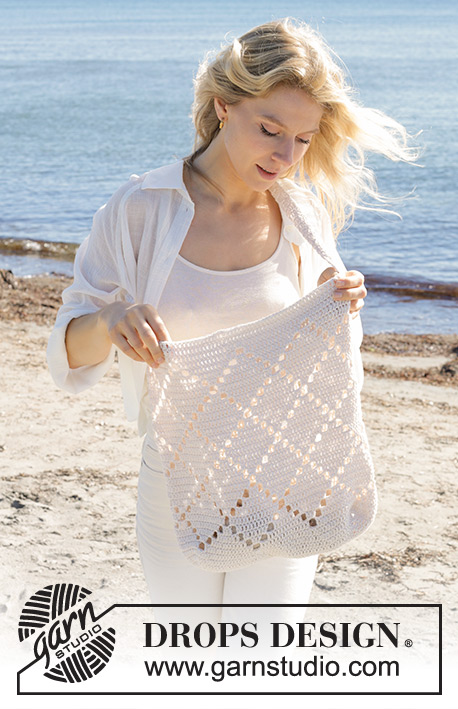
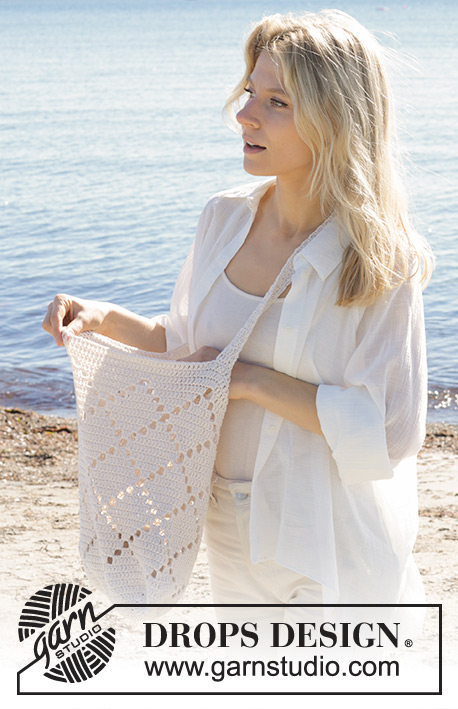
Diamond Bag |
|||||||||||||
 |
 |
||||||||||||
Crocheted bag in DROPS Belle or DROPS Cotton Light. The piece is worked bottom up with lace pattern.
DROPS 238-5 |
|||||||||||||
|
------------------------------------------------------- EXPLANATIONS FOR THE PATTERN: ------------------------------------------------------- PATTERN: See diagrams A.1 to A.3. CHAIN STITCH: If you work outermost on the hook the chain stitch will often be too tight; 1 chain stitch should be as long as 1 double crochet is wide. CROCHET INFORMATION: At the beginning of each round of double crochets, work 3 chain stitches which replace the first double crochet (i.e. skip the first double crochet from the previous round). The round finishes with 1 slip stitch in the 3rd chain stitch at the beginning of the round. DECREASE TIP: Decrease 1 double crochet by working 2 double crochets together: Work 1 double crochet, but wait with the last yarn over and pull-through (= 2 loops on the hook), work the next double crochet and, when working the last yarn over, pull it through all 3 loops on the hook (= 1 double crochet decreased). ------------------------------------------------------- START THE PIECE HERE: ------------------------------------------------------- BAG - SHORT OVERVIEW OF THE PIECE: The piece is worked in the round, bottom up. The strap is worked to finish. BAG: Work 40 CHAIN STITCHES – read description above, using hook size 4 MM = US 6 and DROPS Belle or DROPS Cotton Light. ROUND 1: Read CROCHET INFORMATION and PATTERN and work both sides of the chain-stitch row as follows: Work A.1 in the first chain stitch, 1 double crochet in each of the next 38 chain stitches, A.1 in the next chain stitch, turn and work back along the other side of the chain-stitch row: Work A.1 in the same chain stitch as A.1 on the other side, 1 double crochet in each of the next 38 chain stitches, A.1 in the same chain stitch as on the other side of the chain-stitch row = 84 double crochets and 4 chain-spaces on the round. ROUNDS 2-5: Continue in the round with A.1 and 1 double crochet in each double crochet – AT THE SAME TIME, on round 5 decrease 4 double crochets evenly spaced - read DECREASE TIP = 144 stitches. REMEMBER THE CROCHET GAUGE! When A.1 is finished in height, work A.2, 8 times on the round. When A.2 is finished, work A.3, 8 times on the round. A.3 is worked 3 times in height. The piece now measures approx. 34 cm = 13⅜" – measured from the chain-stitch row. Work 3 rounds of double crochets (on the first round work 1 double crochet in each double crochet and 1 double crochet around each chain stitch, then 1 double crochet in each double crochet on the next 2 rounds). Cut and fasten the strand. The piece measures approx. 38 cm = 15" – measured from the chain-stitch row. STRAP: Work 7 chain stitches with hook size 4 MM = US 6 and DROPS Belle or DROPS Cotton Light. Work 1 double crochet in the 4th chain stitch from the hook and 1 double crochet in each of the other 3 chain stitches = 5 stitches (first double crochet on each row replaced by 3 chain stitches). Work double crochets back and forth until the strap measures 60 cm = 23⅝". Now work an edge around the strap as follows: Work 1 single crochet around the first row on the long-side, * 2 chain stitches, 1 single crochet around the next row *, work from *-* along the long-side, work 1 single crochet in each stitch along the short-side, work from *-* along the other long-side and finish with 1 single crochet in each stitch along the other short-side. NOTE: If the strap is tight, work more chain stitches between the single crochets. Cut and fasten the strand. Sew the strap to each side of the bag. |
|||||||||||||
Diagram explanations |
|||||||||||||
|
|||||||||||||

|
|||||||||||||

|
|||||||||||||
|
Have you made this or any other of our designs? Tag your pictures in social media with #dropsdesign so we can see them! Do you need help with this pattern?You'll find tutorial videos, a Comments/Questions area and more by visiting the pattern on garnstudio.com. © 1982-2024 DROPS Design A/S. We reserve all rights. This document, including all its sub-sections, has copyrights. Read more about what you can do with our patterns at the bottom of each pattern on our site. |
|||||||||||||


With over 40 years in knitting and crochet design, DROPS Design offers one of the most extensive collections of free patterns on the internet - translated to 17 languages. As of today we count 304 catalogs and 11422 patterns - 11417 of which are translated into English (US/in).
We work hard to bring you the best knitting and crochet have to offer, inspiration and advice as well as great quality yarns at incredible prices! Would you like to use our patterns for other than personal use? You can read what you are allowed to do in the Copyright text at the bottom of all our patterns. Happy crafting!
Comments / Questions (14)
Tak jak innym osobom po pierwszym okrazeniu wyszlo mi 114 slupkow. Nie mam pojecia skad sie biera 24 dodatkowe slupki w 2 okrezeniu (wg tlumaczen w komentarzach) jesli doadaejmy ich po 6 na kazdym koncu - to samo sie dotyczy 3go okrazenia i 40 slupkow jesli dodajemy 20 itd...
05.04.2024 - 17:05DROPS Design answered:
Witaj, po pierwszym okrążeniu powinnaś mieć 84 słupki i 4 łuki: (4 x A.1)+ (2 x 38) = 8 słupków i 4 łuki z 2 oczek łańcuszka każdy + 76 słupków. Po zakończeniu schematu A.1 powinno być 5 okrążeń (nie licząc łańcuszka początkowego). W okr. 2 powinno być: 76+24=100 sł i 4 łuki. Okr. 3: 76+40=116 sł i 4 łuki. Okr. 4: 76+56=132 sł i 4 łuki. Okr. 5: 76+72=148 sł (ale tutaj równomiernie zamykasz 4 sł i zostaje 144 sł jak w opisie). Pozdrawiamy!
08.04.2024 - 09:01Die Tasche ist in Drops Belle sehr hübsch geworden. Leider ist sie als solche überhaupt nicht nutzbar, da sie bei wenig Inhalt sehr massiv durchhängt...Schade.
20.03.2024 - 19:38Es hat geklappt... Die Tasche ist sehr schön! Ich habe verschiedene Garne für verschiedene Modelle ausprobiert, alle sind toll! Manchmal wäre es gut, mehr Fotos und/oder Zeichnungen von den Modellen und Details zu haben. Aber insgesamt ist alles super!
13.03.2024 - 12:39Ich verstehe das Diagramm A1 nicht. Wie kommt man von 40 auf 84 Maschen, wenn A1 nur in der ersten und den letzten Masche gehäkelt wird? Wo werden die Luftmaschen vom A1 gehäkelt? Danke im Voraus! Seit über 30 Jahren habe ich nicht gehäkelt😄
11.03.2024 - 15:05DROPS Design answered:
Liebe Frau Grassi, so wird es gehäkelt: A.1 in die erste Lm (= 1 Lm / 2 Stb bei der 1. R.), je 1 Stäb in die 38 Luftmaschen (= 38 Lm / 38 Stb), A.1 in die nächste Lm (= 1 Lm / 2 Stb bei der 1. R.), die Arbeit drehen, dann so häkeln: A.1 in dieselbe Lm wie A.1 an der anderen Seite der Lm (= 2 Stb bei der 1. R.) , je 1 Stb in die nächsten 38 Lm (= 38 Stb), die Runde mit A.1 in dieselbe Lm wie A.1 am Anfang der Luftmaschenkette beenden (= 2 Stb bei der 1. R.) = 2+38+2+2+38+2= 84 Stäbchen und 4 Luftmaschenbögen (über 1+38+1=40 Lm). Viel Spaß beim Häkeln!
11.03.2024 - 15:59Det er første gang, jeg har fundet en opskrift med et diagram og jeg forstår simpelthen ikke hvordan jeg kommer videre fra mine 40 luftmasker. Jeg har prøvet at finde nogle videoer, men uden rigtig meget held.
09.02.2024 - 17:16DROPS Design answered:
Hej Pips, du hækler hver maske ifølge masken i diagrammet, du starter nederst til højre i diagrammet og hækler mod venstre. Du starter med nederste række i A.1 som du hækler i hvert hjørne som beskrevet i opskriften :)
22.02.2024 - 10:52Liebes Drops Team, muss ich A2 beide Reihen 8x häkeln? Und bei der zweiten Reihe Stäbchen um die Luftmaschen? Vielen Dank für eine Antwort 😊
04.12.2023 - 16:29DROPS Design answered:
Liebe Claudia, häkeln Sie zuerst die 1. Reihe die ganze Runde (18 Stäbchen x 8 Mal), dann häkeln Sie die 2. Reihe A.2 8 Mal in der Runde; Dann werden Sie A.3 über A.2 häkeln und A.3 in der Höhe wiederholen. Viel Spaß beim häkeln!
05.12.2023 - 08:38Witam, po pierwszym okrążeniu mam 80 słupków. Po przerobieniu wzoru A1 mam 114 słupków a nie 144. Po ukończeniu schematu A1, mam 5 okrążeń. Nie potrafię zlokalizować błędów w swojej robótce. Może mi ktoś napisać ile powinno być słupków w każdym z pięciu okrążeń, i czy po zakończeniu schematu A1 powinno powinno być 5 czy 6 okrążeń. Pozdrawiam
30.08.2023 - 21:27DROPS Design answered:
Witaj Julito, po pierwszym okrążeniu powinnaś mieć 84 słupki i 4 łuki: (4 x A.1)+ (2 x 38) = 8 słupków i 4 łuki z 2 oczek łańcuszka każdy + 76 słupków = 84 słupki + 4 łuki. Po zakończeniu schematu A.1 powinno być 5 okrążeń (nie licząc łańcuszka początkowego). W okr. 2 powinno być: 76+24=100 sł i 4 łuki. Okr. 3: 76+40=116 sł i 4 łuki. Okr. 4: 76+56=132 sł i 4 łuki. Okr. 5: 76+72=148 sł (ale tutaj równomiernie zamykasz 4 sł i zostaje 144 sł jak w opisie). Pozdrawiamy!
31.08.2023 - 21:05Cześć Zrobiłam torbę według tego wzoru, wyszła piękna z włóczki Drops Bellle tu polecanej. Jednak w użyciu bardzo się rozciąga nawet gdy włożyłam do niej tylko chleb. Czy można temu jakoś zapobiec? Chcę zrobić drugą w prezencie dla siostry. Pozdrawiam, Monika
07.08.2023 - 21:37DROPS Design answered:
Witaj Moniko, można zrobić wypełnienie z bawełnianej tkaniny pod kolor. Ewentualnie zrobić taką samą torbę tylko za pomocą mniejszego szydełka. Pozdrawiamy!
08.08.2023 - 21:17Ich habe es jetzt verstanden. Sie müssen nicht antworten.😊
09.06.2023 - 11:23Ich verstehe nicht, wie im Diagramm A1 nach der ersten Reihe (also nach 84 Maschen) die 2 Luftmaschen unterbringe, denn ich häkle diese und mache dann mit Stäbchen weiter, aber dann habe ich 4 Reihen mehr, also 9 und nicht 5 Reihen? Danke!
09.06.2023 - 08:54DROPS Design answered:
Liebe Elsa, häkeln Sie A.1 wie im Diagram gezeigt, A.1 ist insgesamt 5 Reihen, so nach der 1. Runde haben Sie 4 Mal A.1 in der Runde gehäkelt, und jetzt sind es noch 4 weiteren REihen zu häkeln. Die anderen Maschen häkeln Sie im Stäbchen wie bei der 1. Runde - oder misverstehe ich Ihre Frage?
09.06.2023 - 09:36