
Popular categories
Looking for a yarn?


|
|||||||||||||||||||||||||||||||||||||
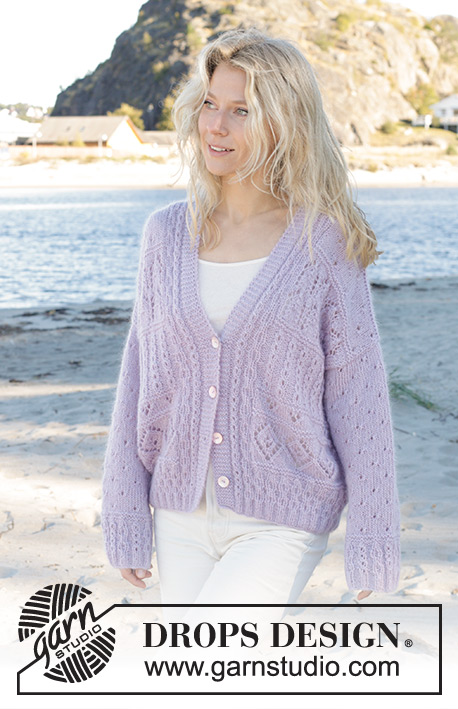
Fabled Harbour Cardigan |
|||||||||||||||||||||||||||||||||||||
 |
 |
||||||||||||||||||||||||||||||||||||
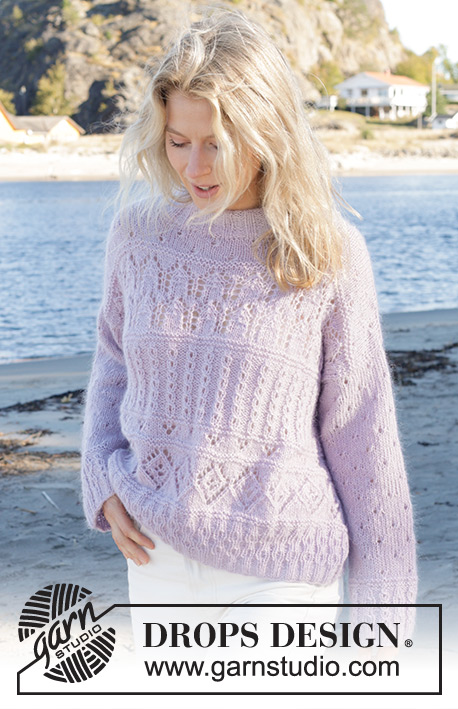
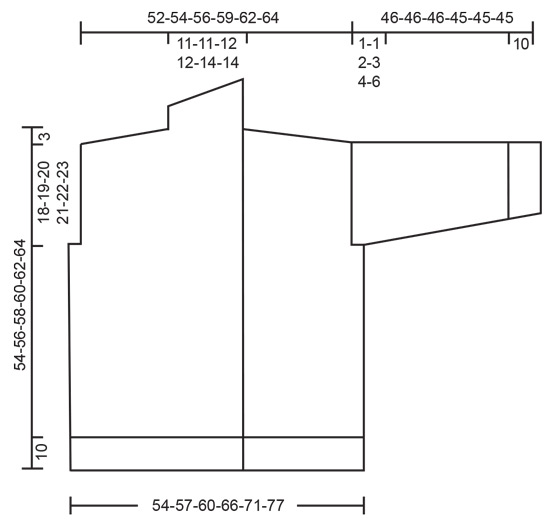
Knitted jacket in DROPS Alpaca and DROPS Kid-Silk. Piece is knitted bottom up with lace pattern. Size: S - XXXL
DROPS 241-10 |
|||||||||||||||||||||||||||||||||||||
|
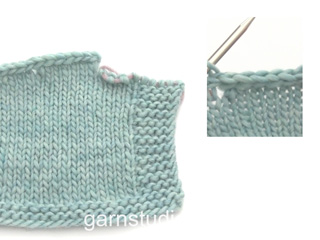
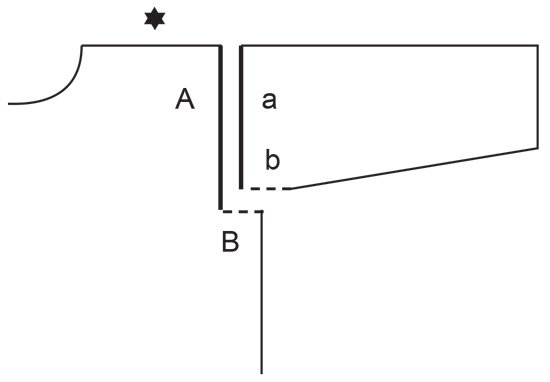
---------------------------------------------------------- EXPLANATION FOR THE PATTERN: ---------------------------------------------------------- GARTER STITCH (back and forth): Knit all rows. 1 ridge vertically = knit 2 rows. GARTER STITCH (worked in the round): 1 ridge vertically = 2 rounds, i.e. knit 1 round and purl 1 round. PATTERN: See diagrams A.1 to A.7. Diagrams show all rows in pattern seen from the right side. When number of stitches is given in pattern, always count A.1a and A.5a as 5 stitches even though number of stitch on some rows in pattern is 6 stitches (because of increase/decrease in pattern). KNIT TOGETHER: FROM RIGHT SIDE: Slip 1 stitch knitwise, knit 1, pass slipped stitch over stitch worked. FROM WRONG SIDE: Purl 2 together. STOCKING STITCH: When working from wrong side, purl and when working from right side, knit. INCREASE TIP (applies to sleeves): Begin 1 stitch before marker, make 1 yarn over, knit 2 (marker thread is between these 2 stitches), make 1 yarn over. On next round knit yarn overs twisted to avoid holes (= 2 stitches increased). BUTTONHOLES (bottom up): Decrease for buttonholes on right band. 1 BUTTONHOLE = knit third and fourth stitch from edge together and make 1 yarn over. On next row knit yarn over to make hole. Decrease for buttonholes when piece measures: S: 6, 14, 22 and 30 cm M: 6, 14, 22 and 30 cm L: 6, 14, 23 and 32 cm XL: 7, 16, 25 and 34 cm XXL: 6, 14, 22, 29 and 36 cm. XXXL: 6, 14, 22, 29 and 36 cm. ---------------------------------------------------------- START THE PIECE HERE: ---------------------------------------------------------- JACKET - SHORT OVERVIEW OF THE PIECE: Work body back and forth on circular needle up to armholes. Divide the body for front pieces and back piece and finish each part separately back and forth. Work sleeves in the round on double pointed needles/short circular needle up to sleeve cap, then work the rest of sleeve back and forth. BODY: Cast on 272-284-296-320-344-368 stitches on circular needle size 4 mm with 1 strand of each quality (2 strands). Purl 1 row from wrong side. Work rib, begin from right side as follows: 7 band stitches in GARTER STITCH - read explanation above, * work A.1, work A.2. *, work from *-* until 7stitches remain, work 7 band stitches in garter stitch. Continue pattern like this - remember BUTTONHOLES - read explanation above. When A.1 and A.2 have been worked 1 time in height, there are 229-239-249-269-289-309 stitches on needle. Work now as follows: 7 band stitches in garter stitch, A.1a, repeat A.2a until 12 stitches remain, work A.1a, increase 1 stitch, 7 band stitches in garter stitch. Continue with 7 band stitches in garter stitch, A.1a, repeat A.2a until 13 stitches remain, work A.1a, purl 1, 7 band stitches in garter stitch. When A.2a has been worked 2 times in total vertically, work pattern and begin from right side as follows: Switch to circular needle size 5 mm. Work 7 band stitches in garter stitch, A.1a, A.2a, purl 1, A.3a, work A.3b until 28 stitches remain AT THE SAME TIME decrease 33 stitches evenly over these stitches, A.3c, A.2a, A.1a, purl 1, 7 band stitches in garter stitch = 197-207-217-237-257-277 stitches. REMEMBER THE KNITTING TENSION! When A.3 has been worked 1 time vertically, piece measures approx. 21 cm. Then work pattern as follows (first row is from right side): 7 band stitches in garter stitch, A.1a, A.2a, purl 1, 0-1-2-0-2-0 stitches in stocking stitch, A.4 until 19-20-21-19-21-19 stitches remain, work 1-2-3-1-3-1 stitch in stocking stitch, A.2a, A.1a, purl 1, 7 band stitches in garter stitch. When A.4 has been worked 1 time vertically, piece measures approx. 25 cm. Work pattern, begin from right side as follows: 7 band stitches in garter stitch, A.1a, A.2a, purl 1, work in garter stitch until 18 stitches remain, work A.2a, A.1a, purl 1, 7 band stitches in garter stitch. Work 2 ridges in total. Work pattern, begin from right side as follows: 7 band stitches in garter stitch, A.1a, A.2a, purl 1, work A.5 until 19 stitches remain, purl 1, work A.2a, A.1a, purl 1, 7 band stitches in garter stitch. Repeat the first 2 rows of A.5 until first row in A.1a should be worked (this is done so that pattern in A.5 is on the same row as in pattern A.1a). Work A.5a over stitches in A.5 and pattern as before until piece measures 33-34-35-36-37-38 cm. Now divide piece for front pieces and back piece on next row from right side: 7 band stitches in garter stitch, A.1a, A.2a, purl 1, knit 34-36-37-44-46-48 (right front piece), then slip them on a thread, cast off 2-4-6-6-12-18 stitches for armhole, knit 89-91-95-101-105-109 (back piece), then slip them on a thread, cast off 2-4-6-6-12-18 stitches for armhole, knit 34-36-37-44-46-48, A.2a, A.1a, purl 1, 7 band stitches in garter stitch (left front piece). Now finish each part separately. LEFT FRONT PIECE: = 52-54-55-62-64-66 stitches. Work first row from wrong side. Knit 3 rows (continue A.1a and A.2a as before). Work pattern, begin from right side as follows: 1 stitch in garter stitch, 0-2-3-2-4-6 stitches in stocking stitch, work A.6 until 19 stitches remain, 1 stitch in stocking stitch, A.2a, A.1a, purl 1, 7 band stitches in garter stitch. When A.6 has been worked 1 time vertically, piece measures approx. 47-48-49-50-51-52 cm. Work pattern, begin from right side as follows: 1 stitch in garter stitch, 0-1-1-1-2-3 stitches in stocking stitch, work A.7 until 19-20-21-20-21-22 stitches remain, 1-2-3-2-3-4 stitches in stocking stitch, A.2a, A.1a, purl 1, 7 band stitches in garter stitch. Continue this pattern until finished measurements. AT THE SAME TIME when piece measures 51-53-55-57-59-61 cm, work diagonal shoulder, begin on next row from the neck as follows: * Work pattern as before until 9-9-9-10-10-11 stitches remain, turn and work back *, work from *-* 3 times in total. I.e. work 9-9-9-10-10-11 stitches less on every turn from the neck. On last row towards the neck work until 17-18-18-22-23-23 stitches remain, slip the last 17-18-18-22-23-23 stitches on a thread for shawl collar and cast on 2 new stitches on needle = 37-38-39-42-43-45 stitches. Now work and cast off with an edge in i-cord over shoulder stitches. Work stitches cast on with shoulder stitches as follows: * Work 1 stitch in STOCKING STITCH – read explanation above, work next stitch together with first/next stitch from shoulder – read KNIT TOGETHER, pass the 2 stitches back on the needle they came from with strand on back side of piece, make sure not to tighten yarn too much *, work from *-* until all stitches from shoulder have been worked together with the 2 new stitches that were cast on. Cast off the 2 stitches. SHAWL COLLAR: Slip the 17-18-18-22-23-23 stitches from stitch holder on circular needle size 5 mm. Work band and pattern A.1a and A.2a as before and in garter stitch over the remaining stitches. At the same time work short rows as follows: ROW 1 (= right side): Work over all stitches, turn and tighten yarn. ROW 2 (= wrong side): Work the first 7 stitches, turn and tighten yarn. ROW 3 (= right side): Work over the 7 stitches, turn and tighten yarn. ROW 4 (= wrong side): Work over all stitches. Work 1st to 4th row until shawl collar measures approx. 7-8-8-9-9-9 cm on the shortest. Work 1 ridge over all stitches. Cast off. RIGHT FRONT PIECE: = 52-54-55-62-64-66 stitches. REMEMBER BUTTONHOLES! Work first row from wrong side. Knit 3 rows (continue A.1a and A.2a as before). Work pattern, begin from right side as follows: 7 band stitches in garter stitch, A.1a, A.2a, purl 1, work A.6 until 2-4-5-4-6-8 stitches remain, 1-3-4-3-5-7 stitches in stocking stitch and 1 stitch in garter stitch. When A.6 has been worked 1 time vertically, piece measures approx. 47-48-49-50-51-52 cm. Work pattern, begin from right side as follows: 7 band stitches in garter stitch, A.1a, A.2a, purl 1, 0-1-2-1-2-3 stitches in stocking stitch, work A.7 until 2-3-3-3-4-5 stitches remain, 1-2-2-2-3-4 stitches in stocking stitch, 1 stitch in garter stitch. Continue this pattern until finished measurements. AT THE SAME TIME when piece measures 51-53-55-57-59-61 cm, work diagonal shoulder, begin on next row from the neck as follows: * Work pattern as before until 9-9-9-10-10-11 stitches remain, turn and work back *, work from *-* 3 times in total. I.e. work 9-9-9-10-10-11 stitches less on every turn from the neck. On last row towards the neck work until 17-18-18-22-23-23 stitches remain, slip the last 17-18-18-22-23-23 stitches on a thread for shawl collar and cast on 2 new stitches on needle = 37-38-39-42-43-45 stitches. Now work and cast off with an edge in i-cord over shoulder stitches. Work stitches cast on with shoulder stitches as follows: Work * 1 stitch in stocking stitch, work next stitch together with first/next stitch from shoulder – remember KNIT TOGETHER, pass the 2 stitches back on needle they came from with strand on back side of piece, make sure not to tighten yarn too much *, work from *-* until all stitches from shoulder have been worked together with the 2 new stitches cast on. Cast off the 2 stitches. SHAWL COLLAR: Slip the 17-18-18-22-23-23 stitches from stitch holder on circular needle size 5 mm. Work band and pattern A.1a and A.2a as before and in garter stitch over the remaining stitches. AT THE SAME TIME work short rows as follows: ROW 1 (= wrong side): Work over all stitches, turn and tighten yarn. ROW 2 (= right side): Work the first 7 stitches, turn and tighten yarn. ROW 3 (= wrong side): Work over the 7 stitches, turn and tighten yarn. ROW 4 (= right side): Work over all stitches. Work 1st to 4th row until shawl collar measures approx. 7-8-8-9-9-9 cm on the shortest. Work 1 ridge over all stitches. Cast off. BACK PIECE: = 89-91-95-101-105-109 stitches. Knit 3 rows (work first row from wrong side). Work pattern, begin from right side as follows: 1 stitch in garter stitch, 3-0-2-1-3-1 in stocking stitch, work A.6 until 5-2-4-3-5-3 stitches remain, 4-1-3-2-4-2 stitches in stocking stitch, 1 stitch in garter stitch. When A.6 has been worked 1 time vertically, piece measures approx. 47-48-49-50-51-52 cm. Work pattern, begin from right side as follows: 1 stitch in garter stitch, 3-0-2-1-3-1 in stocking stitch, work A.7 until 5-2-4-3-5-3 stitches remain, 4-1-3-2-4-2 stitches in stocking stitch, 1 stitch in garter stitch. Continue this pattern until finished measurements. When piece measures 50-52-54-56-58-60 cm, cast off the middle 17-17-19-19-21-21 stitches for neck and finish each shoulder separately (36-37-38-41-42-44 stitches remain on each shoulder). Continue with pattern over stitches that fit the pattern, work the remaining stitches in stocking stitch. On next row from neck cast off 1 stitch at the beginning of row = 35-36-37-40-41-43 stitches. When piece measures 51-53-55-57-59-61 cm, work diagonal shoulder, begin on next row from the neck as follows: * Work pattern as before until 9-9-9-10-10-11 stitches remain, turn and work back *, work from *-* 3 times in total. I.e. work 9-9-9-10-10-11 stitches less on every row from the neck. On last row towards neck, cast on 2 new stitches at the end of row = 37-38-39-42-43-45 stitches. Now work and cast off with an edge in i-cord over shoulder stitches. Work stitches cast on with shoulder stitches as follows: * Work 1 stitch in stocking stitch, work next stitch together with first/next stitch from shoulder - remember KNIT TOGETHER, pass the 2 stitches back on needle they came from with strand on back side of piece, make sure that strand is not too tight *, work from *-* until all stitches from shoulder have been worked together with the 2 new stitches cast on. Cast off the 2 stitches. Work the other shoulder the same way. SLEEVES: Cast on 60-60-60-72-72-72 stitches on double pointed needles size 4 mm with 1 strand of each quality. Knit 1 round. Insert 1 marker at beginning of round. * Work A.1, work A.2 *, work from *-* over all stitches. When A.1 and A.2 have been worked 1 time in height, there are 50-50-50-60-60-60 stitches on needle. Now repeat A.1a and A.2a until A.2a has been worked 2 times in total vertically (= A.1a = 4 times). Work 2 ridges in GARTER STITCH in the round over all stitches - read explanation above. AT THE SAME TIME on first round decrease 2-2-2-4-4-4 stitches evenly = 48-48-48-56-56-56 stitches. Switch to double pointed needles size 5 mm. Work A.7 in the round over all stitches. Repeat A.7 vertically until finished measurements. When piece measures 14-14-13-13-13-12 cm, increase 1 stitch on each side of marker - read INCREASE TIP! Increase like this every 5½-4-3-4½-3-2½ cm 6-8-10-7-9-11 times in total = 60-64-68-70-74-78 stitches. Work the increased stitches in the pattern (switch to a short circular needle when increasing stitches). When sleeve measures 45-45-44-43-41-39 cm, work sleeve cap back and forth (from marker thread mid under sleeve) on circular needle until finished measurements. Cast off when sleeve measures approx. 46-46-46-45-45-45 cm. Work another sleeve the same way. ASSEMBLY: Sew shoulder seams inside 1 stitch on i-cord edge. Sew shawl collar together mid back (make sure that seam is the correct way when garment is worn) Sew shawl collar to neck line in the back of neck. Sew sleeve cap to armhole. Then sew vent at the top of sleeve to bottom of armhole - see chart. Sew the buttons on to left front piece. |
|||||||||||||||||||||||||||||||||||||
Diagram explanations |
|||||||||||||||||||||||||||||||||||||
|
|||||||||||||||||||||||||||||||||||||

|
|||||||||||||||||||||||||||||||||||||

|
|||||||||||||||||||||||||||||||||||||

|
|||||||||||||||||||||||||||||||||||||
|
|||||||||||||||||||||||||||||||||||||
|
|||||||||||||||||||||||||||||||||||||
|
Have you made this or any other of our designs? Tag your pictures in social media with #dropsdesign so we can see them! Do you need help with this pattern?You'll find tutorial videos, a Comments/Questions area and more by visiting the pattern on garnstudio.com. © 1982-2024 DROPS Design A/S. We reserve all rights. This document, including all its sub-sections, has copyrights. Read more about what you can do with our patterns at the bottom of each pattern on our site. |
|||||||||||||||||||||||||||||||||||||


With over 40 years in knitting and crochet design, DROPS Design offers one of the most extensive collections of free patterns on the internet - translated to 17 languages. As of today we count 304 catalogues and 11422 patterns - 11422 of which are translated into English (UK/cm).
We work hard to bring you the best knitting and crochet have to offer, inspiration and advice as well as great quality yarns at incredible prices! Would you like to use our patterns for other than personal use? You can read what you are allowed to do in the Copyright text at the bottom of all our patterns. Happy crafting!
Comments / Questions (30)
Hallo, die abgebildete Jacke (Foto) hat weder Schalkragen noch Armkugeln (wie in der Anleitung beschrieben). Auch im Diagramm gibt es keine Armkugel. Das irritiert.... LG
14.12.2023 - 20:14DROPS Design answered:
Liebe Grit, diese Jacke hat einen einfachen Schalkragen, der wie in Video (aber mit mehr Maschen) gestrickt wird. Es sind keine richtige Armkugel, aber die letzten cm werden in Hin- und Rückreihen gestrickt - siehe Maßskizze und passende Video. Viel Spaß beim stricken!
15.12.2023 - 08:18Help please! I can’t find a video for “sew shoulder seams inside 1 stitch on I-cord edge”. I’m so excited to have completed this and can’t wait to wear it.
06.12.2023 - 06:14DROPS Design answered:
Dear Katie! All the relevant videos for every pattern can be found below the instructions and diagrams. Do not forget that you van roll down the list, if you click within the frame itself- I hope this helps. Happy Knitting!
10.12.2023 - 21:01Die vorletzte und letzte Reihe von A1a gehen nicht auf. Die vorletzte Reihe von A1a ergeben 4 Maschen, darüber soll man aber 5 Maschen stricken. ich denke, da müssen ZWEI BLINDFELDER in die letzte Reihe von A1a.
05.12.2023 - 10:00DROPS Design answered:
Liebe Grit, beachten Sie, daß bei der 3. Reihe in A.1a nur 1 Masche abgenommen wird: 1 Masche wie zum Rechtsstricken abheben, 2 Maschen rechts, die abgehobene Masche über die gestrickten ziehen, die 3 rechte Maschen sind jetzt nur noch 2, so A.1a ist nach dieser Reihe und bei der letzten Reihe nur 5 Maschen, und bei der 1. Reihe wieder 6 Maschen. Viel Spaß beim stricken!
05.12.2023 - 15:59Ich bin beim linken Vorderteil und frage mich, was ich mit den 9 Maschen machen soll, die ich laut Anleitung 3x weniger stricken muss. Ich finde leider nicht, was ich am Ende mit diesen 9 Maschen machen soll. Soll ich sie abketten? Danke
02.10.2023 - 23:55DROPS Design answered:
Liebe Kathrin, hier werden verkürzten Reihen gestrickt, dh die letzten 9 Maschen der Reihe (für den Schulter) nicht stricken, wenden und die nächste Reihe stricken, wenden, diese 2 Reihen stricken Sie insgesamt 3 Mal - schauen Sie mal dieses Video, wir zeigen, wie man solche verkürzten Reihen strickt, und wie die Maschen für den Schulter abgekettet werden. Viel Spaß beim stricken!
03.10.2023 - 08:13Bonjour, je ne comprends pas les explications. Faut il tricoter A1et ensuite A2 pendant 9 rangs don on retrouve avec 2 m endroit, 2 m envers 4 m endroits et 2 m envers et 2 m endroit et le 10 eme rang on effectue les diminutions…et ensuite on tricote en suivant A1a et A2 a? Merci pour votre reponse
22.09.2023 - 19:30DROPS Design answered:
Bonjour Mme Mallet, vous tricotez d'abord alternativement (A.1 et A.2) en entier (vous allez diminuer au 10ème rang), puis vous tricotez A.1a après les mailles de bordure devant comme avant, vous répétez ensuite A.2a jusqu'au dernier A.1 du rang, avant la bordure devant, et vous terminez par A.1a et la bordure devant. Bon tricot!
25.09.2023 - 08:16For the shawl collar, are the short rows worked over the garter stitch edge or the inner A.2a section?
07.09.2023 - 09:18DROPS Design answered:
Dear Hazel, the short rows for shawl collar are worked starting from WS (with 7 sts in garter stitch) on left front piece / from RS (with 7 sts in garter stitch) on right front piece. Happy knitting!
07.09.2023 - 09:26Hi, I have a question related to the last comment. The instructions says “7 band stitches, A1a, repeat A2a untill 13 stitches, work A1a, purl 1, 7 band stitches”. A 1a is shorter then A 2a, so my question is, once I reached the end of A1a do I just work A2a all the way right after the 7 band?
19.08.2023 - 08:55DROPS Design answered:
Dear Giada, once you finish a vertical repeat of A.1a, you will restart the repeat, that is, you will start working row 1 of A.1a again and continue upwards. You will repeat A.2a and A.7 in the same way later on, if you need to repeat them several times vertically before reaching the final length. Happy knitting!
20.08.2023 - 17:32At the beguiling of the “BODY” : «When A2a has been worked 2 times vertically…” does it mean that at the end of A1a I work just A2a, and then start again with A1a-A2a and then only A2a again untill the end? I’m so confused..😵💫
18.08.2023 - 11:55DROPS Design answered:
Dear Julia, A.1a and A.2a are worked over a different number of rows (4 rows for A.1a and 8 rows for A.2a), so that when you have worked A.2a a total of 2 times (= 16 rows), you have worked A.1a a total of 4 times. Happy knitting!
18.08.2023 - 16:12Is the bottom rib 4p, 2k? If you run A1 then A2 that’s what I see… pls clarify
13.08.2023 - 04:42DROPS Design answered:
Hi Shelley, Yes, that is correct, the rib is purl 4, knit 2. Happy knitting!
14.08.2023 - 06:49Kuuluuko A3a, A3b ja A3c neuloa koko rivi vai vain yhtä näistä?. Mielestä silmukat ei riitä. Ohjeessa sanotaan, kun olet neulonut piirroksen 3A loppuun, työn pituus on 21 cm. Pusero-ohjeessa ei ole kuin yksi A3.
25.07.2023 - 10:07DROPS Design answered:
Piirroksen A.3 mallineule neulotaan seuraavasti: Neulo 7 ainaoikeinneulottua silmukkaa (etureuna), A.1a, A.2a, 1 silmukka nurin, A.3a, neulo mallineuletta piirroksen A.3b mukaisesti, kunnes jäljellä on 28 silmukkaa, ja kavenna SAMALLA tasavälein näiden silmukoiden kohdalla 33 silmukkaa, A.3c, A.2a, A.1a, 1 silmukka nurin, 7 ainaoikeinneulottua silmukkaa (etureuna) = 197-207-217-237-257-277 silmukkaa. Eli piirroksen A.3a mallikerta neulotaan kerran, piirroksen A.3b mallikertaa toistetaan ja piirroksen A.3c mallikerta neulotaan kerran kerroksella.
21.08.2023 - 16:55