DROPS Kid-Silk
DROPS Kid-Silk
75% Mohair, 25% Silk
from 4.60 £ /25g
Get the yarn to make this pattern from 32.20£.

The yarn cost is calculated from the pattern’s smallest size and the yarn’s cheapest product type. Looking for an even better price? You might find it on the DROPS Deals!

DROPS SS24

Sweet Spring

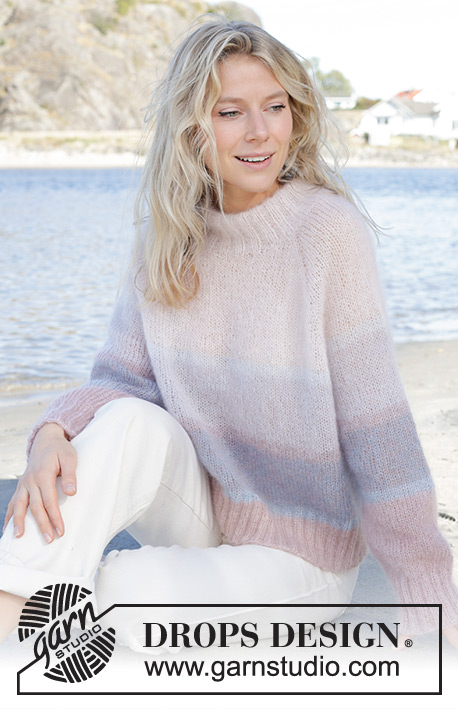
Knitted jumper in 2 strands DROPS Kid-Silk. The piece is worked top down with raglan, cables and lace pattern. Sizes S - XXXL.

DROPS 241-2
DROPS Design: Pattern ks-206
Yarn group A + A or C
-------------------------------------------------------

SIZES:
S - M - L - XL - XXL - XXXL

YARN:
DROPS KID-SILK from Garnstudio (belongs to yarn group A)
175-200-200-225-250-275 g colour 47, pistachio ice cream

NEEDLES:
DROPS CIRCULAR NEEDLE SIZE 5MM: Length 40 cm and 80 cm.
DROPS CIRCULAR NEEDLE SIZE 4 MM: Length 40 cm and 80 cm.
DROPS DOUBLE POINTED NEEDLES SIZE 5 MM.
DROPS DOUBLE POINTED NEEDLES SIZE 4 MM.
DROPS CABLE NEEDLE.
The technique MAGIC LOOP can be used – you then only need circular needle of 80 cm in each size.

KNITTING TENSION:
17 stitches in width and 22 rows in height with stocking stitch and 2 strands = 10 x 10 cm.
NOTE: Needle size is only a guide. If you get too many stitches on 10 cm, change to a larger needle size. If you get too few stitches on 10 cm, change to a smaller needle size.

-------------------------------------------------------

Alternative Yarn – See how to change yarns here
Yarn Groups A to F – Use the same pattern and change the yarn here
Yarn usage using an alternative yarn – Use our yarn converter here

-------------------------------------------------------

DROPS Kid-Silk
DROPS Kid-Silk
75% Mohair, 25% Silk
from 4.60 £ /25g
Get the yarn to make this pattern from 32.20£.

The yarn cost is calculated from the pattern’s smallest size and the yarn’s cheapest product type. Looking for an even better price? You might find it on the DROPS Deals!

Pattern instructions

NOTE: This pattern is written in British English. All measurements in charts are in cm. For conversion from cm to inches - click here. There are different terms for crocheting in British and American English. If this pattern includes crochet, click for "crochet terms" here. For this pattern in American English, please click here.
-------------------------------------------------------

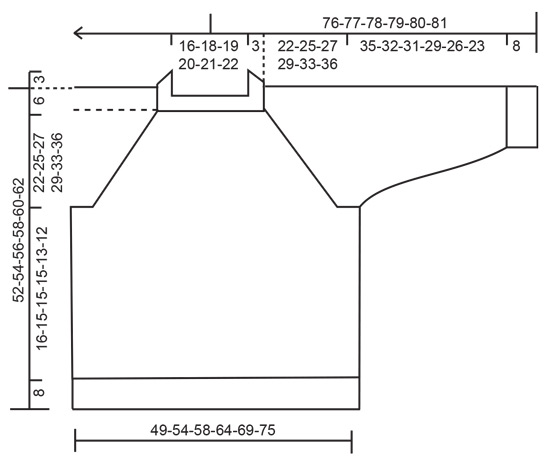
EXPLANATIONS FOR THE PATTERN:

-------------------------------------------------------

PATTERN:
See diagrams A.1 and A.2.

RAGLAN:
Increase 1 stitch before/after the stitch in stocking stitch (the stitch with the marker) in each transition between body and sleeves. Increase 1 stitch by making 1 yarn over, which is knitted twisted on the next round to avoid a hole. Then work the new stitches in stocking stitch.

DECREASE TIP (for sleeves):
Decrease 1 stitch on either side of the marker-thread as follows: Work until there are 3 stitches left before the marker-thread, knit 2 together, knit 2 (marker-thread sits between these 2 stitches), slip 1 stitch as if to knit, knit 1 and pass the slipped stitch over the knitted stitch.

-------------------------------------------------------

START THE PIECE HERE:
-------------------------------------------------------

JUMPER – SHORT OVERVIEW OF THE PIECE:
The yoke is worked in the round with circular needle, from mid back and top down AT THE SAME TIME as increasing for raglan. The yoke is divided for body and sleeves and the body is continued in the round with circular needle, top down. The sleeves are worked with short circular needle/double pointed needles.

YOKE:
Cast on 100-104-108-112-116-120 stitches with circular needle size 4 mm and 2 strands DROPS Kid-Silk.
Knit 1 round. Work rib (knit 2, purl 2) for 3 cm. Change to circular needle size 5 mm. Insert 1 marker; the yoke is now measured from here.

Insert 4 markers in the piece as described below, without working the stitches:
Count 13-14-15-16-17-18 stitches (half back piece), insert 1 marker in the next stitch, count 22 stitches (sleeve), insert 1 marker in the next stitch, count 26-28-30-32-34-36 stitches (front piece), insert 1 marker in the next stitch, count 22 stitches (sleeve), insert 1 marker in the next stitch. There are 13-14-15-16-17-18 stitches left (half back piece).
Continue with stocking stitch over the front and back pieces and A.1 (22 stitches) over each sleeve, AT THE SAME TIME on the first round start to increase for RAGLAN, in each transition between the body and sleeves – read description above. Increase for raglan every 2nd round. When A.1 is finished in height there are 132-136-140-144-148-152 stitches. Work A.2 (26 stitches) over A.1 and stocking stitch on the body as before. REMEMBER THE KNITTING TENSION!

Continue increasing for raglan until you have increased 18-21-22-23-29-29 times on each side of all 4 marker-stitches. Continue increasing, but every 2nd increase is now only on the body (4 stitches increased), i.e. every 2nd round on the body and every 4th round on the sleeves. Increase like this 6-6-6-8-6-8 times on the body (3-3-3-4-3-4 times on the sleeves). You have increased a total of 24-27-28-31-35-37 times on the body and 21-24-25-27-32-33 times on the sleeves. Continue working without further increases until the yoke measures 22-25-27-29-33-36 cm. There are 288-316-328-352-392-408 stitches.

Divide for the body and sleeves as follows:
Work the first 38-42-44-48-53-56 stitches (half back piece), place the next 68-74-76-80-90-92 stitches on a thread for the sleeve, cast on 8-8-10-12-12-16 stitches (in side under sleeve), work the next 76-84-88-96-106-112 stitches (front piece), place the next 68-74-76-80-90-92 stitches on a thread for the sleeve, cast on 8-8-10-12-12-16 stitches (in side under sleeve), work the last 38-42-44-48-53-56 stitches (half back piece). The piece is now measured from here!

BODY:
= 168-184-196-216-236-256 stitches. Continue in the round with stocking stitch for a further 16-15-15-15-13-12 cm. Knit 1 round and increase 36-40-48-52-52-56 stitches evenly spaced = 204-224-244-268-288-312 stitches. Change to circular needle size 4 mm. Work rib (purl 2, knit 2) for 8 cm. Cast off a little loosely. The jumper measures approx. 52-54-56-58-60-62 cm from the shoulder.

SLEEVES:
Place the 68-74-76-80-90-92 stitches from the thread on the one side of the piece on short circular needle/double pointed needles size 5 mm and knit up 1 stitch in each of the 8-8-10-12-12-16 stitches cast on under the sleeve = 76-82-86-92-102-108 stitches. Insert a marker-thread in the middle of the 8-8-10-12-12-16 stitches under the sleeve and allow it to follow your work onwards; it is used when decreasing under the sleeve.
Start at the marker-thread. Continue with A.2 and stocking stitch in the round.
When the sleeve measures 3 cm decrease 2 stitches mid under sleeve – read DECREASE TIP. Decrease like this every 3-2½-2-1½-1-1 cm a total of 10-11-13-16-17-18 times = 56-60-60-60-68-72 stitches. Continue working until the sleeve measures 35-32-31-29-26-23 cm from the division or to desired length.
Change to double pointed needles size 4 mm and work rib (knit 2, purl 2) for 8 cm. Cast off a little loosely. The sleeve measures approx. 43-40-39-37-34-31 cm from the division.
Work the other sleeve in the same way.

This pattern has been corrected.

Updated online: 07.03.2023
BODY: ...The jumper measures approx. 52-54-56-58-60-62 cm from the shoulder.

Diagram

symbols = knit
symbols = purl
symbols = between 2 stitches make 1 yarn over which is knitted twisted on the next round to avoid a hole
symbols = between 2 stitches make 1 yarn over which is knitted on the next round to leave a hole
symbols = knit 2 together
symbols = slip 1 stitch as if to knit, knit 1 and pass the slipped stitch over the knitted stitch
symbols = place 5 stitches on cable needle in front of piece, knit 5, knit 5 from cable needle
diagram
diagram

Each of our patterns has specific tutorial videos to help you.

Do you have a question? See a list of frequently asked questions (FAQ)

Knitting tension is what determines the final measurements of your work, and is usually measured per 10 x 10 cm. It is provided like so: number of stitches in width x number of rows in height - eg: 19 stitches x 26 rows = 10 x 10 cm.

The knitting tension is very individual; some people knit/crochet loosely while others work tightly. You adjust the knitting tension with the needle size, which is why the suggested needle size is only meant as a guide! You need to adjust this (up or down) to ensure that YOUR knitting tension matches the knitting tension provided in the pattern. If you work with a different knitting tension than provided you will have a different yarn consumption, and your work will have different measurements than what the pattern suggests.

The knitting tension also determines which yarns can replace each other. As long as you achieve the same knitting tension you can replace one yarn with another.

See DROPS lesson: How to measure your tension/gauge

See DROPS video: How to make a gauge tension swatch

The required amount of yarn is provided in grams, eg: 450 g. To calculate how many balls you’ll need you first need to know how many grams are in 1 ball (25g, 50g or 100g). This information is available if you click on the individual yarn quality on our pages. Divide the amount required with the amount of each ball. For example, if each ball is 50g (the most common amount), the calculation will be as follows: 450 / 50 = 9 balls.

The important thing when changing from one yarn to another is that the knitting/crochet tension remains the same. This is so that the measurements of the finished piece will be the same as on the sketch provided. It is easier to achieve the same knitting tension using yarns from the same yarn group. It is also possible to work with multiple strands of a thinner yarn to achieve the knitting tension of a thicker one. Please try our yarn converter. We recommend you to always work a test swatch.

Please NOTE: when changing yarn the garment might have a different look and feel to the garment in the photo, due to individual properties and qualities of each yarn.

See DROPS lesson: Can I use a different yarn than the one mentioned in the pattern?

All our yarns are categorised into yarn groups (from A to F) according to thickness and knitting tension – group A contains the thinnest yarns and group F the thickest. This makes it easier for you to find alternative yarns to our patterns, should you wish to switch yarn. All yarns within the same group have a similar knitting tension and can easily replace each other. However, different yarn qualities have different structures and properties which will give the finished work a unique look and feel.

Click here for an overview of the yarns in each yarn group

At the top of all our patterns you’ll find a link to our yarn calculator, which is a helpful tool should you wish to use a different yarn than suggested. By filling in the yarn quality you wish to replace, the amount (in your size) and number of strands, the calculator will present good alternative yarns with the same knitting tension. Additionally it will tell you how much you’ll require in the new qualities and whether you’ll need to work with multiple strands. Most skeins are 50g (some are 25g or 100g).

If the pattern is worked with multiple colours, every colour will have to be calculated separately. Similarly, if the pattern is worked with several strands of different yarns (for example 1 strand Alpaca and 1 strand Kid-Silk) you will have to find alternatives for each, individually.

Click here to see our yarn calculator

Since different yarns have different qualities and textures we have chosen to keep the original yarn in our patterns. However, you can easily find options among our available qualities by using our yarn calculator, or simply pick a yarn from the same yarn group.

It is possible that some retailers still have discontinued yarns in stock, or that someone has a few skeins at home that they would like to find patterns for.

The yarn calculator will provide both alternative yarn as well as required amount in the new quality.

If you think it's hard to decide what size to make, it can be a good idea to measure a garment you own already and like the size of. Then you can pick the size by comparing those measures with the ones available in the pattern's size chart.

You'll find the size chart at the bottom of the pattern.

See DROPS lesson: How to read size chart

The needle size provided in the pattern serves only as a guide, the important thing is to follow the knitting tension. And since knitting tension is very individual, you will have to adjust the needle size to ensure that YOUR tension is the same as in the pattern – maybe you’ll have to adjust 1, or even 2 needle sizes, up or down to achieve the correct tension. For this, we recommend that you work test swatches.

Should you work with a different knitting tension than the one provided, the measurements of the finished garment might deviate from the measurement sketch.

See DROPS lesson: How to measure your tension/gauge

See DROPS video: How to make a tension/gauge swatch

Working a garment top-down provides more flexibility and room for personal adjustment. For example it is easier to try the garment on while working, as well as making adjustments to length of yoke and shoulder caps.

The instructions are carefully explaining every step, in the correct order. Diagrams are adjusted to the knitting direction and are worked as usual.

The diagram depicts all rows/rounds, and every stitch seen from the right side. It is read from bottom to top, from right to left. 1 square = 1 stitch.

When working back and forth, every other row is worked from the right side and every other row is worked from the wrong side. When working from the wrong side, the diagram will have to be worked reversed: from left to right, knit stitches are purled, purl stitches are knit etc.

When working in the round every round is worked from the right side and the diagram are worked from right to left on all rounds.

See DROPS lesson: How to read knitting diagrams

The diagram depicts all rows/rounds, and every stitch seen from the right side. It is worked from bottom to top, from right to left.

When working back and forth every other row is worked from the right side: from right to left and every other row is worked from the wrong side: from left to right.

When working in the round, every row in the diagram are worked from the right side, from right to left.

When working a circular diagram you start in the middle and work your way outwards, counter clockwise, row by row.

The rows usually start with a given number of chain stitches (equivalent to the height of the following stitch), this will either be depicted in the diagram or explained in the pattern.

See DROPS lesson: How to read crochet diagrams

Instructions for working several diagrams after each other on the same row/round, will often be written like so: “work A.1, A.2, A.3 a total of 0-0-2-3-4 times". This means you work A.1 once, then A.2 is worked once, and A.3 is repeated (in width) the number of times provided for your size – in this case like so: S = 0 times, M = 0 times, L=2 times, XL= 3 times and XXL = 4 times.

The diagrams are worked as usual: begin with the first row in A.1, then work the first row in A.2 etc.

See DROPS lesson: How to read knitting diagrams

See DROPS lesson: How to read crochet diagrams

The total width of the garment (from wrist-to-wrist) will be larger in the larger sizes, despite the actual sleeves being shorter. The larger sizes have longer sleeve caps and wider shoulders, so there will be a good fit in all sizes.

The measurement sketch/schematic drawing provides information regarding the full length of the garment. If it’s a jumper or a jacket the length is measured from the highest point on the shoulder closest to the neckline, and straight down to the bottom of the garment. It is NOT measured from the tip of shoulder. Similarly, the length of yoke is measured from the highest point on the shoulder and down to where yoke is split into body and sleeves.

On a jacket measures are never taken along bands, unless specifically stated. Always measure inside band stitches when measuring the length.

See DROPS lesson: How to read a schematic drawing

Diagrams are often repeated on the round or in height. 1 repeat is the diagram the way it appears in the pattern. If it says to work 5 repeats of A.1 in the round, then you work A.1 a total of 5 times after/next to each other in the round. If it says to work 2 repeats of A.1 vertically/in height you work the entire diagram once, then begin again at the start and work the entire diagram one more time.

Chain stitches are slightly narrower than other stitches and to avoid working the cast-on edge too tight, we simply chain more stitches to begin with. The stitch count will be adjusted on the following row to fit the pattern and measurement sketch.

The rib edge is more elastic and will contract slightly compared to, for example, stocking stitch. By increasing before the rib edge, you avoid a visible difference in width between the rib edge and the rest of the body.

It’s very easy to cast off too tightly, and by making yarn overs while casting off (and simultaneously casting these off) you avoid a too tight cast off edge.

See DROPS video: How to bind off with yarn overs (yo)

To achieve an even increase (or decrease) you can increase on, for example: every 3rd and 4th row alternately, like so: work 2 rows and increase on the 3rd row, work 3 rows and increase on the 4th. Repeat this until the increase is complete.

See DROPS lesson: Increase or decrease 1 st on every 3rd and 4th row alternately

Should you prefer to work in the round instead of back and forth, you may of course adjust the pattern. You’ll need to add steeks mid-front (usually 5 stitches), and follow the instructions. When you would normally turn and work from the wrong side, simply work across the steek and continue in the round. At the end you’ll cut the piece open, pick up stitches to work bands, and cover the cut edges.

See DROPS video: How to knit steeks and cut open

Should you prefer to work back and forth instead of in the round, you may of course adjust the pattern so you work the pieces separately and then assemble them at the end. Divide the stitches for the body in 2, add 1 edge stitch in each side (for sewing) and work the front and back pieces separately.

See DROPS lesson: Can I adapt a pattern for circular needles into straight needles?

Pattern repeats can vary slightly in the different sizes, in order to get the correct proportions. If you’re not working the exact same size as the garment in the photo, yours might deviate slightly. This has been carefully developed and adjusted so that the complete impression of the garment is the same in all sizes.

Make sure to follow instructions and diagrams for your size!

If you have found a pattern you like which is available in women’s size it’s not very difficult to convert it to men’s size. The biggest difference will be the length of sleeves and body. Start working on the women size that you think would fit across the chest. The additional length will be worked right before you cast off for the armhole/sleeve cap. If the pattern is worked top-down you can add the length right after the armhole or before the first decrease on sleeve.

Regarding additional yarn amount, this will depend on how much length you add, but it is better with a skein too many than too few.

All yarns will have excess fibres (from production) that might come off as lint or shedding. Brushed yarns (ie hairier yarns) have more of these loose, excess fibres, causing more shedding.

Shedding also depends on what is worn under or over the garment, and whether this pulls at the yarn fibres. It’s therefore not possible to guarantee that there will be no shedding

Below are some tips on how to get the best result when working with hairier yarns:

1. When the garment is finished (before you wash it) shake it vigorously so the looser hairs come off. NOTE: do NOT use a lint roller, brush or any method that pulls at the yarn.

2. Place the garment in a plastic bag and put it in your freezer - the temperature will cause the fibres to become less attached to each other, and excess fibres will come off easier.

3. Leave in the freezer for a few hours before taking it out and shaking it again.

4. Wash the garment according to the instructions on the yarn label.

Pilling is a natural process that happens to even the most exclusive of fibers. It's a natural sign of wear and tear that is hard to avoid, and that is most visible in high friction areas of your garment like a sweater's arms and cuffs.

You can make your garment look as new by removing the pilling, using a fabric comb or a pill/lint remover.

Still can't find the answer you need? Then scroll down and leave your question so one of our experts can try to help you. This will be done normally within 5 to 10 working days.
In the meantime, you can read the questions and answers that others have left to this pattern or join the DROPS Workshop on Facebook to get help from fellow knitters/crocheters!

You might also like...

Sweet Spring

Fryda, Denmark

Sweet Spring

Anne Lise, Norway

Sweet Spring

Ania, Poland

Sweet Spring

@freyjagi

Sweet Spring

@tojazdzid, Poland

Sweet Spring

Olga, Poland

Post a comment to pattern DROPS 241-2

We would love to hear what you have to say about this pattern!

If you want to leave a question, please make sure you select the correct category in the form below, to speed up the answering process. Required fields are marked *.

Comments / Questions (80)

country flag Nadia Mobron wrote:

Voor maar M eindig ik na A1 op 136 steken, vanaf hier moet ik verder met A2, wordt hierbij gemeerderd? Daarna 21x4 = 84 meerderen, gevolgd door in totaal 24 en 27 wat samen 271 wordt. Dit zou 316 moeten zijn, waar ga ik fout? De steken hierna tellen trouwens op tot 332 (84×2 + 8×2 + 74×2) en niet 316, maar ik zie niet waar er gemeerderd wordt.

16.04.2024 - 00:30

country flag Sigrid Grohmann-Kraus wrote:

Kann es sein, dass die Mascheneinteilung nach dem Rippenmuster falsch ist? Wenn ich Größe xl stricke, habe ich 112 M auf der Nadel. Beim Zusammenrechnen der einzelnen Abschnitte beim Einsetzen der Maschenmarkierer komme ich aber nur auf 108 Maschen...

22.03.2024 - 13:39

DROPS Design answered:

Liebe Frau Grohmann-Kraus, es sieht so aus, daß Ihnen nur 4 Maschen fehlen, haben Sie die Markierungen zwischen Maschen eingesetzt? Sie sollten je in eine Masche sein, so haben Sie: 16+1+22+1+32+1+22+1+16=112 Maschen. Viel Spaß beim Stricken!

22.03.2024 - 15:17

country flag Anitta wrote:

Når arbejdet måler 3 cm fra delingen, tages der 2 masker ind midt under ærmet – læs INDTAGNINGSTIPS. Tag ind således på hver 3.-2½.-2.-1½.-1.-1.cm totalt 10-11-13-16-17-18 gange = 56-60-60-60-68-72 masker. Strikker i str. L hvordan kan det blive 13 gange

08.03.2024 - 08:35

DROPS Design answered:

Hei Anitta. I str. L har du 86 masker. Når ermet måler 3 cm fra delingen felles det 2 masker = 84 masker = 1 . ermfelling. Så skal du felle 2 masker på hver 2. cm. Inkl 1. felling så skal det felles totalt 13 ganger. Ved 2. felling måler arbeidet 5 cm = 84 masker, 3. felling / 7cm / 82 masker, 4. felling / 9 cm/80 masker...... og ved 13. felling / 27 cm/ 60 masker. Strikk til arbeidet måler 31 cm fra delingen (eller ønsket lengde). mvh DROPS Design

11.03.2024 - 13:39

country flag Antonella wrote:

Salve! Sto facendo la taglia S. Montando 100 maglie, con i 4 aumenti del primo giro A1 + tre volte gli 8 aumenti per il raglan mi troverei alla fine di A1 con 128 maglie, voi parlate invece di 132 maglie Dove sbaglio?.

02.03.2024 - 13:17

DROPS Design answered:

Buongiorno Antonella, ha inserito i segnapunti NELLE maglie come indicato e non TRA le maglie? Buon lavoro!

02.03.2024 - 13:50

country flag Liv Granli wrote:

Hei. Jeg strikker i str S og er kommet til det stedet i oppskriften : fortsett økningen til det er økt totalt 18-21-22-23-29-29 ganger. Med det garnet jeg strikker er det vanskelig å telle økninger. Mitt spørsmål er: hvor mange masker skal det være på pinnen når det er økt 18 ganger. Mvh Liv

24.02.2024 - 20:21

DROPS Design answered:

Hej Liv, du er nødt til at tælle dem, for det kommer an på hvor mange af de andre økninger du har lavet...

01.03.2024 - 14:23

country flag Raffaella wrote:

Buongiorno nella spiegazione dello sprone c'è scritto di proseguire con A.4 (26 maglie) su A.1 , mi confermate che si tratta di refuso e che si prosegue con A2 (26 maglie) su A1? Grazie mille!

16.02.2024 - 23:57

DROPS Design answered:

Buongiorno Raffaella, grazie per la segnalazione: abbiamo corretto il testo, è giusto A.2. Buon lavoro!

17.02.2024 - 13:21

country flag Patricia wrote:

Bonjour, Je ne comprends pas à quel endroit on augmente « 1fois sur 2 pour le devant et le dos seulement et tous les 4 tours pour les manches » J’ai mes 4 marqueurs qui sont de chaque côté des manches. Où augmenter ? Merci de votre réponse et bravo pour ce splendide modèle !

14.02.2024 - 18:20

DROPS Design answered:

Bonjour Patricia, vous augmentez pour le raglan aux mêmes endroits qu'avant, sauf que vous n'augmenterez d'abord que pour le devant et le dos (4 augmentations) 1 fois sur 2, autrement dit vous allez augmenter ainsi: *tous les 2 rangs: avant le 1er marqueur (demi-dos) + après le 2ème + avant le 3ème (devant) + après le 4ème marqueur (demi-dos, et tous les 4 rangs: de chaque côté de chaque marqueur*. Bon tricot!

15.02.2024 - 07:26

country flag Elena wrote:

Buon giorno gli aumenti per il raglan che voi indicate ogni due giri, si intende che aumento il 1° giro dispari, poi no il 2°, no il 3° e al 4° eseguo gli aumenti ? se è così si aumenta sul giro pari (dietro) ? grazie

14.02.2024 - 08:47

DROPS Design answered:

Buonasera Elena, ogni 2 giri si intende 1 giro sì e 1 giro no. Buon lavoro!

15.02.2024 - 17:52

country flag Elena wrote:

Buon giorno\r\nin questo modello ho montato 104 maglie per la taglia M, alla fine di A1 sono stati fatti 48 aumenti totali per raglan (8 aumenti per giro per 6 volte ) 104+48 = 152.\r\nvoi indicate a fine A1 136 maglie. Potete chiarirmi dove è l\'errore? \r\ngrazie Elena

31.01.2024 - 15:05

DROPS Design answered:

Buongiorno Elena, sul 1° giro di A.1 dovrà aumentare 8 maglie per il raglan e 4 maglie per ogni A.1 (8 maglie totali). Sul 3° e 6° giro aumenterà 8 maglie per giro, per un totale di 16+8+8= 32 aumenti: 104+32=136 maglie. Buon lavoro!

03.02.2024 - 11:20

country flag Bente Svebak wrote:

Hei, hvor mange nøster i Drops Kid-silk trenger jeg for å strikke denne genseren i størrelse M?

16.01.2024 - 12:05

DROPS Design answered:

Hej Bente, i str M skal du bruge 200 g = 8 nøster DROPS Kid-Silk (du strikker den i dobbelt garn) :)

16.01.2024 - 13:52