DROPS Flora
DROPS Flora
65% Wool, 35% Alpaca
from 3.30 $ /50g
DROPS Kid-Silk
DROPS Kid-Silk
75% Mohair, 25% Silk
from 6.75 $ /25g
Get the yarn to make this pattern from 50.25$.

The yarn cost is calculated from the pattern’s smallest size and the yarn’s cheapest product type. Looking for an even better price? You might find it on the DROPS Deals!

DROPS SS24

Wave Breaker

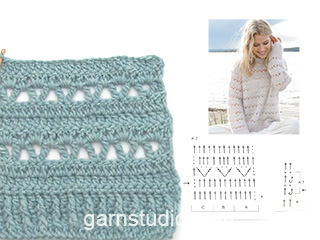
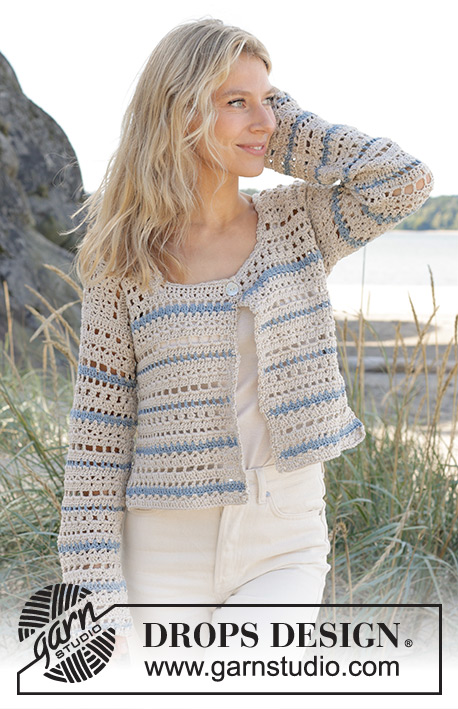
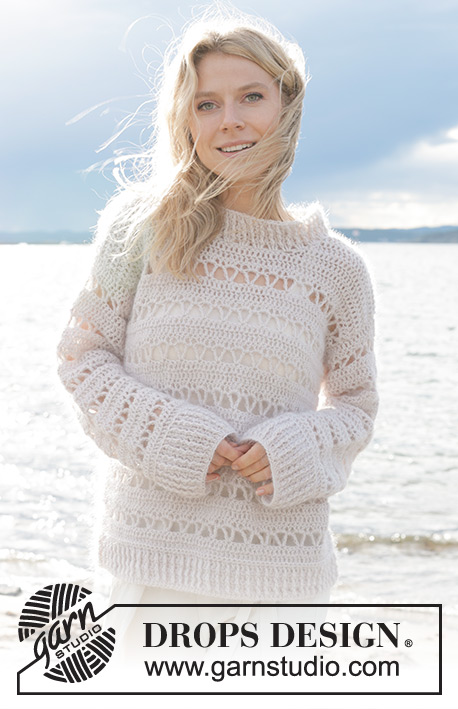
Crocheted sweater in DROPS Flora and DROPS Kid-Silk. The piece is worked bottom up with lace pattern. Sizes S - XXXL

DROPS 240-2
DROPS Design: Pattern fl-082
Yarn group A + A or C
-------------------------------------------------------

SIZES:
S - M - L - XL - XXL – XXXL

Finished measurements:
Chest measurements: 92-104-110-122-132-144 cm = 36¼"-41"-43⅜"-48"-52"-56½"
Full length: 56-58-60-62-64-66 cm = 22"-22¾"-23⅝"-24⅜"-25¼"-26"
All measurements in charts are in cm.

YARN
DROPS FLORA from Garnstudio (belongs to yarn group A)
250-250-300-300-350-350 g color 22, white fog
And use:
DROPS KID-SILK from Garnstudio (belongs to yarn group A)
125-125-150-150-175-175 g color 01, off white

CROCHET HOOK:
DROPS CROCHET HOOK SIZE 5 MM = US H/8.

CROCHET GAUGE:
14 double crochets in width and 8.5 rows in height with 1 strand of each quality = 10 x 10 cm = 4" x 4".
Hook size is only a guide. If you get too many stitches on 10 cm = 4", change to a larger hook size. If you get too few stitches on 10 cm = 4", change to a smaller hook size.

-------------------------------------------------------

Alternative Yarn – See how to change yarns here
Yarn Groups A to F – Use the same pattern and change the yarn here
Yarn usage using an alternative yarn – Use our yarn converter here

-------------------------------------------------------

DROPS Flora
DROPS Flora
65% Wool, 35% Alpaca
from 3.30 $ /50g
DROPS Kid-Silk
DROPS Kid-Silk
75% Mohair, 25% Silk
from 6.75 $ /25g
Get the yarn to make this pattern from 50.25$.

The yarn cost is calculated from the pattern’s smallest size and the yarn’s cheapest product type. Looking for an even better price? You might find it on the DROPS Deals!

Pattern instructions

NOTE: This pattern is written in American English. All measurements in charts are in cm. For conversion from inches to cm - click here. There are different terms for crocheting in American and British English. If this pattern includes crochet, click for "crochet terms" here. For this pattern in British English, please click here.
-------------------------------------------------------

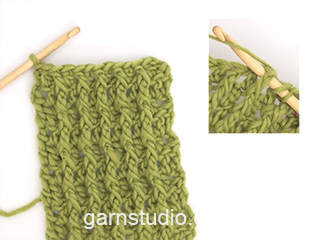
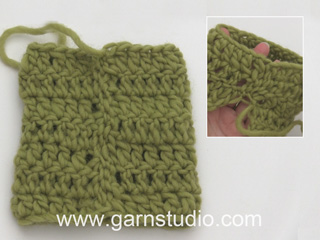
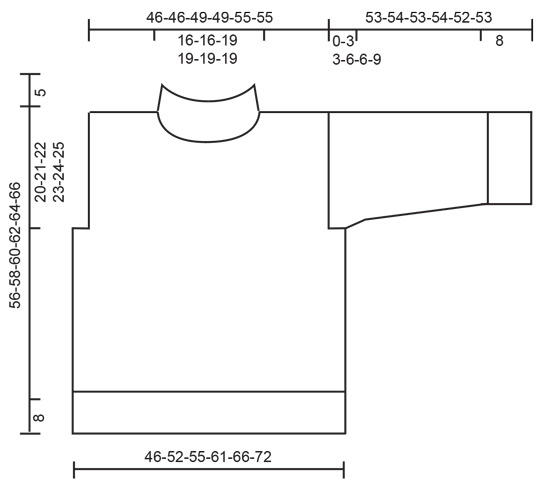
EXPLANATIONS FOR THE PATTERN:

-------------------------------------------------------

CHAIN STITCH:
If you work outermost on the hook the chain stitch will often be too tight; 1 chain stitch should be as long as 1 single/double crochet is wide.


CROCHET INFORMATION:
At the beginning of each row of double crochets work 3 chain stitches, which replace the first double crochet. The last double crochet on the row is worked in the 3rd chain stitch from the beginning of the row.
When working in the round (sleeves and neck):
At the beginning of each round of double crochets work 3 chain stitches, which replace the first double crochet. The round finishes with 1 slip stitch in the 3rd chain stitch.
At the beginning of each round of single crochets work 1 chain stitch, which replaces the first single crochet. The round finishes with 1 slip stitch in the first chain stitch at the beginning of the round.

DECREASE TIP:
Decrease 1 stitch by working 2 double crochets together as follows:
* Make 1 yarn over, insert the hook through the next double crochet, pick up the strand, make 1 yarn over and pull it through the first 2 loops on the hook *, work from *-* 1 more time, make 1 yarn over and pull it through all 3 loops on the hook (= 1 double crochet decreased).

PATTERN:
See diagrams A.1 to A.4.

-------------------------------------------------------

START THE PIECE HERE:

-------------------------------------------------------

SWEATER – SHORT OVERVIEW OF THE PIECE:
The front and back pieces are worked separately, back and forth. The sleeves are worked in the round, turning after each round, working alternately from the right and wrong side. This gives you the same texture as on the body. The neck is worked to finish.

BACK PIECE:
Work 67-75-79-87-95-103 chain stitches – read CHAIN STITCH, with hook size 5 MM = US H/8 and 1 strand of each quality (2 strands).
Work 1 double crochet in the 4th chain stitch from the hook then 1 double crochet in each of the remaining chain stitches = 65-73-77-85-93-101 stitches. Read CROCHET INFORMATION!
Work 3 chain stitches (first double crochet), work A.1 to the end of the row. Repeat the last 2 rows in A.1 until the piece measures 6 cm = 2⅜" – with the last row being a row of single crochets from the wrong side, then work a row of double crochets (1 double crochet in each stitch).

Continue with pattern as follows: Work A.2C, then A.2B until there are 5 double crochets left, A.2A. Continue back and forth; A.2 is repeated in height. REMEMBER THE CROCHET GAUGE!

SIZES M- L- XL- XXL-XXL:
When the piece measures 37-38-39-40-41 cm = 14½"-15"-15¼"-15¾"-16⅛" (with the next row a row similar to row 2 in the diagram), bind off for the armholes as follows (armholes are not worked in size S):
Work 1 slip stitch in each of the first 4-4-8-8-12 stitches, work double crochets as before over the next 65-69-69-77-77 stitches (4-4-8-8-12 double crochets left on the row).

ALL SIZES:
Work pattern as before back and forth over the 65-65-69-69-77-77 stitches until the piece measures 52-54-56-58-60-62 cm = 20½"-21¼"-22"-22¾"-23⅝"-24⅜", then continue with double crochets (with at least 2 rows of double crochets after the lace pattern before working the neck).
Continue working until the piece measures 54-56-58-60-62-64 cm = 21¼"-22"-22¾"-23⅝"-24⅜"-25¼" – with the next row from the right side. Work the first 19-19-19-19-23-23 double crochets on the right shoulder, work the next 2 double crochets together – read DECREASE TIP, turn, work back over the 20-20-20-20-24-24 stitches. The piece measures 56-58-60-62-64-66 cm = 22"-22¾"-23⅝"-24⅜"-25¼"-26". Cut and fasten the strands.
Skip the middle 23-23-27-27-27-27 stitches, start in the 24th-24th-28th-28th-28th-28th stitch and work the last 21-21-21-21-25-25 double crochets on the left shoulder, starting from the right side and neck as follows:
Work the first 2 double crochets together, work 1 double crochet in each of the remaining 19-19-19-19-23-23 double crochets. Turn and work 1 double crochet in each of the 20-20-20-20-24-24 double crochets. Cut and fasten the strand.
SIZE S: Insert 1 marker-thread in each side, 20 cm = 8" down from the shoulder to mark the armholes.

FRONT PIECE:
Work in the same way as the back piece until the front measures 49-51-52-54-55-57 cm = 19¼"-20"-20½"-21¼"-21⅝"-22½". Now work the neck, with at least 2 rows of double crochets after the finished lace pattern and continuing with double crochets.

RIGHT AND LEFT SHOULDER:
Work the first 22-22-22-22-26-26 double crochets, 2 double crochets together (1 double crochet decreased), turn and work 2 double crochets together (1 double crochet decreased), work to the end of the row. Work the first 20-20-20-24-24-24 stitches, 2 double crochets together (1 double crochet decreased), turn and work 2 double crochets together (1 double crochet decreased), work to the end of the row = 20-20-20-20-24-24 double crochets on the shoulder.
Continue back and forth until the piece measures 56-58-60-62-64-66 cm = 22"-22¾"-23⅝"-24⅜"-25¼"-26" from the shoulder down – finishing after a row from the right side. Cut and fasten the strands.
Skip the next 17-17-21-21-21-21 double crochets (neck), start in the 18th-18th-22nd-22nd-22nd-22nd double crochet from the right side and work as follows:
Work 2 double crochets together (1 double crochet decreased), work to the end of the row. Turn and work the first 21-21-21-21-25-25 stitches, work 2 double crochets together (1 double crochet decreased). Work 2 double crochets together (1 double crochet decreased), work to the end of the row. Turn and work the first 19-19-19-19-23-23 double crochets, work 2 double crochets together (1 double crochet decreased) = 20-20-20-20-24-24 double crochets on the shoulder. Continue back and forth until the piece measures 56-58-60-62-64-66 cm = 22"-22¾"-23⅝"-24⅜"-25¼"-26" from the shoulder down – finishing after a row from the right side. Cut and fasten the strands.
SIZE S: Insert 1 marker-thread in each side, 20 cm = 8" down from the shoulder to mark the armholes.

SLEEVES:
Work 45-45-45-49-49-49 chain stitches – remember CHAIN STITCH, with hook size 5 MM = US H/8 and 1 strand of each quality (2 strands). Form them into a ring with 1 slip stitch in the first chain stitch. Work 1 double crochet in each chain stitch = 45-45-45-49-49-49 stitches.

Work 3 chain stitches (first double crochet), work A.3 to the end of the round. Repeat round 1 onwards until the sleeve measures 8 cm = 3⅛". Work round 2 in A.3. Then continue as follows:
Work A.4A, repeat A.4B and finish with 1 slip stitch at the beginning of the round.
You are working in the round (but now turning after each round) and A.4 is repeated in height. Make sure the rounds of treble crochets and chain stitches are worked from the right side so the texture is the same as on the body.

When the sleeve measures 13 cm = 5⅛" (making sure you increase on a round of double crochets), start to increase under the sleeve. Increase 1 double crochet in the first and last double crochet on the round by working 2 double crochets in the stitches. Increase like this every 8-6-5-4½-3½-3 cm = 3⅛"-2⅜"-2"-1⅝"-1¼"-1⅛" a total of 5-7-8-8-9-10 times (always on a round of double crochets) = 55-59-61-65-67-69 stitches. The stitches which do not fit into A.4 are worked with double crochets. Continue working until the sleeve measures 53-51-50-48-46-44 cm = 21"-20"-19¾"-19"-18"-17¼". The sleeve is finished in size S. Work 1 more sleeve like this in size S.

SIZES M- L-XL-XXL-XXXL:
Now work back and forth, starting from the beginning of the round, to leave a split under the sleeve. When the sleeve measures 54-53-54-52-53 cm = 21¼"-21"-21¼"-20½"-21" it is finished. Cut and fasten the strands. Work the other sleeve in the same way.

ASSEMBLY:
Sew the shoulder seams. Sew the sleeves to the armholes as shown in the sketch. Sew the side seams down from the armholes.

NECK:
Start at the top of one shoulder, with hook size 5 MM = US H/8 and 1 strand of each quality (2 strands):
Fasten with 1 single crochet in the shoulder seam, * work 2 chain stitches, skip 1 cm = ⅜", work 1 single crochet *, work from *-* a total of 24-24-26-26-26-26 times on the round, finishing with 1 slip stitch in the first single crochet.
Work 3 chain stitches – remember CROCHET INFORMATION, then 3 double crochets around each chain-space = 72-72-78-78-78-78 double crochets and + 3 chain stitches to turn. Continue in the round with A.3. Repeat round 1 in A.3 until the neck measures 5 cm = 2" (including the first round of double crochets). Cut and fasten the strands.

Diagram

All measurements in charts are in cm.

symbols = row already worked - start at arrow
symbols = start here
symbols = 1 RELIEF-TREBLE CROCHET: Work 1 treble crochet around the double/relief-treble crochet from the previous row/round (do not work in the loops but around the stitch). In A.1 work around a relief-treble crochet from 2 rounds below.
symbols = 1 single crochet in stitch
symbols = 1 double crochet in stitch/around chain-space/between 2 treble crochets
symbols = 1 treble crochet in stitch
symbols = chain stitch
symbols = Sleeve cap sewn to armhole: Sew a to A and b to B
diagram
diagram
diagram
diagram
diagram
Do you have a question? See a list of frequently asked questions (FAQ)

Knitting tension is what determines the final measurements of your work, and is usually measured per 10 x 10 cm. It is provided like so: number of stitches in width x number of rows in height - eg: 19 stitches x 26 rows = 10 x 10 cm.

The knitting tension is very individual; some people knit/crochet loosely while others work tightly. You adjust the knitting tension with the needle size, which is why the suggested needle size only serve as a guide! You need to adjust this (up or down) to ensure that YOUR knitting tension matches the knitting tension provided in the pattern. If you work with a different knitting tension than provided you will have a different yarn consumption, and your work will have different measurements than what the pattern suggests.

The knitting tension also determines which yarns can replace each other. As long as you achieve the same knitting tension you can replace one yarn with another.

See DROPS lesson: How to measure your tension/gauge

See DROPS video: How to make a gauge tension swatch

The required amount of yarn is provided in grams, eg: 450 g. To calculate how many balls you’ll need you first need to know how many grams are in 1 ball (25g, 50g or 100g). This information is available if you click on the individual yarn quality on our pages. Divide the amount required with the amount of each ball. For example, if each ball is 50g (the most common amount), the calculation will be as follows: 450 / 50 = 9 balls.

The important thing when changing from one yarn to another is that the knitting/crochet tension remains the same. This is so that the measurements of the finished piece will be the same as on the sketch provided. It is easier to achieve the same knitting tension using yarns from the same yarn group. It is also possible to work with multiple strands of a thinner yarn to achieve the knitting tension of a thicker one. Please try our yarn converter. We recommend you to always work a test swatch.

Please NOTE: when changing yarn the garment might have a different look and feel to the garment in the photo, due to individual properties and qualities of each yarn.

See DROPS lesson: Can I use a different yarn than the one mentioned in the pattern?

All our yarns are categorised into yarn groups (from A to F) according to thickness and knitting tension – group A contains the thinnest yarns and group F the thickest. This makes it easier for you to find alternative yarns to our patterns, should you wish to switch yarn. All yarns within the same group have a similar knitting tension and can easily replace each other. However, different yarn qualities have different structures and properties which will give the finished work a unique look and feel.

Click here for an overview of the yarns in each yarn group

At the top of all our patterns you’ll find a link to our yarn converter, which is a helpful tool should you wish to use a different yarn than suggested. By filling in the yarn quality you wish to replace, the amount (in your size) and number of strands, the converter will present good alternative yarns with the same knitting tension. Additionally it will tell you how much you’ll require in the new qualities and whether you’ll need to work with multiple strands. Most skeins are 50g (some are 25g or 100g).

If the pattern is worked with multiple colours, every colour will have to be converted separately. Similarly, if the pattern is worked with several strands of different yarns (for example 1 strand Alpaca and 1 strand Kid-Silk) you will have to find alternatives for each, individually.

Click here to see our yarn converter

Since different yarns have different qualities and textures we have chosen to keep the original yarn in our patterns. However, you can easily find options among our available qualities by using our yarn converter, or simply pick a yarn from the same yarn group.

It is possible that some retailers still have discontinued yarns in stock, or that someone has a few skeins at home that they would like to find patterns for.

The yarn converter will provide both alternative yarn as well as required amount in the new quality.

If you think it's hard to decide what size to make, it can be a good idea to measure a garment you own already and like the size of. Then you can pick the size by comparing those measures with the ones available in the pattern's size chart.

You'll find the size chart at the bottom of the pattern.

See DROPS lesson: How to read size chart

The needle size provided in the pattern serves only as a guide, the important thing is to follow the knitting tension. And since knitting tension is very individual, you will have to adjust the needle size to ensure that YOUR tension is the same as in the pattern – maybe you’ll have to adjust 1, or even 2 needle sizes, up or down to achieve the correct tension. For this, we recommend that you work test swatches.

Should you work with a different knitting tension than the one provided, the measurements of the finished garment might deviate from the measurement sketch.

See DROPS lesson: How to measure your tension/gauge

See DROPS video: How to make a gauge tension swatch

Working a garment top-down provides more flexibility and room for personal adjustment. For example it is easier to try the garment on while working, as well as making adjustments to length of yoke and shoulder caps.

The instructions are carefully explaining every step, in the correct order. Diagrams are adjusted to the knitting direction and are worked as usual.

The diagram depicts all rows/rounds, and every stitch seen from the right side. It is read from bottom to top, from right to left. 1 square = 1 stitch.

When working back and forth, every other row is worked from the right side and every other row is worked from the wrong side. When working from the wrong side, the diagram will have to be worked reversed: from left to right, knit stitches are purled, purl stitches are knit etc.

When working in the round every round is worked from the right side and the diagram are worked from right to left on all rounds.

See DROPS lesson: How to read knitting diagrams

The diagram depicts all rows/rounds, and every stitch seen from the right side. It is worked from bottom to top, from right to left.

When working back and forth every other row is worked from the right side: from right to left and every other row is worked from the wrong side: from left to right.

When working in the round, every row in the diagram are worked from the right side, from right to left.

When working a circular diagram you start in the middle and work your way outwards, counter clockwise, row by row.

The rows usually start with a given number of chain stitches (equivalent to the height of the following stitch), this will either be depicted in the diagram or explained in the pattern.

See DROPS lesson: How to read crochet diagrams

Instructions for working several diagrams after each other on the same row/round, will often be written like so: “work A.1, A.2, A.3 a total of 0-0-2-3-4 times". This means you work A.1 once, then A.2 is worked once, and A.3 is repeated (in width) the number of times provided for your size – in this case like so: S = 0 times, M = 0 times, L=2 times, XL= 3 times and XXL = 4 times.

The diagrams are worked as usual: begin with the first row in A.1, then work the first row in A.2 etc.

See DROPS lesson: How to read knitting diagrams

See DROPS lesson: How to read crochet diagrams

The total width of the garment (from wrist-to-wrist) will be larger in the larger sizes, despite the actual sleeves being shorter. The larger sizes have longer sleeve caps and wider shoulders, so there will be a good fit in all sizes.

The measurement sketch/schematic drawing provides information regarding the full length of the garment. If it’s a jumper or a jacket the length is measured from the highest point on the shoulder (usually closest to the neckline), and straight down to the bottom of the garment. It is NOT measured from the tip of shoulder. Similarly, the length of yoke is measured from the highest point on the shoulder and down to where yoke is split into body and sleeves.

See DROPS lesson: How to read a schematic drawing

Diagrams are often repeated on the round or in height. 1 repeat is the diagram the way it appears in the pattern. If it says to work 5 repeats of A.1 in the round, then you work A.1 a total of 5 times after/next to each other in the round. If it says to work 2 repeats of A.1 vertically/in height you work the entire diagram once, then begin again at the start and work the entire diagram one more time.

Chain stitches are slightly narrower than other stitches and to avoid working the cast-on edge too tight, we simply chain more stitches to begin with. The stitch count will be adjusted on the following row to fit the pattern and measurement sketch.

The rib edge is more elastic and will contract slightly compared to, for example, stocking stitch. By increasing before the rib edge, you avoid a visible difference in width between the rib edge and the rest of the body.

It’s very easy to cast off too tightly, and by making yarn overs while casting off (and simultaneously casting these off) you avoid a too tight cast off edge.

See DROPS video: How to bind off with yarn overs (yo)

To achieve an even increase (or decrease) you can increase on, for example: every 3rd and 4th row alternately, like so: work 2 rows and increase on the 3rd row, work 3 rows and increase on the 4th. Repeat this until the increase is complete.

See DROPS lesson: Increase or decrease 1 st on every 3rd and 4th row alternately

Should you prefer to work in the round instead of back and forth, you may of course adjust the pattern. You’ll need to add steeks mid-front (usually 5 stitches), and follow the instructions. When you would normally turn and work from the wrong side, simply work across the steek and continue in the round. At the end you’ll cut the piece open, pick up stitches to work bands, and cover the cut edges.

See DROPS video: How to knit steeks and cut open

Should you prefer to work back and forth instead of in the round, you may of course adjust the pattern so you work the pieces separately and then assemble them at the end. Divide the stitches for the body in 2, add 1 edge stitch in each side (for sewing) and work the front and back pieces separately.

See DROPS lesson: Can I adapt a pattern for circular needles into straight needles?

Pattern repeats can vary slightly in the different sizes, in order to get the correct proportions. If you’re not working the exact same size as the garment in the photo, yours might deviate slightly. This has been carefully developed and adjusted so that the complete impression of the garment is the same in all sizes.

Make sure to follow instructions and diagrams for your size!

If you have found a pattern you like which is available in women’s size it’s not very difficult to convert it to men’s size. The biggest difference will be the length of sleeves and body. Start working on the women size that you think would fit across the chest. The additional length will be worked right before you cast off for the armhole/sleeve cap. If the pattern is worked top-down you can add the length right after the armhole or before the first decrease on sleeve.

Regarding additional yarn amount, this will depend on how much length you add, but it is better with a skein too many than too few.

All yarns will have excess fibres (from production) that might come off as lint or shedding. Brushed yarns (ie hairier yarns) have more of these loose, excess fibres, causing more shedding.

Shedding also depends on what is worn under or over the garment, and whether this pulls at the yarn fibres. It’s therefore not possible to guarantee that there will be no shedding

Below are some tips on how to get the best result when working with hairier yarns:

1. When the garment is finished (before you wash it) shake it vigorously so the looser hairs come off. NOTE: do NOT use a lint roller, brush or any method that pulls at the yarn.

2. Place the garment in a plastic bag and put it in your freezer - the temperature will cause the fibres to become less attached to each other, and excess fibres will come off easier.

3. Leave in the freezer for a few hours before taking it out and shaking it again.

4. Wash the garment according to the instructions on the yarn label.

Pilling is a natural process that happens to even the most exclusive of fibers. It's a natural sign of wear and tear that is hard to avoid, and that is most visible in high friction areas of your garment like a sweater's arms and cuffs.

You can make your garment look as new by removing the pilling, using a fabric comb or a pill/lint remover.

Still can't find the answer you need? Then scroll down and leave your question so one of our experts can try to help you. This will be done normally within 5 to 10 working days.
In the meantime, you can read the questions and answers that others have left to this pattern or join the DROPS Workshop on Facebook to get help from fellow knitters/crocheters!

You might also like...

Wave Breaker

pantarejka, Poland

Wave Breaker

Elina, Estonia

Wave Breaker

Elina, Estonia

Post a comment to pattern DROPS 240-2

We would love to hear what you have to say about this pattern!

If you want to leave a question, please make sure you select the correct category in the form below, to speed up the answering process. Required fields are marked *.

Comments / Questions (17)

country flag Fernanda Martins wrote:

Boa tarde . Adoro os vossos modelos , parabens pelo site. Comprei drops flora + drops kid silk para fazer este modelo, mas nao gosto do toque do fio drops kid silk, tem muitos pelos e nao era o eu pretendia. Pois na foto nao se vêem tantos pelos. Gostaria de saber que fio me aconselham para subtituir o kid silk? Ou se posso fazer so com drops flora e que agulha recomenda ? Muito obrigada . Cumprimentos

15.09.2023 - 16:02

DROPS Design answered:

Bom dia, Muito obrigado pelo seu comentário. Trabalhamos muito para poder trazer novos modelos gratuitos. Pode, em alternativa, dobrar o Flora (=usar 2 fios) ou combinar o Flora com o Alpaca (que tem muit menos pêlo do que o Kid.Silk). Bons crochés!

19.09.2023 - 10:19

country flag Myrèle wrote:

Bonjour Pour la mamche ; vois mentionnez de ceocheter en rond mais de tourner à chaque tour? Autrement dit nous fesons jn rang à l’endroit et un rang sur l’envers toujours en continue au lieu d’être toujours sur l’endroit ???? Merci

04.04.2023 - 18:28

DROPS Design answered:

Bonjour Myrèle, tout à fait, pensez à bien fermer vos rangs par 1 maille coulée dans la 1ère maille du début du tour pour éviter une couture. Bon crochet!

11.04.2023 - 11:17

country flag Blandine wrote:

Modèle attaqué ce soir. Les points sont un régal pour les yeux. Il me tarde de le finir pour le porter.

14.02.2023 - 00:51

country flag Eimante wrote:

Will there be more crochet patterns available for the SS2023 collection?

08.02.2023 - 13:23

country flag Laura wrote:

Hello, How do I find the measurements for each size, so I can choose the best one for me? It's the first time I try one of your patterns but I can't seem to find this info anywhere on the page. This collection looks so beautiful! Can't wait to start! Thank you very much! Laura

07.02.2023 - 12:26

DROPS Design answered:

Dear Laura, thank you very much! Measure a similar garment you have and like the shape and compare these measurements to those in the chart, this will be the best way to find your size for each garment; read even more here. Happy crocheting!

07.02.2023 - 13:22

country flag Ana Oliveira wrote:

Hallo Drobs Team! Habe mich direkt in den Pulli verliebt! Habe aber festgestellt, dass sich beim Rückenteil in Größe L bei der Angabe zur Abnahme für den Armausschnitt ein rechnerischer Fehler eingeschlichen hat. 77 - 8 = 69 .Aber man sollte dann nach der Abnahme am Anfang der Reihe nur noch 61 M häkeln um den 2. Armausschnitt zu haben. Hoffentlich ist das hier die richtige Adresse um Korrekturanregungen zu tätigen 🤣 Gruß Ana

04.02.2023 - 17:20

DROPS Design answered:

Liebe Frau Oliveira, beachten Sie, daß unter GRÖSSE M- L- XL- XXL-XXL: wird dann die Größe L die 2. Größe so werden nur 4 Maschen beidseitig abgenommen, so sind es 77-8= 69 Maschen übrig. Viel Spaß beim häkeln!

06.02.2023 - 11:03

country flag Rebecca Gibbs wrote:

I just wanted to say thank you for putting a crochet 🧶 pattern out so soon with the other new patterns. It’s always so exciting to look at and read the new patterns. Can’t wait to get the summer crochet idea’s flowing. Thank you for all the wonderful patterns Garnstudio has provided for years of fabulous enjoyment. 💖💖💖

04.02.2023 - 07:10

country flag Trude Jacobsen wrote:

Veldig fin heklegenser. Super til våren ! Lagt til i favoritter :-)

03.02.2023 - 13:31

country flag Simone wrote:

Summer cloude

21.01.2023 - 22:46

country flag Pirjo wrote:

White lightness

21.01.2023 - 12:08