DROPS Big Merino
DROPS Big Merino
100% Wool
from 4.55 $ /50g
DROPS Kid-Silk
DROPS Kid-Silk
75% Mohair, 25% Silk
from 6.75 $ /25g
Get the yarn to make this pattern from 72.50$.

The yarn cost is calculated from the pattern’s smallest size and the yarn’s cheapest product type. Looking for an even better price? You might find it on the DROPS Deals!

DROPS SS24

Country Cream

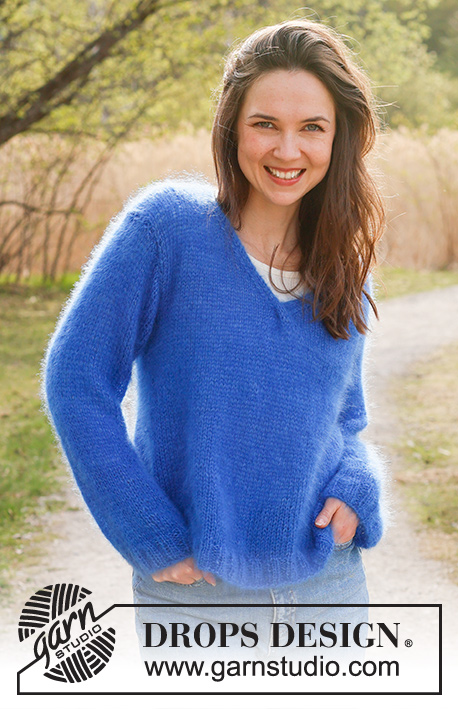
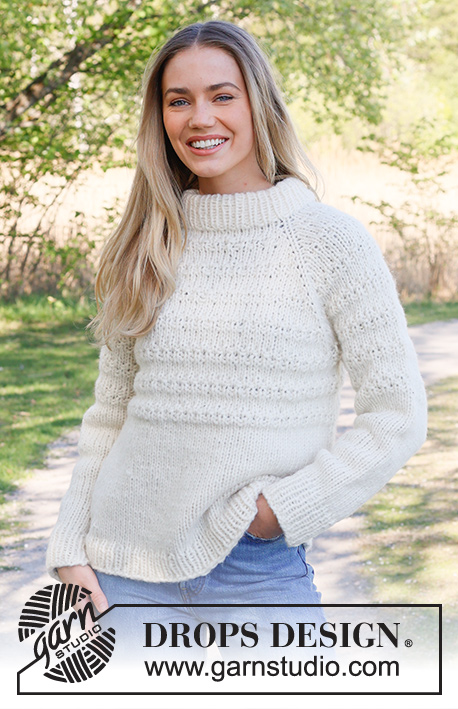
Knitted sweater in 1 strand DROPS kid-Silk and 1 strand DROPS Big Merino / 1 strand DROPS Alaska. Piece is knitted bottom up, in stockinette stitch with V-neck. Size XS – XXL.

DROPS 236-35
DROPS design: Pattern mb-067
Yarn group C + A or D
----------------------------------------------------------

SIZE:
XS - S - M - L - XL – XXL

Finished measurements:
Chest measurements: 90-98-104-114-126-138 cm = 35½"-38½"-41"-45"-49½"-54¼"
Full length: 58-60-62-64-66-68 cm = 22¾"-23⅝"-24⅜"-25¼"-26"-26¾"
All measurements in charts are in cm.

MATERIALS:
DROPS Big Merino from Garnstudio (belongs to yarn group C)
500-550-600-650-700-750 g color 01, off white
And use:
DROPS Kid-Silk from Garnstudio (belongs to yarn group A)
100-100-100-125-125-150 g color 01, off white

Or use:
DROPS Alaska from Garnstudio (belongs to yarn group C)
500-550-600-700-750-800 g color 02, off white
And use:
DROPS Kid-Silk from Garnstudio (belongs to yarn group A)
100-100-100-125-125-150 g color 01, off white

NEEDLES:
DROPS CIRCULAR NEEDLE SIZE 7 MM = US 10.75: Length 40 and 80 cm = 16" and 32".
DROPS CIRCULAR NEEDLE SIZE 5.5 MM = US 9: Length 40 and 80 cm = 16" and 32".
DROPS DOUBLE POINTED NEEDLES SIZE 7 MM = US 10.75
DROPS DOUBLE POINTED NEEDLES SIZE 5.5 MM = US 9
The technique MAGIC LOOP can be used – you then only need circular needle of 80 cm = 32" in each size.

KNITTING GAUGE:
13 stitches in width and 15 rows vertically in stockinette stitch and 1 strand of each quality = 10 x 10 cm = 4" x 4".
NOTE! Remember that needle size is only a suggestion. If you have too many stitches on 10 cm = 4" switch to larger needles. If you have too few stitches on 10 cm = 4" switch to smaller needles.

-------------------------------------------------------

Alternative Yarn – See how to change yarns here
Yarn Groups A to F – Use the same pattern and change the yarn here
Yarn usage using an alternative yarn – Use our yarn converter here

-------------------------------------------------------

DROPS Big Merino
DROPS Big Merino
100% Wool
from 4.55 $ /50g
DROPS Kid-Silk
DROPS Kid-Silk
75% Mohair, 25% Silk
from 6.75 $ /25g
Get the yarn to make this pattern from 72.50$.

The yarn cost is calculated from the pattern’s smallest size and the yarn’s cheapest product type. Looking for an even better price? You might find it on the DROPS Deals!

Pattern instructions

NOTE: This pattern is written in American English. All measurements in charts are in cm. For conversion from inches to cm - click here. There are different terms for crocheting in American and British English. If this pattern includes crochet, click for "crochet terms" here. For this pattern in British English, please click here.
----------------------------------------------------------

EXPLANATION FOR THE PATTERN:

----------------------------------------------------------

GARTER STITCH (back and forth):
Knit all rows.
1 ridge vertically = knit 2 rows.

DECREASE TIP (applies to V-neck):
All decreases are done from the right side!
DECREASE AT BEGINNING OF ROW AS FOLLOWS:
Work 1 edge stitch in garter stitch, slip 1 stitch knitwise, knit 1, pass slipped stitch over stitch worked
DECREASE AT END OF ROW AS FOLLOWS:
Work until 3 stitches remain, knit 2 together and work 1 edge stitch in garter stitch.

INCREASE TIP (applies to sleeves):
Begin 1 stitch before marker, make 1 yarn over, knit 2 (marker thread is between these 2 stitches), make 1 yarn over. On next round knit yarn overs twisted to avoid holes (= 2 stitches increased).

----------------------------------------------------------

START THE PIECE HERE:

----------------------------------------------------------

SWEATER - SHORT OVERVIEW OF THE PIECE:
Work back piece and front piece back and forth on needle separately, bottom up. Work sleeves in the round, bottom up. Sew piece together and pick up stitches for a neck edge.

BACK PIECE:
Cast on 81-89-95-103-113-125 stitches on circular needle size 5.5 MM = US 9 with 1 strand of each quality. Purl 1 row from wrong side. Then work piece back and forth, begin from right side as follows: Work 1 edge stitch in GARTER STITCH - read explanation above, * knit 1, purl 1 *, work from *-* until 2 stitches remain on needle, knit 1 and finish with 1 edge stitch in garter stitch.
Continue rib back and forth like this until piece measures 14 cm = 5½". Switch to circular needle size 7 MM = US 10.75. Work in stockinette stitch with 1 edge stitch in garter stitch in each side and decrease 21-23-25-27-29-33 stitches evenly on first row = 60-66-70-76-84-92 stitches.
REMEMBER THE KNITTING GAUGE!
When piece measures 38-39-40-41-42-43 cm = 15"-15¼"-15¾"-16⅛"-16½"-17", bind off 2 stitches for armholes at beginning of the 2 next rows = 56-62-66-72-80-88 stitches.
When piece measures 56-58-60-62-64-66 cm = 22"-22¾"-23⅝"-24⅜"-25¼"-26", bind off the middle 16-16-18-18-20-20 stitches for neck and finish each shoulder separately. Then bind off 1 stitch on next row from neck = 19-22-23-26-29-33 stitches remain for shoulder. Then work as before until piece measures 58-60-62-64-66-68 cm = 22¾"-23⅝"-24⅜"-25¼"-26"-26¾". Bind off. Work the other shoulder the same way.

FRONT PIECE:
Cast on and work as back piece until piece measures 36-37-38-39-40-41 cm = 14¼"-14½"-15"-15¼"-15¾"-16⅛" 60-66-70-76-84-92 stitches. Then decrease stitches for V-neck on next row from right side as follows:
Work 27-30-32-35-39-43 stitches, knit 2 together and 1 edge stitch in garter stitch, turn.
Slip the last stitches on a thread without working them (right shoulder)
Finish each shoulder separately.

LEFT SHOULDER (front piece):
Read all of the following section before continuing, decrease for V-neck while decreasing for armholes.
Work in stockinette stitch with 1 edge stitch in garter stitch towards mid front, and decrease for neck inside 1 edge stitch in garter stitch at the end of row from right side – read DECREASE TIP. Decrease every 2 cm = ¾" 9-9-10-10-11-11 times in total (the first decrease was done when front piece was divided). AT THE SAME TIME when piece measures 38-39-40-41-42-43 cm = 15"-15¼"-15¾"-16⅛"-16½"-17", bind off 2 stitches for armhole at the beginning of next row from right side.
When all decreases for V-neck and armhole are done 19-22-23-26-29-33 stitches remain on shoulder. Continue in stockinette stitch with 1 edge stitch in garter stitch towards mid front until piece measures 58-60-62-64-66-68 cm = 22¾"-23⅝"-24⅜"-25¼"-26"-26¾" in total. Bind off knitting from right side.

RIGHT SHOULDER (front piece):
Slip stitches from stitch holder back on needle = 30-33-35-38-42-46 stitches.
Read all of the following section before continuing, decrease for V-neck while decreasing for armholes.
Work in stockinette stitch with 1 edge stitch in garter stitch towards mid front (work first row from right side), and decrease for neck inside 1 edge stitch in garter stitch at the beginning of row from right side - remember DECREASE TIP. Decrease every 2 cm = ¾" 9-9-10-10-11-11 times in total. NOTE: First decrease is done on first row worked. AT THE SAME TIME when piece measures 38-39-40-41-42-43 cm = 15"-15¼"-15¾"-16⅛"-16½"-17", bind off 2 stitches for armhole at the beginning of next row from wrong side. When all decreases for V-neck and armhole are done 19-22-23-26-29-33 stitches remain on shoulder. Continue in stockinette stitch with 1 edge stitch in garter towards mid front until piece measures 58-60-62-64-66-68 cm = 22¾"-23⅝"-24⅜"-25¼"-26"-26¾" in total. Bind off knitting from right side.

SLEEVE:
Cast on 60-62-64-70-72-76 stitches on double pointed needles size 5.5 MM = US 9 with 1 strand of each quality. Knit 1 round, then work rib (knit 1/purl 1). When piece measures 10 cm = 4", switch to double pointed needles size 7 MM = US 10.75. Knit 1 round and decrease 16-16-16-18-18-20 stitches evenly = 44-46-48-52-54-56 stitches. Insert a marker thread at beginning of round = mid under sleeve. Work in stockinette stitch in the round. When piece measures 12 cm = 4¾", increase 1 stitch on each side of marker thread - read INCREASE TIP. Increase like this every 17-17-16-16-15-14 cm = 6¾"-6¾"-6¼"-6¼"-6"-5½" 3 times in total = 50-52-54-58-60-62 stitches. When sleeve measures 50-48-48-47-44-42 cm = 19¾"-19"-19"-18½"-17¼"-16½", work sleeve cap back and forth (from marker thread mid under sleeve) on circular needle until finished measurements. Work until sleeve measures approx. 52-50-50-49-46-44 cm = 20½"-19¾"-19¾"-19¼"-18"-17¼", i.e. there is a vent of 2 cm = ¾" at the top of sleeve. Bind off. Work another sleeve the same way.

ASSEMBLY:
Sew the shoulder seams. Sew sleeve cap to armhole - see chart. Sew side seams inside edge stitch in garter stitch, leave the bottom 14 cm = 5½" open = vent.

NECK EDGE:
Begin from right side mid back with circular needle size 5.5 MM = US 9 with 1 strand in each quality. Pick up approx. 84 to 104 stitches around the neck - number of stitches must be divisible by with 2. Work rib in the round = knit 1/purl 1 – adjust so that 1 knit stitch is mid front.
AT THE SAME TIME on every round decrease 2 stitches mid front as follows: Work until 1 stitch remains before knit stitch mid front, slip 2 stitches knitwise, knit 1, pass the 2 slipped stitches over stitch worked (= 2 stitches decreased). This way the V-neck will lay nicely in the neck and knit stitch will follows as a straight line mid front. Decrease like this every round until neck edge measures 4 cm = 1½". Loosely bind off all stitches with knit over knit and purl over purl.

Diagram

All measurements in charts are in cm.

symbols = sew sleeve cap to armhole as follows: Sew a against A and b against B.
diagram
diagram

Each of our patterns has specific tutorial videos to help you.

Do you have a question? See a list of frequently asked questions (FAQ)

Knitting tension is what determines the final measurements of your work, and is usually measured per 10 x 10 cm. It is provided like so: number of stitches in width x number of rows in height - eg: 19 stitches x 26 rows = 10 x 10 cm.

The knitting tension is very individual; some people knit/crochet loosely while others work tightly. You adjust the knitting tension with the needle size, which is why the suggested needle size only serve as a guide! You need to adjust this (up or down) to ensure that YOUR knitting tension matches the knitting tension provided in the pattern. If you work with a different knitting tension than provided you will have a different yarn consumption, and your work will have different measurements than what the pattern suggests.

The knitting tension also determines which yarns can replace each other. As long as you achieve the same knitting tension you can replace one yarn with another.

See DROPS lesson: How to measure your tension/gauge

See DROPS video: How to make a gauge tension swatch

The required amount of yarn is provided in grams, eg: 450 g. To calculate how many balls you’ll need you first need to know how many grams are in 1 ball (25g, 50g or 100g). This information is available if you click on the individual yarn quality on our pages. Divide the amount required with the amount of each ball. For example, if each ball is 50g (the most common amount), the calculation will be as follows: 450 / 50 = 9 balls.

The important thing when changing from one yarn to another is that the knitting/crochet tension remains the same. This is so that the measurements of the finished piece will be the same as on the sketch provided. It is easier to achieve the same knitting tension using yarns from the same yarn group. It is also possible to work with multiple strands of a thinner yarn to achieve the knitting tension of a thicker one. Please try our yarn converter. We recommend you to always work a test swatch.

Please NOTE: when changing yarn the garment might have a different look and feel to the garment in the photo, due to individual properties and qualities of each yarn.

See DROPS lesson: Can I use a different yarn than the one mentioned in the pattern?

All our yarns are categorised into yarn groups (from A to F) according to thickness and knitting tension – group A contains the thinnest yarns and group F the thickest. This makes it easier for you to find alternative yarns to our patterns, should you wish to switch yarn. All yarns within the same group have a similar knitting tension and can easily replace each other. However, different yarn qualities have different structures and properties which will give the finished work a unique look and feel.

Click here for an overview of the yarns in each yarn group

At the top of all our patterns you’ll find a link to our yarn converter, which is a helpful tool should you wish to use a different yarn than suggested. By filling in the yarn quality you wish to replace, the amount (in your size) and number of strands, the converter will present good alternative yarns with the same knitting tension. Additionally it will tell you how much you’ll require in the new qualities and whether you’ll need to work with multiple strands. Most skeins are 50g (some are 25g or 100g).

If the pattern is worked with multiple colours, every colour will have to be converted separately. Similarly, if the pattern is worked with several strands of different yarns (for example 1 strand Alpaca and 1 strand Kid-Silk) you will have to find alternatives for each, individually.

Click here to see our yarn converter

Since different yarns have different qualities and textures we have chosen to keep the original yarn in our patterns. However, you can easily find options among our available qualities by using our yarn converter, or simply pick a yarn from the same yarn group.

It is possible that some retailers still have discontinued yarns in stock, or that someone has a few skeins at home that they would like to find patterns for.

The yarn converter will provide both alternative yarn as well as required amount in the new quality.

If you think it's hard to decide what size to make, it can be a good idea to measure a garment you own already and like the size of. Then you can pick the size by comparing those measures with the ones available in the pattern's size chart.

You'll find the size chart at the bottom of the pattern.

See DROPS lesson: How to read size chart

The needle size provided in the pattern serves only as a guide, the important thing is to follow the knitting tension. And since knitting tension is very individual, you will have to adjust the needle size to ensure that YOUR tension is the same as in the pattern – maybe you’ll have to adjust 1, or even 2 needle sizes, up or down to achieve the correct tension. For this, we recommend that you work test swatches.

Should you work with a different knitting tension than the one provided, the measurements of the finished garment might deviate from the measurement sketch.

See DROPS lesson: How to measure your tension/gauge

See DROPS video: How to make a gauge tension swatch

Working a garment top-down provides more flexibility and room for personal adjustment. For example it is easier to try the garment on while working, as well as making adjustments to length of yoke and shoulder caps.

The instructions are carefully explaining every step, in the correct order. Diagrams are adjusted to the knitting direction and are worked as usual.

The diagram depicts all rows/rounds, and every stitch seen from the right side. It is read from bottom to top, from right to left. 1 square = 1 stitch.

When working back and forth, every other row is worked from the right side and every other row is worked from the wrong side. When working from the wrong side, the diagram will have to be worked reversed: from left to right, knit stitches are purled, purl stitches are knit etc.

When working in the round every round is worked from the right side and the diagram are worked from right to left on all rounds.

See DROPS lesson: How to read knitting diagrams

The diagram depicts all rows/rounds, and every stitch seen from the right side. It is worked from bottom to top, from right to left.

When working back and forth every other row is worked from the right side: from right to left and every other row is worked from the wrong side: from left to right.

When working in the round, every row in the diagram are worked from the right side, from right to left.

When working a circular diagram you start in the middle and work your way outwards, counter clockwise, row by row.

The rows usually start with a given number of chain stitches (equivalent to the height of the following stitch), this will either be depicted in the diagram or explained in the pattern.

See DROPS lesson: How to read crochet diagrams

Instructions for working several diagrams after each other on the same row/round, will often be written like so: “work A.1, A.2, A.3 a total of 0-0-2-3-4 times". This means you work A.1 once, then A.2 is worked once, and A.3 is repeated (in width) the number of times provided for your size – in this case like so: S = 0 times, M = 0 times, L=2 times, XL= 3 times and XXL = 4 times.

The diagrams are worked as usual: begin with the first row in A.1, then work the first row in A.2 etc.

See DROPS lesson: How to read knitting diagrams

See DROPS lesson: How to read crochet diagrams

The total width of the garment (from wrist-to-wrist) will be larger in the larger sizes, despite the actual sleeves being shorter. The larger sizes have longer sleeve caps and wider shoulders, so there will be a good fit in all sizes.

The measurement sketch/schematic drawing provides information regarding the full length of the garment. If it’s a jumper or a jacket the length is measured from the highest point on the shoulder (usually closest to the neckline), and straight down to the bottom of the garment. It is NOT measured from the tip of shoulder. Similarly, the length of yoke is measured from the highest point on the shoulder and down to where yoke is split into body and sleeves.

See DROPS lesson: How to read a schematic drawing

Diagrams are often repeated on the round or in height. 1 repeat is the diagram the way it appears in the pattern. If it says to work 5 repeats of A.1 in the round, then you work A.1 a total of 5 times after/next to each other in the round. If it says to work 2 repeats of A.1 vertically/in height you work the entire diagram once, then begin again at the start and work the entire diagram one more time.

Chain stitches are slightly narrower than other stitches and to avoid working the cast-on edge too tight, we simply chain more stitches to begin with. The stitch count will be adjusted on the following row to fit the pattern and measurement sketch.

The rib edge is more elastic and will contract slightly compared to, for example, stocking stitch. By increasing before the rib edge, you avoid a visible difference in width between the rib edge and the rest of the body.

It’s very easy to cast off too tightly, and by making yarn overs while casting off (and simultaneously casting these off) you avoid a too tight cast off edge.

See DROPS video: How to bind off with yarn overs (yo)

To achieve an even increase (or decrease) you can increase on, for example: every 3rd and 4th row alternately, like so: work 2 rows and increase on the 3rd row, work 3 rows and increase on the 4th. Repeat this until the increase is complete.

See DROPS lesson: Increase or decrease 1 st on every 3rd and 4th row alternately

Should you prefer to work in the round instead of back and forth, you may of course adjust the pattern. You’ll need to add steeks mid-front (usually 5 stitches), and follow the instructions. When you would normally turn and work from the wrong side, simply work across the steek and continue in the round. At the end you’ll cut the piece open, pick up stitches to work bands, and cover the cut edges.

See DROPS video: How to knit steeks and cut open

Should you prefer to work back and forth instead of in the round, you may of course adjust the pattern so you work the pieces separately and then assemble them at the end. Divide the stitches for the body in 2, add 1 edge stitch in each side (for sewing) and work the front and back pieces separately.

See DROPS lesson: Can I adapt a pattern for circular needles into straight needles?

Pattern repeats can vary slightly in the different sizes, in order to get the correct proportions. If you’re not working the exact same size as the garment in the photo, yours might deviate slightly. This has been carefully developed and adjusted so that the complete impression of the garment is the same in all sizes.

Make sure to follow instructions and diagrams for your size!

If you have found a pattern you like which is available in women’s size it’s not very difficult to convert it to men’s size. The biggest difference will be the length of sleeves and body. Start working on the women size that you think would fit across the chest. The additional length will be worked right before you cast off for the armhole/sleeve cap. If the pattern is worked top-down you can add the length right after the armhole or before the first decrease on sleeve.

Regarding additional yarn amount, this will depend on how much length you add, but it is better with a skein too many than too few.

All yarns will have excess fibres (from production) that might come off as lint or shedding. Brushed yarns (ie hairier yarns) have more of these loose, excess fibres, causing more shedding.

Shedding also depends on what is worn under or over the garment, and whether this pulls at the yarn fibres. It’s therefore not possible to guarantee that there will be no shedding

Below are some tips on how to get the best result when working with hairier yarns:

1. When the garment is finished (before you wash it) shake it vigorously so the looser hairs come off. NOTE: do NOT use a lint roller, brush or any method that pulls at the yarn.

2. Place the garment in a plastic bag and put it in your freezer - the temperature will cause the fibres to become less attached to each other, and excess fibres will come off easier.

3. Leave in the freezer for a few hours before taking it out and shaking it again.

4. Wash the garment according to the instructions on the yarn label.

Pilling is a natural process that happens to even the most exclusive of fibers. It's a natural sign of wear and tear that is hard to avoid, and that is most visible in high friction areas of your garment like a sweater's arms and cuffs.

You can make your garment look as new by removing the pilling, using a fabric comb or a pill/lint remover.

Still can't find the answer you need? Then scroll down and leave your question so one of our experts can try to help you. This will be done normally within 5 to 10 working days.
In the meantime, you can read the questions and answers that others have left to this pattern or join the DROPS Workshop on Facebook to get help from fellow knitters/crocheters!

You might also like...

Post a comment to pattern DROPS 236-35

We would love to hear what you have to say about this pattern!

If you want to leave a question, please make sure you select the correct category in the form below, to speed up the answering process. Required fields are marked *.

Comments / Questions (6)

country flag Hanna wrote:

Ja robię ten sweter ze ściągaczem 2x2 z wełny Alpaca. Teraz ma zamykać oczka nad ściągaczem Jak to zrobić aby było ładnie. Czy zamykać na prawych czy lewych oczkach wg wyliczonej ilości do zamknięcia. Czy oczka prawe mają być przekręcone. ?Próbowałam już ale wychodzi nieładnie, są dziury..Już jedno pytanie dzisiaj napisałam. Pozdrawiam.

10.02.2024 - 17:36

DROPS Design answered:

Witaj Haniu, ładniej będzie to wyglądać, gdy będziesz zamykać oczka lewe, przerabiając 2 oczka lewe razem na lewo. Film pomocniczy znajdziesz TUTAJ. Pozdrawiamy!

13.02.2024 - 09:48

country flag Hanna wrote:

Proszę o informację. Robię ten sweter w rozm.L. Jakie powinno być szerokie ramię . Czy na schemacie 16 cm dotyczy podkroju na plecach? Hanna

10.02.2024 - 14:39

DROPS Design answered:

Witaj Haniu, 16 cm to szerokość dekoltu. Szybkie obliczenie: 55-16=39/2= 19,5 cm. Czyli szerokość ramienia wynosi 19,5 cm. Pozdrawiamy!

13.02.2024 - 09:51

country flag Hanna wrote:

Robię drugi sweter z Waszego wzoru. Mam cieńszą włóczkę niż w oryginale. Robię rozmiar L, druty nr 6 i 5. Na podstawie próbki robionej ściągaczem wyliczyłam, że potrzebuję 133 oczka na ściągacz aby uzyskać 57 cm szerokości. Nie wiem ile oczek powinnam zamknąć w momencie przerabiania powyżej ściągacza ściegiem dżersejowym? Proszę o pomoc. Hanna

12.01.2024 - 09:41

DROPS Design answered:

Haniu, musisz ustalić jaką szerokość ma mieć Twój sweter, wykonać próbkę dżersejem na drutach, których będziesz używać, i na podstawie próbki wyliczyć liczbę potrzebnych oczek. Wtedy odejmij tą liczbę od 133 oczek początkowych i będziesz wiedzieć ile oczek zamknąć w pierwszym rzędzie dżersejem. Zobacz też kurs DROPS TUTAJ. Pozdrawiamy!

12.01.2024 - 10:47

country flag Zuzana wrote:

Ľahký zrozumiteľný návod, pekný svetrík, rýchlo hotový, urobil radosť. Len tá spotreba vyšla tesne.

03.03.2023 - 19:13

country flag Liv wrote:

Der er ikke nogle mål ift. hvad størrelse man skal vælge? Overvidde ig længde osv.? 🥹

17.02.2023 - 22:22

DROPS Design answered:

Hej Liv, jo du finder måleskitsen nederst i opskriften. Brystvidde i den mindste størrelse er 45 x 2 = 90 cm

23.02.2023 - 15:00

country flag Elena Anzari wrote:

There are not many patterns for white Big Merino and this one is gorgeous! I appreciate the V neck.

06.08.2022 - 14:53