DROPS Merino Extra Fine
100% Wool
from 4.55 $ /50g
DROPS Kid-Silk
DROPS Kid-Silk
75% Mohair, 25% Silk
from 6.75 $ /25g
Get the yarn to make this pattern from 63.40$.

The yarn cost is calculated from the pattern’s smallest size and the yarn’s cheapest product type. Looking for an even better price? You might find it on the DROPS Deals!

DROPS SS24

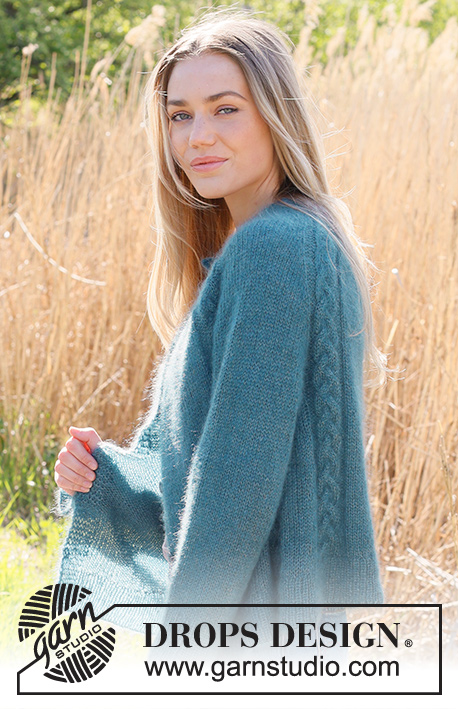
Southern Migration Cardigan

Knitted jacket in DROPS Merino Extra Fine and DROPS Kid-Silk. The piece is worked bottom up with relief-pattern, V-neck and sewn-in sleeves. Sizes S - XXXL.

DROPS 235-14
DROPS Design: Pattern me-247
Yarn group B + A or C
-------------------------------------------------------

SIZES:
S - M - L - XL - XXL – XXXL

Finished measurements:
Chest measurements: 100-108-116-126-138-150 cm = 39⅜"-42½"-45¾"-49½"-54¼"-59"
Full length: 52-54-56-58-60-62 cm = 20½"-21¼"-22"-22¾"-23⅝"-24⅜"
All measurements in charts are in cm.

MATERIALS:
DROPS MERINO EXTRA FINE from Garnstudio (belongs to yarn group B)
400-450-500-550-600-650 g color 01, off white
And use:
DROPS KID-SILK from Garnstudio (belongs to yarn group A)
100-125-125-150-150-175 g color 01, off white

DROPS BUTTONS NO 522: 4-4-5-5-5-5 items.

NEEDLES:
DROPS CIRCULAR NEEDLE SIZE 5.5 MM = US 9: Length 40 cm = 16" and 80 cm = 32".
DROPS CIRCULAR NEEDLE SIZE 4 MM = US 6: Length 40 cm = 16" and 80 cm = 32".
DROPS DOUBLE POINTED NEEDLES SIZE 5.5 MM = US 9.
DROPS DOUBLE POINTED NEEDLES SIZE 4 MM = US 6.
The technique MAGIC LOOP can be used – you then only need circular needle of 80 cm = 32" in each size.

KNITTING GAUGE:
16 stitches in width and 20 rows in height with stockinette stitch and 1 strand of each quality = 10 x 10 cm = 4" x 4".
17 stitches in width and 20 rows in height with pattern A.1 and 1 strand of each quality = 10 x 10 cm = 4" x 4".
NOTE: Needle size is only a guide. If you get too many stitches on 10 cm = 4", change to a larger needle size. If you get too few stitches on 10 cm = 4", change to a smaller needle size.

-------------------------------------------------------

Alternative Yarn – See how to change yarns here
Yarn Groups A to F – Use the same pattern and change the yarn here
Yarn usage using an alternative yarn – Use our yarn converter here

-------------------------------------------------------

DROPS Merino Extra Fine
100% Wool
from 4.55 $ /50g
DROPS Kid-Silk
DROPS Kid-Silk
75% Mohair, 25% Silk
from 6.75 $ /25g
Get the yarn to make this pattern from 63.40$.

The yarn cost is calculated from the pattern’s smallest size and the yarn’s cheapest product type. Looking for an even better price? You might find it on the DROPS Deals!

Pattern instructions

NOTE: This pattern is written in American English. All measurements in charts are in cm. For conversion from inches to cm - click here. There are different terms for crocheting in American and British English. If this pattern includes crochet, click for "crochet terms" here. For this pattern in British English, please click here.
-------------------------------------------------------

EXPLANATIONS FOR THE PATTERN:
-------------------------------------------------------

RIDGE/GARTER STITCH (worked back and forth):
Knit all rows.
1 ridge = knit 2 rows.

PATTERN:
See diagram A.1. The diagram shows all rows in the pattern from the right side.

DECREASE TIP (V-neck):
All decreases are worked from the right side. When there isn’t room for a complete repeat of the pattern towards the neck, work stockinette stitch over the remaining stitches.
LEFT FRONT PIECE:
Work until there are 9 stitches left on the row, knit 2 together, knit 1 and 6 band stitches in garter stitch.
RIGHT FRONT PIECE:
6 band stitches in garter stitch, knit 1, slip 1 stitch as if to knit, knit 1 and pass the slipped stitch over the knitted stitch.

INCREASE TIP (sleeves):
Work until there are 2 stitches left before the marker, 1 yarn over, knit 4 (marker sits between these 4 stitches), 1 yarn over. On the next round knit the yarn overs twisted to avoid holes. Then work the new stitches in stockinette stitch.

BUTTONHOLES (bottom up):
Work the buttonholes on the right band. 1 BUTTONHOLE = knit together the 3rd and 4th stitch from the edge, make 1 yarn over. On the next row knit the yarn over to leave a hole.
Work the buttonholes when the piece measures:
S: 5, 14, 23 and 32 cm = 2", 5½", 9" and 12½".
M: 6, 15, 24 and 33 cm = 2⅜", 6", 9½" and 13".
L: 6, 13, 20, 27 and 34 cm = 2⅜", 5⅛", 8", 10⅝" and 13⅜".
XL: 4, 12, 20, 28 and 36 cm = 1½", 4¾", 8", 11" and 14¼".
XXL: 5, 13, 21, 29 and 37 cm = 2", 5⅛", 8¼", 11⅜" and 14½".
XXXL: 5, 13, 21, 29 and 37 cm = 2", 5⅛", 8¼", 11⅜" and 14½".

-------------------------------------------------------

START THE PIECE HERE:

-------------------------------------------------------

JACKET – SHORT OVERVIEW OF THE PIECE:
The body is worked back and forth bottom up on circular needle. The piece is divided for the armholes and the front and back pieces finished separately. The sleeves are worked in the round with double pointed needles/short circular needle.

BODY:
Cast on 206-221-239-257-278-299 stitches with circular needle size 4 MM = US 6 and 1 strand DROPS Merino Extra Fine and 1 strand DROPS Kid-Silk. Purl 1 row from the wrong side.
Work the next row from the right side as follows: 6 band stitches in GARTER STITCH – read description above, work rib (knit 2, purl 1) until there are 6 stitches left and 6 band stitches in garter stitch. Continue this rib for 4 cm = 1½" and the next row is from the right side - read BUTTONHOLES.
Change to circular needle size 5.5 MM = US 9. Knit 1 row from the right side and decrease 21-24-26-28-29-30 stitches evenly spaced (do not decrease over the bands) = 185-197-213-229-249-269 stitches. Purl 1 row from the wrong side (bands are knitted).
Then work as follows from the right side; remember the BUTTONHOLES on the right band – read description above: 6 band stitches in garter stitch, work A.1 over the next 36-36-45-45-54-54 stitches, 2-5-0-4-0-5 stitches in stockinette stitch, A.1 over 9 stitches, 2-5-0-4-0-5 stitches in stockinette stitch, A.1 over the next 72-72-90-90-108-108 stitches, 2-5-0-4-0-5 stitches in stockinette stitch, A.1 over 9 stitches, 2-5-0-4-0-5 stitches in stockinette stitch, A.1 over the next 36-36-45-45-54-54 stitches, 3 stitches in stockinette stitch, 6 band stitches in garter stitch.
Insert 2 markers, 50-53-57-61-66-71 stitches in from each side (85-91-99-107-117-127 stitches between the markers on the back piece); allow the markers to follow your work onwards.
Continue this pattern until the piece measures 33-34-35-36-37-38 cm = 13"-13⅜"-13¾"-14¼"-14½"-15" from the cast-on edge – adjust so the next row is row 7 or 1 in A.1 (this gives you a neat pattern along the V-neck).
Start to decrease for the neck AT THE SAME TIME as you bind off for the armholes as follows from the right side:
6 band stitches in garter stitch, 1 stitch in stockinette stitch, purl 3 together, work as before until there are 2-3-6-8-11-15 stitches left before the marker, bind off 4-6-12-16-22-30 stitches, work as before until there are 2-3-6-8-11-15 stitches left before the marker, bind off 4-6-12-22-30 stitches, work until there are 10 stitches left, purl 3 together, knit 1 and 6 band stitches in garter stitch. The front and back pieces are finished separately.

LEFT FRONT PIECE:
= 46-48-49-51-53-54 stitches. Work 1 row from the wrong side as before. Then work as follows from the right side: 6-8-0-2-4-5 stitches in stockinette stitch, A.1 over the next 27-27-27-27-36-36 stitches as before, stockinette stitch until there are 10 stitches left on the row, purl 3 together, knit 1 and 6 band stitches in garter stitch = 44-46-47-49-51-52 stitches.
Decrease 1 stitch for the neck on each row from the right side – read DECREASE TIP.
Decrease like this a total of 11-11-11-12-11-11 times = 33-35-36-37-40-41 stitches.
When the piece measures 44-46-47-49-50-52 cm = 17¼"-18"-18½"-19¼"-19¾"-20½", continue with stockinette stitch – adjust to after a complete repeat in height. AT THE SAME TIME on the first row from the right side decrease 2-2-2-2-3-3 stitches evenly spaced (do not decrease over the band) = 31-33-34-35-37-38 stitches. Continue with stockinette stitch and 6 band stitches in garter stitch until the piece measures 52-54-56-58-60-62 cm = 20½"-21¼"-22"-22¾"-23⅝"-24⅜". On the next row from the right side bind off the first 25-27-28-29-31-32 stitches for the shoulder = 6 stitches. Work garter stitch over these 6 stitches for 7-7-7-8-8-8 cm = 2¾"-2¾"-2¾"-3⅛"-3⅛"-3⅛". Bind off.

RIGHT FRONT PIECE:
= 46-48-49-51-53-54 stitches. Work 1 row from the wrong side as before. Then work as follows from the right side: 6 band stitches in garter stitch, knit 1, purl 3 together, work to the end of the row as before = 44-46-47-49-51-52 stitches.
Then decrease 1 stitch for the neck on each row from the right side – remember DECREASE TIP.
Decrease like this a total of 11-11-11-12-11-11 times = 33-35-36-37-40-41 stitches.
When the piece measures 44-46-47-49-50-52 cm = 17¼"-18"-18½"-19¼"-19¾"-20½", continue with stockinette stitch – adjust to after a complete repeat in height. AT THE SAME TIME on the first row from the right side decrease 2-2-2-2-3-3 stitches evenly spaced (do not decrease over the band) = 31-33-34-35-37-38 stitches. Continue with stockinette stitch and 6 band stitches in garter stitch until the piece measures 52-54-56-58-60-62 cm = 20½"-21¼"-22"-22¾"-23⅝"-24⅜". On the next row from the wrong side bind off the first 25-27-28-29-31-32 stitches for the shoulder = 6 stitches. Work garter stitch over these 6 stitches for 7-7-7-8-8-8 cm = 2¾"-2¾"-2¾"-3⅛"-3⅛"-3⅛". Bind off.

BACK PIECE:
= 81-85-87-91-95-97 stitches. Work 1 row from the wrong side as before. On the next row from the wrong side work as follows: 3-5-6-8-1-2 stitches in stockinette stitch, A.1 over the next 72-72-72-72-90-90 stitches, work the first 3 stitches in A.1 and 3-5-6-8-1-2 stitches in stockinette stitch.
When the piece measures 48-50-52-54-56-58 cm = 19"-19¾"-20½"-21¼"-22"-22¾", continue with stockinette stitch – adjust to after a complete repeat in height. AT THE SAME TIME on the first row from the right side decrease 6 stitches evenly spaced = 75-79-81-85-89-91 stitches. When the piece measures 50-52-54-56-58-60 cm = 19¾"-20½"-21¼"-22"-22¾"-23⅝" and the next row is from the right side, bind off the middle 23-23-23-25-25-25 stitches for the neck and finish each shoulder separately.

LEFT SHOULDER:
= 26-28-29-30-32-33 stitches. Start from the wrong side and work as before. On the first row from the right side decrease for the neck as follows: Knit 2, knit 2 together and knit to the end of the row = 25-27-28-29-31-32 stitches. Continue with stockinette stitch. Bind off when the piece measures 52-54-56-58-60-62 cm = 20½"-21¼"-22"-22¾"-23⅝"-24⅜" from the cast-on edge.

RIGHT SHOULDER:
= 26-28-29-30-32-33 stitches. Start from the wrong side and work as before. On the first row from the right side decrease for the neck as follows: Knit until there are 4 stitches left, slip 1 stitch as if to knit, knit 1 and pass the slipped stitch over the knitted stitch, knit 2 = 25-27-28-29-31-32 stitches. Continue with stockinette stitch. Bind off when the piece measures 52-54-56-58-60-62 cm = 20½"-21¼"-22"-22¾"-23⅝"-24⅜" from the cast-on edge.

SLEEVES:
Cast on 48-48-51-54-54-57 stitches with double pointed needles size 4 MM = US 6 and 1 strand of each quality (2 strands). Knit 1 round. Work rib (knit 2, purl 1) in the round for 4 cm = 1½". Knit 1 round and decrease 8-6-7-10-8-9 stitches evenly spaced = 40-42-44-44-46-48 stitches.
Insert a marker at the beginning of the round (mid-under sleeve). Allow the marker to follow your work onwards – it is used when increasing under the sleeve. Change to double pointed needles size 5.5 MM = US 9 and work stockinette stitch. When the sleeve measures 9-9-9-7-8-6 cm = 3½"-3½"-3½"-2¾"-3⅛"-2⅜", increase 1 stitch on each side of the marker – read INCREASE TIP. Increase like this every 4-3½-3-3-2½-2½ cm = 1½"-1¼"-1⅛"-1⅛"-1"-1" a total of 10-11-12-13-14-14 times = 60-64-68-70-74-76 stitches. When the piece measures 48-47-46-44-43-40 cm = 19"-18½"-18"-17¼"-17"-15¾", divide at the marker and work the sleeve cap back and forth. Bind off when the sleeve measures 50 cm = 19¾" (a split of 2-3-4-6-7-10 cm = ¾"-1⅛"-1½"-2⅜"-2¾"-4" at the top). Work the other sleeve in the same way.

ASSEMBLY:
Sew the shoulder seams. Sew the bands together mid-back (collar). Sew the collar to the neck-line at the back.
Sew the sleeve cap to the armhole, then the split to the bottom of the armhole – see sketch.

Diagram

All measurements in charts are in cm.

symbols = knit from right side, purl from wrong side
symbols = knit 2 together
symbols = slip 1 stitch as if to knit, knit 1 and pass the slipped stitch over the knitted stitch
symbols = no stitch; go straight to the next symbol in the diagram
symbols = long stitch: insert the needle through the piece between the decreases 2 rows below. Pick up the strand and pull it through to the right side. Make sure the strand is long enough so that it does not tighten the work.
symbols = Sew a to A and b to B
diagram
diagram
diagram

Each of our patterns has specific tutorial videos to help you.

Do you have a question? See a list of frequently asked questions (FAQ)

Knitting tension is what determines the final measurements of your work, and is usually measured per 10 x 10 cm. It is provided like so: number of stitches in width x number of rows in height - eg: 19 stitches x 26 rows = 10 x 10 cm.

The knitting tension is very individual; some people knit/crochet loosely while others work tightly. You adjust the knitting tension with the needle size, which is why the suggested needle size only serve as a guide! You need to adjust this (up or down) to ensure that YOUR knitting tension matches the knitting tension provided in the pattern. If you work with a different knitting tension than provided you will have a different yarn consumption, and your work will have different measurements than what the pattern suggests.

The knitting tension also determines which yarns can replace each other. As long as you achieve the same knitting tension you can replace one yarn with another.

See DROPS lesson: How to measure your tension/gauge

See DROPS video: How to make a gauge tension swatch

The required amount of yarn is provided in grams, eg: 450 g. To calculate how many balls you’ll need you first need to know how many grams are in 1 ball (25g, 50g or 100g). This information is available if you click on the individual yarn quality on our pages. Divide the amount required with the amount of each ball. For example, if each ball is 50g (the most common amount), the calculation will be as follows: 450 / 50 = 9 balls.

The important thing when changing from one yarn to another is that the knitting/crochet tension remains the same. This is so that the measurements of the finished piece will be the same as on the sketch provided. It is easier to achieve the same knitting tension using yarns from the same yarn group. It is also possible to work with multiple strands of a thinner yarn to achieve the knitting tension of a thicker one. Please try our yarn converter. We recommend you to always work a test swatch.

Please NOTE: when changing yarn the garment might have a different look and feel to the garment in the photo, due to individual properties and qualities of each yarn.

See DROPS lesson: Can I use a different yarn than the one mentioned in the pattern?

All our yarns are categorised into yarn groups (from A to F) according to thickness and knitting tension – group A contains the thinnest yarns and group F the thickest. This makes it easier for you to find alternative yarns to our patterns, should you wish to switch yarn. All yarns within the same group have a similar knitting tension and can easily replace each other. However, different yarn qualities have different structures and properties which will give the finished work a unique look and feel.

Click here for an overview of the yarns in each yarn group

At the top of all our patterns you’ll find a link to our yarn converter, which is a helpful tool should you wish to use a different yarn than suggested. By filling in the yarn quality you wish to replace, the amount (in your size) and number of strands, the converter will present good alternative yarns with the same knitting tension. Additionally it will tell you how much you’ll require in the new qualities and whether you’ll need to work with multiple strands. Most skeins are 50g (some are 25g or 100g).

If the pattern is worked with multiple colours, every colour will have to be converted separately. Similarly, if the pattern is worked with several strands of different yarns (for example 1 strand Alpaca and 1 strand Kid-Silk) you will have to find alternatives for each, individually.

Click here to see our yarn converter

Since different yarns have different qualities and textures we have chosen to keep the original yarn in our patterns. However, you can easily find options among our available qualities by using our yarn converter, or simply pick a yarn from the same yarn group.

It is possible that some retailers still have discontinued yarns in stock, or that someone has a few skeins at home that they would like to find patterns for.

The yarn converter will provide both alternative yarn as well as required amount in the new quality.

If you think it's hard to decide what size to make, it can be a good idea to measure a garment you own already and like the size of. Then you can pick the size by comparing those measures with the ones available in the pattern's size chart.

You'll find the size chart at the bottom of the pattern.

See DROPS lesson: How to read size chart

The needle size provided in the pattern serves only as a guide, the important thing is to follow the knitting tension. And since knitting tension is very individual, you will have to adjust the needle size to ensure that YOUR tension is the same as in the pattern – maybe you’ll have to adjust 1, or even 2 needle sizes, up or down to achieve the correct tension. For this, we recommend that you work test swatches.

Should you work with a different knitting tension than the one provided, the measurements of the finished garment might deviate from the measurement sketch.

See DROPS lesson: How to measure your tension/gauge

See DROPS video: How to make a gauge tension swatch

Working a garment top-down provides more flexibility and room for personal adjustment. For example it is easier to try the garment on while working, as well as making adjustments to length of yoke and shoulder caps.

The instructions are carefully explaining every step, in the correct order. Diagrams are adjusted to the knitting direction and are worked as usual.

The diagram depicts all rows/rounds, and every stitch seen from the right side. It is read from bottom to top, from right to left. 1 square = 1 stitch.

When working back and forth, every other row is worked from the right side and every other row is worked from the wrong side. When working from the wrong side, the diagram will have to be worked reversed: from left to right, knit stitches are purled, purl stitches are knit etc.

When working in the round every round is worked from the right side and the diagram are worked from right to left on all rounds.

See DROPS lesson: How to read knitting diagrams

The diagram depicts all rows/rounds, and every stitch seen from the right side. It is worked from bottom to top, from right to left.

When working back and forth every other row is worked from the right side: from right to left and every other row is worked from the wrong side: from left to right.

When working in the round, every row in the diagram are worked from the right side, from right to left.

When working a circular diagram you start in the middle and work your way outwards, counter clockwise, row by row.

The rows usually start with a given number of chain stitches (equivalent to the height of the following stitch), this will either be depicted in the diagram or explained in the pattern.

See DROPS lesson: How to read crochet diagrams

Instructions for working several diagrams after each other on the same row/round, will often be written like so: “work A.1, A.2, A.3 a total of 0-0-2-3-4 times". This means you work A.1 once, then A.2 is worked once, and A.3 is repeated (in width) the number of times provided for your size – in this case like so: S = 0 times, M = 0 times, L=2 times, XL= 3 times and XXL = 4 times.

The diagrams are worked as usual: begin with the first row in A.1, then work the first row in A.2 etc.

See DROPS lesson: How to read knitting diagrams

See DROPS lesson: How to read crochet diagrams

The total width of the garment (from wrist-to-wrist) will be larger in the larger sizes, despite the actual sleeves being shorter. The larger sizes have longer sleeve caps and wider shoulders, so there will be a good fit in all sizes.

The measurement sketch/schematic drawing provides information regarding the full length of the garment. If it’s a jumper or a jacket the length is measured from the highest point on the shoulder (usually closest to the neckline), and straight down to the bottom of the garment. It is NOT measured from the tip of shoulder. Similarly, the length of yoke is measured from the highest point on the shoulder and down to where yoke is split into body and sleeves.

See DROPS lesson: How to read a schematic drawing

Diagrams are often repeated on the round or in height. 1 repeat is the diagram the way it appears in the pattern. If it says to work 5 repeats of A.1 in the round, then you work A.1 a total of 5 times after/next to each other in the round. If it says to work 2 repeats of A.1 vertically/in height you work the entire diagram once, then begin again at the start and work the entire diagram one more time.

Chain stitches are slightly narrower than other stitches and to avoid working the cast-on edge too tight, we simply chain more stitches to begin with. The stitch count will be adjusted on the following row to fit the pattern and measurement sketch.

The rib edge is more elastic and will contract slightly compared to, for example, stocking stitch. By increasing before the rib edge, you avoid a visible difference in width between the rib edge and the rest of the body.

It’s very easy to cast off too tightly, and by making yarn overs while casting off (and simultaneously casting these off) you avoid a too tight cast off edge.

See DROPS video: How to bind off with yarn overs (yo)

To achieve an even increase (or decrease) you can increase on, for example: every 3rd and 4th row alternately, like so: work 2 rows and increase on the 3rd row, work 3 rows and increase on the 4th. Repeat this until the increase is complete.

See DROPS lesson: Increase or decrease 1 st on every 3rd and 4th row alternately

Should you prefer to work in the round instead of back and forth, you may of course adjust the pattern. You’ll need to add steeks mid-front (usually 5 stitches), and follow the instructions. When you would normally turn and work from the wrong side, simply work across the steek and continue in the round. At the end you’ll cut the piece open, pick up stitches to work bands, and cover the cut edges.

See DROPS video: How to knit steeks and cut open

Should you prefer to work back and forth instead of in the round, you may of course adjust the pattern so you work the pieces separately and then assemble them at the end. Divide the stitches for the body in 2, add 1 edge stitch in each side (for sewing) and work the front and back pieces separately.

See DROPS lesson: Can I adapt a pattern for circular needles into straight needles?

Pattern repeats can vary slightly in the different sizes, in order to get the correct proportions. If you’re not working the exact same size as the garment in the photo, yours might deviate slightly. This has been carefully developed and adjusted so that the complete impression of the garment is the same in all sizes.

Make sure to follow instructions and diagrams for your size!

If you have found a pattern you like which is available in women’s size it’s not very difficult to convert it to men’s size. The biggest difference will be the length of sleeves and body. Start working on the women size that you think would fit across the chest. The additional length will be worked right before you cast off for the armhole/sleeve cap. If the pattern is worked top-down you can add the length right after the armhole or before the first decrease on sleeve.

Regarding additional yarn amount, this will depend on how much length you add, but it is better with a skein too many than too few.

All yarns will have excess fibres (from production) that might come off as lint or shedding. Brushed yarns (ie hairier yarns) have more of these loose, excess fibres, causing more shedding.

Shedding also depends on what is worn under or over the garment, and whether this pulls at the yarn fibres. It’s therefore not possible to guarantee that there will be no shedding

Below are some tips on how to get the best result when working with hairier yarns:

1. When the garment is finished (before you wash it) shake it vigorously so the looser hairs come off. NOTE: do NOT use a lint roller, brush or any method that pulls at the yarn.

2. Place the garment in a plastic bag and put it in your freezer - the temperature will cause the fibres to become less attached to each other, and excess fibres will come off easier.

3. Leave in the freezer for a few hours before taking it out and shaking it again.

4. Wash the garment according to the instructions on the yarn label.

Pilling is a natural process that happens to even the most exclusive of fibers. It's a natural sign of wear and tear that is hard to avoid, and that is most visible in high friction areas of your garment like a sweater's arms and cuffs.

You can make your garment look as new by removing the pilling, using a fabric comb or a pill/lint remover.

Still can't find the answer you need? Then scroll down and leave your question so one of our experts can try to help you. This will be done normally within 5 to 10 working days.
In the meantime, you can read the questions and answers that others have left to this pattern or join the DROPS Workshop on Facebook to get help from fellow knitters/crocheters!

You might also like...

Post a comment to pattern DROPS 235-14

We would love to hear what you have to say about this pattern!

If you want to leave a question, please make sure you select the correct category in the form below, to speed up the answering process. Required fields are marked *.

Comments / Questions (14)

country flag Sylvie wrote:

Bonjour. Je vous remercie pour la vidéo très explicite. Bonne fin de journée

09.04.2024 - 12:03

country flag Sylvie wrote:

Bonsoir. Dans les explications pour une taille M il est noté : "Quand l'ouvrage mesure 48-47-46-44-43-40 cm, diviser au marqueur et tricoter la tête de manche en allers et retours. Rabattre quand la manche mesure 50 cm (on a une fente de 2-3-4-6-7-10 cm en haut de la manche)". Sur combien de maille doit on travailler ? Que veut dire diviser au marqueur et la tête de manche ? Merci pour vos explications

08.04.2024 - 21:50

DROPS Design answered:

Bonjour Sylvie, en taille M vous tricotez en rond jusqu'à ce que la manche mesure 47 cm de hauteur totale, puis vous tricotez le haut de la manche en allers et retours pendant 3 cm = la manche mesure 50 cm de hauteur totale et le haut /la tête de la manche mesure 3 cm. Découvrez cette façon de faire dans cette vidéo. Bon tricot!

09.04.2024 - 08:50

country flag Sylvie wrote:

Bonjour. Je vous remercie pour la vidéo très explicite. Bonne fin de journée

02.04.2024 - 18:38

country flag Sylvie wrote:

Bonjour. Je sollicite votre aide car je n'ai pas bien compris pour faire une maille longue. Merci

01.04.2024 - 15:06

DROPS Design answered:

Bonjour Sylvie, cette vidéo devrait alors vous aider, car elle montre comment tricoter ce type de motifs. Notez juste que dans la vidéo, les motifs se répètent plus souvent en hauteur et en quinconce alors qu'ici, vous allez les tricoter en répétant A.1 en hauteur. Bon tricot!

02.04.2024 - 15:19

country flag Bianca Kotterink wrote:

Wat zijn de wasinstructies voor dit vest?? Want die zijn van Merino extra fine en kid silk nogal verschillend.

11.03.2024 - 09:32

DROPS Design answered:

Dag Bianca,

Je houdt altijd de instructies van het meest kwetsbare garen aan, alleen in dit geval moet het ene in de wasmachine gewassen worden en het andere met de hand. Lastig inderdaad. Je zou het kledingstuk ook buiten kunnen luchten. Misschien kun je het plat op een rekje neerleggen. Als het een beetje nevelig/mistig buiten is en je legt het een nacht buiten, dan frist het ook behoorlijk op. Hopelijk heb je hier wat aan.

11.03.2024 - 20:58

country flag Capucine wrote:

Bonjour \r\nPour la manche, c est noté il il faut diviser au marqueur la tête de manche mais ce n est pas indiqué combien de maille. Vous pouvez m’éclairer à ce sujet ? Merci beaucoup

10.09.2023 - 11:41

DROPS Design answered:

Bonjour Capucine, vous divisez l'ouvrage au niveau du marqueur sous la manche et continuez en allers et retours à partir du milieu sous la manche (sans diminuer, autrement dit, tricotez maintenant toutes les mailles en rangs, en commençant au milieu sous la manche, comme avant). Bon tricot!

11.09.2023 - 10:15

country flag Honor wrote:

Can someone give me a clue about sizes? Am I missing something, but I can't find any advice about what the sizes S to XXL mean.

20.08.2023 - 09:29

DROPS Design answered:

Dear Honor, the measurements for the sizes can be found in the schematic drawing, after the pattern's charts. You can see here how to read this schematic:https://www.garnstudio.com/lesson.php?id=24&cid=19. The measurements are all in cm. Happy knitting!

20.08.2023 - 17:01

country flag Vorst wrote:

Dans les explications en haut pour l encolure il dise 2 mailles ensemble à l endroits et dans les explications plus bas ils disent 3 mailles ensemble à l envers donc je suis un peu perdu

03.03.2023 - 14:58

DROPS Design answered:

Bonjour Mme Vorst, on diminue d'abord en tricotant 3 mailles ensemble à l'envers pour l'encolure, puis, on continue en diminuant ensuite 1 seule maille comme indiqué sous DIMINUTIONS. Bon tricot!

03.03.2023 - 15:34

country flag Estela wrote:

Não entendi o diagrama. Qdo se diz pra diminuir, não tem laçada pra compensar a diminuição. ? Se finerentes assim a peça vai encolher

17.02.2023 - 20:05

DROPS Design answered:

Bom dia, Não, de facto, não há laçadas neste bonito ponto. Há malhas alongadas que formam os buraquinhos. Tem à sua disposição um vídeo que explica como fazer o ponto com malhas alongadas: https://www.garnstudio.com/video.php?id=1663&lang=pt Bons tricôs!

21.03.2023 - 09:56

country flag Pinel Nadine wrote:

Bonjour, sauf erreur de ma part, lorsque je fais la règle de 3 avec les références du modèle, je ne trouve pas les mêmes résultats. Ex: les valeurs du point fantaisie sont 17 m =10 cm . Monter 206 m . 206m ×10 =2060/17=121/2=60,5 cm. Sur le patron ça fait 54 cm. Merci de bien vouloir m éclairer sur le mode de calcul . Bien a vous. Nadine

08.02.2023 - 08:44

DROPS Design answered:

Bonjour Mme Pinel, en fait les 206 mailles sont celles montées pour tricoter en côtes avec les petites aiguilles, on va ensuite diminuer avant de tricoter le point fantaisie, on aura ainsi 185 m au total sur l'aiguille soit 85 m pour le dos et ainsi on retrouve bien nos 50 cm de large. Bon tricot!

08.02.2023 - 09:21