
Popular categories
Looking for a yarn?


|
|
Holiday Glow |
|
 |
 |
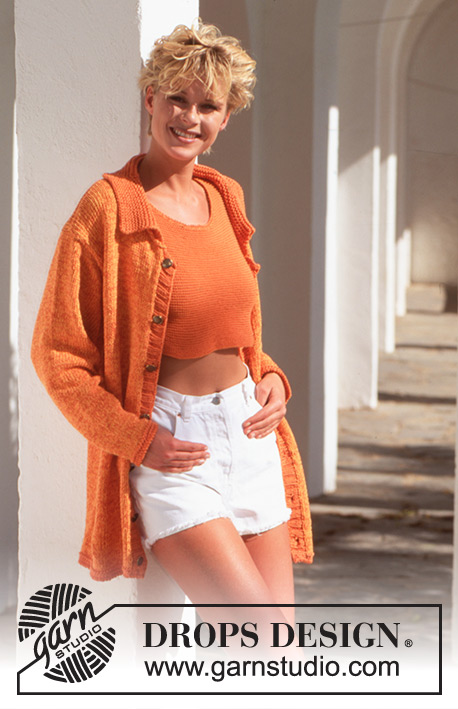
DROPS jacket and top in double Safran with collar
DROPS 51-2 |
|
|
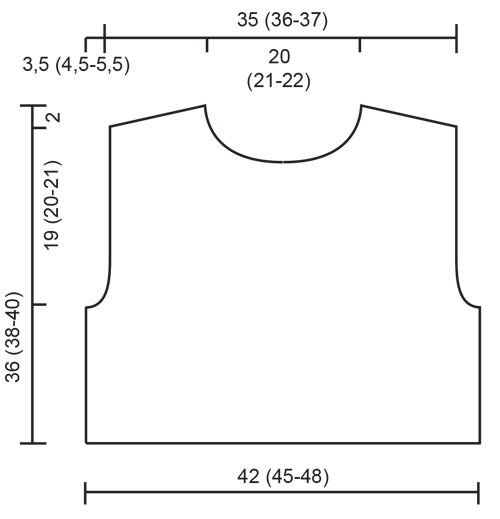
KNITTING TENSION: 17 sts x 22 rows on needle size 5 and stocking st = 10 x 10 cm. Remember needle size is only a suggestion. GARTER ST (back and forth on needle): 1 ridge = 2 rows. Row 1: K all sts, 2nd row: K all sts. GARTER ST (on circular needle): 1 ridge = 2 rounds. Round 1: P all sts. Round 2: K all sts. Rib: * K 2, P 2 *. Repeat from *-*. BODY: Worked back and forth on circular needle with double yarn. Cast on 194 (206-218) sts (incl 2 edge sts in each side) on circular needle size 5 mm with 2 strands orange and work 1 ridge. Switch to 1 strand yellow + 1 strand orange and work in stocking st. Remember the knitting tension! When piece measures 44 (48-50) cm, work next row as follows: 47 (50-53) sts front piece, cast off 4 sts for armhole, 92 (98-104) sts back piece, cast off 4 sts for armhole, 47 (50-53) sts front piece. Finish each part separately. FRONT PIECE: = 47 (50-53) sts. Then cast off for armholes every other row: 2 sts x 2 (2-3), 1 st x 3 (4-4) = 40 (42-43) sts. When piece measures 61 (65-68) cm, cast off towards the neck on every other row: 5 (6-6) sts 1 time, 3 sts 1 time, 2 sts 1 time, 1 st 3 times. Cast off when piece measures 69 (73-76) cm. BACK PIECE: = 92 (98-104) sts. Then cast off for armholes as on front piece = 78 (82-84) sts. When piece measures 67 (71-74) cm, cast off the middle 20 (22-22) sts for neck. Then cast off 2 sts in each side on next towards the neck. Cast off when piece measures 69 (73-76) cm. SLEEVE: Cast on 38 (38-40) sts on double pointed needles size 5 mm with 2 strands orange and work 1 ridge. Switch to 1 strand yellow + 1 strand orange and work in stocking st. At the same time when piece measures 5 cm, inc mid under sleeve every 3rd round: 2 sts 24 (24-25) times = 86 (86-90) sts. When piece measures 43 (42-41) cm, cast off 4 sts mid under sleeve and work back and forth until finished measurements. Then cast off for sleeve cap in each side on every other row: 3 sts 8 (9-10) times, cast off. Piece measures approx. 51 (51-51) cm. ASSEMBLY: Sew the shoulder seam. Left band: Pick up 104 (112-118) sts on circular needle size 5 mm with 2 strands orange and work rib back and forth on needle for 3 cm, cast off. Right band: Pick up and work as left band but after 1 cm work 7 buttonholes evenly on row - 1 buttonhole = cast off 2 sts and cast on 2 new sts over the cast off sts on next row. Collar: Pick up approx. 88-92 sts from WS around the neck (not over band) on circular needle size 5 mm with 2 strands orange and work in garter st back and forth on row while inc every 6th row: 1 st on each side of st mid on top of shoulder. Cast off when piece measures 8-10 cm. CROCHET EDGES: Work with double orange yarn from RS with hook size 4 mm as follows: 1 row with approx. 130-140 dc around edge in garter st at the bottom of body. Then work a row with reversed dc, i.e. from left to right without turning piece. Work dc from RS in every dc from previous row. Repeat both rows at the bottom around sleeve over approx. 25-30 dc. Sew in sleeves and sew on buttons. ----------------------------------------------------------- TOP in Safran with garter st and crochet edges Size: Small (Medium - Large) Materials: DROPS Safran from Garnstudio 150 (150-200) g colour no 28, orange DROPS Circular needle size 3.5 mm. Crochet hook 2.5 mm KNITTING TENSION: 23 sts x 45 rows on needle size 3.5 and in garter st = 10 x 10 cm. Remember needle size is only a suggestion. GARTER ST (back and forth on needle): 1 ridge = 2 rows. Row 1: K all sts, 2nd row: K all sts. FRONT PIECE: Cast on 98 (106-112) sts (incl 2 edge sts for seam) on circular needle size 3.5 mm with orange and work garter st back and forth on needle. Remember the knitting tension! When piece measures 15 (16-17) cm, cast off for armholes in each side on every other row as follows: 2 sts 2 (2-2) times, 1 st 4 (6-8) times = 82 (86-88) sts. When piece measures 25 (27-29) cm, cast off the middle 14 (16-18) sts for neck. Continue to cast off towards the neck on every other row: 3 sts 2 times, 2 sts 3 times, 1 st 4 times. When piece measures 34 (36-38) cm, cast off from shoulder towards the neck on every other row: 5 sts 2 (3-3) times, 4 sts 2 (1-1) times. All sts on shoulder should now be cast off. BACK PIECE: Cast on and work as front piece but when piece measures 30 (32-34) cm, cast off the middle 18 (20-22) sts for neck. Continue to cast off towards the neck on every other row: 3 sts 2 times, 2 sts 3 times, 1 st 2 times. When piece measures 34 (36-38) cm, cast off from shoulder towards the neck on every other row: 5 sts 2 (3-3) times, 4 sts 2 (1-1) times. All sts on shoulder should now be cast off. ASSEMBLY: sew shoulder seams and sew side seams. CROCHET EDGE: Work from RS with orange and hook size 2.5 mm as follows: 1 row with approx. 120 dc around the neck. Then work a row with reversed dc, i.e. from left to right without turning piece. Work dc from RS in every dc from previous row. Repeat both rows around the armhole with approx. 85-90 dc. |
|

|
|
|
|
|
Have you made this or any other of our designs? Tag your pictures in social media with #dropsdesign so we can see them! Do you need help with this pattern?You'll find tutorial videos, a Comments/Questions area and more by visiting the pattern on garnstudio.com. © 1982-2024 DROPS Design A/S. We reserve all rights. This document, including all its sub-sections, has copyrights. Read more about what you can do with our patterns at the bottom of each pattern on our site. |
|


With over 40 years in knitting and crochet design, DROPS Design offers one of the most extensive collections of free patterns on the internet - translated to 17 languages. As of today we count 304 catalogues and 11422 patterns - 11422 of which are translated into English (UK/cm).
We work hard to bring you the best knitting and crochet have to offer, inspiration and advice as well as great quality yarns at incredible prices! Would you like to use our patterns for other than personal use? You can read what you are allowed to do in the Copyright text at the bottom of all our patterns. Happy crafting!
Comments / Questions (11)
90 Maschen minus 3x 10 Maschen x 2 = 36 Maschen übrig = zu schmal für Armloch ???
21.11.2022 - 10:58DROPS Design answered:
Liebe Claudia, alle die 90 Maschen werden bei dem Armloch angenäht, nicht nur die restlichen nach Abketten. Das ganze Abkettenrand nähen Sie am Armloch, die 4 Maschen mitte under der Ärmel (2 M beidseitig) werden an die 4 abgekettene Maschen am Rumpfteil angenäht, dann wird das obere Rand der Ärmel am Armloch entlang angenäht. Viel Spaß beim stricken!
21.11.2022 - 16:12Danke für Ihre Antworten Aber, bei den Ärmeln sollen doch nach den Zunahmen = 90 Maschen auch wieder Maschen abgenommen werden: Außerdem für den Ärmelrand auf jeder Seite in jeder 2. Reihe abketten: 3 M x 8 (9-10) oder ist das ein Fehler in der Anleitung??? Danke
21.11.2022 - 10:12DROPS Design answered:
Liebe Claudia, alles ist so richtig die Ärmel wird schön in das Armoch anpassen, die Breite wird nicht mit den Armelabnahmen kalkuliert, es ist etwas mehr kompliziert. Die Abnahmen sind auch so richtig, am Ende Der Ärmel wird 3 Maschen x 8(9-10) Mal beidseitig abgkettet. Viel Spaß beim stricken!
21.11.2022 - 10:42Wäre schön eine Anleitung, wo man Rücken- und Vorderteile von Anfang an einzeln strickt und die Ärmel in Hin- und Rückreihen, ohne Nadelspiel. Danke
20.11.2022 - 15:10DROPS Design answered:
Liebe Claudia, ja sicher, solche Jacke finden Sie bei unseren Anleitungen; diese Lektion erklärt, wie man in Hin- und Rückreihen anstatt in Runden anpassen kann. Viel Spaß beim stricken!
21.11.2022 - 09:27Wenn beim Ärmel in jeder 2. Reihe auf jeder Seite 10x 3 Maschen = 60 Maschen abgekettet werden soll, bleiben nur noch 26 Maschen übrig = zu klein für das Armloch, das lt Skizze 26 cm sein soll ???
20.11.2022 - 14:50DROPS Design answered:
Liebe Claudia, am Ende der Zunahmen bei den Ärmeln haben Sie 90 Maschen = ca 52 cm = ca 26 cm , dh die Ärmel passen genau bei den Armlöchern. Viel Spaß beim stricken!
21.11.2022 - 09:29Guten Tag, ich würde gerne Rückenteil und die beiden Vorderteile von Anfang an einzeln stricken. Wo muss ich dann die 2x 4 Maschen für das Armloch hinzu rechnen?? Danke
20.11.2022 - 14:45DROPS Design answered:
Liebe Claudia, dann sollen Sie die 2 letzten Maschen vom 1. Vorderteil + die 2 ersten Maschen vom Rückenteil und die 2 letzten Maschen vom Rückenteil + die 2 ersten Maschen vom 2. Vorderteil abketten. Viel Spaß beim stricken!
21.11.2022 - 09:26Guten Tag, ich würde gerne Rückenteil und die beiden Vorderteile von Anfang an einzeln stricken. Wo hinzu muss ich dann die 2x 4 Maschen für das Armloch hinzu rechnen?? Danke
20.11.2022 - 12:08Beim Ärmel Nach 43 (42-41) cm unter dem Ärmel 4 M. abk. und die Arbeit hin und zurück fertig stricken. Weiter, bei jeder 2. R. gegen die Schulter abk.: 3 M. x 8 (9-10). Danach abk. Wie stricke ich das ??? Für die Hilfe herzlichen Dank.
21.07.2021 - 16:45DROPS Design answered:
Liebe Frau Tiemann, ketten Sie die 2 ersten Maschen der Runde und alle restlichen Maschen stricken, wenden, die 2 ersten Maschen abketten und Reihe bis zur Ende stricken, und jetzt ketten Sie am Anfang jeder Reihe (Hin- sowie Rückreihe) 3 Maschen am Anfang der 16(18-20) nächsten Reihen (= insgesamt 3 Maschen beidseitig 8(9-10) Mal ). Viel Spaß beim stricken!
21.07.2021 - 16:51For the front of the crop top, after you cast of the center stiches is is one strap worked and then you go back to the other or is there a different technique that is supposed to be used? And after the work measures 36 cm does the side edge mean the side closest to the neckline? Thanks in advance!
19.06.2020 - 05:34DROPS Design answered:
Dear Meda, after sts for neck have been cast off, continue each shoulder separately - after 36 cm you cast off stitches for shoulder beg from the armhole side (not from the neck), ie at the beg of a WS row on right shoulder and at the beg of a RS row on left shoulder. Happy knitting!
19.06.2020 - 07:58Can you please tell me what "thread" means when you say 1 thread or 2 thread etc. Many thanks.
02.06.2020 - 21:13DROPS Design answered:
Dear Mrs Whiter, this means you work with 2 strands of yarn Safran held together just as there were only one. You can work with 1 strand from 2 balls for example. Happy knitting!
03.06.2020 - 06:47Buongiorno, è possibile vedere lo scollo dietro ?
02.05.2020 - 10:24DROPS Design answered:
Buongiorno Maria Teresa. Purtroppo non abbiamo altre fotografie oltre a quelle pubblicate. Buon lavoro!
02.05.2020 - 14:35