DROPS Brushed Alpaca Silk
77% Alpaca, 23% Silk
from 3.10 € /25g
Get the yarn to make this pattern from 18.60€.

The yarn cost is calculated from the pattern’s smallest size and the yarn’s cheapest product type. Looking for an even better price? You might find it on the DROPS Deals!

DROPS SS24

Marmalade

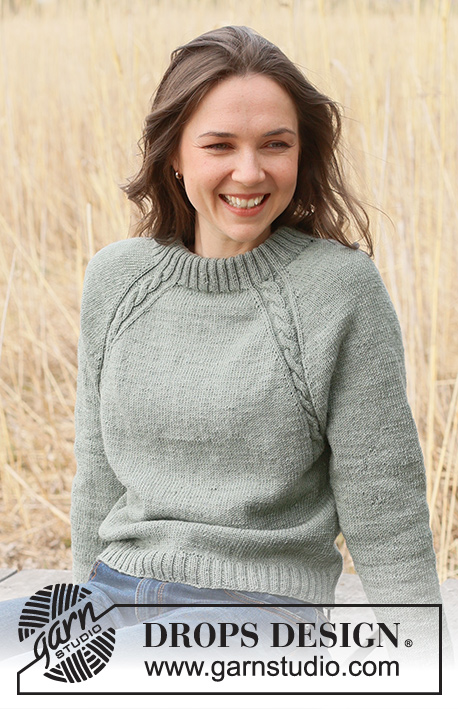
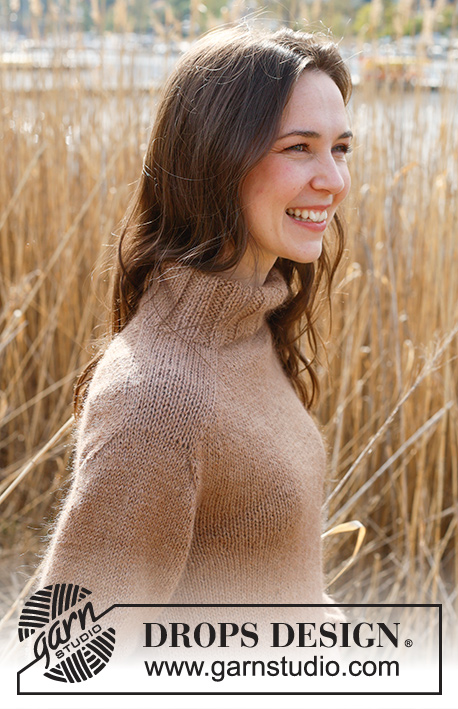
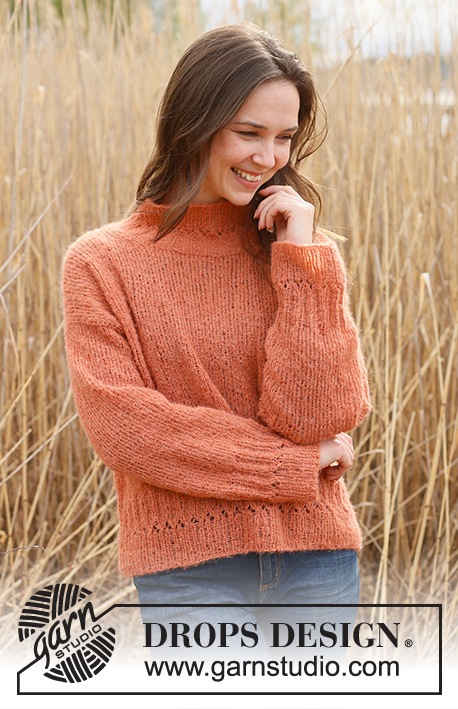
Knitted jumper in DROPS Brushed Alpaca Silk. The piece is worked top down with European shoulders / diagonal shoulders. Sizes S - XXXL.

DROPS 236-23
DROPS Design: Pattern as-177
Yarn group C or A + A
-------------------------------------------------------

SIZES:
S - M - L - XL - XXL - XXXL

MATERIALS:
DROPS BRUSHED ALPACA SILK from Garnstudio (belongs to yarn group C)
150-175-200-200-225-250 g colour 22, pale rust

NEEDLES:
DROPS CIRCULAR NEEDLE SIZE 5 MM: Length 40 cm and 80 cm.
DROPS CIRCULAR NEEDLE SIZE 3.5 MM: Length 40 cm and 80 cm.
DROPS DOUBLE POINTED NEEDLES SIZE 5 MM.
DROPS DOUBLE POINTED NEEDLES SIZE 3.5 MM.
The technique MAGIC LOOP can be used – you then only need circular needle of 80 cm in each size.

KNITTING TENSION:
17 stitches in width and 22 rows in height with stocking stitch = 10 x 10 cm.
NOTE: Needle size is only a guide. If you get too many stitches on 10 cm, change to a larger needle size. If you get too few stitches on 10 cm, change to a smaller needle size.

-------------------------------------------------------

Alternative Yarn – See how to change yarns here
Yarn Groups A to F – Use the same pattern and change the yarn here
Yarn usage using an alternative yarn – Use our yarn converter here

-------------------------------------------------------

DROPS Brushed Alpaca Silk
77% Alpaca, 23% Silk
from 3.10 € /25g
Get the yarn to make this pattern from 18.60€.

The yarn cost is calculated from the pattern’s smallest size and the yarn’s cheapest product type. Looking for an even better price? You might find it on the DROPS Deals!

Pattern instructions

-------------------------------------------------------

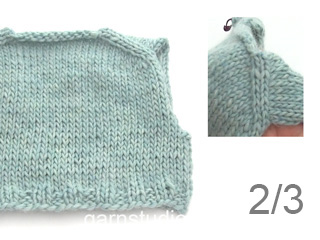
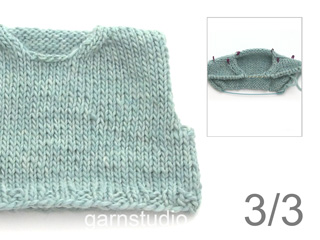
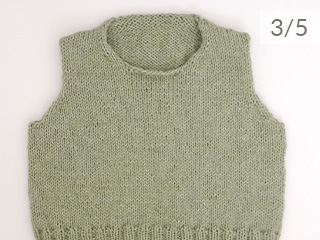
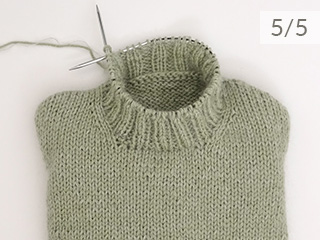
EXPLANATIONS FOR THE PATTERN:
-------------------------------------------------------

INCREASE TIP FROM THE RIGHT SIDE:
Increase towards the left AFTER MARKER:
Use left needle to pick up thread between 2 stitches from row below, pick up thread from front and knit stitch in back loop.
Increase towards the right BEFORE MARKER:
Use left needle to pick up thread between 2 stitches from row below, pick up thread from behind and knit stitch in front loop.

INCREASE TIP FROM THE WRONG SIDE:
Increase towards the left AFTER MARKER:
Use left needle to pick up thread between 2 stitches from row below, pick up thread from behind and purl stitch in front loop.
Increase towards the right BEFORE MARKER:
Use left needle to pick up thread between 2 stitches from row below, pick up thread from front and purl stitch in back loop.

DECREASE TIP (for sleeves):
Decrease 1 stitch on either side of the marker as follows: Work until there are 3 stitches left before the marker, knit 2 together, knit 2 (marker sits between these 2 stitches), slip 1 stitch as if to knit, knit 1 and pass the slipped stitch over the knitted stitch.

-------------------------------------------------------

START THE PIECE HERE:

-------------------------------------------------------

JUMPER – SHORT OVERVIEW OF THE PIECE:
The top of the back piece is worked top down and back and forth with circular needle to the bottom of the armholes. Stitches are knitted up along each shoulder, stitches increased for the neck and the front piece is worked back and forth with circular needle to the bottom of the armholes.
The front and back pieces are joined and the body worked in the round with circular needle. Stiches are knitted up around each armhole and the sleeve cap worked back and forth before the sleeve is joined and finished in the round with short circular needle/double pointed needles. The neck is worked in the round to finish.

BACK PIECE:
Cast on 30-30-34-36-38-40 stitches with circular needle size 5 mm and DROPS Brushed Alpaca Silk.
Purl 1 row from the wrong side.
Insert 1 marker after the 3rd stitch from each side. The markers should sit inside the 3 stitches on each row onwards.
Work stocking stitch back and forth.
AT THE SAME TIME increase AFTER the marker at the beginning of the row (seen from the right side) and BEFORE the marker at the end of the row – read INCREASE TIP FROM RIGHT SIDE.
On the next row (wrong side) increase in the same way – read INCREASE TIP FROM WRONG SIDE.
Continue increasing like this from both the right and wrong side a total of 26-28-28-30-32-36 times = 82-86-90-96-102-112 stitches.
The piece is now measured from here!
Continue in stocking stitch until the piece measures 16-17-18-19-19-20 cm, down the armhole. Cut the yarn, put stitches on a thread or an extra needle and work the front piece.

FRONT PIECE:
Start with the left shoulder (when garment is worn).
Knit up 26-28-28-30-32-36 stitches inside the outermost stitch along the left shoulder on the back piece (when the garment is worn, knitting up 1 stitch in each row along the edge). Work stocking stitch back and forth for 4 cm. Now increase stitches at the beginning of each row from the right side for the neck, inside 3 stitches – remember INCREASE FROM THE RIGHT SIDE. Increase 1 stitch 4 times = 30-32-32-34-36-40 stitches. Purl 1 row from the wrong side, cut the yarn, put stitches on a thread or an extra needle and work the right shoulder.

Knit up 26-28-28-30-32-36 stitches inside the outermost stitch along the right shoulder on the back piece. Work stocking stitch back and forth for 4 cm. Now increase stitches at the end of each row from the right side, inside 3 stitches – remember INCREASE FROM THE RIGHT SIDE. Increase 1 stitch 4 times = 30-32-32-34-36-40 stitches.
Purl back from the wrong side after the last increase.
Work the next row from the right side as follows: Knit the 30-32-32-34-36-40 stitches from the right front piece, cast on 22-22-26-28-30-32 stitches for the neck at the end of the row then knit the 30-32-32-34-36-40 stitches from the left front piece = 82-86-90-96-102-112 stitches.
Work stocking stitch back and forth until the front piece measures 22-23-24-25-27-28 cm along the armhole.
Now join the front and back pieces for the body as follows.

BODY:
Work stocking stitch over the 82-86-90-96-102-112 stitches from the front piece and cast on 4-6-8-12-16-16 stitches at the end of the row (= side), work stocking stitch over the 82-86-90-96-102-112 stitches from the back piece and cast on 4-6-8-12-16-16 stitches at the end of the row = 172-184-196-216-236-256 stitches. Work stocking stitch in the round until the piece measures 42-44-46-48-50-52 cm from the top of the front piece.
Knit 1 round and increase 16-16-20-20-24-24 stitches evenly spaced = 188-200-216-236-260-280 stitches. Change to circular needle size 3.5 mm and work A.1 over all stitches. Repeat the first 4 rounds in height until the rib measures 5 cm, then complete A.1, Repeat the 4 last rounds until the rib measures a total of 12 cm. Cast off.
The jumper measures approx. 54-56-58-60-62-64 cm, measured from the top of the shoulder by the neck.

LEFT SLEEVE:
Use circular needle size 5 mm and DROPS Brushed Alpaca Silk. Start at the bottom of the armhole and knit up 37-39-41-43-46-48 stitches from the right side up the front piece to the shoulder then 27-29-31-31-32-34 stitches down the back piece, from the shoulder to the bottom of the armhole = 64-68-72-74-78-82 stitches. Insert 1 marker in the middle of the row – the sleeve is measured from this marker.
Work stocking stitch back and forth for 1-2-2-4-5-5 cm.
Now join the piece on short circular needle/double pointed needles size 5 mm and finish the sleeve in the round. Insert 1 marker at the beginning of the round (mid-under sleeve). Allow this marker to follow your work onwards.
Start at the marker under the sleeve and work stocking stitch until the sleeve measures 4-4-4-5-6-6 cm. Now decrease 2 stitches under the sleeve – read DECREASE TIP.
Decrease like this every 6-4-3-3-2-½-2 cm a total of 6-8-9-9-10-11 times = 52-52-54-56-58-60 stitches.
Continue working until the sleeve measures 36-36-36-35-34-32 cm from the marker (there is 12 cm left – try the jumper on and work to desired length). Knit 1 round and increase 4-4-6-8-6-8 stitches evenly spaced = 56-56-60-64-64-68 stitches. Change to double pointed needles size 3.5 mm and work A.1 over all stitches. Repeat the first 4 rounds in height until the rib measures 5 cm, then complete A.1, Repeat the 4 last rounds until the rib measures a total of 12 cm. Cast off. The sleeve measures approx. 48-48-48-47-46-44 cm from the marker.

RIGHT SLEEVE:
Work the same way as left sleeve, but knit up 27-29-31-31-32-34 stitches from the bottom of the armhole up the back piece to the shoulder then 37-39-41-43-46-48 stitches down the front piece. Sew the bottom of the armholes – see sketch.

NECK:
Start on one shoulder and knit up inside the 1 edge stitch and from the right side 68 to 92 stitches around the neck, using short circular needle size 3.5 mm (stitch-number divisible by 4). Work A.1 over all stitches. Repeat the first 4 rounds in height until the rib measures 3 cm, then complete A.1, Repeat the 4 last rounds until the rib measures a total of 8 cm. Cast off.

Diagram

symbols = knit
symbols = purl
symbols = between 2 stitches make 1 yarn over which is knitted on the next round to leave a hole
symbols = slip 1 stitch as if to knit, knit 2 together and pass the slipped stitch over.
symbols = purl 2 together
symbols = bottom of armhole sewn together: b to B
diagram
diagram
diagram

Each of our patterns has specific tutorial videos to help you.

Do you have a question? See a list of frequently asked questions (FAQ)

Knitting tension is what determines the final measurements of your work, and is usually measured per 10 x 10 cm. It is provided like so: number of stitches in width x number of rows in height - eg: 19 stitches x 26 rows = 10 x 10 cm.

The knitting tension is very individual; some people knit/crochet loosely while others work tightly. You adjust the knitting tension with the needle size, which is why the suggested needle size is only meant as a guide! You need to adjust this (up or down) to ensure that YOUR knitting tension matches the knitting tension provided in the pattern. If you work with a different knitting tension than provided you will have a different yarn consumption, and your work will have different measurements than what the pattern suggests.

The knitting tension also determines which yarns can replace each other. As long as you achieve the same knitting tension you can replace one yarn with another.

See DROPS lesson: How to measure your tension/gauge

See DROPS video: How to make a gauge tension swatch

The required amount of yarn is provided in grams, eg: 450 g. To calculate how many balls you’ll need you first need to know how many grams are in 1 ball (25g, 50g or 100g). This information is available if you click on the individual yarn quality on our pages. Divide the amount required with the amount of each ball. For example, if each ball is 50g (the most common amount), the calculation will be as follows: 450 / 50 = 9 balls.

The important thing when changing from one yarn to another is that the knitting/crochet tension remains the same. This is so that the measurements of the finished piece will be the same as on the sketch provided. It is easier to achieve the same knitting tension using yarns from the same yarn group. It is also possible to work with multiple strands of a thinner yarn to achieve the knitting tension of a thicker one. Please try our yarn converter. We recommend you to always work a test swatch.

Please NOTE: when changing yarn the garment might have a different look and feel to the garment in the photo, due to individual properties and qualities of each yarn.

See DROPS lesson: Can I use a different yarn than the one mentioned in the pattern?

All our yarns are categorised into yarn groups (from A to F) according to thickness and knitting tension – group A contains the thinnest yarns and group F the thickest. This makes it easier for you to find alternative yarns to our patterns, should you wish to switch yarn. All yarns within the same group have a similar knitting tension and can easily replace each other. However, different yarn qualities have different structures and properties which will give the finished work a unique look and feel.

Click here for an overview of the yarns in each yarn group

At the top of all our patterns you’ll find a link to our yarn calculator, which is a helpful tool should you wish to use a different yarn than suggested. By filling in the yarn quality you wish to replace, the amount (in your size) and number of strands, the calculator will present good alternative yarns with the same knitting tension. Additionally it will tell you how much you’ll require in the new qualities and whether you’ll need to work with multiple strands. Most skeins are 50g (some are 25g or 100g).

If the pattern is worked with multiple colours, every colour will have to be calculated separately. Similarly, if the pattern is worked with several strands of different yarns (for example 1 strand Alpaca and 1 strand Kid-Silk) you will have to find alternatives for each, individually.

Click here to see our yarn calculator

Since different yarns have different qualities and textures we have chosen to keep the original yarn in our patterns. However, you can easily find options among our available qualities by using our yarn calculator, or simply pick a yarn from the same yarn group.

It is possible that some retailers still have discontinued yarns in stock, or that someone has a few skeins at home that they would like to find patterns for.

The yarn calculator will provide both alternative yarn as well as required amount in the new quality.

If you think it's hard to decide what size to make, it can be a good idea to measure a garment you own already and like the size of. Then you can pick the size by comparing those measures with the ones available in the pattern's size chart.

You'll find the size chart at the bottom of the pattern.

See DROPS lesson: How to read size chart

The needle size provided in the pattern serves only as a guide, the important thing is to follow the knitting tension. And since knitting tension is very individual, you will have to adjust the needle size to ensure that YOUR tension is the same as in the pattern – maybe you’ll have to adjust 1, or even 2 needle sizes, up or down to achieve the correct tension. For this, we recommend that you work test swatches.

Should you work with a different knitting tension than the one provided, the measurements of the finished garment might deviate from the measurement sketch.

See DROPS lesson: How to measure your tension/gauge

See DROPS video: How to make a tension/gauge swatch

Working a garment top-down provides more flexibility and room for personal adjustment. For example it is easier to try the garment on while working, as well as making adjustments to length of yoke and shoulder caps.

The instructions are carefully explaining every step, in the correct order. Diagrams are adjusted to the knitting direction and are worked as usual.

The diagram depicts all rows/rounds, and every stitch seen from the right side. It is read from bottom to top, from right to left. 1 square = 1 stitch.

When working back and forth, every other row is worked from the right side and every other row is worked from the wrong side. When working from the wrong side, the diagram will have to be worked reversed: from left to right, knit stitches are purled, purl stitches are knit etc.

When working in the round every round is worked from the right side and the diagram are worked from right to left on all rounds.

See DROPS lesson: How to read knitting diagrams

The diagram depicts all rows/rounds, and every stitch seen from the right side. It is worked from bottom to top, from right to left.

When working back and forth every other row is worked from the right side: from right to left and every other row is worked from the wrong side: from left to right.

When working in the round, every row in the diagram are worked from the right side, from right to left.

When working a circular diagram you start in the middle and work your way outwards, counter clockwise, row by row.

The rows usually start with a given number of chain stitches (equivalent to the height of the following stitch), this will either be depicted in the diagram or explained in the pattern.

See DROPS lesson: How to read crochet diagrams

Instructions for working several diagrams after each other on the same row/round, will often be written like so: “work A.1, A.2, A.3 a total of 0-0-2-3-4 times". This means you work A.1 once, then A.2 is worked once, and A.3 is repeated (in width) the number of times provided for your size – in this case like so: S = 0 times, M = 0 times, L=2 times, XL= 3 times and XXL = 4 times.

The diagrams are worked as usual: begin with the first row in A.1, then work the first row in A.2 etc.

See DROPS lesson: How to read knitting diagrams

See DROPS lesson: How to read crochet diagrams

The total width of the garment (from wrist-to-wrist) will be larger in the larger sizes, despite the actual sleeves being shorter. The larger sizes have longer sleeve caps and wider shoulders, so there will be a good fit in all sizes.

The measurement sketch/schematic drawing provides information regarding the full length of the garment. If it’s a jumper or a jacket the length is measured from the highest point on the shoulder closest to the neckline, and straight down to the bottom of the garment. It is NOT measured from the tip of shoulder. Similarly, the length of yoke is measured from the highest point on the shoulder and down to where yoke is split into body and sleeves.

On a jacket measures are never taken along bands, unless specifically stated. Always measure inside band stitches when measuring the length.

See DROPS lesson: How to read a schematic drawing

Diagrams are often repeated on the round or in height. 1 repeat is the diagram the way it appears in the pattern. If it says to work 5 repeats of A.1 in the round, then you work A.1 a total of 5 times after/next to each other in the round. If it says to work 2 repeats of A.1 vertically/in height you work the entire diagram once, then begin again at the start and work the entire diagram one more time.

Chain stitches are slightly narrower than other stitches and to avoid working the cast-on edge too tight, we simply chain more stitches to begin with. The stitch count will be adjusted on the following row to fit the pattern and measurement sketch.

The rib edge is more elastic and will contract slightly compared to, for example, stocking stitch. By increasing before the rib edge, you avoid a visible difference in width between the rib edge and the rest of the body.

It’s very easy to cast off too tightly, and by making yarn overs while casting off (and simultaneously casting these off) you avoid a too tight cast off edge.

See DROPS video: How to bind off with yarn overs (yo)

To achieve an even increase (or decrease) you can increase on, for example: every 3rd and 4th row alternately, like so: work 2 rows and increase on the 3rd row, work 3 rows and increase on the 4th. Repeat this until the increase is complete.

See DROPS lesson: Increase or decrease 1 st on every 3rd and 4th row alternately

Should you prefer to work in the round instead of back and forth, you may of course adjust the pattern. You’ll need to add steeks mid-front (usually 5 stitches), and follow the instructions. When you would normally turn and work from the wrong side, simply work across the steek and continue in the round. At the end you’ll cut the piece open, pick up stitches to work bands, and cover the cut edges.

See DROPS video: How to knit steeks and cut open

Should you prefer to work back and forth instead of in the round, you may of course adjust the pattern so you work the pieces separately and then assemble them at the end. Divide the stitches for the body in 2, add 1 edge stitch in each side (for sewing) and work the front and back pieces separately.

See DROPS lesson: Can I adapt a pattern for circular needles into straight needles?

Pattern repeats can vary slightly in the different sizes, in order to get the correct proportions. If you’re not working the exact same size as the garment in the photo, yours might deviate slightly. This has been carefully developed and adjusted so that the complete impression of the garment is the same in all sizes.

Make sure to follow instructions and diagrams for your size!

If you have found a pattern you like which is available in women’s size it’s not very difficult to convert it to men’s size. The biggest difference will be the length of sleeves and body. Start working on the women size that you think would fit across the chest. The additional length will be worked right before you cast off for the armhole/sleeve cap. If the pattern is worked top-down you can add the length right after the armhole or before the first decrease on sleeve.

Regarding additional yarn amount, this will depend on how much length you add, but it is better with a skein too many than too few.

All yarns will have excess fibres (from production) that might come off as lint or shedding. Brushed yarns (ie hairier yarns) have more of these loose, excess fibres, causing more shedding.

Shedding also depends on what is worn under or over the garment, and whether this pulls at the yarn fibres. It’s therefore not possible to guarantee that there will be no shedding

Below are some tips on how to get the best result when working with hairier yarns:

1. When the garment is finished (before you wash it) shake it vigorously so the looser hairs come off. NOTE: do NOT use a lint roller, brush or any method that pulls at the yarn.

2. Place the garment in a plastic bag and put it in your freezer - the temperature will cause the fibres to become less attached to each other, and excess fibres will come off easier.

3. Leave in the freezer for a few hours before taking it out and shaking it again.

4. Wash the garment according to the instructions on the yarn label.

Pilling is a natural process that happens to even the most exclusive of fibers. It's a natural sign of wear and tear that is hard to avoid, and that is most visible in high friction areas of your garment like a sweater's arms and cuffs.

You can make your garment look as new by removing the pilling, using a fabric comb or a pill/lint remover.

Still can't find the answer you need? Then scroll down and leave your question so one of our experts can try to help you. This will be done normally within 5 to 10 working days.
In the meantime, you can read the questions and answers that others have left to this pattern or join the DROPS Workshop on Facebook to get help from fellow knitters/crocheters!

You might also like...

Post a comment to pattern DROPS 236-23

We would love to hear what you have to say about this pattern!

If you want to leave a question, please make sure you select the correct category in the form below, to speed up the answering process. Required fields are marked *.

Comments / Questions (12)

country flag Christina Eldero wrote:

Hej! Jag har problem att förstå hur antalet maskor man ska plocka/sticka upp för ärm kan stämma med det antal cm man är instruerad att sticka för bak- och för framstycket: I stl L: 18 cm bakstycke och 24 cm framstycke. Med en stickfasthet på 22 varv/10 cm ska man sticka avrundat 40 varv till bakst. och 53 varv till framst., MEN man ska plocka/sticka upp 41 maskor längs framst. och 31 längs bakst. Hur går det ihop??

26.01.2024 - 03:41

DROPS Design answered:

Hei Christina. Om man skal plukke opp like mange masker som pinner (varv) vil ikke overgangen mellom bol / erme bli pen. Ermene vil da"pose" seg ut ved overgangen. Slik at når du skal plukke opp masker "hopper" man over ca hver 3 -4 pinne/varv, slik at overgangen blir penest mulig. mvh DROPS Design

05.02.2024 - 09:12

country flag Maria Christine Weber wrote:

Ich habe 12 Strangen alpaka-silk Wolle und würde gerne eine Jacke stricken. Leider finde ich keine Anleitung. Können Sie mir helfen,bitte.

11.09.2023 - 23:40

DROPS Design answered:

Liebe Frau Weber, haben Sie DROPS Brushed Alpaca Silk (siehe Farbkarte? Dann finden Sie alle passende Anleitungen hier; oder haben Sie DROPS Baby Alpaca Silk (jetzt ausgelaufen), dann finden Sie passende Anleitung (Garngruppe A) hier. Viel Spaß beim stricken!

12.09.2023 - 09:25

country flag Fran wrote:

Thanks for your help. I finished this sweater few days ago, I love it!

13.03.2023 - 16:45

country flag Fran wrote:

Hello, my question is about the Front piece, "increase sts at the beginning of each row from the RS for the neck, inside 3 sts. Increase 1st 4 times". I'm supposed to increase 1 st at the beginning of the row on the RS, 4 times. So, I have to knit 8 rows in total, increasing only on RS. Also, what does mean "inside 3sts"? Where I have to increase, between the 2nd and 3rd stitch? It's the first time I knit this kind of sleeves, I'm a little confused. TIA!

16.02.2023 - 12:27

DROPS Design answered:

Dear Fran, "inside 3 sts" means you work the first 3 stitches then increase 1 stitch (when increasing at the beg of the row on left front piece) and/or work until 3 sts remain then increase 1 stitch (when increasing at the end of the row on right front piece). Increase as explained above under INCREASE FROM RIGHT SIDE, before marker = after the first 3 sts, before marker = when 3 sts remain. This video is showing (for another pattern but same technique) how to work such a front piece. Happy knitting!

16.02.2023 - 13:54

country flag De Weirt Françoise wrote:

Bonjour Combien de pelotes faudrait-il pour tricoter double fil aiguilles 5 ou 6? Merci Françoise

12.12.2022 - 10:51

DROPS Design answered:

Bonjour Mme De Weirt, ce modèle se tricote avec 1 seul fil DROPS Brushed Alpaca Silk et des aiguilles 5 - retrouvez la quantité pour chaque taille sous l'en-tête - divisez le poids par celui de la pelote (25 g) pour avoir le nombre de pelotes pour la taille. Pour tricoter avec 2 fils du groupe A, utilisez < a href="https://www.garnstudio.com/includes/yarn-calc.php?cid=8">notre convertisseur pour voir les alternatives et les quantités correspondantes. Bon tricot!

12.12.2022 - 16:01

country flag Cathleen Castaneda wrote:

Hello again! I have one more question. Why do I cast on more stitches on the front portion of the sleeve than on the back portion of the sleeve instead if equal nimber if stitches? Thank you fir your help!!!

11.12.2022 - 01:20

DROPS Design answered:

Dear Cathleen, it's a specific type of sleeve, where the seam is displaced towards the back. That's why the number of stitches is not equal. Happy knitting!

11.12.2022 - 23:45

country flag Cathleen Castaneda wrote:

Hello! I’m not understanding how to start the sleeve section. The underarm section of the body is squared off. Do I start picking up stitches on either end of the squared off portion or do I start in the middle of the 8 cast on stitches that formed the squared off section? And the pattern says to knit back & forth for 3/8” before joining to knit in the round, but the pattern doesn’t say anything about sewing the underarm seam together since it wasn’t started in the round

11.12.2022 - 01:10

DROPS Design answered:

Dear Cathleen, you start picking up around the stitches of the 8 cast on stitches (excluding them). You will sew the rows worked back and forth with these 8 stitches (you can see the B and b in the diagram after the pattern explanations). Happy knitting!

11.12.2022 - 23:45

country flag Sylvia Marzolf wrote:

Bonjour nCombien de pelotes faut-il pour ce pull en M ?nMerci

06.12.2022 - 14:10

DROPS Design answered:

Bonjour Mme Marzolf, vous trouverez toutes les quantités nécessaires pour chaque taille dans l'en-tête, avec la taille des aiguilles et l'échantillon, autrement dit, en M il faut ici 175 g Brushed Alpaca Silk / 25 g la pelote = 7 pelotes. Bon tricot!

06.12.2022 - 16:30

country flag Cathie Castaneda wrote:

The video connected to this pattern shows increases done on every row but instructions for the Front Piece sound like increases are only done on right side. Instructions say “every right side”. Thank you!

01.12.2022 - 00:49

DROPS Design answered:

Dear Mrs Castaneda, videos are there to illustrate the technique, but depending on the pattern you might have to increase more/less stitches and more/less often, in this pattern you increase for the neck on every row from the right side, this means on every other row. Happy knitting!

01.12.2022 - 11:25

country flag Cathie Castaneda wrote:

Hello! I have a question on the 4th sentence in the paragraph under “Front Piece”. It says to “increase stitches at the beginning of each row from the right side for the neck. Increase one stitch 4 times.” Am I doing the increases on just the right side or doing the increase on both ride & wrong side like previously done on the back piece?

30.11.2022 - 21:54

DROPS Design answered:

Dear Mrs Castaneda, you increase for the neck on every row from the right side (at the beg of the row on left shoulder/at the end of the row on right shoulder). Happy knitting!

01.12.2022 - 11:16