
Popular categories
Looking for a yarn?


|
|||||||||||||
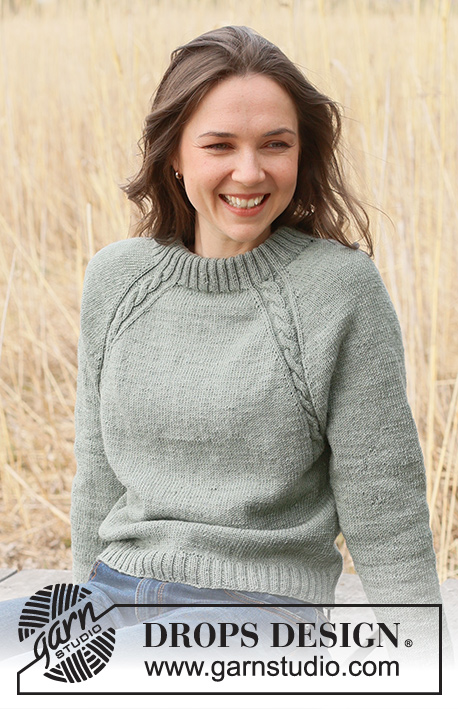
Sage Twist Cardigan |
|||||||||||||
 |
 |
||||||||||||
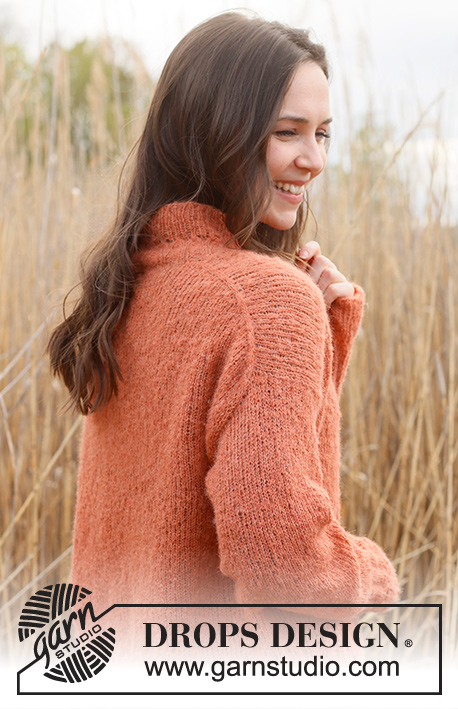
Knitted jacket in DROPS BabyMerino. The piece is worked top down with raglan, double neck and cables. Sizes S - XXXL.
DROPS 237-32 |
|||||||||||||
|
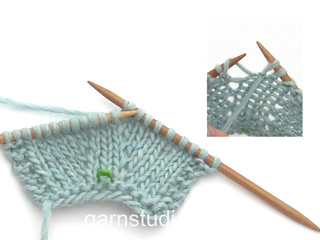
------------------------------------------------------- EXPLANATIONS FOR THE PATTERN: ------------------------------------------------------- PATTERN: See diagrams A.1 and A.2. The diagrams show all rows in the pattern from the right side. RAGLAN: Increase 1 stitch on each side of A.1/A.2, from the right side, by making 1 yarn over. Work the yarn over as follows from the wrong side: BEFORE A.1/A.2: Purl the yarn over in the back loop. The stitch twists to the right. AFTER A.1/A.2: Slip the yarn-over off the left needle, then replace it the other way round (insert the left needle into the back when replacing it). Purl the yarn over in the front loop. The stitch twists to the left. The new stitches are subsequently worked in stocking stitch. BUTTONHOLES: Work buttonholes on the right band (when the garment is worn). Work from the right side when there are 4 stitches left on the row as follows: Make 1 yarn over, knit 2 together and knit 2. On the next row (wrong side), knit the yarn over to leave a hole. The first buttonhole is worked straight after the neck. Then work the other 5-5-5-6-6-6 buttonholes with approx. 8½-9-9½-8-8½-9 cm between each one. DECREASE TIP (sleeves): Decrease 1 stitch on either side of the marker as follows: Work until there are 3 stitches left before the marker, knit 2 together, knit 2 (marker sits between these 2 stitches), slip 1 stitch as if to knit, knit 1 and pass the slipped stitch over the knitted stitch. ------------------------------------------------------- START THE PIECE HERE: ------------------------------------------------------- JACKET – SHORT OVERVIEW OF THE PIECE. The neck, yoke and body are worked back and forth with circular needle and top down. The sleeves are worked in the round with short circular needle/double pointed needles. DOUBLE NECK: Cast on 122-130-130-138-138-142 stitches with DROPS Baby Merino, using short circular needles sizes 3 mm and 2.5 mm held together. Remove the needle size 3 mm keeping the stitches on the needle size 2.5 mm (this gives you an elastic cast-on edge). Work rib as follows in the different sizes: SIZES S, XL and XXL: Purl 2, * knit 2, purl 2 *, work from *-* and finish with purl 2. SIZES M, L and XXXL: Knit 2, * purl 2, knit 2 *, work from *-* and finish with knit 2. Work this rib back and forth for 4½ cm. On the next 2 rows cast on 7 stitches at the end of each row = 136-144-144-152-152-156 stitches. Continue the rib, with 7 band stitches in garter stitch on each side, until the neck measures 9 cm from the cast-on edge, adjust so that the next row is to be worked from right side. Fold the neck double to the inside and work 1 more row of rib, working every 2nd stitch together with its corresponding stitch on the cast-on edge. You now have a double neck. The yoke is measured from here. Purl 1 row from wrong side (with front band stitches as before). YOKE: Change to circular needle size 3 mm, work and increase as follows from the right side: 7 band stitches in garter stitch, work stocking stitch and increase 2-1-2-1-2-3 stitches evenly over the next 12-14-14-16-16-18 stitches (14-15-16-17-18-21 stitches on the front piece), A.1, work stocking stitch and increase 4 stitches evenly over the next 10 stitches (14 stitches on the sleeve), A.1, work stocking stitch and increase 6-4-6-4-6-8 stitches evenly over the next 22-26-26-30-30-34 stitches (28-30-32-34-36-42 stitches on the back piece), A.1, work stocking stitch and increase 4 stitches evenly over the next 10 stitches (14 stitches on the sleeve), A.1, work stocking stitch and increase 2-1-2-1-2-3 stitches evenly over the next 12-14-14-16-16-18 stitches (14-15-16-17-18-21 stitches on the front piece) and 7 band stitches in garter stitch - NOTE! The first BUTTONHOLE is worked now – read description above = 162-166-170-174-178-190 stitches. Work the pattern back from the wrong side. Read the next section before continuing! Read RAGLAN in explanations above and start to increase on the next row from the right side. AT THE SAME TIME, when diagram A.1 is finished in height continue with A.2 over A.1. REMEMBER THE KNITTING TENSION! Increase differently on the sleeves and body: SLEEVES: Increase every 2nd row 10-12-10-20-30-40 times, then every 4th row 10-12-15-12-9-4 times. FRONT/ BACK PIECE: Increase every 2nd row 24-27-31-40-49-54 times, then every 4th row 7-8-7-3-0-0 times. When all the increases are finished there are 366-402-422-474-530-582 stitches. Between each A.2 there are 54-62-64-78-92-102 stitches on each sleeve, 90-100-108-120-134-150 stitches on the back piece and 52-57-61-67-74-82 stitches on each front piece. Continue with stocking stitch, bands in garter stitch and A.2 without increases and without cables (just knit and purl as shown in the diagram) until the yoke measures 25-27-28-30-32-34 cm from the neck. Divide for the body and sleeves from the right side as follows: Work 7 band stitches in garter stitch, knit 53-58-62-68-75-83 (to middle of A.2), place the next 70-78-80-94-108-118 stitches on a thread without working them, cast on 12-12-14-14-16-16 stitches under the sleeve, knit 106-116-124-136-150-166 (back piece), place the next 70-78-80-94-108-118 stitches on a thread without working them, cast on 12-12-14-14-16-16 stitches under the sleeve, knit 53-58-62-68-75-83 and 7 band stitches in garter stitch. The body and sleeves are finished separately and the piece is now measured from here. BODY: = 250-270-290-314-346-378 stitches. Continue with stocking stitch and 7 band stitches in garter stitch on each side for a further 19-19-20-20-20-20 cm or to desired length (there is approx. 4 cm left). Knit 1 row from the right side and increase 14-18-22-26-26-30 stitches evenly spaced (do not increase the bands) = 264-288-312-340-372-408 stitches. Work back from the wrong side. Change to circular needle size 2.5 mm. Work rib from the right side in the different sizes as follows: SIZES S, XL and XXL: Work 7 band stitches in garter stitch, purl 2, * knit 2, purl 2 *, work from *-* and finish with 7 band stitches in garter stitch. SIZES M, L and XXXL: Work 7 band stitches in garter stitch, knit 2, * purl 2, knit 2 *, work from *-* and finish with 7 band stitches in garter stitch. ALL SIZES: Work this rib for 4 cm. Cast off with knit over knit and purl over purl. The jacket measures approx. 52-54-56-58-60-62 cm from the shoulder down. SLEEVES: Place the 70-78-80-94-108-118 stitches from the thread on the one side of the piece on short circular needle/double pointed needles size 3 mm and knit up 1 stitch in each of the 12-12-14-14-16-16 stitches cast on under the sleeve = 82-90-94-108-124-134 stitches. Insert a marker in the middle of the new stitches under the sleeve. Read DECREASE TIP and work stocking stitch in the round for 4-4-4-4-2-2 cm. Now decrease as follows in the different sizes: SIZES S, M, L, XL and XXL: Decrease every 2½-2-1½-1-1 cm 12-15-16-21-28 times. SIZE XXXL: Decrease alternately every ½ cm and 1 cm 32 times. ALL SIZES: = 58-60-62-66-68-70 stitches. Work until the sleeve measures 36-34-34-32-31-30 cm or to desired length (approx. 4 cm left). Change to double pointed needles size 2.5 mm. Knit 1 round and increase 10-8-10-6-8-10 stitches evenly spaced = 68-68-72-72-76-80 stitches. Work rib (knit 2, purl 2) for 4 cm. Cast off with knit over knit and purl over purl. Work the other sleeve in the same way. ASSEMBLY: Sew the buttons onto the left band. |
|||||||||||||
Diagram explanations |
|||||||||||||
|
|||||||||||||

|
|||||||||||||

|
|||||||||||||
|
Have you made this or any other of our designs? Tag your pictures in social media with #dropsdesign so we can see them! Do you need help with this pattern?You'll find tutorial videos, a Comments/Questions area and more by visiting the pattern on garnstudio.com. © 1982-2024 DROPS Design A/S. We reserve all rights. This document, including all its sub-sections, has copyrights. Read more about what you can do with our patterns at the bottom of each pattern on our site. |
|||||||||||||


With over 40 years in knitting and crochet design, DROPS Design offers one of the most extensive collections of free patterns on the internet - translated to 17 languages. As of today we count 304 catalogues and 11422 patterns - 11422 of which are translated into English (UK/cm).
We work hard to bring you the best knitting and crochet have to offer, inspiration and advice as well as great quality yarns at incredible prices! Would you like to use our patterns for other than personal use? You can read what you are allowed to do in the Copyright text at the bottom of all our patterns. Happy crafting!
Comments / Questions (18)
Hva blir målene på denne jakken i str M
19.02.2024 - 15:13DROPS Design answered:
Hei Anita, Det finner en målskisse på bunnen av oppskriften, som har alle mål til de forskjellige størrelsene. God fornøyelse!
20.02.2024 - 07:10Buongiorno, mi scusi ma sommando tutte le maglie che risultano alla fine dello sprone per la taglia S non risultano 366 ma 350 (54+54+52+52+90+(12*4)=350) c'è un errore di calcolo? Grazie
14.02.2024 - 11:31DROPS Design answered:
Buonasera Lucia, il diagramma A.2 è formato da 16 maglie, non 12. Buon lavoro!
15.02.2024 - 17:54Mi scusi ma il diagramma considera i ferri di andata e ritorno o di sola andata e quindi i soli ferri a diritto. Grazie Lucia
09.02.2024 - 16:17DROPS Design answered:
Buonasera Lucia, i diagrammi mostrano tutti i ferri, sia di andata che di ritorno. Buon lavoro!
10.02.2024 - 19:10Mi scusi ma i diagrammi sono di andata e ritorno o devo considerare soltanto i ferri a diritto? Grazie Lucia
09.02.2024 - 16:16DROPS Design answered:
Buonasera Lucia, i diagrammi mostrano tutti i ferri, sia di andata che di ritorno. Buon lavoro!
10.02.2024 - 19:11HELP!!! Have I folded the neck wrongly? Can I do a purl row over the wrong side and start the yoke from right side and do the increase?
23.06.2023 - 12:40DROPS Design answered:
Dear Mrs Pang, after working neck together from RS, just work 1 row from WS (added in the pattern to make it more clear). Happy knitting!
02.10.2023 - 09:25I have completed folding the double neck. I want to start the yoke. However I seem to be on the WRONG side and not the right side. Have I done something incorrectly?
22.06.2023 - 11:43Gratitudine per il vostro servizio di commenti e spiegazioni: questo sito è veramente eccellente. Però mi permetto di suggerirvi di correggere le spiegazioni indicando chiaramente che gli unici aumenti, dopo lo sprone, sono quelli del raglan e anche spiegando che nel conteggio del davanti sono inserite anche le 7 maglie del bordo. In questo modo credo che tutto sarebbe più chiaro e ricevereste anche meno domande. Adesso è tutto chiaro anche per me dopo aver scucito posso procedere
19.04.2023 - 10:39Buongiorno credo di aver capito come procedere, anche se non era specificato nella spiegazione che bisogna aumentare 2 maglie sia per le maniche sia per il dietro con il numero di volte poi specificato. Però questo non mi torna per il davanti perché si dice che alla fine ci sono 61 maglie -16 che erano nello sprone ne restano 45: come raggiungo 45 maglie? Su 38 volte di aumento (31+7) non mi è chiaro perché il numero non è divisibile in modo esatto, grazie
18.04.2023 - 08:27DROPS Design answered:
Buonasera Lorena, ha contato le 7 maglie del bordo sul davanti? Buon lavoro!
18.04.2023 - 22:25Buonasera mi riferisco alla taglia L. Ho fatto tutti i conti e ho capito che si chiede di aumentare 2 maglie per le volte indicate sia per le maniche sia per il dietro, ma facendo tutti i conti coincidono per il dietro e le maniche, ma non riesco a spiegarmi come si possono it tenere 61 maglie per ciascuno dei due davanti sono dei numeri non divisibili per i giri di aumento 31 e 7 (38) 🤔🤔🤔 grazie
17.04.2023 - 23:58DROPS Design answered:
Buonasera Lorena, per il davanti parte da 16 maglie e ne aumenta 38 con il raglan + 7 maglie per il bordo = 61 maglie totali. Buon lavoro!
18.04.2023 - 22:25Buonasera a me non tornano i conti con gli aumenti: se bisogna continuare ad aumentare come indicato nella spiegazione dello sprone per esempio nelle maniche aumentando 10 × 6 =60; 4x 15 =84 più 14 totale 138 e non 64 🤔🤔🤔🤔 perché non avete fatto uno schema per gli aumenti? Faccio riferimento a misura L grazie 🙏
16.04.2023 - 23:27DROPS Design answered:
Buonasera Lorena, per il davanti aumenta 38 maglie con il raglan arrivando a 61 maglie e per le maniche aumenta 50 maglie arrivando a 64 maglie. Buon lavoro!
18.04.2023 - 22:27