DROPS Sky
DROPS Sky
74% Alpaca, 18% Polyamide, 8% Wool
from 5.10 £ /50g
Get the yarn to make this pattern from 30.60£.

The yarn cost is calculated from the pattern’s smallest size and the yarn’s cheapest product type. Looking for an even better price? You might find it on the DROPS Deals!

DROPS SS24

Warm Blush

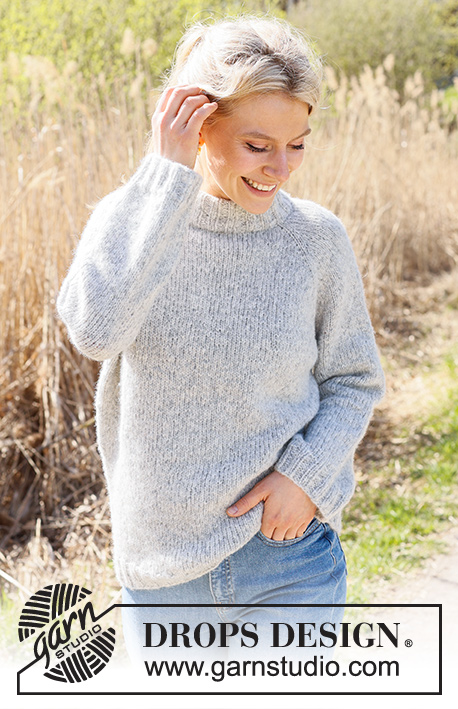
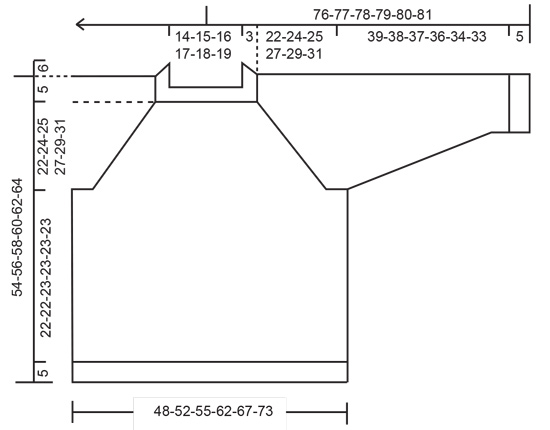
Knitted jumper in DROPS Sky. Piece is knitted top down with double neck edge, raglan and broken rib. Size: S - XXXL

DROPS 235-6
DROPS design: Pattern sk-171
Yarn group B
----------------------------------------------------------

SIZE:
S - M - L - XL - XXL - XXXL

MATERIALS:
DROPS SKY from Garnstudio (belongs to yarn group B)
300-350-400-400-450-500 g colour 09, cranberry

NEEDLES:
DROPS CIRCULAR NEEDLE SIZE 4 mm: Length 40 and 80 cm.
DROPS CIRCULAR NEEDLE SIZE 3 mm: Length 40 and 80 cm.
DROPS DOUBLE POINTED NEEDLES SIZE 4 mm
DROPS DOUBLE POINTED NEEDLES SIZE 3 mm
The technique MAGIC LOOP can be used – you then only need circular needle of 80 cm in each size.

KNITTING TENSION:
21 stitches in width and 28 rows vertically with pattern A.1 = 10 x 10 cm.
NOTE! Remember that needle size is only a suggestion. If you have too many stitches on 10 cm switch to larger needles. If you have too few stitches on 10 cm switch to smaller needles.

-------------------------------------------------------

Alternative Yarn – See how to change yarns here
Yarn Groups A to F – Use the same pattern and change the yarn here
Yarn usage using an alternative yarn – Use our yarn converter here

-------------------------------------------------------

DROPS Sky
DROPS Sky
74% Alpaca, 18% Polyamide, 8% Wool
from 5.10 £ /50g
Get the yarn to make this pattern from 30.60£.

The yarn cost is calculated from the pattern’s smallest size and the yarn’s cheapest product type. Looking for an even better price? You might find it on the DROPS Deals!

Pattern instructions

NOTE: This pattern is written in British English. All measurements in charts are in cm. For conversion from cm to inches - click here. There are different terms for crocheting in British and American English. If this pattern includes crochet, click for "crochet terms" here. For this pattern in American English, please click here.
----------------------------------------------------------

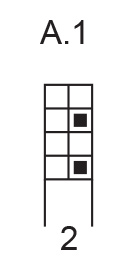
EXPLANATION FOR THE PATTERN:

----------------------------------------------------------

PATTERN:
See diagram A.1.

RAGLAN:
Increase 1 stitch before/after 1 stitch in stocking stitch in every transition between front piece/back piece and sleeves.
AFTER MARKER:
Work stitch with marker, pick up yarn between stitch with marker and next stitch - pick up from the front with left needle and knit stitch in back loop of stitch - stitch is twisted towards the left. On next round work stitch in pattern A.1.
BEFORE MARKER:
Work until stitch with marker, pick up yarn between previous stitch and stitch with marker - pick up from the back with left needle and knit stitch in front loop of stitch - stitch is twisted towards the right. On next round work stitch in pattern A.1.

DECREASE TIP (applies to mid under sleeves):
Decrease 1 stitch on each side of stitch with marker as follows: Work until 2 stitches remain before stitch with marker, knit 2 together, work 1 stitch (marker is in this stitch) slip 1 stitch knitwise, knit 1, pass slipped stitch over stitch worked.

----------------------------------------------------------

START THE PIECE HERE:

----------------------------------------------------------

JUMPER - SHORT OVERVIEW OF THE PIECE:
Double neck edge, yoke and body are worked in the round on circular needle, top down. Work sleeves in the round on double pointed needles/a short circular needle.

DOUBLE NECK EDGE:
Cast on 100-104-108-112-116-120 stitches on circular needle size 4 mm with DROPS Sky. Switch to circular needle size 3 mm. Work in the round in rib (knit 2/purl 2) for 13 cm (rib is later folded double and measures approx. 6 cm).

YOKE:
Switch to circular needle size 4 mm. Knit 1 round while increasing and insert markers as follows: Knit 1 and insert 1st marker in this stitch, knit 21 (sleeve), knit 1 and insert 2nd marker in this stitch, knit and increase 0-2-2-6-8-14 stitches evenly over the next 27-29-31-33-35-37 stitches (27-31-33-39-43-51 stitches for front piece), knit 1 and insert 3rd marker in this stitch, knit 21 (sleeve), knit 1 and insert 4th marker in this stitch, knit and increase 0-2-2-6-8-14 stitches evenly over the next 27-29-31-33-35-37 stitches (27-31-33-39-43-51 stitches for back piece). There are 100-108-112-124-132-148 stitches on round. Insert a marker thread mid back (between 1st and 4th marker), measure yoke from here later.
Now work pattern according to diagram A.1 (work stitches with markers in stocking stitch), AT THE SAME TIME increase for RAGLAN - read explanation above!

Increase for raglan every other round at each marker 6-8-12-19-19-21 times in at every marker total = 148-172-208-276-284-314 stitches. REMEMBER THE KNITTING TENSION!

Read all of the following section before continuing!
Now change the increase and increase differently on body and sleeve:
BODY: Increase after 2nd and 4th marker and before 3rd and 1st marker. Continue increase like this every other round until increase has been done 24-24-22-19-21-21 more times, 30-32-34-38-40-42 times in total on body.
SLEEVE: Increase after 1st and 3rd marker and before 2nd and 4th marker. Continue increase like this every 4th round until increase has been done 11-11-10-9-9-9 times, 17-19-22-28-28-30 times in total on sleeve.

When all increases for raglan are done, there are 288-312-336-388-404-436 stitches on round. Work pattern without increase until piece measures 22-24-25-27-29-31 cm from marker mid back.
On next round divide piece for sleeves and body as follows: Knit 1 (stitch with 1st marker belongs to back piece), slip the next 55-59-65-77-77-81 stitches on a thread for sleeve without working them, cast on 11-11-13-13-15-17 new stitches in the side under sleeve, work 89-97-103-117-125-137 stitches in pattern A.1, slip the next 55-59-65-77-77-81 stitches on a thread for sleeve without working them, cast on 11-11-13-13-15-17 new stitches in the side under sleeve, work pattern A.1 over the last 88-96-102-116-124-136 stitches on round (back piece). Now finish body and sleeves separately.

BODY:
= 200-216-232-260-280-308 stitches. Work pattern A.1 as before. Work until piece measures approx. 22-22-23-23-23-23 cm from division – or desired length (5 cm remain until finished measurements). Knit 1 round and increase 20-24-24-24-28-32 stitches evenly on round = 220-240-256-284-308-340 stitches. Switch to circular needle size 3 mm, work rib = knit 2/purl 2 for 5 cm. Jumper measures approx. 54-56-58-60-62-64 cm from shoulder.
Cast off stitches with knit over knit and purl over purl.

SLEEVES:
Slip stitches from one thread on a short circular needle/double pointed needle size 4 mm. Pick in addition up 1 stitch in each of the 11-11-13-13-15-17 stitches cast on in each side under sleeve = 66-70-78-90-92-98 stitches. Insert a marker in the middle of the new stitches cast on and move marker upwards when working. Work pattern A.1 as before. When piece measures 4 cm, decrease 2 stitches on underside of sleeve - read DECREASE TIP in explanation above. Repeat decrease approx. every 6-5-3½-2-2-1½ cm 6-7-10-14-15-16 times in total = 54-56-58-62-62-66 stitches. Work until piece measures approx. 39-38-37-36-34-33 cm. Knit 1 round and increase 6-4-6-6-6-6 stitches evenly = 60-60-64-68-72-72 stitches. Switch to double pointed needles size 3 mm, and work rib = knit 2/purl 2 for 5 cm. Cast off stitches with knit over knit and purl over purl.
Work the other sleeve the same way.

ASSEMBLY:
Fold rib at the top of neck down on inside of garment. Sew a couple of stitches so that the neck is double.

Diagram

symbols = knit
symbols = purl
diagram
diagram

Each of our patterns has specific tutorial videos to help you.

Do you have a question? See a list of frequently asked questions (FAQ)

Knitting tension is what determines the final measurements of your work, and is usually measured per 10 x 10 cm. It is provided like so: number of stitches in width x number of rows in height - eg: 19 stitches x 26 rows = 10 x 10 cm.

The knitting tension is very individual; some people knit/crochet loosely while others work tightly. You adjust the knitting tension with the needle size, which is why the suggested needle size is only meant as a guide! You need to adjust this (up or down) to ensure that YOUR knitting tension matches the knitting tension provided in the pattern. If you work with a different knitting tension than provided you will have a different yarn consumption, and your work will have different measurements than what the pattern suggests.

The knitting tension also determines which yarns can replace each other. As long as you achieve the same knitting tension you can replace one yarn with another.

See DROPS lesson: How to measure your tension/gauge

See DROPS video: How to make a gauge tension swatch

The required amount of yarn is provided in grams, eg: 450 g. To calculate how many balls you’ll need you first need to know how many grams are in 1 ball (25g, 50g or 100g). This information is available if you click on the individual yarn quality on our pages. Divide the amount required with the amount of each ball. For example, if each ball is 50g (the most common amount), the calculation will be as follows: 450 / 50 = 9 balls.

The important thing when changing from one yarn to another is that the knitting/crochet tension remains the same. This is so that the measurements of the finished piece will be the same as on the sketch provided. It is easier to achieve the same knitting tension using yarns from the same yarn group. It is also possible to work with multiple strands of a thinner yarn to achieve the knitting tension of a thicker one. Please try our yarn converter. We recommend you to always work a test swatch.

Please NOTE: when changing yarn the garment might have a different look and feel to the garment in the photo, due to individual properties and qualities of each yarn.

See DROPS lesson: Can I use a different yarn than the one mentioned in the pattern?

All our yarns are categorised into yarn groups (from A to F) according to thickness and knitting tension – group A contains the thinnest yarns and group F the thickest. This makes it easier for you to find alternative yarns to our patterns, should you wish to switch yarn. All yarns within the same group have a similar knitting tension and can easily replace each other. However, different yarn qualities have different structures and properties which will give the finished work a unique look and feel.

Click here for an overview of the yarns in each yarn group

At the top of all our patterns you’ll find a link to our yarn calculator, which is a helpful tool should you wish to use a different yarn than suggested. By filling in the yarn quality you wish to replace, the amount (in your size) and number of strands, the calculator will present good alternative yarns with the same knitting tension. Additionally it will tell you how much you’ll require in the new qualities and whether you’ll need to work with multiple strands. Most skeins are 50g (some are 25g or 100g).

If the pattern is worked with multiple colours, every colour will have to be calculated separately. Similarly, if the pattern is worked with several strands of different yarns (for example 1 strand Alpaca and 1 strand Kid-Silk) you will have to find alternatives for each, individually.

Click here to see our yarn calculator

Since different yarns have different qualities and textures we have chosen to keep the original yarn in our patterns. However, you can easily find options among our available qualities by using our yarn calculator, or simply pick a yarn from the same yarn group.

It is possible that some retailers still have discontinued yarns in stock, or that someone has a few skeins at home that they would like to find patterns for.

The yarn calculator will provide both alternative yarn as well as required amount in the new quality.

If you think it's hard to decide what size to make, it can be a good idea to measure a garment you own already and like the size of. Then you can pick the size by comparing those measures with the ones available in the pattern's size chart.

You'll find the size chart at the bottom of the pattern.

See DROPS lesson: How to read size chart

The needle size provided in the pattern serves only as a guide, the important thing is to follow the knitting tension. And since knitting tension is very individual, you will have to adjust the needle size to ensure that YOUR tension is the same as in the pattern – maybe you’ll have to adjust 1, or even 2 needle sizes, up or down to achieve the correct tension. For this, we recommend that you work test swatches.

Should you work with a different knitting tension than the one provided, the measurements of the finished garment might deviate from the measurement sketch.

See DROPS lesson: How to measure your tension/gauge

See DROPS video: How to make a tension/gauge swatch

Working a garment top-down provides more flexibility and room for personal adjustment. For example it is easier to try the garment on while working, as well as making adjustments to length of yoke and shoulder caps.

The instructions are carefully explaining every step, in the correct order. Diagrams are adjusted to the knitting direction and are worked as usual.

The diagram depicts all rows/rounds, and every stitch seen from the right side. It is read from bottom to top, from right to left. 1 square = 1 stitch.

When working back and forth, every other row is worked from the right side and every other row is worked from the wrong side. When working from the wrong side, the diagram will have to be worked reversed: from left to right, knit stitches are purled, purl stitches are knit etc.

When working in the round every round is worked from the right side and the diagram are worked from right to left on all rounds.

See DROPS lesson: How to read knitting diagrams

The diagram depicts all rows/rounds, and every stitch seen from the right side. It is worked from bottom to top, from right to left.

When working back and forth every other row is worked from the right side: from right to left and every other row is worked from the wrong side: from left to right.

When working in the round, every row in the diagram are worked from the right side, from right to left.

When working a circular diagram you start in the middle and work your way outwards, counter clockwise, row by row.

The rows usually start with a given number of chain stitches (equivalent to the height of the following stitch), this will either be depicted in the diagram or explained in the pattern.

See DROPS lesson: How to read crochet diagrams

Instructions for working several diagrams after each other on the same row/round, will often be written like so: “work A.1, A.2, A.3 a total of 0-0-2-3-4 times". This means you work A.1 once, then A.2 is worked once, and A.3 is repeated (in width) the number of times provided for your size – in this case like so: S = 0 times, M = 0 times, L=2 times, XL= 3 times and XXL = 4 times.

The diagrams are worked as usual: begin with the first row in A.1, then work the first row in A.2 etc.

See DROPS lesson: How to read knitting diagrams

See DROPS lesson: How to read crochet diagrams

The total width of the garment (from wrist-to-wrist) will be larger in the larger sizes, despite the actual sleeves being shorter. The larger sizes have longer sleeve caps and wider shoulders, so there will be a good fit in all sizes.

The measurement sketch/schematic drawing provides information regarding the full length of the garment. If it’s a jumper or a jacket the length is measured from the highest point on the shoulder closest to the neckline, and straight down to the bottom of the garment. It is NOT measured from the tip of shoulder. Similarly, the length of yoke is measured from the highest point on the shoulder and down to where yoke is split into body and sleeves.

On a jacket measures are never taken along bands, unless specifically stated. Always measure inside band stitches when measuring the length.

See DROPS lesson: How to read a schematic drawing

Diagrams are often repeated on the round or in height. 1 repeat is the diagram the way it appears in the pattern. If it says to work 5 repeats of A.1 in the round, then you work A.1 a total of 5 times after/next to each other in the round. If it says to work 2 repeats of A.1 vertically/in height you work the entire diagram once, then begin again at the start and work the entire diagram one more time.

Chain stitches are slightly narrower than other stitches and to avoid working the cast-on edge too tight, we simply chain more stitches to begin with. The stitch count will be adjusted on the following row to fit the pattern and measurement sketch.

The rib edge is more elastic and will contract slightly compared to, for example, stocking stitch. By increasing before the rib edge, you avoid a visible difference in width between the rib edge and the rest of the body.

It’s very easy to cast off too tightly, and by making yarn overs while casting off (and simultaneously casting these off) you avoid a too tight cast off edge.

See DROPS video: How to bind off with yarn overs (yo)

To achieve an even increase (or decrease) you can increase on, for example: every 3rd and 4th row alternately, like so: work 2 rows and increase on the 3rd row, work 3 rows and increase on the 4th. Repeat this until the increase is complete.

See DROPS lesson: Increase or decrease 1 st on every 3rd and 4th row alternately

Should you prefer to work in the round instead of back and forth, you may of course adjust the pattern. You’ll need to add steeks mid-front (usually 5 stitches), and follow the instructions. When you would normally turn and work from the wrong side, simply work across the steek and continue in the round. At the end you’ll cut the piece open, pick up stitches to work bands, and cover the cut edges.

See DROPS video: How to knit steeks and cut open

Should you prefer to work back and forth instead of in the round, you may of course adjust the pattern so you work the pieces separately and then assemble them at the end. Divide the stitches for the body in 2, add 1 edge stitch in each side (for sewing) and work the front and back pieces separately.

See DROPS lesson: Can I adapt a pattern for circular needles into straight needles?

Pattern repeats can vary slightly in the different sizes, in order to get the correct proportions. If you’re not working the exact same size as the garment in the photo, yours might deviate slightly. This has been carefully developed and adjusted so that the complete impression of the garment is the same in all sizes.

Make sure to follow instructions and diagrams for your size!

If you have found a pattern you like which is available in women’s size it’s not very difficult to convert it to men’s size. The biggest difference will be the length of sleeves and body. Start working on the women size that you think would fit across the chest. The additional length will be worked right before you cast off for the armhole/sleeve cap. If the pattern is worked top-down you can add the length right after the armhole or before the first decrease on sleeve.

Regarding additional yarn amount, this will depend on how much length you add, but it is better with a skein too many than too few.

All yarns will have excess fibres (from production) that might come off as lint or shedding. Brushed yarns (ie hairier yarns) have more of these loose, excess fibres, causing more shedding.

Shedding also depends on what is worn under or over the garment, and whether this pulls at the yarn fibres. It’s therefore not possible to guarantee that there will be no shedding

Below are some tips on how to get the best result when working with hairier yarns:

1. When the garment is finished (before you wash it) shake it vigorously so the looser hairs come off. NOTE: do NOT use a lint roller, brush or any method that pulls at the yarn.

2. Place the garment in a plastic bag and put it in your freezer - the temperature will cause the fibres to become less attached to each other, and excess fibres will come off easier.

3. Leave in the freezer for a few hours before taking it out and shaking it again.

4. Wash the garment according to the instructions on the yarn label.

Pilling is a natural process that happens to even the most exclusive of fibers. It's a natural sign of wear and tear that is hard to avoid, and that is most visible in high friction areas of your garment like a sweater's arms and cuffs.

You can make your garment look as new by removing the pilling, using a fabric comb or a pill/lint remover.

Still can't find the answer you need? Then scroll down and leave your question so one of our experts can try to help you. This will be done normally within 5 to 10 working days.
In the meantime, you can read the questions and answers that others have left to this pattern or join the DROPS Workshop on Facebook to get help from fellow knitters/crocheters!

You might also like...

Post a comment to pattern DROPS 235-6

We would love to hear what you have to say about this pattern!

If you want to leave a question, please make sure you select the correct category in the form below, to speed up the answering process. Required fields are marked *.

Comments / Questions (14)

country flag Andrea Veth wrote:

Hallo, was mir nicht ganz klar ist, werden die Zunahmen an Rumpf und Ärmeln nacheinander gestrickt oder zusammen? Liebe Grüße A. Veth

29.03.2024 - 18:04

DROPS Design answered:

Liebe Frau Veth, die Raglanzunahmen werden gleichzeitig gestrickt, es wird zuerst in jeder 2. Runde zugenommen (8 Zunahmen) und danach am einen unterschiedlichen Rythmus: abwechslungsweise 4 Maschen (nur Rumpfteil) und 8 Maschen (Rumpfteil + Ärmel) zugenommen. Viel Spaß beim Stricken!

02.04.2024 - 14:20

country flag Carola Kaandorp wrote:

Ik heb een vraag over het meerderen vanaf 208 steken (large), verschillend voor lijf en mouwen. Ik begrijp meerderen voor het lijf elke 2e naald, dus in naald 1, 3, 5, 7, 9, 11, …, 39, 41, 43 (22x). En meerderen voor de mouwen elke 4e naald, dus in naald 3, 7, 11, … 35, 39 (10x). Dan zijn er afwisselend 4 en 8 meerderingen vanaf naald 1 (+4 steken) tot en met naald 41 (+4) en daarna in naald 43 alweer +4. De reeks is dus niet 4-[8-4]-8-4, maar 4-[8-4-]8-4-4. Klopt dat?

19.12.2023 - 16:30

DROPS Design answered:

Dag Carola,

Vanaf het punt dat je verschillend meerdert voor het lijf en de mouwen, meerder je voor maat L nog 22 keer op het lijf en nog 10 keer op de mouwen. Als je met de mouwen klaar bent, dan moet je voor het lijf inderdaad nog 2 keer meerderen, dus eindigt de reeks inderdaad met -4-4.

20.12.2023 - 18:55

country flag Alex wrote:

Jeżeli potrzebuję rozmiaru XXS to w jaki sposób powinnam zmniejszyć liczbę oczek dla poszczególnych elementów swetra?

07.12.2023 - 13:53

DROPS Design answered:

Witaj Alex, niestety nie jesteśmy w stanie dopasować naszych wzorów do indywidualnych wymagań. Zalecamy zwrócenie się do sklepu, w którym kupujesz włóczkę, tam na pewno uzyskać pomoc. Pozdrawiamy!

07.12.2023 - 15:18

country flag Mc Cransac wrote:

Bonjour, peut-on tricoter ce modèle en soft tweed ? merci

07.11.2023 - 21:53

DROPS Design answered:

Bonjour Mme Cransac, tout à fait car les 2 laines sont du même groupe, utilisez notre convertisseur pour calculer la nouvelle quantité correspondante. Bon tricot!

08.11.2023 - 08:09

country flag Kate wrote:

Is the second increase section where it says to increase differently for body and sleeve, not work out as the same as the yoke increase in the paragraph before; that is -increase before and after each marker

30.10.2023 - 22:48

Kate answered:

Sorry I’ve worked out the answer to my own question. - it is different. Apologies!

30.10.2023 - 22:59

country flag Lena wrote:

Guten Abend, ich würde sehr gerne diesen Pullover stricken, Größe S wird aber anhand der angegebenen Maße zu groß für mich werden, ich bräuchte Größe XS. Haben Sie einen Tipp für mich, wie ich es am besten umrechnen kann? Vielen Dank!

27.03.2023 - 22:21

DROPS Design answered:

Liebe Lena, vielleicht können Sie sich von einem ähnlichen Pullover in XS inspirieren? Viel Spaß beim stricken!

28.03.2023 - 10:12

country flag Sophie Barbe wrote:

Bonjour Combien y a-t-il d'aisance pour ce modèle ?merci

28.02.2023 - 14:54

DROPS Design answered:

Bonjour Mme Barbe, mesurez un vêtement que vous avez et dont vous aimez la forme et comparez ces mesures à celles du schéma, ainsi, vous pourrez trouver la taille (et l'aisance) que vous souhaitez. Retrouvez plus d'infos ici. Bon tricot!

28.02.2023 - 17:51

country flag Marta wrote:

Does this pattern have short rows? Will the back be raised higher than the front? Thank you!

31.01.2023 - 11:36

country flag Simone wrote:

Onderstaande is onduidelijk voor mij: Meerder voor de raglan iedere andere naald op elke markeerdraad in totaal 6-8-12-19-19-21 keer op iedere markeerdraad = 148-172-208-276-284-314 steken. Voor M 64 steken erbij: per naald 8: voor en na de markeersteek. Om de naald: meerdere in naald 1,3,5,7,9,11,13,15? Steekverhouding?

09.12.2022 - 23:13

country flag Iris wrote:

Muss ich bei den Zunahmen am Rumpf erst die Zunahmen in jeder 2. Reihe machen bis ich diese dann 24x in der Höhe gemacht habe und dann erst die Zunahmen für die Ärmel beginnen? Oder mach ich diese im Wechsel mit den Zunahmen vom Rumpf?

08.12.2022 - 14:40

DROPS Design answered:

Liebe Iris, bei der 1. Runde der Passe stricken Sie glatt rechts und nehmen gleichzeitig regelmäßig zu, dann nehmen Sie für den Raglan: 8 Maschen in jeder 2. Runde (6-8 Mal = 148-172 Maschen) - dann nehmen Sie in jeder 2. Runde für Rumpfteil aber nur in jeder 4. Runde für Ärmel, dh Sie nehmen abwechslungsweise 4 Maschen (nur Rumpf) und 8 Maschen (Rumpf + Ärmel) bis die Zunahmen 30-32 7-Mal beim Rumpf und 17-19 Mal bei den Ärmeln (also ingsesamt von Anfang an) gearbeitet wurden. Viel Spaß beim stricken!

08.12.2022 - 17:32