
Popular categories
Looking for a yarn?


|
||||||||||
Glazed Orange |
||||||||||
 |
 |
|||||||||
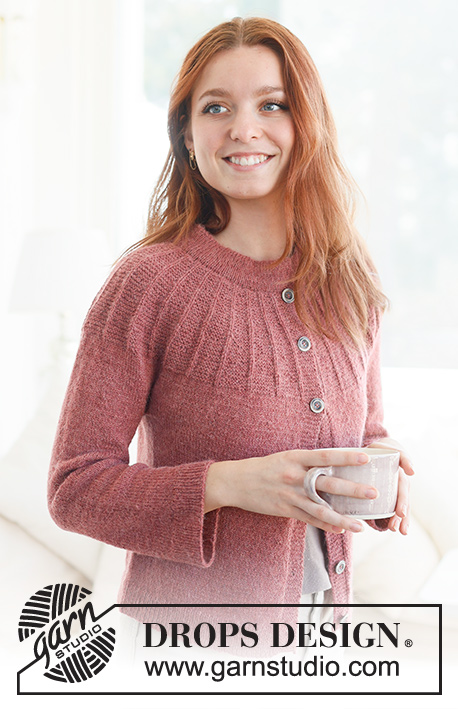
Knitted jacket in DROPS Karisma and DROPS Kid-Silk. Piece is knitted bottom up in stocking stitch with V-neck and double knitted band. Size XS – XXL.
DROPS 236-37 |
||||||||||
|
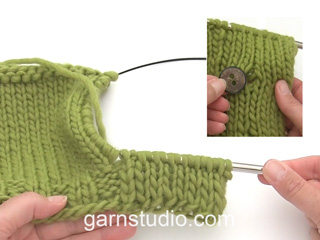
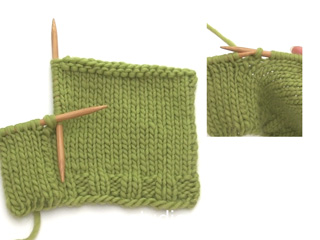
---------------------------------------------------------- EXPLANATION FOR THE PATTERN: ---------------------------------------------------------- PATTERN: See diagrams A.1 to A.3. Diagrams show all rows in pattern seen from the right side. GARTER STITCH (back and forth): Knit all rows. 1 ridge vertically = knit 2 rows. DECREASE TIP (applies to decreases for V-neck and armholes): All decreases are done from the right side! DECREASE 2 STITCHES AT THE BEGINNING OF ROW AS FOLLOWS: Work 1 edge stitch in garter stitch, knit 1, work A.1 over the next 3 stitches. DECREASE 2 STITCHES AT THE END OF ROW AS FOLLOWS: Work until 5 stitches remain on row, A.1 over the next 3 stitches, knit 1 and 1 edge stitch in garter stitch. DECREASE 1 STITCH AT THE BEGINNING OF ROW AS FOLLOWS: Work 1 edge stitch in garter stitch, knit 1, work A.2 over the next 3 stitches. DECREASE 1 STITCH AT THE END OF ROW AS FOLLOWS: Work until 5 stitches remain on row, A.3 over the next 3 stitches, knit 1 and 1 edge stitch in garter stitch. INCREASE TIP (applies to sleeves): Knit 1 past marker thread, make 1 yarn over, knit until 1 stitch remain before marker thread, make 1 yarn over. On next row knit yarn overs twisted. BUTTONHOLES: Work buttonhole, begin from right side, as follows: Work the first 8 stitches as before, turn and work over the 8 stitches as before, work 3 rows in total over the 8 stitches (work last row from right side). Cut the yarn. Work 4 rows in total as before over the remaining 8 band stitches (work first row from right side) and work last stitch from right side together with next stitch along edge of jacket as before. On last row from wrong side work as before over all band stitches and continue as before over all band stitches. Work buttonholes when band measures: XS: 8, 18 and 28 cm S: 8, 18 and 28 cm M: 8, 19 and 30 cm L: 8, 19 and 30 cm XL: 8, 19 and 30 cm XXL: 8, 19 and 30 cm ---------------------------------------------------------- START THE PIECE HERE: ---------------------------------------------------------- JACKET - SHORT OVERVIEW OF THE PIECE: Work piece back and forth on circular needle, from the bottom up to armholes. Then divide the piece, and work back piece and front piece back and forth on circular needle separately. Work sleeves in the round on double pointed needles/short circular needle up to where sleeve cap begins, then work back and forth on circular needle. Pick up stitches along front pieces, and work a double knitted band. BODY: Cast on 192-204-224-240-260-280 stitches on circular needle size 5 mm with 1 strand DROPS Karisma and 1 strand DROPS Kid-Silk. Purl 1 row from wrong side. On next row (from right side ) work rib as follows: 1 edge stitch in GARTER STITCH - read explanation above, * purl 2, knit 2 *, work from *-* until 3 stitches remain, purl 2, 1 edge stitch in garter stitch. Continue rib like this. When rib measures 10 cm, knit 1 row from right side while decreasing 38-42-46-50-50-54 stitches evenly = 154-162-178-190-210-226 stitches. Switch to circular needle size 6 mm. Insert 1 marker thread 39-41-45-48-53-57 stitches in from each side (= 76-80-88-94-104-112 stitches on back piece). Move the markers threads upwards when working, they mark the sides on body and should be used when decreasing for armholes. Work in stocking stitch with 1 edge stitch in garter stitch in each side. REMEMBER THE KNITTING TENSION! OVERVIEW OF NEXT SECTION: When piece measures 28-28-30-30-30-30 cm, begin decreases for V-neck. AT THE SAME TIME as decreasing for V-neck, cast off stitches for armholes, and then finish each part separately as explained below. Read V-NECK and ARMHOLES before continuing. V-NECK: When piece measures 28-28-30-30-30-30 cm, decrease for V-neck in each side on next row from right side - read DECREASE TIP. Decrease 2 stitches in each side on every 4th row 6 times in total. Then decrease 1 stitch in each side every 4th row 3-3-4-5-5-6 times in total. ARMHOLES: AT THE SAME TIME when piece measures 30-31-32-33-34-35 cm and next row is from right side, cast off for armholes as follows: Work as before until 1-2-2-3-4-7 stitches remain before first marker thread in the side, cast off 2-4-4-6-8-14 stitches for armhole, work as before until 1-2-2-3-4-7 stitches remain before the other marker thread, cast off 2-4-4-6-8-14 stitches for armholes, work as before the rest of row. Finish front pieces and back piece separately. LEFT FRONT PIECE (when garment is worn): Begin from wrong side, work in stocking stitch and continue decrease for V-neck. In addition, decrease for armhole as follows: ARMHOLE: At the beginning of next row from right side decrease 2 stitches, decrease like this every 4th row 1-1-1-1-2-2 times, then decrease 1 stitch on every 4th row 1-1-2-3-3-3 times in total – remember DECREASE TIP. After all decreases for V-neck and armhole, 20-21-23-23-25-25 stitches remain on shoulder. Work in stocking stitch. Cast off when piece measures 52-54-56-58-60-62 cm. RIGHT FRONT PIECE: Begin from wrong side, work in stocking stitch and continue decrease for V-neck. In addition, decrease for armhole as follows: ARMHOLE: At the end of next row from right side decrease 2 stitches, decrease like this every 4th row 1-1-1-1-2-2 times, then decrease 1 stitch on every 4th row 1-1-2-3-3-3 times in total – remember DECREASE TIP. After all decreases for V-neck and armhole, 20-21-23-23-25-25 stitches remain on shoulder. Work in stocking stitch. Cast off when piece measures 52-54-56-58-60-62 cm. BACK PIECE: = 74-76-84-88-96-98 stitches. Work in stocking stitch. In addition, decrease for armhole as follows: On next row from right side decrease 2 stitches in each side of piece for armhole, decrease like this every 4th row 1-1-1-1-2-2 times, then decrease 1 stitch in each side on every 4th row 1-1-2-3-3-3 times in total – remember DECREASE TIP = 68-70-76-78-82-84 stitches. When piece measures 48-50-52-54-56-58 cm, cast off the middle 26-26-28-30-30-32 stitches for neck (21-22-24-24-26-26 stitches remain on each shoulder). Finish each shoulder separately. On next row from the neck cast off 1 stitch for neck = 20-21-23-23-25-25 stitches. Cast off when piece measures 52-54-56-58-60-62 cm. Work the other shoulder the same way. SLEEVES: Cast on 52-52-56-56-56-60 stitches on double pointed needles size 5 mm with 1 strand of each quality. Knit 1 round. Then work rib in the round (knit 2/purl 2) for 10 cm. Knit 1 round while decreasing 10-10-12-12-10-12 stitches evenly = 42-42-44-44-46-48 stitches. Insert a marker thread at beginning of round (mid under sleeve). Move the marker thread upwards when working - marker thread should be used for increase mid under sleeve. Switch to double pointed needles size 6 mm, and work in stocking stitch. When sleeve measures 12-12-12-13-13-13 cm, increase 1 stitch on each side of marker thread - read INCREASE TIP. Increase like this every 3½-3-2½-2-2-1½ cm 9-10-11-12-13-14 times in total = 60-62-66-68-72-76 stitches. When sleeve measures 41-41-39-39-38-34 cm, increase 1 stitch on each side of marker thread as before, but now increase every other round 3 times in total = 66-68-72-74-78-84 stitches. When sleeve measures 44-44-42-42-41-39 cm and increases are done, work next round as follows: Begin 1-2-2-3-4-7 stitches before marker thread, cast off 2-4-4-6-8-14 stitches, work in stocking stitch the entire round = 64-64-68-68-70-70 stitches. Then work a sleeve cap as follows: Begin from wrong side, work in stocking stitch back and forth and cast off stitches at the beginning of every row in each side as follows: Cast off 2 stitches 2 times and 1 stitch 2 times. Then cast off 2 stitches at beginning of every row in each side until piece measures 50-50-49-49-49-49 cm. Then cast off 3 stitches at the beginning of the next 2 rows. Cast off the remaining stitches. Sleeve measures approx. 51-51-50-50-50-50 cm. Work the other sleeve the same way. ASSEMBLY: Sew shoulder seams inside cast-off edge. Sew in sleeves inside 1 edge stitch along armholes. RIGHT BAND: Work band bottom up towards the neck. Pick up stitches along right front piece, skip 1½ to 2 meters in on thread and use yarn end to pick up stitches with (that way you can continue to work with the ball without cutting the yarn afterwards) as follows: Begin pick up at the bottom of front piece and pick up 1 stitch in every knitted row along the entire front piece inside 1 edge stitch, use circular needle size 5 mm and 1 strand of each quality. Now continue piece at the end of row where ball is = at the bottom of front piece. Cast on 16 stitches for band as an extension of the stitches pick up at the bottom of front piece (cast on stitches from wrong side). Work band over the 16 stitches at the same time as band is knitted together with stitches picked up along the front piece as follows: ROW 1 (= right side): Slip first stitch on to right needle purlwise with strand in front of piece, * knit 1, slip 1 stitch on to right needle purlwise with strand in front of piece *, work from *-* until 1 stitch remains of the 16 band stitches, slip last stitch on to right needle knitwise, with strand behind piece, knit next stitch, pass slipped stitch over stitch worked, turn. ROW 2 (= wrong side): * Slip first/next stitch on to right needle purlwise with strand in front of piece, knit 1 *, work from *-* over all the 16 band stitches, turn. Repeat rows 1 and 2. Work BUTTONHOLES - read explanation above. When all stitches from front piece have been worked together with band, work neck edge at the back. BACK NECK EDGE: Now work over the 16 band stitches as follows: ROW 1: * Slip first/next stitch on to right needle purlwise, with strand in front of piece, knit 1 *, work from *-* over the 16 stitches. Repeat row 1 both from right side and wrong side for 11-11-12-12-12-13 cm. On last row from right side knit all stitches together 2 by 2 and then cast off. LEFT BAND: Work band bottom up. Pick up stitches at the top by shoulder on front piece, pick up 1 stitch in every knitted row down along the entire front piece inside 1 edge stitch, use circular needle size 5 mm and 1 strand of each quality. After the pick up cast on 16 stitches for band (= at the bottom of front piece). Work band over the 16 stitches at the same time as band is knitted together with stitches picked up along the front piece as follows: ROW 1 (= wrong side): Knit 1, * slip 1 stitch on to right needle purlwise with strand in front of piece, knit 1 *, work from *-* until 1 stitch remains of the 16 band stitches, slip the next 2 stitches on to right needle purlwise with strand in front of piece, turn. ROW 2 (= right side): Knit 2 together, *, slip 1 stitch on to right needle purlwise with strand in front of piece, knit 1 *, work from *-* until 1 stitch remains, slip last stitch on to right needle purlwise with strand in front of piece, turn. Repeat rows 1 and 2. When all stitches from front piece have been worked together with band work neck edge at the back. BACK NECK EDGE: Now work over the 16 band stitches as follows: ROW 1: * Knit 1, slip next stitch on to right needle purlwise with strand in front of piece *, work from *-* over the 16 stitches. Repeat row 1 both from right side and wrong side for 11-11-12-12-12-13 cm. On last row from right side work all stitches together as follows: Slip 1 stitch on to right needle knitwise, knit 1, pass slipped stitch over stitch worked. Then cast off the stitches. ASSEMBLY: Sew the band together mid back and sew it to the neckline on back piece. Sew the buttons on to left band. |
||||||||||
Diagram explanations |
||||||||||
|
||||||||||

|
||||||||||

|
||||||||||
|
Have you made this or any other of our designs? Tag your pictures in social media with #dropsdesign so we can see them! Do you need help with this pattern?You'll find tutorial videos, a Comments/Questions area and more by visiting the pattern on garnstudio.com. © 1982-2024 DROPS Design A/S. We reserve all rights. This document, including all its sub-sections, has copyrights. Read more about what you can do with our patterns at the bottom of each pattern on our site. |
||||||||||


With over 40 years in knitting and crochet design, DROPS Design offers one of the most extensive collections of free patterns on the internet - translated to 17 languages. As of today we count 304 catalogues and 11422 patterns - 11422 of which are translated into English (UK/cm).
We work hard to bring you the best knitting and crochet have to offer, inspiration and advice as well as great quality yarns at incredible prices! Would you like to use our patterns for other than personal use? You can read what you are allowed to do in the Copyright text at the bottom of all our patterns. Happy crafting!
Comments / Questions (7)
Bij patroon 236-37 begrijp ik de omschrijving voor de 'kopmouw' niet. Het 2 x 2 afkanten? is dat voor het rechter en linkerdeel van 1 mouw (omdat je de middelste 6 stk hebt afgekant)? of kant je aan de uiteinden van 1 mouw af? Ook het stukje over de bies aanbreien en dan 1/2 tot 1 mtr draad overhouden? Brei je de bies dan niet ineen keer over de hele voorkant?
27.12.2023 - 21:19DROPS Design answered:
Dag Karin,
Je bent nu de mouwkop aan het heen en weer breien en je kant aan het begin van elke naald 2 steken af. Dus 2 steken afkanten, de naald uitbreien, keren, weer 2 steken afkanten. Dit doe je nog een keer, zodat je 2 keer 2 steken hebt afgekant aan beide kanten. Daarna kant je 2 keer 1 steek af, ook aan beide kanten. Vervolgens kant je steeds aan het begin van iedere naald 2 steken af, tot je op de juiste lengte bent.
01.01.2024 - 13:17Bonjour, Je ne vois pas à quel endroit du tricot on utilise les points fantaisie.
04.11.2023 - 18:44DROPS Design answered:
Bonjour Mme Cattaneo, les diagrammes A.1, A.2 et A.3 sont tricotés lors des diminutions de l'encolure et des emmanchures - cf descriptif sous DIMINUTIONS (encolure V et emmanchures):. Bon tricot!
06.11.2023 - 08:19Bonjour pour les bordures des devant du gilet. On monte les 16 mailles en bas du gilet ? Je pensais que les 16 mailles rajoutées c était pour la bordure du dos donc pour moi ça serait plus logique de les monter en haut du devant du gilet?
03.06.2023 - 07:12DROPS Design answered:
Bonjour Muriel, pas à ce stade, on fait pour l'instant la bordure des devants, ces vidéos vont probablement pouvoir vous aider à visualiser la technique: bordure devant droit (avec boutonnières), et bordure devant gauche (sans boutonnière). À la fin de chacune de ces boutonnières, on va continuer à tricoter ces 16 mailles (sans les tricoter avec des mailles relevées) jusqu'au milieu de l'encolure dos, les 2 bordures seront ensuite assemblées entre elles puis cousues le long de l'encolure dos. Bon tricot!
05.06.2023 - 09:52Bonjour je suis en train de tricoter le glazed orange et je ne comprends pas comment on tricote les bordures des devant et d encolure. Pourriez vous m aider s il vous plaît Je ne comprends pas le système des mailles relevées et le point Merci bonne soirée
14.05.2023 - 22:42DROPS Design answered:
Bonjour Mme Cousin, volontiers, voici 2 vidéos qui pourront vous aider: bordure avec boutonnière et bordure sans boutonnière. Bon tricot!
15.05.2023 - 08:55Hej i beskrivningen drops 236-37 finns det ett diagram med i beskrivningen, men inget står om när jag skall börja använda detta diagram? Koftan skall enligt beskrivningen stickas i slätstickning, men när som sagt kommer diagrammet in?
20.10.2022 - 14:41DROPS Design answered:
Hej Agneta, jo du hittar diagrammen i FELLETIPSET øverst i beskrivningen :)
25.10.2022 - 11:50What I wanted to know is... what does yarn group a + b equal to, as a single yarn weight? I have beautiful yarn my daughter bought for me, but it is a worsted weight. I am concerned about about weight differences. Thank you for your time and attention to my question. Have a great day KNITTING!
13.10.2022 - 00:46DROPS Design answered:
Dear Mrs Pepper, read more about our yarn groups here - click on each yarn name to read more. You will find the list of DROPS Stores shipping to US here. Happy knitting!
13.10.2022 - 09:24Are yarn weights of B and A equal to C weight? Thank you for your help. I sooo appreciate it. Have a great day... KNITTING!
11.10.2022 - 17:52DROPS Design answered:
Dear Mrs Pepper, you might eventually use a yarn group C but make first a swatch to check if you like the texture - it might be more airy than the texture of this pattern worked with yarn weight A + B. Happy knitting!
12.10.2022 - 08:35