
Popular categories
Looking for a yarn?


|
|
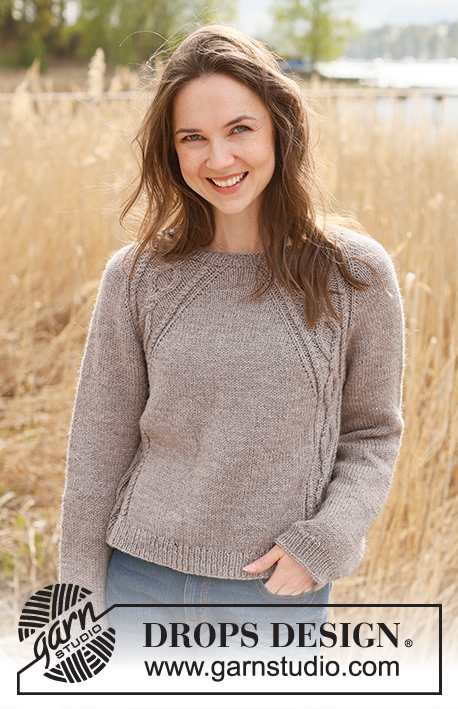
Autumn Medley Cardigan |
|
 |
 |
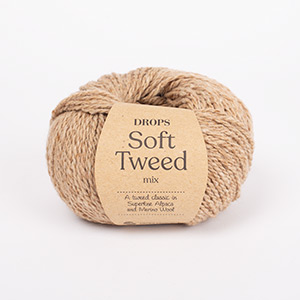
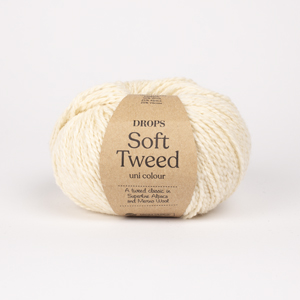
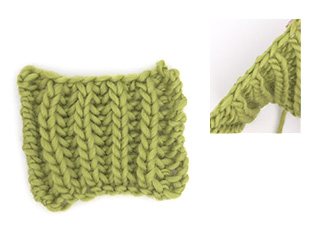
Knitted jacket in DROPS Soft Tweed and DROPS Kid-Silk. Piece is knitted bottom up with English rib, pockets, V-neck and double knitted band. Size: S - XXXL
DROPS 237-43 |
|
|
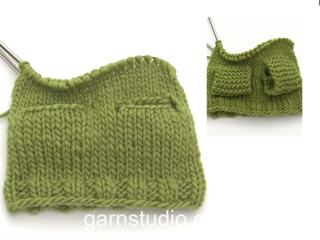
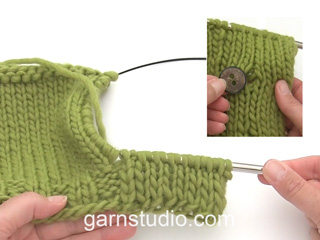
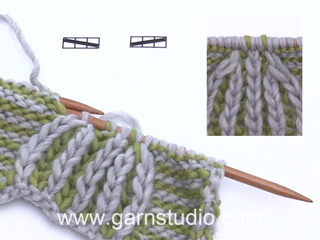
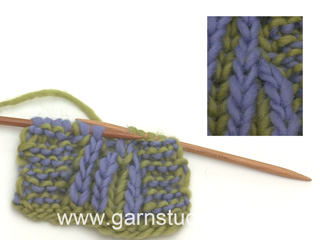
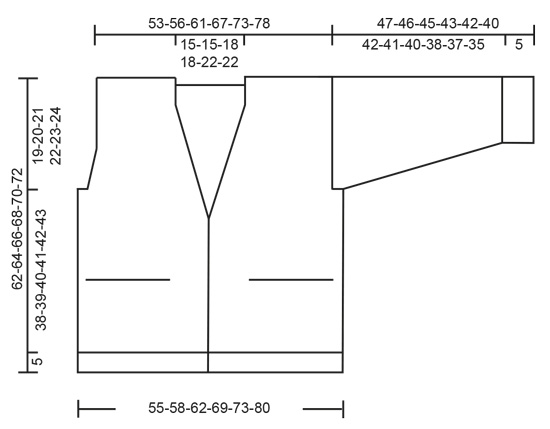
---------------------------------------------------------- EXPLANATION FOR THE PATTERN: ---------------------------------------------------------- GARTER STITCH (back and forth): Knit all rows. 1 ridge vertically = knit 2 rows. ENGLISH RIB back and forth: ROW 1 (from right side): Work 1 edge stitch in garter stitch, * make 1 yarn over, slip 1 stitch on to right needle purlwise, knit yarn over and slipped stitch together *, work from *-* until 2 stitches remain, make 1 yarn over, slip 1 stitch on to right needle purlwise and 1 edge stitch in garter stitch. ROW 2 (from wrong side): Work 1 edge stitch in garter stitch, * knit yarn over and slipped stitch together, make 1 yarn over, slip 1 stitch on to right needle purlwise *, work from *-* until 2 stitches remain, knit yarn over and slipped stitch together and 1 edge stitch in garter stitch. Repeat rows 1 and 2. ENGLISH RIB in the round (applies to sleeves): ROUND 1: * Knit yarn over and the slipped stitch together, make 1 yarn over, slip 1 stitch purlwise *, repeat from *-* the entire round. ROUND 2: * Make 1 yarn over, slip 1 stitch purlwise, purl yarn over and slipped stitch together *, repeat from *-* the entire round. Repeat rounds 1 to 2. ENGLISH RIB STITCH: When counting the stitches, the yarn overs are not counted as stitches. DECREASE TIP (applies to neck): All decreases are done on a row from the right side! DECREASE 2 STITCHES AT THE BEGINNING OF ROW AS FOLLOWS: Work 1 edge stitch in garter stitch and 1 English rib stitch as before, slip next stitch and related yarn over on to right needle knitwise, knit the next 2 stitches (and related yarn over) together and lift slipped stitch and yarn over over stitches worked together. DECREASE 2 STITCHES AT THE END OF ROW AS FOLLOWS: Work until 5 stitches remain, knit the next 3 stitches (and related yarn overs) together, work 1 English rib stitch as before and 1 edge stitch in garter stitch. INCREASE TIP (applies to sleeves): Work 3 stitches in a knit stitch as follows: Knit yarn over and stitch together but wait to slip stitch and yarn over off the needle, make 1 yarn over on right needle and knit stitch and yarn over together 1 more time, then slip knit stitch and yarn over knitted off left needle = 3 stitches. Increase alternately in first and last knit stitch on round. Do first increase in first knit stitch, second increase in the last knit stitch etc. I.e. increase 2 stitches on every increase. BUTTONHOLES: Work buttonhole, beginning from right side, as follows: Work the first 6 stitches as before, turn and work over the 6 stitches as before, work 3 row in total over the 6 stitches (work last row from right side). Cut the yarn. Work 4 rows in total as before over the remaining 6 band stitches (work first row from right side) and work last stitch from right side together with next stitch along edge of jacket as before. On last row from wrong side work as before over all band stitches and continue as before over all band stitches. Work buttonholes when band measures: S: 4, 13, 21, 29 and 37 cm = 1½", 5⅛", 8¼", 11⅜" and 14½" M: 4, 13, 22, 30 and 38 cm = 1½", 5⅛", 8¾", 11¾" and 15" L: 5, 13, 22, 31 and 39 cm = 2", 5⅛", 8¾", 12¼" and 15¼" XL: 4, 13, 22, 31 and 39 cm = 1½", 5⅛", 8¾", 12¼" and 15¼" XXL: 4, 13, 22, 31 and 39 cm = 1½", 5⅛", 8¾", 12¼" and 15¼" XXXL: 4, 13, 22, 31 and 39 cm = 1½", 5⅛", 8¾", 12¼" and 15¼" ---------------------------------------------------------- START THE PIECE HERE: ---------------------------------------------------------- JACKET - SHORT OVERVIEW OF THE PIECE: Work body back and forth on circular needle, bottom up. Work pockets back and forth, and sew together when finished. Divide body for front pieces and back piece and continue each part back and forth. Work sleeves in the round on double pointed needles/a short circular needle. Pick up stitches along front pieces, and work a double knitted band. BODY: Cast on 217-229-244-271-289-313 stitches on circular needle size 4 MM = US 6 with 1 strand of each quality. Purl 1 row from wrong side. Work rib, begin from right side as follows: 1 edge stitch in GARTER STITCH - read explanation above, * purl 2, knit 1 *, work from *-* until 3 stitches remain, purl 2 and 1 edge stitch in garter stitch. When rib measures 5 cm = 2", work next row as follows from wrong side: 1 edge stitch in garter stitch, * knit 2 together, make 1 yarn over, slip 1 stitch on to right needle purlwise *, work from *-* until 3 stitches remain, knit 2 together and 1 edge stitch in garter stitch = 145-153-163-181-193-209 stitches. Switch to circular needle size 5.5 MM = US 9. Work ENGLISH RIB back and forth - read explanation above. Read ENGLISH RIB STITCH! When piece measures 23 cm = 9", work pockets as follows: POCKETS: Now work a pocket on each front piece, on next row from right side as follows: Pockets are worked double and sewn together in the side. Work 1 edge stitch in garter stitch, 5-5-7-8-10-12 stitches in English rib and slip then on a thread, knit the next 23-25-25-27-27-27 stitches and increase 7-8-8-8-8-8 stitches evenly = 30-33-33-35-35-35 stitches. Turn. Work stockinette stitch over de 30-33-33-35-35-35 stitches, and cast on 1 stitch at end of for the next 2 rows = 32-35-35-37-37-37 stitches for pocket. Work the new stitches in garter stitch. When pocket measures 36 cm = 14¼" from where stitch were put on a thread, work next row as follows from right side: Knit the first 2 stitches together, knit and decrease 7-8-8-8-8-8 stitches evenly until 2 stitches remain, knit the last 2 stitches together = 23-25-25-27-27-27 stitches. Work English rib over the next 87-91-97-109-117-129 stitches from body, and then slip them on a thread, work pocket the same way over the next 23-25-25-27-27-27 stitches. When pocket has been worked, work English rib over the next 5-5-7-8-10-12 stitches and 1 edge stitch in garter stitch. Slip all stitches back on needle without working them. Work English rib with 1 edge stitch in garter stitch in each side. Insert 1 marker thread after 37-39-41-45-49-53 stitches in from each side (front pieces). Move the marker threads upwards when working - marker threads should be used to divide for front pieces and back piece). OVERVIEW OF NEXT SECTION: When piece measures 38-39-40-40-40-40 cm = 15"-15¼"-15¾"-15¾"-15¾"-15¾", begin decreases for V-neck. AT THE SAME TIME as decreasing for V-neck, bind off stitches for armholes, and then finish each part separately as explained below. Read V-NECK and ARMHOLES before continuing. V-NECK: When piece measures 38-39-40-40-40-40 cm = 15"-15¼"-15¾"-15¾"-15¾"-15¾", decrease 2 stitches in each side of piece for V-neck – read DECREASE TIP! Decrease like this every 14th row 5-5-6-6-7-7 times in total. ARMHOLE: AT THE SAME TIME when piece measures 43-44-45-46-47-48 cm = 17"-17¼"-17¾"-18"-18½"-19", divide piece for front pieces and back piece on next row from right side as follows: Work as before until first marker thread (right front piece), then slip these stitches on a thread, bind off 1 stitch for armhole, work as before over the next 69-73-79-89-93-101 stitches (back piece), then slip these stitches on a thread, bind off 1 stitch for armhole and work as before over the last stitches (left front piece). Now finish each part separately. LEFT FRONT PIECE: On first row from wrong side work as before and cast on 1 new stitch at the end of row. Work English rib with 1 edge stitch in garter stitch in each side. Remember neck decrease. When neck decrease is done, 28-30-30-34-36-40 stitches remain on shoulder. When piece measures 62-64-66-68-70-72 cm = 24⅜"-25¼"-26"-26¾"-27½"-28⅜", bind off with knit over knit and purl over purl (work yarn overs together with stitch they belong to). RIGHT FRONT PIECE: Work 1 row as before from wrong side. On next row from right side cast on 1 stitch at the end of row. Work English rib with 1 edge stitch in garter stitch in each side. Rememeber neck decrease. When neck decrease is done, 28-30-30-34-36-40 stitches remain on shoulder. When piece measures 62-64-66-68-70-72 cm = 24⅜"-25¼"-26"-26¾"-27½"-28⅜", bind off with knit over knit and purl over purl (work yarn overs together with stitch they belong to). BACK PIECE: = 69-73-79-89-93-101 stitches. Cast on 1 new stitch at the end of the next 2 rows = 71-75-81-91-95-103 stitches. Work English rib with 1 edge stitch in garter stitch as before. When piece measures 58-60-62-64-66-68 cm = 22¾"-23⅝"-24⅜"-25¼"-26"-26¾", bind off the middle 11-11-17-19-19-19 stitches for neck on next row from right side and finish each shoulder separately (30-32-32-36-38-42 stitches remain on each shoulder). At the beginning of next row from neck bind off 2 stitches for neck = 28-30-30-34-36-40 stitches. Bind off with knit over knit and purl over purl when piece measures 62-64-66-68-70-72 cm = 24⅜"-25¼"-26"-26¾"-27½"-28⅜" (work yarn overs together with stitch they belong to). Work the other shoulder the same way. SLEEVES: Cast on 54-54-57-60-63-66 stitches on double pointed needles size 4 MM = US 6 with 1 strand of each quality. Knit 1 round. Work rib (purl 2/knit 1). When rib measures 5 cm = 2", work next round as follows: * Purl 2 together, make 1 yarn over, slip 1 stitch on to right needle purlwise *, work from *-* over all stitches = 36-36-38-40-42-44 stitches. Switch to double pointed needles size 5.5 MM = US 9. Work ENGLISH RIB in the round. When sleeve measures 20-20-18-16-14-12 cm = 8"-8"-7"-6¼"-5½"-4¾", increase 2 stitches on next round - read INCREASE TIP. Work the increased stitches in English rib. On first round work the increased stitches without yarn overs. Increase like this every 10th round 7-8-9-9-9-9 times in total = 50-52-56-58-60-62 stitches. Bind off with knit over knit and purl over purl (work yarn overs together with stitches they belong to) when sleeve measures 47-46-45-43-42-40 cm = 18½"-18"-17¾"-17"-16½"-15¾". Work the other sleeve the same way. ASSEMBLY: Sew the shoulder seams. Sew in sleeves inside 1 edge stitch along armholes. Sew side seams on the pockets. RIGHT BAND: Work band bottom up. Pick up stitches along right front piece with the end of yarn (to continue to work with the ball) as follows: Leave approx. 110-130 cm = 43⅜"-51¼" yarn at the end, use the end of yarn, begin at the bottom of front piece and pick up 1 stitch in every row along the entire front piece up to shoulder, inside 1 edge stitch with circular needle size 5 MM = US 8 and 1 strand of each quality. Cast on 12 stitches on needle at the bottom of front piece (i.e. from wrong side). Work band over the 12 band stitches and work band together with stitches picked up along the edge on front piece as follows: ROW 1 (= right side): Slip first stitch on to right needle purlwise with strand in front of piece, * knit 1, slip 1 stitch on to right needle purlwise with strand in front of piece *, work from *-* until 1 stitch remains of the 12 band stitches, slip 1 stitch on to right needle knitwise, with strand behind piece, knit next stitch, pass slipped stitch over stitch worked, turn. ROW 2 (= wrong side): * Slip first/next stitch on to right needle purlwise with strand in front of piece, knit 1 *, work from *-* over all the 12 band stitches. Repeat row 1 and 2 and work BUTTONHOLES - read explanation above, until all stitches from front piece have been worked together with band. Now work over the 12 band stitches as follows: ROW 1: * Slip first/next stitch on to right needle purlwise, with strand in front of piece, knit 1 *, work from *-* over the 12 stitches. Repeat row 1 both from right side and wrong side for 6-6-7-7-9-9 cm = 2⅜"-2⅜"-2¾"-2¾"-3½"-3½". On next row from right side knit all stitches together 2 by 2 and bind off. LEFT BAND: Work band bottom up. Begin at the shoulder on left front piece and pick up 1 stitch in every row along the entire front piece, inside 1 edge stitch with circular needle size 5 MM = US 8 and 1 strand of each quality and cast on 12 stitches at the end of row. Work band over the 12 stitches and work band together with stitches picked up along the edge on front piece as follows: ROW 1 (= wrong side): Knit 1, * slip 1 stitch on to right needle purlwise with strand in front of piece, knit 1 *, work from *-* until 1 stitch remains of the 12 band stitches, slip the next 2 stitches on to right needle purlwise with strand in front of piece, turn. ROW 2 (= right side): Knit 2 together, *, slip 1 stitch on to right needle purlwise with strand in front of piece, knit 1 *, work from *-* until 1 stitch remains, slip last stitch on to right needle purlwise with strand in front of piece. Repeat row 1 and 2 until all stitches from front piece have been worked together with band. Now work over the 12 band stitches as follows: ROW 1: * Knit 1, slip next stitch on to right needle purlwise with strand in front of piece *, work from *-* over the 12 stitches. Repeat row 1 both from right side and wrong side for 6-6-7-7-9-9 cm = 2⅜"-2⅜"-2¾"-2¾"-3½"-3½". On next row from right side work all stitches together and bind off as follows: Slip 1 stitch on to right needle knitwise, knit 1, pass slipped stitch over stitch worked, bind off stitch. ASSEMBLY: Sew the band together mid back and sew it to the neck edge on back piece. Sew the buttons on to the left band. |
|
|
|
|
Have you made this or any other of our designs? Tag your pictures in social media with #dropsdesign so we can see them! Do you need help with this pattern?You'll find tutorial videos, a Comments/Questions area and more by visiting the pattern on garnstudio.com. © 1982-2024 DROPS Design A/S. We reserve all rights. This document, including all its sub-sections, has copyrights. Read more about what you can do with our patterns at the bottom of each pattern on our site. |
|


With over 40 years in knitting and crochet design, DROPS Design offers one of the most extensive collections of free patterns on the internet - translated to 17 languages. As of today we count 304 catalogs and 11422 patterns - 11417 of which are translated into English (US/in).
We work hard to bring you the best knitting and crochet have to offer, inspiration and advice as well as great quality yarns at incredible prices! Would you like to use our patterns for other than personal use? You can read what you are allowed to do in the Copyright text at the bottom of all our patterns. Happy crafting!
Comments / Questions (9)
Je ne comprends pas le rang envers après les côtes, il est sensé diminuer le nombre de maille. Mais moi je n'ai pas de diminution. Pouvez vous m'aider merci Michèle
25.09.2023 - 13:17DROPS Design answered:
Bonjour Mme Hazard, vous allez bien diminuer le nombre de mailles car vous tricotez 2 m ens à l'end, mais les jetés ne comptent pas pour des mailles car ils appartiennent à la maille que l'on va glisser (1 jeté + 1 m glissée = 1 maille). Bon tricot!
25.09.2023 - 15:34Je ne comprends pas l’explication pour les bordures Vous relevez les mailles avec l’aiguille circulaire Avec quelles aiguilles montez vous les 12 mailles Pourquoi relevez vous les mailles une fois en commençant par en bas une fois par en haut ? Merci pour l’information. Nicole
31.12.2022 - 18:16DROPS Design answered:
Bonjour Mme Lejeune, les mailles sont relevées avec l'aiguille circulaire 5 - nous avons 2 vidéos pour ces bordures: une pour la bordure sans boutonnière (ici) et une pour la bordure avec boutonnière (ici), vous pourrez sans doute ainsi mieux visualiser comment on procède. Bon tricot!
02.01.2023 - 13:54Apparemment il n’y a pas de diminutions pour les emmanchures dans le dos. \r\nIl y a au contraire une augmentation de 69 mailles on passe à 71 mailles \r\nEst- ce exact ? Merci pour la réponse. Nicole
29.11.2022 - 17:28DROPS Design answered:
Bonjour Nicole, c'est exact, comme on continue les devants et le dos séparément en allers et retours, on a besoin d'1 maille lisière pour les coutures, donc on monte 1 maille côté emmanchure à chacun des devants et 2 mailles pour le dos (= 1 m de chaque côté). Bon tricot!
30.11.2022 - 08:58Bonjour, Je souhaiterais vraiment confectionner ce modèle. J'ai un gros souci, je ne tricote pas avec des aiguilles circulaires. De plus, je n'arrive pas à convertir ce modèle avec : le dos, les deux devants et les manches... C'est bien dommage car il me plait terriblement. Merci pour votre réponse. Cécile
24.10.2022 - 12:24DROPS Design answered:
Bonjour Mme Servais, vous pouvez tricoter le dos et les deux devants sur une seule aiguille si vous préférez, ça vous fera beaucoup de mailles sur la même aiguille mais si vous êtes ainsi plus à l'aise, vous aurez moins d'ajustements à faire. Pour les manches, il suffit de monter 2 mailles en plus (pour les lisières) et de tricoter les côtes en rangs du coup. Retrouvez des astuces pour adapter un modèle sur aiguilles droites ici. Bon tricot!
24.10.2022 - 16:21Bonjour, je n ai pas vu de modèle qui utilise la laine soft tweed sans kid silk. Peut-on les tricoter sans cet ajout. Car je trouve kid silk jolie mais elle s accroche beaucoup aux vêtements. Merci
27.09.2022 - 13:17DROPS Design answered:
Bonjour Mme Riviere, découvrez parmi modèles tricotés en Soft Tweed ceux tricotés avec juste Soft Tweed (tension de 16 à 21 m - sans "+") - vous pouvez également utiliser Soft Tweed pour tous les modèles tricotés avec un fil du groupe de fils B - utilisez le convertisseur pour obtenir la nouvelle quantité correspondante en Soft Tweed - Ou vous pouvez aussi remplacer Kid-Silk par une autre laine du groupe A (notre convertisseur vous donnera quelques alternatives et les quantités correspondantes). Bon tricot!
27.09.2022 - 13:36Vanilla autum
07.08.2022 - 11:50Sweet caramel
06.08.2022 - 20:32Grandma's Cozy
06.08.2022 - 06:46Warmer Herbstspaziergang
05.08.2022 - 11:45