
Popular categories
Looking for a yarn?


|
||||||||||
Autumn Woods Cardigan |
||||||||||
 |
 |
|||||||||
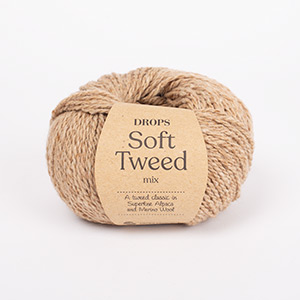
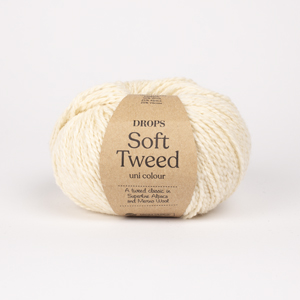
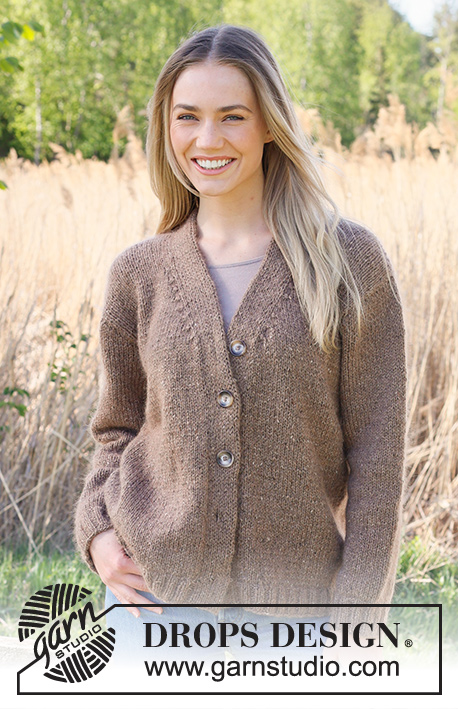
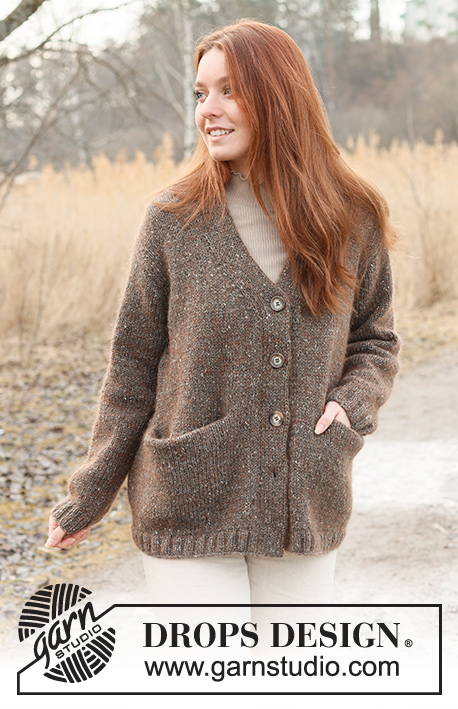
Knitted long jacket in DROPS Soft Tweed and DROPS Kid-Silk. The piece is worked bottom up, in stocking stitch, with double knitted bands, V-neck and pockets. Sizes XS - XXL.
DROPS 237-24 |
||||||||||
|
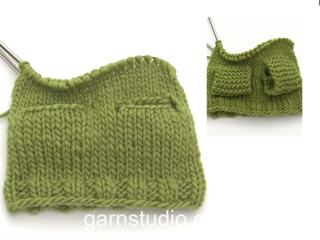
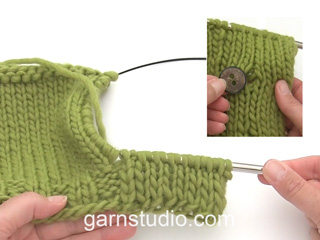
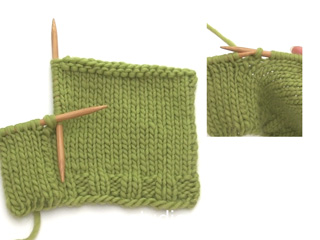
------------------------------------------------------- EXPLANATIONS FOR THE PATTERN: ------------------------------------------------------- PATTERN: See diagrams A.1 to A.3. The diagrams show all rows in the pattern from the right side. RIDGE/GARTER STITCH (worked back and forth): Knit all rows. 1 ridge = knit 2 rows. DECREASE TIP (for V-neck and armholes): All decreases are worked from the right side! DECREASE 2 STITCHES AT THE BEGINNING OF THE ROW: Work 1 edge stitch in garter stitch, knit 1, work A.1 over the next 3 stitches. DECREASE 2 STITCHES AT THE END OF THE ROW: Work until there are 5 stitches left on the row, work A.1 over the next 3 stitches, knit 1 and 1 edge stitch in garter stitch. DECREASE 1 STITCH AT THE BEGINNING OF THE ROW: Work 1 edge stitch in garter stitch, knit 1, work A.2 over the next 3 stitches. DECREASE 1 STITCH AT THE END OF THE ROW: Work until there are 5 stitches left on the row, work A.3 over the next 3 stitches, knit 1 and 1 edge stitch in garter stitch. INCREASE TIP (for sleeves): Knit 1 stitch past the marker, make 1 yarn over, knit until there is 1 stitch left before the marker, 1 yarn over. On the next round knit the yarn overs twisted. BUTTONHOLES: Work the buttonholes starting from the right side as follows: Work the first 8 stitches as before, turn and work the 8 stitches as before, turn and work these 8 stitches again – you have worked a total of 3 rows over these stitches (last row is worked from the right side). Cut the strand. Work 4 rows over the remaining 8 band stitches (first row from the right side) and knit together the last stitch from the right side and the stitch on the edge of the jacket. On the last row from the wrong side work all the band stitches as before. Work the buttonholes when the band measures: XS: 6, 15, 24, 33 and 41 cm. S: 6, 15, 24, 33 and 41 cm. M: 6, 15, 24, 33 and 41 cm. L: 6, 15, 24, 33 and 42 cm. XL: 6, 16, 25, 34 and 43 cm. XXL: 6, 16, 26, 35 and 44 cm. ------------------------------------------------------- START THE PIECE HERE: ------------------------------------------------------- JACKET – SHORT OVERVIEW OF THE PIECE: The piece is worked back and forth with circular needle, bottom up as far as the armholes. The piece is then divided and the front and back pieces finished separately. The sleeves are worked in the round with double pointed needles/short circular needle as far as the sleeve cap, then finished back and forth. Stitches are knitted up along the front pieces to finish and you then work the double knitted bands. BODY: Cast on 192-208-224-240-264-280 stitches with circular needle size 4 mm and 1 strand DROPS Soft Tweed and 1 strand DROPS Kid-Silk. Purl 1 row from the wrong side. On the next row (right side) work rib as follows: 1 edge stitch in GARTER STITCH – read description above, * knit 2, purl 2 *, work from *-* until there are 3 stitches left, knit 2 and 1 edge stitch in garter stitch. When the rib measures 4 cm, knit 1 row from the right side and decrease 30-34-38-38-46-46 stitches evenly spaced = 162-174-186-202-218-234 stitches. Change to circular needle size 5 mm. Insert 1 marker 41-44-47-51-55-59 stitches in from each side. Allow the markers to follow your work onwards; they mark the sides and are used when casting off for the armholes. Work stocking stitch with 1 edge stitch in garter stitch on each side. REMEMBER THE KNITTING TENSION! When the piece measures 23 cm work the pockets. POCKETS: Pockets are now worked on each front piece, on the next row from the right side. The pockets are worked double and sewn together to finish. Knit 9-10-10-12-14-14 and place these stitches on a thread/extra needle, knit 27-29-29-31-33-35, turn. Work stocking stitch over these 27-29-29-31-33-35 stitches and cast on 1 stitch at the end of the first 2 rows = 29-31-31-33-35-37 pocket-stitches. The new stitches are worked in garter stitch. When the pocket measures 36 cm (measure from the stitches on the thread), work it together with the jacket on the next row from the right side as follows: Knit both the edge stitches together with the stitches before/after, knit the next 90-96-108-116-124-136 stitches on the body, knit 27-29-29-31-33-35 stitches, turn and work the second pocket in the same way as the first. When the pocket is finished, knit the last 9-10-10-12-14-14 stitches. Place the stitches from the thread/extra needle back on the circular needle. Continue with stocking stitch and 1 edge stitch in garter stitch on each side. OVERVIEW OF THE NEXT SECTION: When the piece measures 42-42-42-43-44-45 cm, start to decrease for the V-neck. AT THE SAME TIME stitches will be cast off for the armholes and each piece finished separately. Read V-NECK and ARMHOLES before continuing. V-NECK: When the piece measures 42-42-42-43-44-45 cm, on the next row from the right side, decrease for the neck each side – read DECREASE TIP. Decrease 2 stitches on each side every 4th row a total of 4 times in all sizes. Then decrease 1 stitch on each side every 4th row 3-3-4-4-5-5 times. ARMHOLES: AT THE SAME TIME when the piece measures 47-48-49-50-51-52 cm and the next row is from the right side, cast off for the armholes as follows: Work as before until there are 2-3-4-4-4-5 stitches left before the first marker, cast off 4-6-8-8-8-10 stitches, work until there are 2-3-4-4-4-5 stitches left before the second marker, cast off 4-6-8-8-8-10 stitches and work to the end of the row. The front and back pieces are finished separately. LEFT FRONT PIECE (when the garment is worn): Start from the wrong side and work stocking stitch with 1 edge stitch in garter stitch on each side and continue to decrease for the neck from the right side. In addition decrease for the armhole as follows: ARMHOLE: At the beginning of the next row from the right side decrease 1-1-1-2-2-2 stitches, then decrease 1 stitch every 4th row 0-0-0-1-3-3 times – remember DECREASE TIP. After all the decreases for the neck and armhole there are 27-29-30-32-33-36 stitches on the shoulder. Work stocking stitch with 1 edge stitch in garter stitch on each side. Cast off when the piece measures 66-68-70-72-74-76 cm. RIGHT FRONT PIECE: Start from the wrong side and work stocking stitch with 1 edge stitch in garter stitch on each side and continue to decrease for the neck from the right side. In addition decrease for the armhole as follows: ARMHOLE: At the end of the next row from the right side decrease 1-1-1-2-2-2 stitches, then decrease 1 stitch every 4th row 0-0-0-1-3-3 times – remember DECREASE TIP. After all the decreases for the neck and armhole there are 27-29-30-32-33-36 stitches on the shoulder. Work stocking stitch with 1 edge stitch in garter stitch on each side. Cast off when the piece measures 66-68-70-72-74-76 cm. BACK PIECE: = 76-80-84-92-100-106 stitches. Start from the wrong side and work stocking stitch with 1 edge stitch in garter stitch on each side. In addition decrease for the armholes as follows: On the next row from the right side decrease 1-1-1-2-2-2 stitches on each side, then 1 stitch on each side every 4th row 0-0-0-1-3-3 times – remember DECREASE TIP = 74-78-82-86-90-96 stitches. When the piece measures 63-65-67-69-71-73 cm cast off the middle 18-18-20-20-22-22 stitches for the neck (28-30-31-33-34-37 stitches on each shoulder). Finish each shoulder separately. On the next row from the neck cast off 1 stitch = 27-29-30-32-33-36 stitches. Cast off when the piece measures 66-68-70-72-74-76 cm. Work the other shoulder in the same way. SLEEVES: Cast on 44-44-48-48-52-52 stitches with double pointed needles size 4 mm and 1 strand of each quality (2 strands). Knit 1 round, then work rib (knit 2, purl 2) for 5 cm. Knit 1 round where you decrease 6-4-6-4-6-6 stitches evenly spaced = 38-40-42-44-46-46 stitches. Insert a marker at the beginning of the round (mid-under sleeve). Allow the marker to follow your work onwards – it is used when increasing under the sleeve. Change to double pointed needles size 5 mm and work stocking stitch. When the sleeve measures 9-10-8-10-8-10 cm, increase 1 stitch on each side of the marker – read INCREASE TIP. Increase like this every 3½-3-3-2½-2½-2 cm a total of 11-12-13-13-14-15 times = 60-64-68-70-74-76 stitches. When the sleeve measures 46-46-46-43-42-42 cm, work as follows: Start 2-3-4-4-4-5 stitches before the marker, cast off 4-6-8-8-8-10 stitches and work to the end of the round = 56-58-60-62-66-66 stitches. Start from the wrong side and work the sleeve cap in stocking stitch, back and forth, casting off stitches at the beginning of each row as follows: 9-9-10-5-4-4 stitches 2-2-2-5-6-6 times on each side = 20-22-20-12-18-18 stitches. Cast off. Work the other sleeve in the same way. ASSEMBLY: Sew the shoulder seams inside the cast-off edge. Sew in the sleeves, inside the 1 edge stitch on the armholes. Sew together the sides of the pockets. RIGHT BAND: The band is worked bottom up. Wind out a 90 to 110 cm yarn-end and use it to knit up stitches along the front piece (this means you can continue working without cutting the strand afterwards): Start at the bottom and knit up 1 stitch inside the 1 edge stitch, with circular needle size 4.5 mm and 1 strand of each quality. Work from the end of the needle, where the wool-ball is = bottom of the front piece. Cast on 16 stitches from the wrong side, extending the band outwards. Work back and forth over these 16 stitches and work the band together with the front piece as follows: ROW 1 (right side): Slip the first stitch onto the right needle as if to purl, keeping the strand at the front, * knit 1, slip 1 stitch onto the right needle as if to purl, keeping the strand in front *, work from *-* until there is 1 stitch left on the band, slip the last stitch onto the right needle as if to knit, keeping the strand at the back, knit the next stitch and pass the slipped stitch over the knitted stitch, turn. ROW 2 (wrong side): * Slip the first/next stitch onto the right needle as if to purl, keeping the strand in front, knit 1 *, work from *-* over all 16 band-stitches, turn. Repeat rows 1 and 2. Remember the BUTTONHOLES – read description above. When all the stitches on the front piece are worked together with the band, work as follows: ROW 1: * Slip the first/next stitch onto the right needle as if to purl, keeping the strand in front, knit 1 *, work from *-* over all 16 band-stitches. Repeat row 1 from both the right and wrong side for 6½ cm. On the next row from the right side knit all stitches together 2 and 2, then cast off. LEFT BAND: The band is worked bottom up. Start at the top and knit up 1 stitch in each row down the front piece, working inside the 1 edge stitch, with circular needle size 4.5 mm and 1 strand of each quality. Cast on 16 stitches at the bottom, extending the band outwards. Work back and forth over these 16 stitches and work the band together with the front piece as follows: ROW 1 (wrong side): Knit 1, * slip 1 stitch onto the right needle as if to purl, keeping the strand in front, knit 1 *, work from *-* until there is 1 stitch left on the band, slip the next 2 stitches onto the right needle as if to purl together, keeping the strand in front, turn. ROW 2 (right side): Knit 2 together, * slip 1 stitch onto the right needle as if to purl, keeping the strand in front, knit 1 *, work from *-* until there is 1 stitch left, slip the last stitch onto the right needle as if to purl, keeping the strand in front, turn. Repeat rows 1 and 2 until all the stitches on the front piece are worked together with the band. Now work the 16 stitches as follows: , ROW 1: * Knit 1, slip the next stitch onto the right needle as if to purl, keeping the strand in front *, work from *-* over the 16 stitches. Repeat row 1 from both the right and wrong side for 6½ cm. On the next row from the right side knit all stitches together 2 and 2 and cast off as follows: Slip 1 stitch onto the right needle as if to knit, knit 1, pass the slipped stitch over, cast off the stitch. ASSEMBLY: Sew the bands together mid-back and sew to the neck-line on the back piece. Sew the buttons onto the left band. |
||||||||||
Diagram explanations |
||||||||||
|
||||||||||

|
||||||||||

|
||||||||||
|
Have you made this or any other of our designs? Tag your pictures in social media with #dropsdesign so we can see them! Do you need help with this pattern?You'll find tutorial videos, a Comments/Questions area and more by visiting the pattern on garnstudio.com. © 1982-2024 DROPS Design A/S. We reserve all rights. This document, including all its sub-sections, has copyrights. Read more about what you can do with our patterns at the bottom of each pattern on our site. |
||||||||||


With over 40 years in knitting and crochet design, DROPS Design offers one of the most extensive collections of free patterns on the internet - translated to 17 languages. As of today we count 304 catalogues and 11422 patterns - 11422 of which are translated into English (UK/cm).
We work hard to bring you the best knitting and crochet have to offer, inspiration and advice as well as great quality yarns at incredible prices! Would you like to use our patterns for other than personal use? You can read what you are allowed to do in the Copyright text at the bottom of all our patterns. Happy crafting!
Comments / Questions (13)
Ik zie het al.
04.03.2024 - 21:54De minderingen voor de v-hals voor maat S (4×2 steken + 3x1 steek = 11 steken) plus de afkanting en mindering voor het armsgaten (6÷2=3 steken + 1 mindering per kant) geven een totaal van 15 steken minder. Ik houd dan 41-15=26 steken per schouder over. Het patroon zegt dat ik 29 steken moet hebben. Waar maak ik een fout?
04.03.2024 - 21:41DROPS Design answered:
Dag Anne,
Je hebt na 44 steken vanaf elke kant markeerdraden geplaatst om de zijkanten aan te geven. Elk voorpand heeft dus 44 steken. Je mindert 11 steken in totaal voor de V-hals. Je kant 3 steken af voor de armsgaten (6 steken, met de markeerdraad precies in het midden daarvan), daarna minder je nog een keer 1 steek. Hiermee kom je precies op 29 steken.
05.03.2024 - 22:47So on the first purl row of the body, do I need to do edge stitches in garter stitch too? It seems like throughout the entire pattern there is always that edge stitch but not on the first row. Is that correct?
17.09.2023 - 22:32DROPS Design answered:
Dear Anne, it's not necessary but we recommend working the edge stitch in garter stitch on the first row as well, for uniformity. Happy knitting!
17.09.2023 - 23:26Hur fäster man de långa trådarna vid knapphålen så att det ser snyggt ut? Hittar inget tips i stickbeskrivningen. Med bästa hälsningar, Ingrid
17.07.2023 - 17:27DROPS Design answered:
Hei Ingrid. Du kan prøve å fest trådene "inni" den doble stolpen eller "tråkle tråden "inni" stoplen bort til overgangen mellom stoplen og forstykket og så feste tråden der eller feste den i forstykket. mvh DROPS Design
25.07.2023 - 08:26I am doing sleeve.I closed 8 stitches and what know because pattern is not clear"" Start from the wrong side and work the sleeve cap in stocking stitch, back and forth, casting off stitches at the beginning of each row as follows: 9-9-10-5-4-4 stitches 2-2-2-5-6-6 times on each side = 20-22-20-12-18-18 stitches. Cast off. My question is how stitches casting ? What that does mean cast off 9-9-10-5-4-4 stitches 2-2-2-5-6-6 =20-22-20-12-18 stitches.I don' t understand at all
01.07.2023 - 07:58DROPS Design answered:
Dear Elzbieta, for the sleeve cap we need to cast off = close more stitches. We cast off sts at each side of piece - the better way is to close stitches at the beginning of EVERY row (i.e. both right and wrong side = both sides of piece). So at the beginning of every row we cast off (= close) 9-9-10-5-4-4 stitches (choose for your size) and we repeat it 2-2-2-5-6-6 times. Finally, we are left with 20-22-20-12-18 stitches. In next row we close all of them (= straight top edge of sleeve). Happy knitting!
01.07.2023 - 10:36Ich habe diesen Cardigan gestrickt (in den Farben Kiesel und Mondschein) und er ist sehr schön geworden. Allerdings habe ich auf die Taschen verzichtet - was ich nun bereue. Gibt es eine Möglichkeit, die Taschen nachträglich einzustricken, ohne dass sie "aufgenäht" aussehen? Ich freue mich, wenn es hierzu einen Tipp gibt!
09.04.2023 - 21:01DROPS Design answered:
Liebe Susanne, es kann vielleicht einfacher sein, die Taschen separat zu stricken und sie dann anzunähen - siehe Video. Viel Spaß beim stricken!
11.04.2023 - 14:08Hej Jeg har et 50% uld og merino garn med strikkefasthed 26 m x 38 p på p 2½. Ville det passe sammen med 1 tråd 78% Suri-alpakka 22% nylon med strikkefasthed 24-26 m på p 2.5-3.5 til denne cardigan? Tak 😊
06.03.2023 - 10:44DROPS Design answered:
Hej Gitte, i den her opskrift skal strikkefastheden være 16 masker på 10 cm og det får du med 1 tråd DROPS Soft Tweed og 1 tråd DROPS Kid-Silk :)
08.03.2023 - 09:23I have a question about the bands along the front. In the picture, it looks like the bands are done in stockinette, but in the instructions, it says to knit/slip on both sides, so it is essentially a garter stich. Also, why are rows 1 and 2/ and row 1 repeated in the instructions?
28.11.2022 - 19:11DROPS Design answered:
Dear Aggie, button bands are not worked in garter stitch but following the double knitting technique, ie you will work alternately 1 stitch and slip 1 stitch - this video shows how to work the band without buttonholes - and this one with buttonholes. Happy knitting!
29.11.2022 - 09:50Für die Verlängerung der vorderen Blenden werden je 6 1/2 cm angegeben, die an der hinteren Mitte zusammengenäht werden und an den Halsrand des Rückenteils genäht werden sollen. Wie soll das gehen, da dieser hintere Halsrand mindestens 20 cm (14 cm +2-mal ca.3cm) lang ist ? Liegt hier vielleicht ein Fehler in der Anleitung vor ?
21.10.2022 - 20:57DROPS Design answered:
Liebe Ursula, die Halsblende soll man dann etwas ziehen, damit der Halsausschnitt schön aussieht. Viel Spaß beim stricken!
24.10.2022 - 07:45Kann ich die Jacke Autumm Woods Cardigan nur mit Drops Soft Tweed OHNE Drops Kid-Silk stricken.Muss ich dann die Maschenanzahl verändern?
11.10.2022 - 17:36DROPS Design answered:
Liebe Karin, die Maschenprobe mit nur Soft Tweed würde nicht dieselbe sein, so sollten Sie die ganze Jacke nochmal je nach Ihrer Maschenprobe kalkulieren. Hier lesen Sie mehr über die Maschenprobe. Viel Spaß beim stricken!
12.10.2022 - 08:27