DROPS Soft Tweed
DROPS Soft Tweed
50% Wool, 25% Alpaca, 25% Viscose
from 4.35 € /50g
Get the yarn to make this pattern from 43.50€.

The yarn cost is calculated from the pattern’s smallest size and the yarn’s cheapest product type. Looking for an even better price? You might find it on the DROPS Deals!

DROPS SS24

Blue Diamond

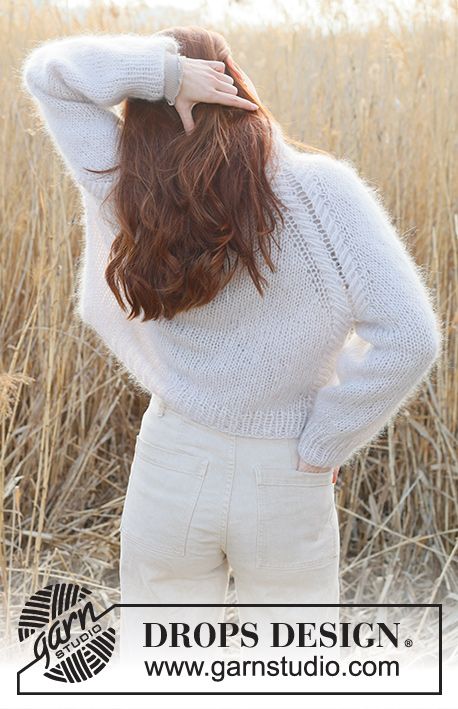
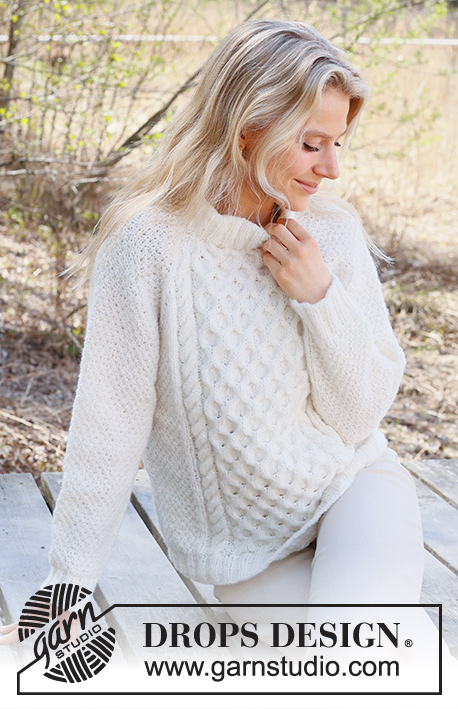
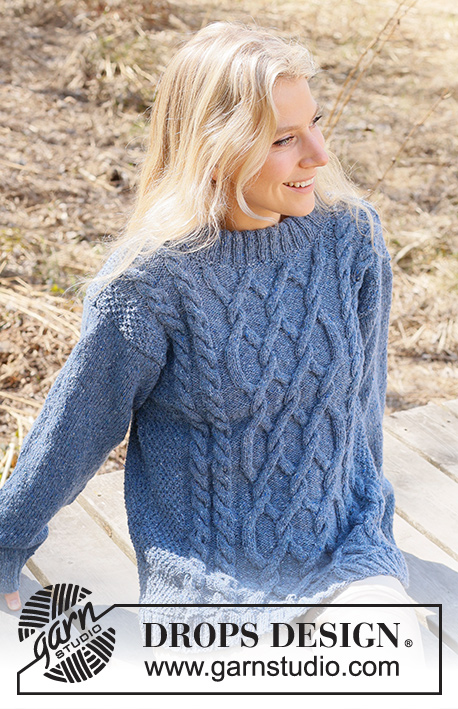
Knitted jumper in DROPS Soft Tweed. Piece is knitted bottom up with cables, moss stitch, double neck edge and sewn-in sleeves. Size: S - XXXL

DROPS 236-29
DROPS design: Pattern st-018
Yarn group B
----------------------------------------------------------

SIZE:
S - M - L - XL - XXL - XXXL

MATERIALS:
DROPS SOFT TWEED from Garnstudio (belongs to yarn group B)
500-550-600-650-700-750 g colour 10, denim jeans

NEEDLES:
DROPS CIRCULAR NEEDLE SIZE 4.5 mm: Length 80 cm.
DROPS CIRCULAR NEEDLE SIZE 3.5 mm: Length 40 and 80 cm.
DROPS CABLE NEEDLE.
The technique MAGIC LOOP can be used – you then only need circular needle of 80 cm in each size.

KNITTING TENSION:
20 stitches in width and 26 rows vertically in stocking stitch / 34 rows vertically with pattern A.1 = 10 x 10 cm. Pattern A.2 to A.6 measures approx. 38 cm in width.
NOTE! Remember that needle size is only a suggestion. If you have too many stitches on 10 cm switch to larger needles. If you have too few stitches on 10 cm switch to smaller needles.

-------------------------------------------------------

Alternative Yarn – See how to change yarns here
Yarn Groups A to F – Use the same pattern and change the yarn here
Yarn usage using an alternative yarn – Use our yarn converter here

-------------------------------------------------------

DROPS Soft Tweed
DROPS Soft Tweed
50% Wool, 25% Alpaca, 25% Viscose
from 4.35 € /50g
Get the yarn to make this pattern from 43.50€.

The yarn cost is calculated from the pattern’s smallest size and the yarn’s cheapest product type. Looking for an even better price? You might find it on the DROPS Deals!

Pattern instructions

----------------------------------------------------------

EXPLANATION FOR THE PATTERN:

----------------------------------------------------------

GARTER STITCH (back and forth):
Knit all rows.
1 ridge vertically = knit 2 rows.

PATTERN:
See diagram A. to A.6 Diagrams show all rows seen from the right side.

INCREASE TIP (applies to sleeve):
All increases are done from the right side.
Make 1 yarn over in each side inside 1 edge stitch. On next row work yarn overs twisted to avoid holes. Then work the new stitches in stocking stitch.

-----------------------------------------------------

START THE PIECE HERE:

----------------------------------------------------------

JUMPER – SHORT OVERVIEW OF THE PIECE:
Work front piece, back piece and sleeves back and forth on circular needle separately, bottom up. Sew the piece together as explained in pattern. Then work the neck edge in the round on circular needle.

BACK PIECE:
Cast on 116-124-136-148-160-172 stitches on circular needle size 3.5 mm with DROPS Soft Tweed. Work rib back and forth as follows - first row is from right side: 1 edge stitch in GARTER STITCH - read explanation above - * knit 2, purl 2 *, work from *-* until 3 stitches remain, knit 2 and 1 edge stitch in garter stitch. Work rib like this until piece measures 5 cm. Switch to circular needle size 4.5 mm. Knit 1 row from right side while decreasing 16-14-18-20-20-20 stitches evenly = 100-110-118-128-140-152 stitches. Knit 1 row from wrong side. Continue to work pattern from the right side as follows:
Work 1 edge stitch in garter stitch, work pattern A.1 until 1 stitch remains and finish with 1 edge stitch in garter stitch. REMEMBER THE KNITTING TENSION!
Continue pattern like this.
When piece measures 37-38-39-40-41-42 cm, cast off stitches for armholes in each side at the beginning of every row as follows: Cast off 3 stitches 1 time, 2 stitches 0-1-1-2-3-4 times, 1 stitch 0-1-1-4-6-8 times = 94-98-102-106-110-114 stitches.
Continue pattern as before. When piece measures 57-59-61-63-65-67 cm, cast off the middle 38-38-40-40-42-42 stitches for neck and finish each shoulder separately. On next row from the neck, cast off 1 stitch = 27-29-30-32-33-35 stitches. Then work pattern A.1 until piece measures 59-61-63-65-67-69 cm. Cast off. Work the other shoulder the same way.

FRONT PIECE:
Cast on 116-124-136-148-160-172 stitches on circular needle size 3.5 mm with DROPS Soft Tweed. Work rib back and forth as follows - first row is from right side: 1 edge stitch in garter stitch, * purl 2, knit 2 *, work from **-* until 3 stitches remain, purl 2 and 1 edge stitch in garter stitch. Work rib like this until piece measures 5 cm. Switch to circular needle size 4.5 mm. Knit 1 row from right side while increasing 12-14-10-8-8-8 stitches evenly = 128-138-146-156-168-180 stitches. Knit 1 row from wrong side. Continue to work pattern from the right side as follows:
Work 1 edge stitch in garter stitch, work pattern A.1 over 11-16-20-25-31-37 stitches, work A.2, A.3, A.4, A.5, A.6, work 11-16-20-25-31-37 stitches A.1 and 1 edge stitch in garter stitch.
Continue pattern like this.
When piece measures 37-38-39-40-41-42 cm, cast off stitches for armholes in each side at the beginning of every row as follows: Cast off 3 stitches 1 time, 2 stitches 0-1-1-2-3-4 times, 1 stitch 0-1-3-4-6-8 times = 122-126-130-134-138-142 stitches.
Continue pattern as before. When piece measures 51-53-54-56-57-59 cm, decrease 12 stitches evenly over knit stitch in pattern A.4 = 110-114-118-122-126-130 stitches. Then slip the middle 32 stitches on a thread for neck. Then finish the shoulders separately and cast off stitches for neck on every row from neck as follows: Cast off 2 stitches 1 time and 1 stitch 2-2-3-3-3-4 times = 35-37-38-40-41-43 stitches remain on needle. When piece measures 58-60-62-64-66-68 cm, decrease 4 stitches in knit stitches in each of A.2 and A.5 / A.3 and A.6= 27-29-30-32-33-35 stitches on shoulder. Continue to work until piece measures 59-61-63-65-67-69 cm. Cast off. Work the other shoulder the same way.

SLEEVE:
Cast on 62-62-66-66-70-70 stitches on circular needle size 3.5 mm with DROPS Soft Tweed. Work rib back and forth as follows - first row is from right side: 1 edge stitch in garter stitch, * knit 2, purl 2 *, work from*-* until 1 stitch remains, work 1 edge stitch in garter stitch. Work rib like this until piece measures 7 cm, adjust to finish next row from right side.
Switch to circular needle size 4.5 mm. Knit 1 row from right side while decreasing 8-6-8-8-10-8 stitches evenly = 54-56-58-58-60-62 stitches. Then work in stocking stitch with 1 edge stitch in garter stitch in each side. When piece measures 8 cm, increase 1 stitch inside 1 edge stitch in each side - read INCREASE TIP. Increase like this every 2½-2½-2-1½-1½-1½ cm 15-15-16-19-19-21 times in total = 84-86-90-96-98-104 stitches. When piece measures 45-44-43-42-41-40 cm, cast off 3 stitches in each side. Cast off for sleeve cap at beginning of every row in each side as follows: 2 stitches 2-2-3-3-4-4 times, 1 stitch 0-1-0-1-0-1 time. Then cast off 2 stitches in each side until piece measures 50 cm in all sizes, cast off 3 stitches in each side, then cast off the remaining stitches. Sleeve measures 51 cm in all sizes. Work another sleeve the same way.

ASSEMBLY:
Sew shoulder seams inside cast-off edge. Sew in sleeves. Sew underarm and side seams in one inside 1 edge stitch.

NECK EDGE:
Work neck edge in the round, begin from right side at one shoulder seam. Use circular needle size 3.5 mm and DROPS Soft Tweed. Pick up approx. 96 to 108 stitches (including stitches from thread at the front) - number of stitches must be divisible with 4. Purl 1 round and knit 1 round. Work rib (knit 2/purl 2) for 11 cm. Cast off stitches with knit over knit and purl over purl.
Fold rib at the top of neck down on inside of garment. Fasten rib to get a double neck edge. To avoid a tight neck edge that sticks out it is important to keep the seam elastic.

Diagram

symbols = knit from the right side, purl from the wrong side
symbols = purl from the right side, knit from the wrong side
symbols = slip 4 stitches on cable needle behind piece, knit 4, knit 4 from cable needle
symbols = slip 4 stitches on cable needle in front of piece, knit 4, knit 4 from cable needle
symbols = slip 2 stitch on cable needle behind piece, knit 4, purl 2 from cable needle
symbols = slip 4 stitches on cable needle in front of piece, purl 2, knit 4 from cable needle
diagram
diagram
diagram

Each of our patterns has specific tutorial videos to help you.

Do you have a question? See a list of frequently asked questions (FAQ)

Knitting tension is what determines the final measurements of your work, and is usually measured per 10 x 10 cm. It is provided like so: number of stitches in width x number of rows in height - eg: 19 stitches x 26 rows = 10 x 10 cm.

The knitting tension is very individual; some people knit/crochet loosely while others work tightly. You adjust the knitting tension with the needle size, which is why the suggested needle size is only meant as a guide! You need to adjust this (up or down) to ensure that YOUR knitting tension matches the knitting tension provided in the pattern. If you work with a different knitting tension than provided you will have a different yarn consumption, and your work will have different measurements than what the pattern suggests.

The knitting tension also determines which yarns can replace each other. As long as you achieve the same knitting tension you can replace one yarn with another.

See DROPS lesson: How to measure your tension/gauge

See DROPS video: How to make a gauge tension swatch

The required amount of yarn is provided in grams, eg: 450 g. To calculate how many balls you’ll need you first need to know how many grams are in 1 ball (25g, 50g or 100g). This information is available if you click on the individual yarn quality on our pages. Divide the amount required with the amount of each ball. For example, if each ball is 50g (the most common amount), the calculation will be as follows: 450 / 50 = 9 balls.

The important thing when changing from one yarn to another is that the knitting/crochet tension remains the same. This is so that the measurements of the finished piece will be the same as on the sketch provided. It is easier to achieve the same knitting tension using yarns from the same yarn group. It is also possible to work with multiple strands of a thinner yarn to achieve the knitting tension of a thicker one. Please try our yarn converter. We recommend you to always work a test swatch.

Please NOTE: when changing yarn the garment might have a different look and feel to the garment in the photo, due to individual properties and qualities of each yarn.

See DROPS lesson: Can I use a different yarn than the one mentioned in the pattern?

All our yarns are categorised into yarn groups (from A to F) according to thickness and knitting tension – group A contains the thinnest yarns and group F the thickest. This makes it easier for you to find alternative yarns to our patterns, should you wish to switch yarn. All yarns within the same group have a similar knitting tension and can easily replace each other. However, different yarn qualities have different structures and properties which will give the finished work a unique look and feel.

Click here for an overview of the yarns in each yarn group

At the top of all our patterns you’ll find a link to our yarn calculator, which is a helpful tool should you wish to use a different yarn than suggested. By filling in the yarn quality you wish to replace, the amount (in your size) and number of strands, the calculator will present good alternative yarns with the same knitting tension. Additionally it will tell you how much you’ll require in the new qualities and whether you’ll need to work with multiple strands. Most skeins are 50g (some are 25g or 100g).

If the pattern is worked with multiple colours, every colour will have to be calculated separately. Similarly, if the pattern is worked with several strands of different yarns (for example 1 strand Alpaca and 1 strand Kid-Silk) you will have to find alternatives for each, individually.

Click here to see our yarn calculator

Since different yarns have different qualities and textures we have chosen to keep the original yarn in our patterns. However, you can easily find options among our available qualities by using our yarn calculator, or simply pick a yarn from the same yarn group.

It is possible that some retailers still have discontinued yarns in stock, or that someone has a few skeins at home that they would like to find patterns for.

The yarn calculator will provide both alternative yarn as well as required amount in the new quality.

If you think it's hard to decide what size to make, it can be a good idea to measure a garment you own already and like the size of. Then you can pick the size by comparing those measures with the ones available in the pattern's size chart.

You'll find the size chart at the bottom of the pattern.

See DROPS lesson: How to read size chart

The needle size provided in the pattern serves only as a guide, the important thing is to follow the knitting tension. And since knitting tension is very individual, you will have to adjust the needle size to ensure that YOUR tension is the same as in the pattern – maybe you’ll have to adjust 1, or even 2 needle sizes, up or down to achieve the correct tension. For this, we recommend that you work test swatches.

Should you work with a different knitting tension than the one provided, the measurements of the finished garment might deviate from the measurement sketch.

See DROPS lesson: How to measure your tension/gauge

See DROPS video: How to make a tension/gauge swatch

Working a garment top-down provides more flexibility and room for personal adjustment. For example it is easier to try the garment on while working, as well as making adjustments to length of yoke and shoulder caps.

The instructions are carefully explaining every step, in the correct order. Diagrams are adjusted to the knitting direction and are worked as usual.

The diagram depicts all rows/rounds, and every stitch seen from the right side. It is read from bottom to top, from right to left. 1 square = 1 stitch.

When working back and forth, every other row is worked from the right side and every other row is worked from the wrong side. When working from the wrong side, the diagram will have to be worked reversed: from left to right, knit stitches are purled, purl stitches are knit etc.

When working in the round every round is worked from the right side and the diagram are worked from right to left on all rounds.

See DROPS lesson: How to read knitting diagrams

The diagram depicts all rows/rounds, and every stitch seen from the right side. It is worked from bottom to top, from right to left.

When working back and forth every other row is worked from the right side: from right to left and every other row is worked from the wrong side: from left to right.

When working in the round, every row in the diagram are worked from the right side, from right to left.

When working a circular diagram you start in the middle and work your way outwards, counter clockwise, row by row.

The rows usually start with a given number of chain stitches (equivalent to the height of the following stitch), this will either be depicted in the diagram or explained in the pattern.

See DROPS lesson: How to read crochet diagrams

Instructions for working several diagrams after each other on the same row/round, will often be written like so: “work A.1, A.2, A.3 a total of 0-0-2-3-4 times". This means you work A.1 once, then A.2 is worked once, and A.3 is repeated (in width) the number of times provided for your size – in this case like so: S = 0 times, M = 0 times, L=2 times, XL= 3 times and XXL = 4 times.

The diagrams are worked as usual: begin with the first row in A.1, then work the first row in A.2 etc.

See DROPS lesson: How to read knitting diagrams

See DROPS lesson: How to read crochet diagrams

The total width of the garment (from wrist-to-wrist) will be larger in the larger sizes, despite the actual sleeves being shorter. The larger sizes have longer sleeve caps and wider shoulders, so there will be a good fit in all sizes.

The measurement sketch/schematic drawing provides information regarding the full length of the garment. If it’s a jumper or a jacket the length is measured from the highest point on the shoulder closest to the neckline, and straight down to the bottom of the garment. It is NOT measured from the tip of shoulder. Similarly, the length of yoke is measured from the highest point on the shoulder and down to where yoke is split into body and sleeves.

On a jacket measures are never taken along bands, unless specifically stated. Always measure inside band stitches when measuring the length.

See DROPS lesson: How to read a schematic drawing

Diagrams are often repeated on the round or in height. 1 repeat is the diagram the way it appears in the pattern. If it says to work 5 repeats of A.1 in the round, then you work A.1 a total of 5 times after/next to each other in the round. If it says to work 2 repeats of A.1 vertically/in height you work the entire diagram once, then begin again at the start and work the entire diagram one more time.

Chain stitches are slightly narrower than other stitches and to avoid working the cast-on edge too tight, we simply chain more stitches to begin with. The stitch count will be adjusted on the following row to fit the pattern and measurement sketch.

The rib edge is more elastic and will contract slightly compared to, for example, stocking stitch. By increasing before the rib edge, you avoid a visible difference in width between the rib edge and the rest of the body.

It’s very easy to cast off too tightly, and by making yarn overs while casting off (and simultaneously casting these off) you avoid a too tight cast off edge.

See DROPS video: How to bind off with yarn overs (yo)

To achieve an even increase (or decrease) you can increase on, for example: every 3rd and 4th row alternately, like so: work 2 rows and increase on the 3rd row, work 3 rows and increase on the 4th. Repeat this until the increase is complete.

See DROPS lesson: Increase or decrease 1 st on every 3rd and 4th row alternately

Should you prefer to work in the round instead of back and forth, you may of course adjust the pattern. You’ll need to add steeks mid-front (usually 5 stitches), and follow the instructions. When you would normally turn and work from the wrong side, simply work across the steek and continue in the round. At the end you’ll cut the piece open, pick up stitches to work bands, and cover the cut edges.

See DROPS video: How to knit steeks and cut open

Should you prefer to work back and forth instead of in the round, you may of course adjust the pattern so you work the pieces separately and then assemble them at the end. Divide the stitches for the body in 2, add 1 edge stitch in each side (for sewing) and work the front and back pieces separately.

See DROPS lesson: Can I adapt a pattern for circular needles into straight needles?

Pattern repeats can vary slightly in the different sizes, in order to get the correct proportions. If you’re not working the exact same size as the garment in the photo, yours might deviate slightly. This has been carefully developed and adjusted so that the complete impression of the garment is the same in all sizes.

Make sure to follow instructions and diagrams for your size!

If you have found a pattern you like which is available in women’s size it’s not very difficult to convert it to men’s size. The biggest difference will be the length of sleeves and body. Start working on the women size that you think would fit across the chest. The additional length will be worked right before you cast off for the armhole/sleeve cap. If the pattern is worked top-down you can add the length right after the armhole or before the first decrease on sleeve.

Regarding additional yarn amount, this will depend on how much length you add, but it is better with a skein too many than too few.

All yarns will have excess fibres (from production) that might come off as lint or shedding. Brushed yarns (ie hairier yarns) have more of these loose, excess fibres, causing more shedding.

Shedding also depends on what is worn under or over the garment, and whether this pulls at the yarn fibres. It’s therefore not possible to guarantee that there will be no shedding

Below are some tips on how to get the best result when working with hairier yarns:

1. When the garment is finished (before you wash it) shake it vigorously so the looser hairs come off. NOTE: do NOT use a lint roller, brush or any method that pulls at the yarn.

2. Place the garment in a plastic bag and put it in your freezer - the temperature will cause the fibres to become less attached to each other, and excess fibres will come off easier.

3. Leave in the freezer for a few hours before taking it out and shaking it again.

4. Wash the garment according to the instructions on the yarn label.

Pilling is a natural process that happens to even the most exclusive of fibers. It's a natural sign of wear and tear that is hard to avoid, and that is most visible in high friction areas of your garment like a sweater's arms and cuffs.

You can make your garment look as new by removing the pilling, using a fabric comb or a pill/lint remover.

Still can't find the answer you need? Then scroll down and leave your question so one of our experts can try to help you. This will be done normally within 5 to 10 working days.
In the meantime, you can read the questions and answers that others have left to this pattern or join the DROPS Workshop on Facebook to get help from fellow knitters/crocheters!

You might also like...

Post a comment to pattern DROPS 236-29

We would love to hear what you have to say about this pattern!

If you want to leave a question, please make sure you select the correct category in the form below, to speed up the answering process. Required fields are marked *.

Comments / Questions (35)

country flag Sharon wrote:

When casting off for the sleeve cap, do I knit a row without casting off when it says cast off 1 stitch 0 times, or move on to casting off 2 stitches each time until 50cm?

21.03.2024 - 12:26

DROPS Design answered:

Dear Sharon, When the number is 0 for your size, you should go to the next step of the instruction. So, in this case you should move on to casting off 2 stitches. Happy Knitting!

21.03.2024 - 13:40

country flag Angelika Musiolik wrote:

Hallo, ich habe den "Blue Diamant " mit der Originalwolle gestrickt. Das Ergebnis war super und die Maschenprobe stimmte. Leider wird er immer breiter (nicht länger). Woran könnte das liegen? Liebe Grüße Angelika

01.03.2024 - 17:50

DROPS Design answered:

Liebe Angelika, sollte Ihre Maschenprobe stimmen, dann sollten Sie die richtigen Maßen genau wie bei der Maßskizze haben, dh genauso breit. Pflegehinweise finden Sei bei der Farbkarte. Viel Spaß beim Stricken!

04.03.2024 - 07:18

country flag Gaëtan wrote:

Bonjour , la j ai un problème comment coudre la manche à mon pull il est arrondi pour la tête de manche mais ça rime pas ? Merci

27.10.2023 - 23:13

DROPS Design answered:

Bonjour Gaëtane, le milieu sous la manche doit correspondre au milieu des mailles rabattues pour les emmanchures, placez votre manche ici, le milieu du haut de la manche doit être au niveau de la couture d'épaules, épinglez si besoin puis cousez simplement la manche en commençant par le milieu sous la manche en remontant jusqu'à l'épaule puis en redescendant. Bon assemblage!

28.10.2023 - 09:12

country flag Isabelle wrote:

Bonjour, Après avoir rabattu les 3 m de chaque côté du rang pour la manche , est-ce qu on rabat tout de suite après 2x 2 m pour la tête de manche ? Merci

23.10.2023 - 12:28

DROPS Design answered:

Bonjour Isabelle, effectivement, quand vous avez rabattu 3 mailles de chaque côté, rabattez 2 mailles au début des 4-4-6-6-8-8 rangs suivants (= 2-2-3-3-4-4 fois de chaque côté), puis 1 maille de chaque côté en fonction de la taille, puis 2 mailles au début de chaque rang de chaque côté jusqu'à ce que la manche mesure 50 cm (le nombre de fois va dépendre de votre tension en hauteur, veillez juste à avoir rabattu le même nombre de mailles de chaque côté) et enfin rabattez 3 mailles au début des 2 rangs suivants et rabattez les mailles restantes. Bon tricot!

24.10.2023 - 08:43

country flag Gaetane wrote:

Bonjour , diminuer 4 mailles dans les mailles endroit mailles de chaque A.2 et A.5 / A.3 et A.6 = il reste 27-29-30-32-33-35 mailles pour l’épaule. Ça veut tu dire diminuer 4 m dans A3 et 4m dans A6 = alors 8 m de chaque côté d épaule c est ça ? Pour arriver à 27 m ! Merci

15.10.2023 - 23:15

DROPS Design answered:

Bonjour Gaetane, tout à fait, on va diminuer 4 m dans A.2 et 4 m dans A.5 (et 4 m dans A.3 et 4 m dans A.6 pour l'autre épaule). Bon tricot!

16.10.2023 - 10:11

country flag Gaetane wrote:

Bonjour , pour le devant, diminuer 12 m .dans les m de A4 , A intervalle régulier , serait-ce je diminues 12 1ère m dans A4 , au début du rang endroit et après je mets 32 m en attente ? Et je continue les autres m, pour l épaule etc,, ? Merci 🙏

14.10.2023 - 17:09

DROPS Design answered:

Bonjour Gaetane, en fonction du niveau de A.4 où vous en êtes, vous avez différentes sections en mailles endroit - ce sont dans ces sections en mailles endroit que vous devez diminuer 12 mailles en une seule fois, avant de mettre les mailles en attente, autrement dit, tricotez A.4 en diminuant 12 mailles (uniquement dans les mailles endroit) et, au rang suivant, glissez les 32 mailles centrales en attente (il ne va rester que 2 mailles de A.4 de chaque côté. Rabattez ensuite au début de chaque rang à partir de l'encolure comme indiqué. Bon tricot!

16.10.2023 - 09:19

country flag Caroline wrote:

De haakjes bij patroon A3 staan verkeerd volgens mij.

23.09.2023 - 19:23

country flag Gaetane wrote:

Bonjour j ai très bien réussit ce modèle ! Puis-je le faire avec un col roulé en respectant le patron tel quel ? Merci 😊

17.09.2023 - 16:14

DROPS Design answered:

Bonjour Gaetane, tout à fait, tricotez simplement la hauteur de côtes souhaitée pour votre col avant de rabattre. Bon tricot!

18.09.2023 - 15:44

country flag Gaetane wrote:

Bonjour ! Puis-je avoir suite à mes questions svp ! Ça fait déjà 1 semaine que j attends votre conseil ! Merci !

14.07.2023 - 13:06

DROPS Design answered:

Bonjour, votre question a ete deja repondue. Excusez-nous la reponse tardive, mais nous sommes actuellement en periode de vacances. Bon tricot!

15.07.2023 - 15:51

country flag Isabelle wrote:

Hello ! Est-ce que ça veut dire on rabat 2 fois 2 m de chaque côté reparti sur 4 rang ? Et après on continue rabattre 2 m de chaque côté à tous les rangs jusqu’à 51 cm ? C est la même chose non ? Merci

08.07.2023 - 11:25

DROPS Design answered:

Bonjour Isabelle, rabattre 2 fois 2 mailles de chaque cote signifie rabattre 2 mailles en debut de rang sur 4 rangs (8 mailles diminuees). Deuxieme question: après on continue rabattre 2 m de chaque côté à tous les rangs jusqu’à 50 cm. Ensuite rabattre 3 mailles de chaque côté, puis rabattre les mailles restantes. La manche mesure 51 cm dans toutes les tailles. Bon tricot!

25.07.2023 - 12:50