DROPS Nord
DROPS Nord
45% Alpaca, 30% Polyamide, 25% Wool
from 2.70 £ /50g
DROPS Kid-Silk
DROPS Kid-Silk
75% Mohair, 25% Silk
from 4.60 £ /25g
Get the yarn to make this pattern from 41.90£.

The yarn cost is calculated from the pattern’s smallest size and the yarn’s cheapest product type. Looking for an even better price? You might find it on the DROPS Deals!

DROPS SS24

Woodland Pixie

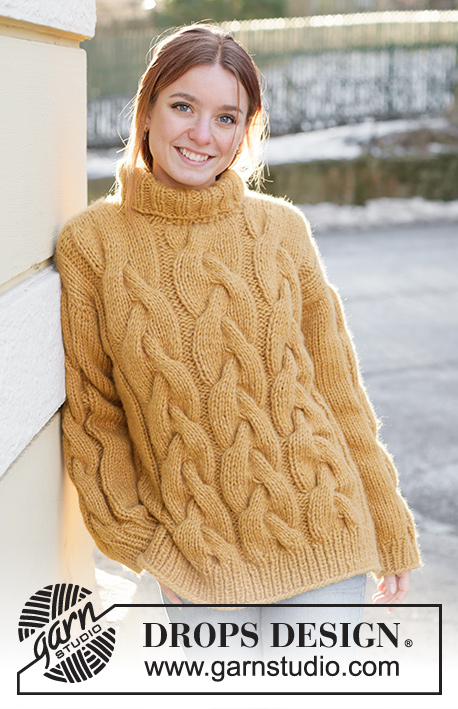
Knitted jumper with hood in DROPS Nord and DROPS Kid-Silk. Piece is knitted bottom up in garter stitch with vent in the neck and vents in the sides. Size: S - XXXL

DROPS 237-5
DROPS design: Pattern no-063
Yarn group A + A or C
----------------------------------------------------------

SIZE:
S - M - L - XL - XXL - XXXL

MATERIALS:
DROPS NORD from Garnstudio (belongs to yarn group A)
350-350-400-450-500-500 g colour 22, chestnut
And use:
DROPS KID-SILK from Garnstudio (belongs to yarn group A)
125-150-150-175-200-200 g colour 42, almond

DROPS BUTTON NO 525: 4 pieces for all sizes

NEEDLES:
DROPS SINGLE POINTED NEEDLES SIZE 5 mm

KNITTING TENSION:
17 stitches in width and 33 rows vertically in garter stitch and 1 strand of each quality = 10 x 10 cm.
NOTE! Remember that needle size is only a suggestion. If you have too many stitches on 10 cm switch to larger needles. If you have too few stitches on 10 cm switch to smaller needles.

-------------------------------------------------------

Alternative Yarn – See how to change yarns here
Yarn Groups A to F – Use the same pattern and change the yarn here
Yarn usage using an alternative yarn – Use our yarn converter here

-------------------------------------------------------

DROPS Nord
DROPS Nord
45% Alpaca, 30% Polyamide, 25% Wool
from 2.70 £ /50g
DROPS Kid-Silk
DROPS Kid-Silk
75% Mohair, 25% Silk
from 4.60 £ /25g
Get the yarn to make this pattern from 41.90£.

The yarn cost is calculated from the pattern’s smallest size and the yarn’s cheapest product type. Looking for an even better price? You might find it on the DROPS Deals!

Pattern instructions

NOTE: This pattern is written in British English. All measurements in charts are in cm. For conversion from cm to inches - click here. There are different terms for crocheting in British and American English. If this pattern includes crochet, click for "crochet terms" here. For this pattern in American English, please click here.
----------------------------------------------------------

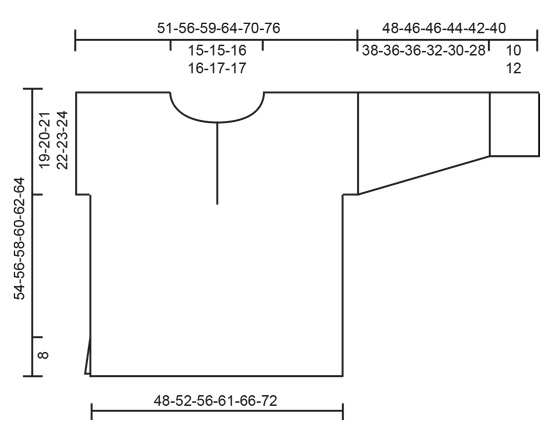
EXPLANATION FOR THE PATTERN:

----------------------------------------------------------

GARTER STITCH (back and forth):
Knit all rows.
1 ridge vertically = knit 2 rows.

PATTERN:
See diagram A.1. Diagrams show all rows in pattern seen from the right side.

MEASURING TIP:
Because of the texture all length measurements should be done by holding the piece up.

BUTTONHOLES:
Cast off for buttonholes on right band along neck vent, from right side as follows: Knit 2, knit 2 together, make 1 yarn over. On next row (wrong side) knit the yarn over to make a hole.
Decrease for buttonholes when neck vent measures:
S-M: 2, 6, 10 and 14 cm
L-XL: 3, 7, 11 and 15 cm
XXL-XXXL: 1, 6, 11 and 16 cm

DECREASE TIP (applies to top of hood):
Begin 4 stitches before marker thread and knit 2 together, knit 4 (marker thread is between these 4 stitches), slip 1 stitch knitwise, knit 1, pass slipped stitch over stitch worked (2 stitches decreased).

----------------------------------------------------------

START THE PIECE HERE:

----------------------------------------------------------

JUMPER - SHORT OVERVIEW OF THE PIECE:
Front piece and back piece are worked back and forth, bottom up. Front piece is divided for neck vent, finish each part separately. Sew piece together on the shoulders. Work up to stitches for sleeves. Work sleeves back and forth, top down. Sew piece together in the sides and under the sleeves. Then pick up stitches around the neck, and knit a hood.

BACK PIECE:
Cast on somewhat loosely 81-89-95-103-113-123 stitches on single pointed needle size 5 mm with 2 strands DROPS Nord and 1 strand DROPS Kid-Silk (3 strands). Remove 1 strand DROPS Nord - work the rest of back piece with 1 strand of each quality (2 strands).
Work in GARTER STITCH - read explanation above. REMEMBER THE KNITTING TENSION!
When piece measures 35-36-37-38-39-40 cm - read MEASURING TIP, cast on 3 new stitches at the end of the next 2 rows = 87-95-101-109-119-129 stitches.
When piece measures 52-54-56-58-60-62 cm, cast off the middle 21-21-23-23-25-25 stitches for neck, and finish each shoulder separately. Continue in garter stitch and cast off for neck at every row from the neck as follows: Cast off 1 stitch 2 times = 31-35-37-41-45-50 stitches remain on shoulder. Work until piece measures 54-56-58-60-62-64 cm - remember MEASURING TIP. Cast off somewhat loosely with 2 strands DROPS Nord and 1 strand DROPS Kid-Silk (3 strands).

FRONT PIECE:
Cast on the same number of stitches as on back piece, and work as back piece until piece measures 33-35-35-37-37-39 cm.

NECK VENT:
Now divide piece mid front for neck vent on next row from right side as follows: Knit 38-42-45-49-54-59, slip stitches on a thread (left front piece).
Knit the next 5 stitches, purl 1, knit the rest of row = 43-47-50-54-59-64 stitches on needle (right front piece).
Then work right front piece as explained below:

RIGHT FRONT PIECE:
Work in garter stitch back and forth but purl 6th stitch from mid front from wrong side/right side on every row (opposite of garter stitch = marked edge). Remember BUTTONHOLES - read explanation above.
AT THE SAME TIME when piece measures 35-36-37-38-39-40 cm, cast on 3 new stitches at the end of row towards the side = 46-50-53-57-62-67 stitches.
When piece measures 48-50-51-53-54-56 cm (1 cm after last buttonhole), slip the outermost 8-8-9-9-9-9 stitches towards mid front on a thread for neck on next row from right side, work them before slipping them on the thread to avoid cutting the yarn.
Continue to cast off for neck at beginning of every row from neck as follows: Cast off 2 stitches 2 times and 1 stitch 3-3-3-3-4-4 times = 31-35-37-41-45-50 stitches remain on shoulder. Work until piece measures 54-56-58-60-62-64 cm - remember MEASURING TIP. Cast off somewhat loosely with 2 strands DROPS Nord and 1 strand DROPS Kid-Silk (3 strands).

LEFT FRONT PIECE:
Slip the 38-42-45-49-54-59 stitches from thread on left front piece back on single pointed needles size 5 mm (without working the stitches), pick up 1 stitch in each of the 5 band stitches on right front piece, but pick up behind the 5 band stitches so that left front piece is behind right front piece = 43-47-50-54-59-64 stitches.
Continue to work the same way as right front piece but reversed (do not cast off for buttonholes on left band).
When piece measures 48-50-51-53-54-56 cm, and last row had been worked from right side, cut the yarn. Turn piece, slip the first 8-8-9-9-9-9 stitches towards mid front on a thread for neck, then continue as before over the remaining stitches.
AT THE SAME TIME cast off for neck at the beginning of every row from neck as follows: Cast off 2 stitches 2 times and 1 stitch 3-3-3-3-4-4 times = 31-35-37-41-45-50 stitches remain on shoulder. Work until piece measures 54-56-58-60-62-64 cm - remember MEASURING TIP. Cast off somewhat loosely with 2 strands DROPS Nord and 1 strand DROPS Kid-Silk (3 strands).


ASSEMBLY-1:
Sew the shoulder seams.

SLEEVES:
Pick up from right side inside 1 stitch, 64-68-72-74-78-82 stitches along one armhole on single pointed needles size 5 mm with 1 strand of each quality (2 strands). Insert 1 marker on first row - measure sleeve from this marker.
Work in garter stitch back and forth. When sleeve measures 3-3-3-3-2-2 cm from marker, decrease 1 stitch in each side (decrease 1 stitch by knitting 2 together inside outermost stitch in garter stitch). Decrease like this every 3-2½-2½-2-2-1½ cm 11-12-13-13-14-15 times in total in each side = 42-44-46-48-50-52 stitches.
Work until sleeve measures 36-34-34-30-28-26 cm from marker- remember MEASURING TIP. Work A.1. After A.1 work in garter stitch until finished measurements. Work until sleeve measures 48-46-46-44-42-40 cm from marker (or desired length). Cast off somewhat loosely with 2 strands DROPS Nord and 1 strand DROPS Kid-Silk. Work the other sleeve the same way.

ASSEMBLY-2:
Sew underarm and side seams in one – sew in outer loop of edge stitch but leave approx. 8 cm at the bottom in each side of front/back piece (vents).
Sew the buttons on to the left band along neck vent.

HOOD:
Cast on 5 stitches on single pointed needles size 5 mm with 1 strand of each quality (2 strands), then pick up from right side approx. 62 to 72 stitches around the neck (including stitches on threads at the front), then cast on 5 stitches at the end of row = approx. 72 to 82 stitches.
Work in garter stitch back and forth but purl 6th stitch from each side from wrong side/right side on every row.
When 2 ridges have been worked, increase evenly to 94-98-102-106-108-112 stitches (do not increase over the outermost 6 stitches in each side).
Continue in garter stitch with 6th stitch in from each side in opposite garter stitch.
When hood measures 31-32-33-34-35-36, insert 1 marker thread in the middle of piece.
On next row from right side decrease 1 stitch on each side of marker thread – read DECREASE TIP. Decrease like this on every row from right side 5 times in total = 84-88-92-96-98-102 stitches.
Then cast off all stitches with 2 strands DROPS Nord and 1 strand DROPS Kid-Silk (3 strands). Hood measures approx. 34-35-36-37-38-39 cm.
Place the hood double and sew it together at the on top. Fold the outermost 5 stitch along the hood out towards the right side and fasten the edge neatly in each side.

Diagram

symbols = knit from the right side, purl from the wrong side
symbols = purl from right side
diagram
diagram

Each of our patterns has specific tutorial videos to help you.

Do you have a question? See a list of frequently asked questions (FAQ)

Knitting tension is what determines the final measurements of your work, and is usually measured per 10 x 10 cm. It is provided like so: number of stitches in width x number of rows in height - eg: 19 stitches x 26 rows = 10 x 10 cm.

The knitting tension is very individual; some people knit/crochet loosely while others work tightly. You adjust the knitting tension with the needle size, which is why the suggested needle size is only meant as a guide! You need to adjust this (up or down) to ensure that YOUR knitting tension matches the knitting tension provided in the pattern. If you work with a different knitting tension than provided you will have a different yarn consumption, and your work will have different measurements than what the pattern suggests.

The knitting tension also determines which yarns can replace each other. As long as you achieve the same knitting tension you can replace one yarn with another.

See DROPS lesson: How to measure your tension/gauge

See DROPS video: How to make a gauge tension swatch

The required amount of yarn is provided in grams, eg: 450 g. To calculate how many balls you’ll need you first need to know how many grams are in 1 ball (25g, 50g or 100g). This information is available if you click on the individual yarn quality on our pages. Divide the amount required with the amount of each ball. For example, if each ball is 50g (the most common amount), the calculation will be as follows: 450 / 50 = 9 balls.

The important thing when changing from one yarn to another is that the knitting/crochet tension remains the same. This is so that the measurements of the finished piece will be the same as on the sketch provided. It is easier to achieve the same knitting tension using yarns from the same yarn group. It is also possible to work with multiple strands of a thinner yarn to achieve the knitting tension of a thicker one. Please try our yarn converter. We recommend you to always work a test swatch.

Please NOTE: when changing yarn the garment might have a different look and feel to the garment in the photo, due to individual properties and qualities of each yarn.

See DROPS lesson: Can I use a different yarn than the one mentioned in the pattern?

All our yarns are categorised into yarn groups (from A to F) according to thickness and knitting tension – group A contains the thinnest yarns and group F the thickest. This makes it easier for you to find alternative yarns to our patterns, should you wish to switch yarn. All yarns within the same group have a similar knitting tension and can easily replace each other. However, different yarn qualities have different structures and properties which will give the finished work a unique look and feel.

Click here for an overview of the yarns in each yarn group

At the top of all our patterns you’ll find a link to our yarn calculator, which is a helpful tool should you wish to use a different yarn than suggested. By filling in the yarn quality you wish to replace, the amount (in your size) and number of strands, the calculator will present good alternative yarns with the same knitting tension. Additionally it will tell you how much you’ll require in the new qualities and whether you’ll need to work with multiple strands. Most skeins are 50g (some are 25g or 100g).

If the pattern is worked with multiple colours, every colour will have to be calculated separately. Similarly, if the pattern is worked with several strands of different yarns (for example 1 strand Alpaca and 1 strand Kid-Silk) you will have to find alternatives for each, individually.

Click here to see our yarn calculator

Since different yarns have different qualities and textures we have chosen to keep the original yarn in our patterns. However, you can easily find options among our available qualities by using our yarn calculator, or simply pick a yarn from the same yarn group.

It is possible that some retailers still have discontinued yarns in stock, or that someone has a few skeins at home that they would like to find patterns for.

The yarn calculator will provide both alternative yarn as well as required amount in the new quality.

If you think it's hard to decide what size to make, it can be a good idea to measure a garment you own already and like the size of. Then you can pick the size by comparing those measures with the ones available in the pattern's size chart.

You'll find the size chart at the bottom of the pattern.

See DROPS lesson: How to read size chart

The needle size provided in the pattern serves only as a guide, the important thing is to follow the knitting tension. And since knitting tension is very individual, you will have to adjust the needle size to ensure that YOUR tension is the same as in the pattern – maybe you’ll have to adjust 1, or even 2 needle sizes, up or down to achieve the correct tension. For this, we recommend that you work test swatches.

Should you work with a different knitting tension than the one provided, the measurements of the finished garment might deviate from the measurement sketch.

See DROPS lesson: How to measure your tension/gauge

See DROPS video: How to make a tension/gauge swatch

Working a garment top-down provides more flexibility and room for personal adjustment. For example it is easier to try the garment on while working, as well as making adjustments to length of yoke and shoulder caps.

The instructions are carefully explaining every step, in the correct order. Diagrams are adjusted to the knitting direction and are worked as usual.

The diagram depicts all rows/rounds, and every stitch seen from the right side. It is read from bottom to top, from right to left. 1 square = 1 stitch.

When working back and forth, every other row is worked from the right side and every other row is worked from the wrong side. When working from the wrong side, the diagram will have to be worked reversed: from left to right, knit stitches are purled, purl stitches are knit etc.

When working in the round every round is worked from the right side and the diagram are worked from right to left on all rounds.

See DROPS lesson: How to read knitting diagrams

The diagram depicts all rows/rounds, and every stitch seen from the right side. It is worked from bottom to top, from right to left.

When working back and forth every other row is worked from the right side: from right to left and every other row is worked from the wrong side: from left to right.

When working in the round, every row in the diagram are worked from the right side, from right to left.

When working a circular diagram you start in the middle and work your way outwards, counter clockwise, row by row.

The rows usually start with a given number of chain stitches (equivalent to the height of the following stitch), this will either be depicted in the diagram or explained in the pattern.

See DROPS lesson: How to read crochet diagrams

Instructions for working several diagrams after each other on the same row/round, will often be written like so: “work A.1, A.2, A.3 a total of 0-0-2-3-4 times". This means you work A.1 once, then A.2 is worked once, and A.3 is repeated (in width) the number of times provided for your size – in this case like so: S = 0 times, M = 0 times, L=2 times, XL= 3 times and XXL = 4 times.

The diagrams are worked as usual: begin with the first row in A.1, then work the first row in A.2 etc.

See DROPS lesson: How to read knitting diagrams

See DROPS lesson: How to read crochet diagrams

The total width of the garment (from wrist-to-wrist) will be larger in the larger sizes, despite the actual sleeves being shorter. The larger sizes have longer sleeve caps and wider shoulders, so there will be a good fit in all sizes.

The measurement sketch/schematic drawing provides information regarding the full length of the garment. If it’s a jumper or a jacket the length is measured from the highest point on the shoulder closest to the neckline, and straight down to the bottom of the garment. It is NOT measured from the tip of shoulder. Similarly, the length of yoke is measured from the highest point on the shoulder and down to where yoke is split into body and sleeves.

On a jacket measures are never taken along bands, unless specifically stated. Always measure inside band stitches when measuring the length.

See DROPS lesson: How to read a schematic drawing

Diagrams are often repeated on the round or in height. 1 repeat is the diagram the way it appears in the pattern. If it says to work 5 repeats of A.1 in the round, then you work A.1 a total of 5 times after/next to each other in the round. If it says to work 2 repeats of A.1 vertically/in height you work the entire diagram once, then begin again at the start and work the entire diagram one more time.

Chain stitches are slightly narrower than other stitches and to avoid working the cast-on edge too tight, we simply chain more stitches to begin with. The stitch count will be adjusted on the following row to fit the pattern and measurement sketch.

The rib edge is more elastic and will contract slightly compared to, for example, stocking stitch. By increasing before the rib edge, you avoid a visible difference in width between the rib edge and the rest of the body.

It’s very easy to cast off too tightly, and by making yarn overs while casting off (and simultaneously casting these off) you avoid a too tight cast off edge.

See DROPS video: How to bind off with yarn overs (yo)

To achieve an even increase (or decrease) you can increase on, for example: every 3rd and 4th row alternately, like so: work 2 rows and increase on the 3rd row, work 3 rows and increase on the 4th. Repeat this until the increase is complete.

See DROPS lesson: Increase or decrease 1 st on every 3rd and 4th row alternately

Should you prefer to work in the round instead of back and forth, you may of course adjust the pattern. You’ll need to add steeks mid-front (usually 5 stitches), and follow the instructions. When you would normally turn and work from the wrong side, simply work across the steek and continue in the round. At the end you’ll cut the piece open, pick up stitches to work bands, and cover the cut edges.

See DROPS video: How to knit steeks and cut open

Should you prefer to work back and forth instead of in the round, you may of course adjust the pattern so you work the pieces separately and then assemble them at the end. Divide the stitches for the body in 2, add 1 edge stitch in each side (for sewing) and work the front and back pieces separately.

See DROPS lesson: Can I adapt a pattern for circular needles into straight needles?

Pattern repeats can vary slightly in the different sizes, in order to get the correct proportions. If you’re not working the exact same size as the garment in the photo, yours might deviate slightly. This has been carefully developed and adjusted so that the complete impression of the garment is the same in all sizes.

Make sure to follow instructions and diagrams for your size!

If you have found a pattern you like which is available in women’s size it’s not very difficult to convert it to men’s size. The biggest difference will be the length of sleeves and body. Start working on the women size that you think would fit across the chest. The additional length will be worked right before you cast off for the armhole/sleeve cap. If the pattern is worked top-down you can add the length right after the armhole or before the first decrease on sleeve.

Regarding additional yarn amount, this will depend on how much length you add, but it is better with a skein too many than too few.

All yarns will have excess fibres (from production) that might come off as lint or shedding. Brushed yarns (ie hairier yarns) have more of these loose, excess fibres, causing more shedding.

Shedding also depends on what is worn under or over the garment, and whether this pulls at the yarn fibres. It’s therefore not possible to guarantee that there will be no shedding

Below are some tips on how to get the best result when working with hairier yarns:

1. When the garment is finished (before you wash it) shake it vigorously so the looser hairs come off. NOTE: do NOT use a lint roller, brush or any method that pulls at the yarn.

2. Place the garment in a plastic bag and put it in your freezer - the temperature will cause the fibres to become less attached to each other, and excess fibres will come off easier.

3. Leave in the freezer for a few hours before taking it out and shaking it again.

4. Wash the garment according to the instructions on the yarn label.

Pilling is a natural process that happens to even the most exclusive of fibers. It's a natural sign of wear and tear that is hard to avoid, and that is most visible in high friction areas of your garment like a sweater's arms and cuffs.

You can make your garment look as new by removing the pilling, using a fabric comb or a pill/lint remover.

Still can't find the answer you need? Then scroll down and leave your question so one of our experts can try to help you. This will be done normally within 5 to 10 working days.
In the meantime, you can read the questions and answers that others have left to this pattern or join the DROPS Workshop on Facebook to get help from fellow knitters/crocheters!

You might also like...

Post a comment to pattern DROPS 237-5

We would love to hear what you have to say about this pattern!

If you want to leave a question, please make sure you select the correct category in the form below, to speed up the answering process. Required fields are marked *.

Comments / Questions (10)

country flag Gisèle wrote:

Bonjour, Ne tenez pas compte de ma demande précédente. En lisant toutes les explications du modèle et notamment celles relatives au "devant gauche", j'ai compris vos instructions. Tout est clair, il fallait tout simplement tout lire. Mille excuses.

21.10.2023 - 20:58

DROPS Design answered:

aucun souci :) la réponse à votre question se trouve ci-dessous, elle pourra peut-être aider quelqu'un d'autre. Bonne continuation et n'hésitez pas à revenir si vous avez d'autres questions.

23.10.2023 - 09:52

country flag Gisèle wrote:

Bonjour, J'ai divisé au milieu du devant l'ouvrage pour réaliser la fente d'encolure mais ne doit on pas monter des mailles pour réaliser une pate d'encolure avec ses boutonnières? Cette pate se superpose ainsi sur le devant gauche sur lequel on fixe les boutons. Il me semble que les 2 devants doivent se superposer au niveau de l'encolure . Pouvez vous m'aider? Merci.

21.10.2023 - 18:32

DROPS Design answered:

Bonjour Gisèle, on ne divise pas directement au milieu du devant mais on va avoir 5 mailles en plus pour le devant droit (ex en S: 38 pour le devant gauche que l'on met en attente et 43 pour le devant droit); lorsque le devant droit est terminé, on va (sur l'envers) relever 1 maille derrière chacune des 5 mailles de la bordure du devant droit et tricoter les 38 m en attente). Ainsi on a bien les 2 bordures qui vont pouvoir se superposer l'une au-dessus de l'autre (la droite au-dessus de la gauche). Bon tricot!

23.10.2023 - 09:49

country flag Hetty wrote:

Can you just use mohair and how many strands would you use ty

11.08.2023 - 21:11

DROPS Design answered:

Dear Hetty, you could use 2 strands DROPS Kid-Silk only, just use the yarn converter to get the new amount of yarn, if you like to work size S you will then need 250 g Kid-Silk in total (10 balls), either same color or 2 different colors (then 125 g each). Happy knitting!

14.08.2023 - 08:45

country flag Momo wrote:

Bonjour, je veux remplacer ces 2 qualités différentes par une seule : la Brushed Alpaca Silk Combien de pelotes dois je commander pour une taille L SVP ; Merci

26.07.2023 - 09:56

DROPS Design answered:

Bonjour Momo, vous avez besoin d'env. 9 pelotes de DROPS Brushed Alpaca Silk. Vous pouvez le calculer vous-meme en regardant la lecon DROPS ICI. Bon tricot!

26.07.2023 - 10:17

country flag Tal wrote:

Can I use a single strand of sport weight yarn for this sweater?

13.06.2023 - 04:01

DROPS Design answered:

Hi Tal, You can use a single strand of any yarn from group C and use the same stitch count and knitting tension. Happy crafting!

13.06.2023 - 06:43

country flag Marina wrote:

You understood my question and in reviewing the pattern I can see how it looks like a "drop" sleeve. I know what to do now. Thank you.

30.11.2022 - 18:39

country flag Marina Pezzotti wrote:

From the picture the sleeve seems to have a sort of a bell, but nothing is mentioned in the instructions. Could you please clarify?

30.11.2022 - 00:06

DROPS Design answered:

Dear Mrs Pezzoti, the jumper on the picture has been worked following the written pattern, on both front and back piece, you will cast on new stitches for shoulders, and sleeves are worked without sleeve cap (like a "drop" sleeve). Hope I didn't misunderstood your question. Happy knitting!

30.11.2022 - 08:53

country flag Hilde wrote:

Kan ik dit breien met soft tweed en kid silk ?

19.11.2022 - 17:15

DROPS Design answered:

Dag Hilde,

Soft Tweed valt onder garencategorie B en Kid Silk onder garencategorie A. Je hebt dan A + B en in het patroon staat A + A aangegeven, waardoor de stekenverhouding van jouw combinatie anders kan zijn. Je zou een proeflapje kunnen maken om te kijken of je op dezelfde stekenverhouding komt. Dan zou het wel kunnen.

20.11.2022 - 17:14

country flag Anna wrote:

I need clarification for this pattern. For a size small it requires 7x50gm balls (350gm total) of Drops Nord and 5x25gm (125gm total) of Drops Kid-Silk. I don' t see anywhere in the pattern where Drops Kid-Silk is not used. I'm confused because if I'm using Kid-Silk for all the pieces, I have 225gms less than Drops Nord. Shouldn't the yarn requirements be the same for both types of yarn?

23.09.2022 - 16:48

DROPS Design answered:

Dear Anna, the important part is not the weight but the yardage. DROPS Nord has 170 meters in each ball of 50gr, while Kid-Silk has 210 meters in each ball of 25 gr. So, 7 balls of Nord have 1190 meters in total, while 5 balls of Kid-Silk has 1050 meters in total. So the yardage is pretty similar and there will be some leftovers of DROPS Nord. Happy knitting!

25.09.2022 - 20:52

country flag Flo wrote:

Could I make this with 1 strand Safran 1 strand kid silk? I'm struggling to find non-itchy yarns for these beautiful patterns! Or could you recommend a C yarn that would work? The colour ranges are not so full in some non-itchy yarns (so many discontinued in baby alpaca silk for example). Can you offer any hope?

22.09.2022 - 15:53

DROPS Design answered:

Dear Flo, you can replace Nord with any other yarn group A, ie Safran for example would work - or you can also use any yarn group C, just remember the texture will be different depending on the yarn chosen - and always check tension as usual. Contact your DROPS Store for any individual assistance choosing the best matching combination, they will help you even per mail or telephone. Happy knitting!

23.09.2022 - 08:04