
Popular categories
Looking for a yarn?


|
||||||||||||||||||||||
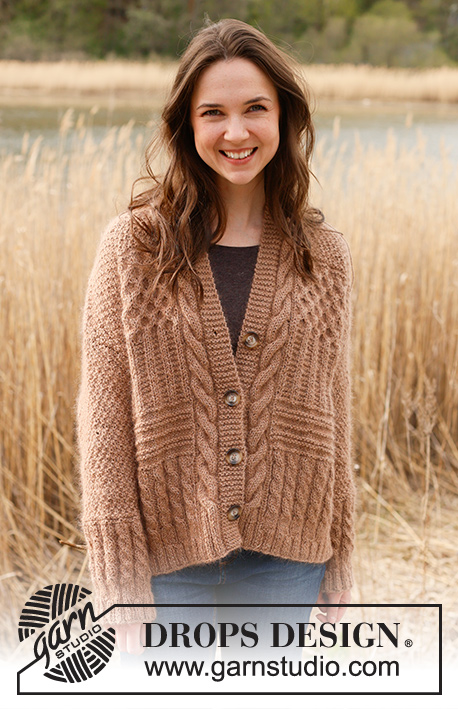
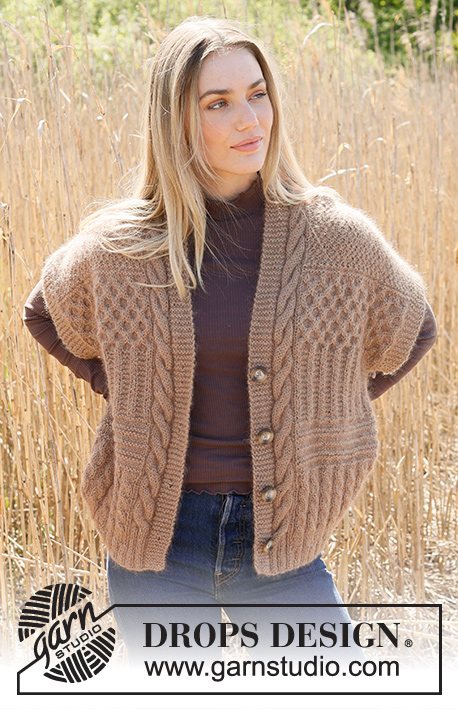
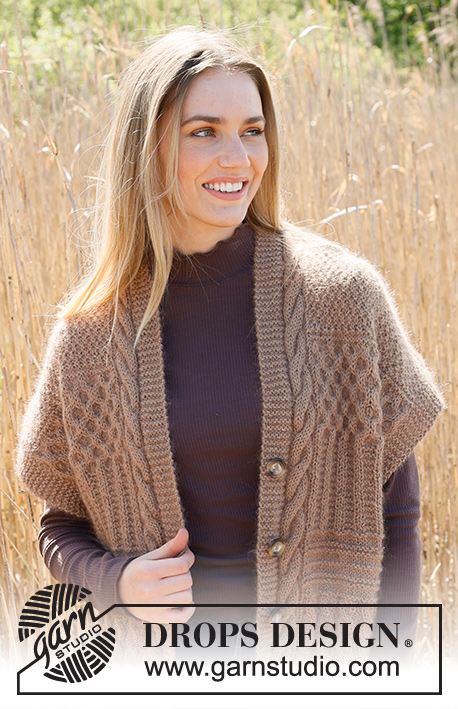
Cracked Walnuts Vest |
||||||||||||||||||||||
 |
 |
|||||||||||||||||||||
Knitted vest in DROPS Kid-Silk and DROPS Puna / DROPS Merino Extra Fine. Piece is knitted bottom up with textured pattern, ridges, cables and rib. Size XS – XXL.
DROPS 237-10 |
||||||||||||||||||||||
|
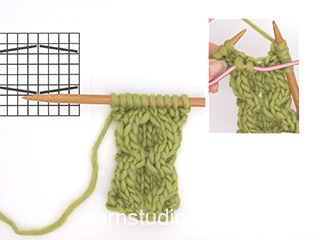
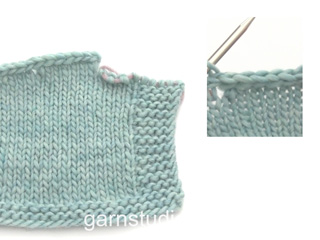
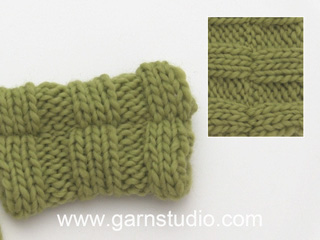
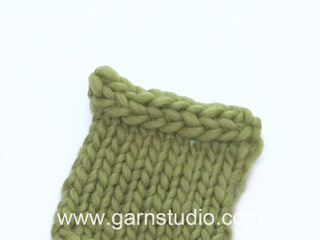
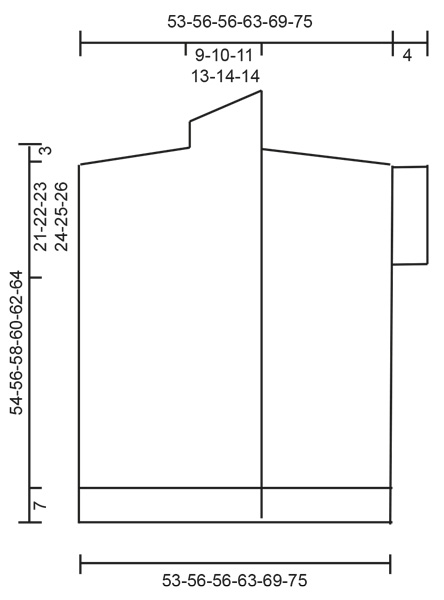
---------------------------------------------------------- EXPLANATION FOR THE PATTERN: ---------------------------------------------------------- GARTER STITCH (back and forth): Knit all rows. 1 ridge vertically = knit 2 rows. PATTERN: See diagrams A.1 to A.10. Diagrams show all rows in pattern seen from the right side. KNIT TOGETHER: FROM RIGHT SIDE: Slip 1 stitch knitwise, knit 1, pass slipped stitch over stitch worked. FROM WRONG SIDE: Purl 2 together. STOCKING STITCH: When working from wrong side, purl and when working from right side, knit. BUTTONHOLES (bottom up): Decrease for buttonholes on right band. 1 BUTTONHOLE = knit third and fourth stitch from edge together and make 1 yarn over. On next row knit yarn over to make hole. Decrease for buttonholes when piece measures: XS: 6, 14, 22 and 30 cm S: 6, 14, 22 and 30 cm M: 6, 14, 23 and 32 cm L: 7, 16, 25 and 34 cm XL: 6, 14, 22, 29 and 36 cm. XXL: 6, 14, 22, 29 and 36 cm. ---------------------------------------------------------- START THE PIECE HERE: ---------------------------------------------------------- VEST – SHORT OVERVIEW OF PIECE: Work front and back piece bottom up, back and forth in parts. BACK PIECE: Cast on 98-110-110-122-134-146 stitches on circular needle size 4 mm with 1 strand of each quality (2 strands). Purl 1 row from wrong side. Work next row as follows from right side: 1 edge stitch in GARTER STITCH – read explanation above, work A.1 until 1 stitch remain, 1 stitch in garter stitch. When A.1 has been worked 1 time vertically, work pattern as follows: 1 edge stitch in garter stitch, work A.2 until 1 stitch remains, 1 edge stitch in garter stitch. When A.2 has been worked 1 time vertically, there are 114-128-128-142-156-170 stitches on needle. Switch to circular needle size 5.5 mm. Work pattern as follows: 1 edge stitch in garter stitch, work A.3 until 1 stitch remains, 1 edge stitch in garter stitch. REMEMBER THE KNITTING TENSION! Repeat A.3 vertically until piece measures 16-17-19-19-21-22 cm. Work pattern, begin from right side as follows: 1 edge stitch in garter stitch, work A.4 until 1 stitch remains and decrease at the same time 27-36-36-40-44-48 stitches evenly, 1 edge stitch in garter stitch = 87-92-92-102-112-122 stitches. When A.4 has been worked 1 time vertically, work pattern as follows: 1 edge stitch in garter stitch, work A.5 until 1 stitch remains, 1 edge stitch in garter stitch. Repeat A.5 vertically. When piece measures 30-31-32-33-34-35 cm, cast on 6 new stitches at the end of the next 2 rows = 99-104-104-114-124-134 stitches. Work the new stitches in garter stitch until finished measurements. Continue pattern like this until piece measures 33-35-36-38-39-41 cm. Work pattern, begin from right side as follows: 7 stitches in garter stitch, work A.6 until 7 stitches remain, 7 stitches in garter stitch. When A.6 has been worked 1 time vertically, there are 150-158-158-174-190-206 stitches on needle. Work pattern as follows: 7 stitches in garter stitch, work A.7 until 7 stitches remain, 7 stitches in garter stitch. Work A.7 3 times in total vertically. Piece measures approx. 45-47-48-50-51-53 cm. Work pattern as follows: 7 stitches in garter stitch, work A.8 until 7 stitches remain and decrease at the same time 51-54-54-60-66-72 stitches evenly, 7 stitches in garter stitch = 99-104-104-114-124-134 stitches. When A.8 has been worked 1 time vertically, work A.8a vertically until finished measurements. When piece measures 49-51-53-55-57-59 cm, cast off the middle 13-14-16-18-20-20 stitches and finish each shoulder (43-45-44-48-52-57 stitches) separately. On next row from neck cast off 1 stitch at the beginning of row = 42-44-43-47-51-56 stitches. On next row from the neck cast off the first 7 stitches = 35-37-36-40-44-49 stitches. Then work diagonal shoulder, begin on next row from the neck as follows: * Work pattern as before until 8-9-9-10-11-12 stitches remain, turn and work back *, work from *-* 3 times in total. I.e. work 8-9-9-10-11-12 stitches less on every row from the neck. On last row towards neck, cast on 2 new stitches at the end of row = 37-39-38-42-46-51 stitches. Now work and cast off with an edge over shoulder stitches. Work stitches cast on with shoulder stitches as follows: Work * 1 stitch in STOCKING STITCH – read explanation above, work next stitch together with first/next stitch from shoulder – read KNIT TOGETHER, pass the 2 stitches back on the needle they came from with strand on wrong side of piece, make sure not to tighten yarn too much *, work from *-* until all stitches from shoulder have been worked together with the 2 new stitches that were cast on. Cast off the 2 stitches. Work the other shoulder the same way. RIGHT FRONT PIECE: Cast on 61-67-67-73-79-85 stitches on circular needle size 4 mm with 1 strand of each quality. Purl until 7 stitches remain, 7 band stitches in garter stitch. On next row from right side work pattern as follows: 7 band stitches in garter stitch, work A.9, purl 1-0-0-1-0-1, knit 1-0-0-1-0-1, work A.1 until 1 stitch remains, 1 edge stitch in garter stitch. When A.1 has been worked 1 time vertically, work pattern from right side as follows: 7 band stitches in garter stitch, A.9 as before, work A.2 until 1 stitch remains, 1 edge stitch in garter stitch. Decrease for BUTTONHOLES - read explanation above. When A.2 has been worked 1 time vertically, there are 70-77-77-84-91-98 stitches on needle. Switch to circular needle size 5.5 mm. Work pattern as follows: 7 band stitches in garter stitch, A.9a, make 1 yarn over (this is done so that the pattern is the same mid front on both front pieces), work A.3 until 1 stitch remains, 1 edge stitch in garter stitch = 71-78-78-85-92-99 stitches. Knit yarn over twisted on next row, then purl from right side and knit from wrong side. Repeat A.3 vertically until piece measures 16-17-19-19-21-22 cm. Work pattern, begin from right side as follows: 7 band stitches in garter stitch, A.9a as before, work A.4 until 1 stitch remains and decrease at the same time 15-17-17-19-21-23 stitches evenly, 1 edge stitch in garter stitch = 56-61-61-66-71-76 stitches. When A.4 has been worked 1 time vertically, work pattern as follows: 7 band stitches in garter stitch, A.9a as before, work A.5 until 1 stitch remains, 1 edge stitch in garter stitch. Repeat A.5 vertically. When piece measures 30-31-32-33-34-35 cm, cast on 6 new stitches at the end of next row from right side = 62-67-67-72-77-82 stitches. Work the new stitches in garter stitch until finished measurements. Continue pattern like this until piece measures 33-35-36-38-39-41 cm. Work pattern, begin from right side as follows: 7 band stitches in garter stitch, A.9a as before, work A.6 until 7 stitches remain, 7 stitches in garter stitch. When A.6 has been worked 1 time vertically, there are 83-91-91-99-107-115 stitches on needle. Work pattern as follows: 7 band stitches in garter stitch, A.9a as before, work A.7 until 7 stitches remain, 7 stitches in garter stitch. Work A.7 3 times in total vertically. Piece measures approx. 45-47-48-50-51-53 cm. Work pattern as follows: 7 band stitches in garter stitch, A.9a as before, work A.8 until 7 stitches remain and decrease at the same time 21-24-24-27-30-33 stitches evenly, 7 stitches in garter stitch = 62-67-67-72-77-82 stitches. When A.8 has been worked 1 time vertically, work A.8a vertically until finished measurements. When piece measures 50-52-54-56-58-60 cm, cast off the first 7 stitches on next row from wrong side = 55-60-60-65-70-75 stitches. Then work diagonal shoulder, begin on next row from the neck as follows: * Work pattern as before until 8-9-9-10-11-12 stitches remain, turn and work back *, work from *-* 3 times in total. I.e. work 8-9-9-10-11-12 stitches less on every row from the neck. On last row towards the neck work until 20-23-24-25-26-26 stitches remain, slip the last 20-23-24-25-26-26 stitches on a thread for shawl collar and cast on 2 new stitches on needle = 37-39-38-42-46-51 stitches. Now work and cast off with an edge over shoulder stitches. Work stitches cast on with shoulder stitches as follows: Work * 1 stitch in stocking stitch, work next stitch together with first/next stitch from shoulder – remember KNIT TOGETHER, pass the 2 stitches back on the needle they came from with strand on wrong side of piece, make sure not to tighten yarn too much *, work from *-* until all stitches from shoulder have been worked together with the 2 new stitches that were cast on. Cast off the 2 stitches. SHAWL COLLAR: Slip the 20-23-24-25-26-26 stitches from stitch holder on circular needle size 5.5 mm. Work as follows, begin from wrong side: 0-2-3-3-5-5 stitches in garter stitch, knit over knit and purl over purl until 7 stitches remain, 7 band stitches in garter stitch. Continue like this (i.e. cables are done) and work short rows as follows: ROW 1 (= right side): Work the first 16-19-20-21-22-22 stitches, turn and tighten yarn. ROW 2 (= wrong side): Work 16-19-20-21-22-22 stitches. ROW 3 (= right side): Work over all stitches, turn and tighten yarn. ROW 4 (= wrong side): Work over all stitches. Work 1st to 4th row until shawl collar measures approx. 7-8-8-9-9-9 cm on the shortest. Work 1 ridge over all stitches. Cast off. LEFT FRONT PIECE: Cast on 61-67-67-73-79-85 stitches on circular needle size 4 mm with 1 strand of each quality. Work 7 band stitches in garter stitch, purl the rest of row. On next row from right side work pattern as follows: 1 edge stitch in garter stitch, work A.1 until 20-18-18-20-18-20 stitches remain, knit 1-0-0-1-0-1, purl 1-0-0-1-0-1, A.10, 7 band stitches in garter stitch. When A.1 has been worked 1 time vertically, work pattern from right side as follows: 1 edge stitch in garter stitch, work A.2 until 18 stitches remain, A.10 as before, 7 band stitches in garter stitch. When A.2 has been worked 1 time vertically, there are 70-77-77-84-91-98 stitches on needle. Switch to circular needle size 5.5 mm. Work pattern as follows: 1 edge stitch in garter stitch, work A.3 until 20 stitches remain, A.10a, 7 band stitches in garter stitch. Repeat A.3 vertically until piece measures 16-17-19-19-21-22 cm. Work pattern, begin from right side as follows: 1 edge stitch in garter stitch, work A.4 until 20 stitches remain and decrease at the same time 14-16-16-18-20-22 stitches evenly, A.10a as before, 7 band stitches in garter stitch = 56-61-61-66-71-76 stitches. When A.4 has been worked 1 time vertically, work pattern as follows: 1 edge stitch in garter stitch, work A.5 until 20 stitches remain, A.10a as before, 7 band stitches in garter stitch. Repeat A.5 vertically. When piece measures 30-31-32-33-34-35 cm, cast on 6 new stitches at the end of next row from wrong side = 62-67-67-72-77-82 stitches. Work the new stitches in garter stitch until finished measurements. Continue pattern like this until piece measures 33-35-36-38-39-41 cm. Work pattern, begin from right side as follows: 7 stitches in garter stitch, work A.6 until 20 stitches remain, A.10a as before, 7 band stitches in garter stitch. When A.6 has been worked 1 time vertically, there are 83-91-91-99-107-115 stitches on needle. Work pattern as follows: 7 stitches in garter stitch, work A.7 until 20 stitches remain, A.10a as before, 7 band stitches in garter stitch. Work A.7 3 times in total vertically. Piece measures approx. 45-47-48-50-51-53 cm. Work pattern as follows: 7 stitches in garter stitch, work A.8 until 20 stitches remain and decrease at the same time 21-24-24-27-30-33 stitches evenly, A.10a as before, 7 band stitches in garter stitch = 62-67-67-72-77-82 stitches. When A.8 has been worked 1 time vertically, work A.8a vertically until finished measurements. When piece measures 50-52-54-56-58-60 cm, cast off the first 7 stitches on next row from right side = 55-60-60-65-70-75 stitches. Then work diagonal shoulder, begin on next row from the neck as follows: * Work pattern as before until 8-9-9-10-11-12 stitches remain, turn and work back *, work from *-* 3 times in total. I.e. work 8-9-9-10-11-12 stitches less on every turn from the neck. On last row towards the neck work until 20-23-24-25-26-26 stitches remain, slip the last 20-23-24-25-26-26 stitches on a thread for shawl collar and cast on 2 new stitches on needle = 37-39-38-42-46-51 stitches. Now work and cast off with an edge over shoulder stitches. Work stitches cast on with shoulder stitches as follows: Work * 1 stitch in stocking stitch, work next stitch together with first/next stitch from shoulder – remember KNIT TOGETHER, pass the 2 stitches back on the needle they came from with strand on wrong side of piece, make sure not to tighten yarn too much *, work from *-* until all stitches from shoulder have been worked together with the 2 new stitches that were cast on. Cast off the 2 stitches. SHAWL COLLAR: Slip the 20-23-24-25-26-26 stitches from stitch holder on circular needle size 5.5 mm. Work as follows, begin from right side: 0-2-3-3-5-5 stitches in garter stitch, knit over knit and purl over purl until until 7 stitches remain, 7 band stitches in garter stitch. Continue like this (i.e. cables are done) and work short rows as follows: ROW 1 (= wrong side): Work the first 16-19-20-21-22-22 stitches, turn and tighten yarn. ROW 2 (= right side): Work 16-19-20-21-22-22 stitches. ROW 3 (= wrong side): Work over all stitches, turn and tighten yarn. ROW 4 (= right side): Work over all stitches. Work 1st to 4th row until shawl collar measures approx. 7-8-8-9-9-9 cm on the shortest. Work 1 ridge over all stitches. Cast off. ASSEMBLY: Sew shoulder seams inside 1 stitch on i-cord edge. Sew stitches in garter stitch together. Sew shawl collar tog mid back and sew on to neck line at the back of neck. Sew side seams inside 1 edge stitch. Sew the buttons on to left front piece. |
||||||||||||||||||||||
Diagram explanations |
||||||||||||||||||||||
|
||||||||||||||||||||||

|
||||||||||||||||||||||

|
||||||||||||||||||||||
|
||||||||||||||||||||||
|
Have you made this or any other of our designs? Tag your pictures in social media with #dropsdesign so we can see them! Do you need help with this pattern?You'll find tutorial videos, a Comments/Questions area and more by visiting the pattern on garnstudio.com. © 1982-2024 DROPS Design A/S. We reserve all rights. This document, including all its sub-sections, has copyrights. Read more about what you can do with our patterns at the bottom of each pattern on our site. |
||||||||||||||||||||||


With over 40 years in knitting and crochet design, DROPS Design offers one of the most extensive collections of free patterns on the internet - translated to 17 languages. As of today we count 304 catalogues and 11422 patterns - 11422 of which are translated into English (UK/cm).
We work hard to bring you the best knitting and crochet have to offer, inspiration and advice as well as great quality yarns at incredible prices! Would you like to use our patterns for other than personal use? You can read what you are allowed to do in the Copyright text at the bottom of all our patterns. Happy crafting!
Comments / Questions (46)
Bonjour dans les explications que vous m avez données, je dois laisser en attente les 7 mailles côté épaule alors que les explications du tricot demandent de les rabattre. Je m y perds un peu merci
10.04.2024 - 16:19DROPS Design answered:
Bonjour Mme Innocenti, vous rabattez en début de rang à partir de l'encolure 1 x 1 m et 1 x 7 m et vous mettez en attente en début de rang à partir de l'épaule 4 x 9 mailles, vous montez ensuite 2 mailles en fin de rang vers l'encolure et rabattez les mailles de l'épaule avec la technique du I-cord. Bon tricot!
11.04.2024 - 07:00Bonjour est ce que je peux avoir des éclaircissements pour tricoter le biais de l épaule pour le dos ? A quoi correspondent les * ? Il est noté de tricoter 9 mailles en moins pour la taille M puis de monter 2 mailles , il reste ensuite 38 mailles. Comment est ce possible puisqu avant de tricoter le biais de l encolure il reste 36 mailles ? Merci
08.04.2024 - 22:40DROPS Design answered:
Bonjour Mme Innocenti, pour former le biais de l'épaule, on va mettre en attente les mailles à la fin du rang côté emmanchure, autrement dit, en commençant par 1 rang à partir de l'encolure, tricotez jusqu'à ce qu'il reste 9 mailles et mettez ces mailles en attente, tournez et tricotez le rang retour, répétez ces 2 rangs encore 2 fois = vous avez 27 mailles en attente côté emmanchure. Lorsque vous avez tricoté le dernier de ces 6 rangs, montez 2 mailles à la fin de ce rang = côté encolure et rabattez les mailles maintenant façon I-cord comme ici. Bon tricot!
09.04.2024 - 08:57Ich komme mit der Anleitung für den Schalkragen nicht zurecht. Wozu müssen 5 Maschen kraus rechts gestrickt werden, ich habe doch eine Blende von 7 Maschen kraus rechts. Ich stricke gerade das linke Vorderteil. Wie breit ist der Schalkragen. Ich hoffe, dass sie mein Problem verstehen und mir helfen können. Mit freundlichen Grüßen freundlichen Grüßen Annemarie Demir
23.03.2024 - 18:02DROPS Design answered:
Liebe Frau Emir, beim linken Vorderteil ist die 1. Reihe eine Hin-Reihe, so beginnt man mit 0 bis 5 Maschen Krausrechts aber endet man mit den 7 Blenden-Maschen, die Blenden-Maschen werden so am Ende den Hin-Reihen und am Anfang den Rück-Reihen gestrickt. Viel Spaß beim Stricken!
02.04.2024 - 09:00Het model op de foto, draagt die een sjaalkraag? Als ik het goed bekijk zit eralleen die 7 st ribbels langs de hals en voorpanden. Ik ben benieuwd, ik wil nl een dubbel gebreide boord/knoopsgatenboord er langs breien, ik ga er van uit datdat wel lukt
05.03.2024 - 07:40DROPS Design answered:
Dag Aly,
Er wordt inderdaad een 'sjaalkraag' gemaakt over 20 tot 26 steken (afhankelijk van je maat) op de voorpanden en deze wordt op het einde midden achter tegen elkaar genaaid en dan aan de halslijn op het achterpand.
05.03.2024 - 22:38Er det mulig å få hjelp til å regne ut hvor mange gram jeg trenger hvis jeg vil strikke med 1 tråd i Drops air? Str Xxl Takknemlig for hjelp!
29.02.2024 - 14:09DROPS Design answered:
Hei Jannicke. Til oppskriften i str. XXL trenger du 700 gram DROPS Puna = 14 nøster. 1 nøste = 50 gram = 110 løpelengde / meter. 14 nøster x 110 meter = 1540 meter. Altså du trenger 1540 meter av DROPS Air (som kommer i 50 gram nøster og har en løpelengde på 150 meter). 1540 meter dele på 150 (Airs løpelengde) = 10,2 nøster = 11 nøster av DROPS Air. mvh DROPS Design
04.03.2024 - 13:25Pouvez vous me dire combien de rangs dans le shéma A-1 et m'envoyer une photo du dos du modèle svp, merci de votre aide
31.01.2024 - 01:21Hallo, Ik ben nu bij het rechter voorpand en ik begrijp het niet. Er staat: 7 voorbiessteken in ribbelsteek, brei A9, (..)brei A1 tot er 1 steek over is. Moet je dan 4x A9 breien en 1x A1 voor maat M? Zo ja, dan betekent het dat er 4x 1 steek recht is aan het eind van telpatroon A9. Klopt dat?
27.01.2024 - 22:46DROPS Design answered:
Dag Dini,
Je breit de voorbiessteken dan brei je 1 x A.9 in de breedte, dan herhaal je A.1 steeds in de breedte tot er 1 steek over is. (In A.9 brei je op een gegeven moment de kabel die vlak naast de biessteken komt.)
28.01.2024 - 18:35Je reviens sur la quantité de fil, il me reste également 42 gr de kid silk, j'ai l'habitude d'avoir du fil en plus avec vos modèles, jusqu'à 100 gr ça ne me choque pas, mais 300 gr c'est énorme. Le fait que baby merino soit très élastique est peut-être une explication.....
25.01.2024 - 15:46Merci pour vos réponses, Pour la quantité de fil, oui tout est correct et correspond, tension et dimensions. Pour les mailles à rabattre, ce n'est pas aussi clair que pour les devants.... Précisez peut-être que ce sont les mailles au point mousse côté manche.
25.01.2024 - 09:57DROPS Design answered:
Bonjour Michelle, après vérification, les 650 g Merino Extra Fine font 1365 mètres, et les 175 g Kid-Silk 1470 m, donc vous devriez avoir suffisamment des 2 laines vu qu'elles ont approximativement le même métrage. Votre proposition a été transmise à nos stylises. Bonne continuation!
25.01.2024 - 10:21J'ai tricoté le modèle en taille xl avec merino extra fine et kid silk, et il me reste plus de 300 gr de merino extra fine ! Ça fait beaucoup ! près de la moitié de ce qui est indiqué sur le patron...
24.01.2024 - 20:20DROPS Design answered:
Bonjour Michelle, merci pour votre retour, avez-vous bien la bonne tension à la fois en hauteur et en largeur? Je transmets votre commentaire à nos stylistes. Bonne continuation!
25.01.2024 - 09:11