
Popular categories
Looking for a yarn?


|
|
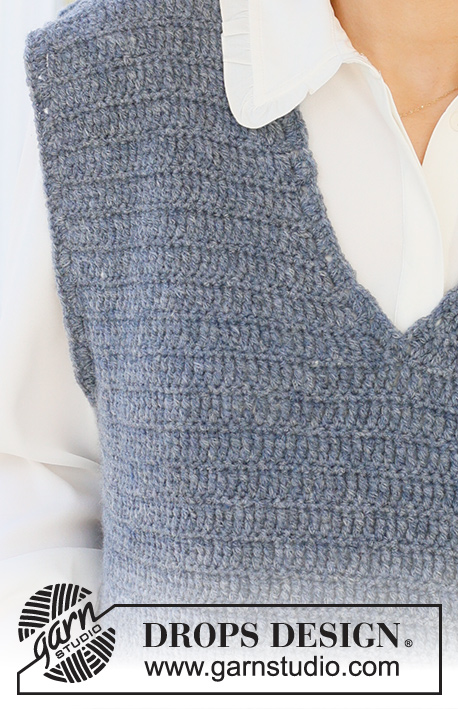
Hazy Dew Slipover |
|
 |
 |
Crocheted vest in DROPS Air. The piece is worked bottom up with split in the sides. Sizes S - XXXL.
DROPS 236-40 |
|
|
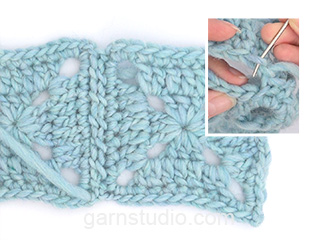
------------------------------------------------------- EXPLANATIONS FOR THE PATTERN: ------------------------------------------------------- CHAIN STITCH: If you work outermost on the hook the chain stitch will often be too tight; 1 chain stitch should be as long as 1 treble crochet is wide. CROCHET INFORMATION: Start each row of treble crochets with 3 chain stitches, which are in addition to the treble crochets and not counted in the stitch-count. Around the sleeve-edges and neck (round 2), replace the first treble crochet with 3 chain stitches and finish the round with 1 slip stitch in the 3rd chain stitch at the beginning of the round. DECREASE TIP (armholes and neck): Beginning of row: Replace the number of stitches to be decreased with 1 slip stitch. End of row: Do not work the number of stitches to be decreased. ------------------------------------------------------- START THE PIECE HERE: ------------------------------------------------------- VEST – SHORT OVERVIEW OF THE PIECE: The back and front pieces are worked separately, back and forth then sewn together. The sleeve-edges and neck are worked to finish. BACK PIECE: Read CHAIN STITCH and CROCHET INFORMATION and work 69-75-81-89-97-105 chain stitches (including 3 chain stitches to turn) with hook size 5 mm and DROPS Air. Work 1 treble crochet in the 4th chain stitch from the hook, then 1 treble crochet in each chain stitch = 66-72-78-86-94-102 treble crochets + 3 chain stitches. Continue back and forth with 1 treble crochet in each stitch. REMEMBER THE CROCHET TENSION! When the piece measures 22-23-24-25-26-27 cm, decrease 3-3-4-4-5-5 stitches for the first armhole – read DECREASE TIP, work 1 treble crochet in each of the next 60-66-70-78-84-92 stitches, turn (do not work the last 3-3-4-4-5-5 stitches for the second armhole). Decrease 1 stitch on each side every row 0-0-0-3-3-6 times, then every 2nd row 2-3-4-4-5-5 times = 56-60-62-64-68-70 stitches. Continue working until the piece measures 46-48-50-52-54-56 cm. Finish each shoulder separately as described below. RIGHT SHOULDER (when garment is worn): Work the first 18-20-20-21-22-23 stitches, turn, decrease 1 stitch for the neck – remember DECREASE TIP, continue with treble crochets = 17-19-19-20-21-22 stitches on the shoulder. Work until the piece measures 50-52-54-56-58-60 cm. Cut and fasten the strand. LEFT SHOULDER: Start on the same side as the right shoulder was started, skip the next 20-20-22-22-24-24 stitches after the right shoulder and work 1 treble crochet in each of the last 18-20-20-21-22-23 stitches. Turn, work treble crochets and decrease 1 stitch at the end of the row for the neck – remember DECREASE TIP = 17-19-19-20-21-22 stitches on the shoulder. Work until the piece measures 50-52-54-56-58-60 cm. Cut and fasten the strand. FRONT PIECE: Work 69-75-81-89-97-105 chain stitches (including 3 chain stitches to turn) with hook size 5 mm and DROPS Air. Work 1 treble crochet in the 4th chain stitch from the hook, then 1 treble crochet in each chain stitch = 66-72-78-86-94-102 treble crochets + 3 chain stitches. Continue back and forth with 1 treble crochet in each stitch. When the piece measures 22-23-24-25-26-27 cm, decrease for the armholes in the same way as on the back piece = 56-60-62-64-68-70 stitches. Continue working until the piece measures 41-43-44-46-47-49 cm. Finish each shoulder separately. LEFT SHOULDER: Work the first 21-23-23-24-26-27 stitches, turn and continue with treble crochets back and forth and decrease for the neck as follows: Decrease 2 treble crochets 1 time and 1 treble crochet 2-2-2-2-3-3 times = 17-19-19-20-21-22 treble crochets on the shoulder. Work until the piece measures 50-52-54-56-58-60 cm. Cut and fasten the strand. RIGHT SHOULDER: Start on the same side as the left shoulder was started, skip the next 14-14-16-16-16-16 stitches after the left shoulder and work 1 treble crochet in each of the last 21-23-23-24-26-27 stitches. Turn, continue with treble crochets back and forth and decrease for the neck as follows: Decrease 2 treble crochets 1 time and 1 treble crochet 2-2-2-2-3-3 times = 17-19-19-20-21-22 stitches on the shoulder. Work until the piece measures 50-52-54-56-58-60 cm. Cut and fasten the strand. ASSEMBLY: Sew the shoulder seams edge to edge. Sew the side seams edge to edge, leaving a split of 8 cm at the bottom on each side. SLEEVE-EDGES: Start at the bottom of the armhole with hook size 4 mm. ROUND 1: * Work 1 double crochet in the middle of the first/next treble-crochet row, 3 chain stitches, skip a row/2 cm *, work from *-* around the armhole, finish with 1 slip stitch in the first double crochet. ROUND 2: Read CROCHET INFORMATION, work 1 slip stitch around the first chain-space, then 4 treble crochets around each chain-space but only 3 treble crochets around the 8 middle chain-spaces on the shoulder and around the 4 bottom chain-spaces. NECK-EDGE: Start at one shoulder seam with hook size 4 mm. ROUND 1: * Work 1 double crochet in the middle of the first/next treble-crochet row, 3 chain stitches, skip a row/2 cm *, work from *-* around the neck, finish with 1 slip stitch in the first double crochet. ROUND 2: Read CROCHET INFORMATION, work 1 slip stitch around the first chain-space, then 4 treble crochets around each chain-space. |
|

|
|
|
Have you made this or any other of our designs? Tag your pictures in social media with #dropsdesign so we can see them! Do you need help with this pattern?You'll find tutorial videos, a Comments/Questions area and more by visiting the pattern on garnstudio.com. © 1982-2024 DROPS Design A/S. We reserve all rights. This document, including all its sub-sections, has copyrights. Read more about what you can do with our patterns at the bottom of each pattern on our site. |
|


With over 40 years in knitting and crochet design, DROPS Design offers one of the most extensive collections of free patterns on the internet - translated to 17 languages. As of today we count 304 catalogues and 11422 patterns - 11422 of which are translated into English (UK/cm).
We work hard to bring you the best knitting and crochet have to offer, inspiration and advice as well as great quality yarns at incredible prices! Would you like to use our patterns for other than personal use? You can read what you are allowed to do in the Copyright text at the bottom of all our patterns. Happy crafting!
Comments / Questions (4)
Penso che ci sia un errore nella spiegazione del 1° giro bordo del collo, manca l\'indicazione delle catenelle. Non è possibile che si lavori solo maglie basse senza l\'intervallo di catenelle tra l\'una e l\'altra, il bordo risulterebbe troppo tirato.
15.04.2024 - 09:53Stor i storleken och ärmhålen är för stora för mitt tycke. Trots rätt virkfasthet blev plagget pösigt och ser lite märkligt ut. Skulle rekommendera att vänta med att göra hål för ärmar samt att virka med mindre virknål eller färre stolpar.
16.11.2023 - 00:03Vest
27.12.2022 - 20:50J’aime beaucoup celui-ci
05.08.2022 - 20:13