DROPS Sky
DROPS Sky
74% Alpaca, 18% Polyamide, 8% Wool
from 5.10 £ /50g
DROPS Kid-Silk
DROPS Kid-Silk
75% Mohair, 25% Silk
from 4.60 £ /25g
Get the yarn to make this pattern from 63.30£.

The yarn cost is calculated from the pattern’s smallest size and the yarn’s cheapest product type. Looking for an even better price? You might find it on the DROPS Deals!

DROPS SS24

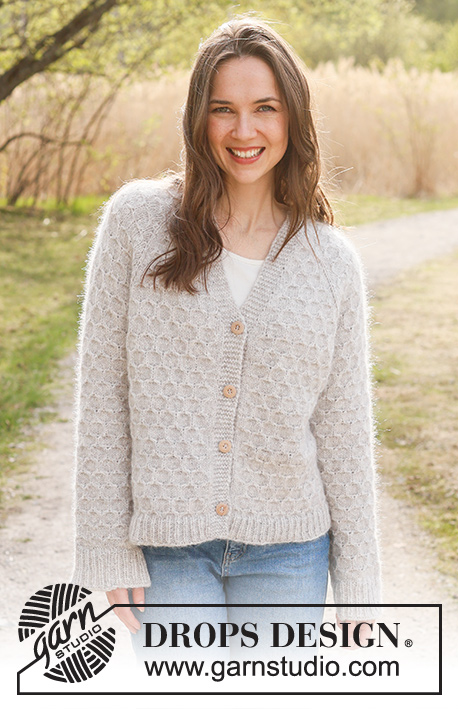
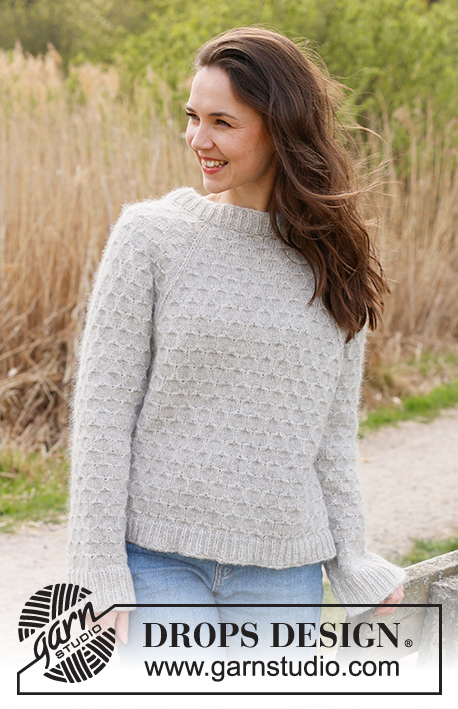
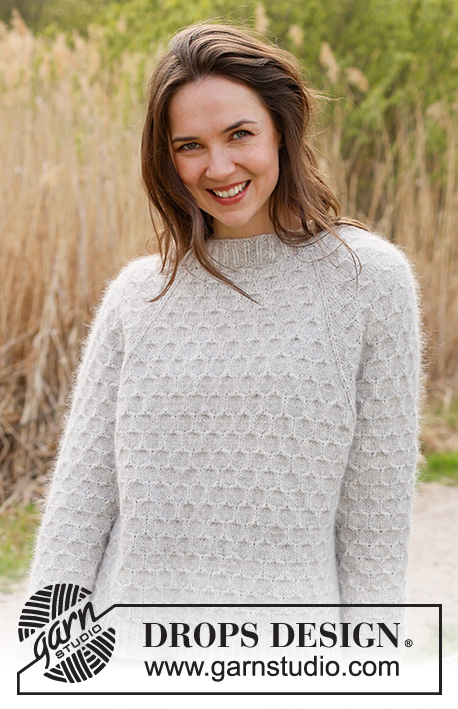
Northern Mermaid Sweater

Knitted jumper in DROPS Sky / DROPS Merino Extra Fine and DROPS Kid-Silk. The piece is worked top down, with raglan and honeycomb pattern. Sizes XS/S - XXXL.

DROPS 236-6
DROPS Design: Pattern sk-176
Yarn group B + A
-------------------------------------------------------

SIZES:
XS/S - M - L - XL - XXL - XXXL

MATERIALS:
Colour/quality used in picture:
DROPS SKY from Garnstudio (belongs to yarn group B)
350-350-400-450-450-500 g colour 03, grey fog
And use:
DROPS KID-SILK from Garnstudio (belongs to yarn group A)
150-175-175-200-225-225 g colour 38, chalk

Or use:
DROPS MERINO EXTRA FINE from Garnstudio (belongs to yarn group B)
550-650-700-750-850-900 g colour 08, light beige
And use:
DROPS KID-SILK from Garnstudio (belongs to yarn group A)
150-175-175-200-225-225 g colour 38, chalk

NEEDLES:
DROPS CIRCULAR NEEDLE SIZE 4.5 MM: Length 40 cm and 80 cm.
DROPS CIRCULAR NEEDLE SIZE 3.5 MM: Length 40 cm and 80 cm.
DROPS DOUBLE POINTED NEEDLES SIZE 4.5 MM.
DROPS DOUBLE POINTED NEEDLES SIZE 3.5 MM.
DROPS CABLE NEEDLE – for cables.
The technique MAGIC LOOP can be used – you then only need circular needle of 80 cm in each size.

KNITTING TENSION:
17 stitches in width and 23 rows in height with stocking stitch and 1 strand of each quality = 10 x 10 cm.
21 stitches in width and 27 rows in height with honeycomb pattern and 1 strand of each quality = 10 x 10 cm.
NOTE: Needle size is only a guide. If you get too many stitches on 10 cm, change to a larger needle size. If you get too few stitches on 10 cm, change to a smaller needle size.

-------------------------------------------------------

Alternative Yarn – See how to change yarns here
Yarn Groups A to F – Use the same pattern and change the yarn here
Yarn usage using an alternative yarn – Use our yarn converter here

-------------------------------------------------------

DROPS Sky
DROPS Sky
74% Alpaca, 18% Polyamide, 8% Wool
from 5.10 £ /50g
DROPS Kid-Silk
DROPS Kid-Silk
75% Mohair, 25% Silk
from 4.60 £ /25g
Get the yarn to make this pattern from 63.30£.

The yarn cost is calculated from the pattern’s smallest size and the yarn’s cheapest product type. Looking for an even better price? You might find it on the DROPS Deals!

Pattern instructions

NOTE: This pattern is written in British English. All measurements in charts are in cm. For conversion from cm to inches - click here. There are different terms for crocheting in British and American English. If this pattern includes crochet, click for "crochet terms" here. For this pattern in American English, please click here.
-------------------------------------------------------

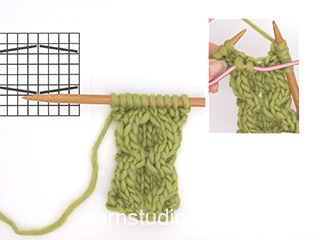
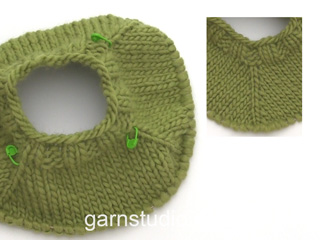
EXPLANATIONS FOR THE PATTERN:
-------------------------------------------------------

PATTERN:
See diagrams A.1 to A.3.
As you increase to raglan, work the new stitches into the pattern as shown in the diagrams, i.e. work them in stocking stitch until they fit 3 or 6 stitches in the pattern.

RAGLAN:
Increase 1 stitch before/after the 4 marker-stitches (in each transition between body and sleeves). Increase 1 stitch by making 1 yarn over.
On the next round work the yarn overs as follows:
BEFORE MARKER:
Slip the yarn over onto the right needle as if to knit, place it twisted back onto the left needle, knit in the front loop (stitch twists to the right). No hole.
AFTER MARKER:
Knit in the back loop of the yarn over (stitch twists to the left). No hole.
Work the new stitches into the pattern as described above.

DECREASE TIP (for sleeves):
Decrease 1 stitch on either side of the marker as follows: Start 2 stitches before the marker-thread, knit 2 together, marker-thread, slip 1 stitch as if to knit, knit 1 and pass the slipped stitch over the knitted stitch.

-------------------------------------------------------

START THE PIECE HERE:

-------------------------------------------------------

JUMPER – SHORT OVERVIEW OF THE PIECE:
The neck and yoke are worked in the round with circular needle, top down. The yoke is divided for body and sleeves and the body is continued in the round with circular needle. The sleeves are worked with short circular needle/double pointed needles.

NECK:
Cast on 84-87-90-93-96-99 stitches with short circular needle size 3.5 mm and 1 strand of each quality (2 strands). Knit 1 round, then work rib (knit 1, purl 2) in the round for 4 cm.
Knit 1 round and increase 16-13-22-19-28-25 stitches evenly spaced = 100-100-112-112-124-124 stitches.

YOKE:
Change to circular needle size 4.5 mm.
Insert 4 markers without working the stitches. These are used when increasing to raglan.
Insert marker-1 in the first stitch, count 18 stitches (sleeve), insert marker-2 in the next stitch, count 30-30-36-36-42-42 stitches (front piece), insert marker-3 in the next stitch, count 18 stitches (sleeve), insert marker-4 in the next stitch. There are 30-30-36-36-42-42 stitches left after the last marker (back piece).

Work the first round as follows: Knit 1 (marker-stitch 1), increase 1 stitch to RAGLAN – read description above, work A.1, A.2, A.3, increase 1 stitch to raglan on each side of marker-stitch 2 (which is knitted), A.1, work A.2, 3-3-4-4-5-5 times, A.3, increase 1 stitch to raglan on each side of marker-stitch 3 (which is knitted), A.1, A.2, A.3, increase 1 stitch to raglan on each side of marker-stitch 4 (which is knitted), A.1, work A.2, 3-3-4-4-5-5 times, A.3, increase 1 stitch to raglan before marker-stitch 1.
Continue this pattern and increase as described below – REMEMBER THE KNITTING TENSION!

RAGLAN:
Increase on each side of all marker-stitches (8 stitches increased) every 2nd round a total of 13-13-13-19-16-10 times, including the first increase. The increased stitches are worked into the pattern as shown in the diagrams – read PATTERN above = 204-204-216-264-252-204 stitches.
Then continue to increase to raglan, but every second time you increase only increase on the front and back pieces (4 stitches increased). You therefore increase every 2nd round on the front/back and every 4th round on the sleeves. Increase like this 18-24-24-18-24-36 times on the front/back piece (9-12-12-9-12-18 times on the sleeves).
You have increased a total of 31-37-37-37-40-46 times on the front/back piece and 22-25-25-28-28-28 times on the sleeves.

There are 312-348-360-372-396-420 stitches.
Continue working without further increases until the yoke measures 23-27-28-29-31-34 cm, measured mid-front and from the neck down. AT THE SAME TIME on the last round decrease 4 stitches by working the marker-stitches as follows:
Marker-stitches 2 and 4: Knit the stitch with the marker twisted together with the following stitch.
Marker-stitches 1 and 3: Start 1 stitch before the marker-stitch and knit 2 together.
308-344-356-368-392-416 stitches.

On the next round divide for the body and sleeves as follows:
Place the first 62-68-68-74-74-74 stitches on a thread for the sleeve, cast on 4-4-10-16-16-22 stitches (in side under sleeve), work the next 92-104-110-110-122-134 stitches as before (front piece), place the next 62-68-68-74-74-74 stitches on a thread for the sleeve, cast on 4-4-10-16-16-22 stitches (in side under sleeve), work the last 92-104-110-110-122-134 stitches (back piece).
The piece measures approx. 27-31-32-33-35-38 cm from the shoulder.
The body and sleeves are finished separately – the piece is now measured from here.

BODY:
= 192-216-240-252-276-312 stitches. Work A.2 in the round over all stitches (make sure the pattern continues correctly from the yoke).
Work until the body measures approx. 25-23-24-25-25-24 cm from the division – finish after round 4 or 10 in A.2.
Knit 1 round and decrease 15-21-21-21-24-30 stitches evenly spaced = 177-195-219-231-252-282 stitches.
Change to circular needle size 3.5 mm. Work rib (knit 1, purl 2) for 4 cm. Cast off with knit a little loosely.
The jumper measures approx. 56-58-60-62-64-66 cm from the shoulder down.

SLEEVES:
Place the 62-68-68-74-74-74 stitches from the thread on the one side of the piece on double pointed needles/short circular needle size 4.5 mm and knit up 1 stitch in each of the new stitches cast on under the sleeve = 66-72-78-90-90-96 stitches. Insert a marker thread in the middle of the new stitches under the sleeve.
Continue A.2 in the round over all stitches (make sure the pattern continues correctly from the yoke).
When the sleeve measures 4-4-4-2-2-2 cm from the division, decrease 2 stitches under the sleeve – read DECREASE TIP. Decrease like this every 5-5-3-2½-2-1½ cm a total of 6-6-9-12-12-15 times = 54-60-60-66-66-66 stitches. Continue working until the sleeve measures approx. 34-31-31-30-29-26 cm from the division – finish after round 4 or 10 in A.2.
There is 6 cm left to finished length; try the jumper on and work to desired length. Change to double pointed needles size 3.5 mm and work rib (knit 1, purl 2) for 6 cm. Cast off with knit a little loosely. The sleeve measures approx. 40-37-37-36-35-32 cm from the division.
Work the other sleeve in the same way.

Diagram

symbols = knit
symbols = place 2 stitches on cable needle behind the piece, knit 1, knit 2 from cable needle
symbols = place 1 stitch on cable needle in front of piece, knit 2, knit 1 from cable needle
diagram
diagram

Each of our patterns has specific tutorial videos to help you.

Do you have a question? See a list of frequently asked questions (FAQ)

Knitting tension is what determines the final measurements of your work, and is usually measured per 10 x 10 cm. It is provided like so: number of stitches in width x number of rows in height - eg: 19 stitches x 26 rows = 10 x 10 cm.

The knitting tension is very individual; some people knit/crochet loosely while others work tightly. You adjust the knitting tension with the needle size, which is why the suggested needle size is only meant as a guide! You need to adjust this (up or down) to ensure that YOUR knitting tension matches the knitting tension provided in the pattern. If you work with a different knitting tension than provided you will have a different yarn consumption, and your work will have different measurements than what the pattern suggests.

The knitting tension also determines which yarns can replace each other. As long as you achieve the same knitting tension you can replace one yarn with another.

See DROPS lesson: How to measure your tension/gauge

See DROPS video: How to make a gauge tension swatch

The required amount of yarn is provided in grams, eg: 450 g. To calculate how many balls you’ll need you first need to know how many grams are in 1 ball (25g, 50g or 100g). This information is available if you click on the individual yarn quality on our pages. Divide the amount required with the amount of each ball. For example, if each ball is 50g (the most common amount), the calculation will be as follows: 450 / 50 = 9 balls.

The important thing when changing from one yarn to another is that the knitting/crochet tension remains the same. This is so that the measurements of the finished piece will be the same as on the sketch provided. It is easier to achieve the same knitting tension using yarns from the same yarn group. It is also possible to work with multiple strands of a thinner yarn to achieve the knitting tension of a thicker one. Please try our yarn converter. We recommend you to always work a test swatch.

Please NOTE: when changing yarn the garment might have a different look and feel to the garment in the photo, due to individual properties and qualities of each yarn.

See DROPS lesson: Can I use a different yarn than the one mentioned in the pattern?

All our yarns are categorised into yarn groups (from A to F) according to thickness and knitting tension – group A contains the thinnest yarns and group F the thickest. This makes it easier for you to find alternative yarns to our patterns, should you wish to switch yarn. All yarns within the same group have a similar knitting tension and can easily replace each other. However, different yarn qualities have different structures and properties which will give the finished work a unique look and feel.

Click here for an overview of the yarns in each yarn group

At the top of all our patterns you’ll find a link to our yarn calculator, which is a helpful tool should you wish to use a different yarn than suggested. By filling in the yarn quality you wish to replace, the amount (in your size) and number of strands, the calculator will present good alternative yarns with the same knitting tension. Additionally it will tell you how much you’ll require in the new qualities and whether you’ll need to work with multiple strands. Most skeins are 50g (some are 25g or 100g).

If the pattern is worked with multiple colours, every colour will have to be calculated separately. Similarly, if the pattern is worked with several strands of different yarns (for example 1 strand Alpaca and 1 strand Kid-Silk) you will have to find alternatives for each, individually.

Click here to see our yarn calculator

Since different yarns have different qualities and textures we have chosen to keep the original yarn in our patterns. However, you can easily find options among our available qualities by using our yarn calculator, or simply pick a yarn from the same yarn group.

It is possible that some retailers still have discontinued yarns in stock, or that someone has a few skeins at home that they would like to find patterns for.

The yarn calculator will provide both alternative yarn as well as required amount in the new quality.

If you think it's hard to decide what size to make, it can be a good idea to measure a garment you own already and like the size of. Then you can pick the size by comparing those measures with the ones available in the pattern's size chart.

You'll find the size chart at the bottom of the pattern.

See DROPS lesson: How to read size chart

The needle size provided in the pattern serves only as a guide, the important thing is to follow the knitting tension. And since knitting tension is very individual, you will have to adjust the needle size to ensure that YOUR tension is the same as in the pattern – maybe you’ll have to adjust 1, or even 2 needle sizes, up or down to achieve the correct tension. For this, we recommend that you work test swatches.

Should you work with a different knitting tension than the one provided, the measurements of the finished garment might deviate from the measurement sketch.

See DROPS lesson: How to measure your tension/gauge

See DROPS video: How to make a tension/gauge swatch

Working a garment top-down provides more flexibility and room for personal adjustment. For example it is easier to try the garment on while working, as well as making adjustments to length of yoke and shoulder caps.

The instructions are carefully explaining every step, in the correct order. Diagrams are adjusted to the knitting direction and are worked as usual.

The diagram depicts all rows/rounds, and every stitch seen from the right side. It is read from bottom to top, from right to left. 1 square = 1 stitch.

When working back and forth, every other row is worked from the right side and every other row is worked from the wrong side. When working from the wrong side, the diagram will have to be worked reversed: from left to right, knit stitches are purled, purl stitches are knit etc.

When working in the round every round is worked from the right side and the diagram are worked from right to left on all rounds.

See DROPS lesson: How to read knitting diagrams

The diagram depicts all rows/rounds, and every stitch seen from the right side. It is worked from bottom to top, from right to left.

When working back and forth every other row is worked from the right side: from right to left and every other row is worked from the wrong side: from left to right.

When working in the round, every row in the diagram are worked from the right side, from right to left.

When working a circular diagram you start in the middle and work your way outwards, counter clockwise, row by row.

The rows usually start with a given number of chain stitches (equivalent to the height of the following stitch), this will either be depicted in the diagram or explained in the pattern.

See DROPS lesson: How to read crochet diagrams

Instructions for working several diagrams after each other on the same row/round, will often be written like so: “work A.1, A.2, A.3 a total of 0-0-2-3-4 times". This means you work A.1 once, then A.2 is worked once, and A.3 is repeated (in width) the number of times provided for your size – in this case like so: S = 0 times, M = 0 times, L=2 times, XL= 3 times and XXL = 4 times.

The diagrams are worked as usual: begin with the first row in A.1, then work the first row in A.2 etc.

See DROPS lesson: How to read knitting diagrams

See DROPS lesson: How to read crochet diagrams

The total width of the garment (from wrist-to-wrist) will be larger in the larger sizes, despite the actual sleeves being shorter. The larger sizes have longer sleeve caps and wider shoulders, so there will be a good fit in all sizes.

The measurement sketch/schematic drawing provides information regarding the full length of the garment. If it’s a jumper or a jacket the length is measured from the highest point on the shoulder closest to the neckline, and straight down to the bottom of the garment. It is NOT measured from the tip of shoulder. Similarly, the length of yoke is measured from the highest point on the shoulder and down to where yoke is split into body and sleeves.

On a jacket measures are never taken along bands, unless specifically stated. Always measure inside band stitches when measuring the length.

See DROPS lesson: How to read a schematic drawing

Diagrams are often repeated on the round or in height. 1 repeat is the diagram the way it appears in the pattern. If it says to work 5 repeats of A.1 in the round, then you work A.1 a total of 5 times after/next to each other in the round. If it says to work 2 repeats of A.1 vertically/in height you work the entire diagram once, then begin again at the start and work the entire diagram one more time.

Chain stitches are slightly narrower than other stitches and to avoid working the cast-on edge too tight, we simply chain more stitches to begin with. The stitch count will be adjusted on the following row to fit the pattern and measurement sketch.

The rib edge is more elastic and will contract slightly compared to, for example, stocking stitch. By increasing before the rib edge, you avoid a visible difference in width between the rib edge and the rest of the body.

It’s very easy to cast off too tightly, and by making yarn overs while casting off (and simultaneously casting these off) you avoid a too tight cast off edge.

See DROPS video: How to bind off with yarn overs (yo)

To achieve an even increase (or decrease) you can increase on, for example: every 3rd and 4th row alternately, like so: work 2 rows and increase on the 3rd row, work 3 rows and increase on the 4th. Repeat this until the increase is complete.

See DROPS lesson: Increase or decrease 1 st on every 3rd and 4th row alternately

Should you prefer to work in the round instead of back and forth, you may of course adjust the pattern. You’ll need to add steeks mid-front (usually 5 stitches), and follow the instructions. When you would normally turn and work from the wrong side, simply work across the steek and continue in the round. At the end you’ll cut the piece open, pick up stitches to work bands, and cover the cut edges.

See DROPS video: How to knit steeks and cut open

Should you prefer to work back and forth instead of in the round, you may of course adjust the pattern so you work the pieces separately and then assemble them at the end. Divide the stitches for the body in 2, add 1 edge stitch in each side (for sewing) and work the front and back pieces separately.

See DROPS lesson: Can I adapt a pattern for circular needles into straight needles?

Pattern repeats can vary slightly in the different sizes, in order to get the correct proportions. If you’re not working the exact same size as the garment in the photo, yours might deviate slightly. This has been carefully developed and adjusted so that the complete impression of the garment is the same in all sizes.

Make sure to follow instructions and diagrams for your size!

If you have found a pattern you like which is available in women’s size it’s not very difficult to convert it to men’s size. The biggest difference will be the length of sleeves and body. Start working on the women size that you think would fit across the chest. The additional length will be worked right before you cast off for the armhole/sleeve cap. If the pattern is worked top-down you can add the length right after the armhole or before the first decrease on sleeve.

Regarding additional yarn amount, this will depend on how much length you add, but it is better with a skein too many than too few.

All yarns will have excess fibres (from production) that might come off as lint or shedding. Brushed yarns (ie hairier yarns) have more of these loose, excess fibres, causing more shedding.

Shedding also depends on what is worn under or over the garment, and whether this pulls at the yarn fibres. It’s therefore not possible to guarantee that there will be no shedding

Below are some tips on how to get the best result when working with hairier yarns:

1. When the garment is finished (before you wash it) shake it vigorously so the looser hairs come off. NOTE: do NOT use a lint roller, brush or any method that pulls at the yarn.

2. Place the garment in a plastic bag and put it in your freezer - the temperature will cause the fibres to become less attached to each other, and excess fibres will come off easier.

3. Leave in the freezer for a few hours before taking it out and shaking it again.

4. Wash the garment according to the instructions on the yarn label.

Pilling is a natural process that happens to even the most exclusive of fibers. It's a natural sign of wear and tear that is hard to avoid, and that is most visible in high friction areas of your garment like a sweater's arms and cuffs.

You can make your garment look as new by removing the pilling, using a fabric comb or a pill/lint remover.

Still can't find the answer you need? Then scroll down and leave your question so one of our experts can try to help you. This will be done normally within 5 to 10 working days.
In the meantime, you can read the questions and answers that others have left to this pattern or join the DROPS Workshop on Facebook to get help from fellow knitters/crocheters!

You might also like...

Post a comment to pattern DROPS 236-6

We would love to hear what you have to say about this pattern!

If you want to leave a question, please make sure you select the correct category in the form below, to speed up the answering process. Required fields are marked *.

Comments / Questions (17)

country flag Lizette wrote:

Når raglan går til hver 2. Omgang udt ved for/bagstykke og hver 4. Omgang udt både ærme og for/bagstykke, synes jeg ikke det er tydeligt hvordan mønsteret skal implicered Det ville være fint med et diagram som følger én helt igennem raglan delen.

21.01.2024 - 10:26

country flag Caro wrote:

Buen día: Quería avisar de un error en la cantidad de puntos que debo aumentar al finalizar el cuello. Dice de aumentar 13 puntos para que de un total de 100, pero luego al colocar los marcadores resultan ser sólo 96 (18 + 30 + 18 + 30). ¿No sería correcto aumentar sólo 9 puntos? Estoy probando esa opción. ¡Gracias!

22.05.2023 - 16:54

country flag Rebecca wrote:

This shows two colors used, and to cast on with two colors, but there isn't any mention of a MC or CC; where does the CC come in, and why/where is it used?

31.01.2023 - 16:45

DROPS Design answered:

Dear Rebecca, the whole jumper is worked with 2 strands held together as there were just one, so that you will work with 1 yarn each quality (Sky + Kid-Silk or Merino Extra Fine + Kid-Silk). Just remember to check your gauge (read more here). Happy knitting!

31.01.2023 - 17:05

country flag Hellu wrote:

I can’t see the pattern grid photos in Finnish version. :-( Could you please reupload those, thanks?! :)

23.01.2023 - 15:24

DROPS Design answered:

The charts will open now.

23.01.2023 - 18:13

country flag Inger Hurum wrote:

Modell sk-176 forklarer om kast mellom 2masker. Men det er ikke tegnet inn noen kast her 😏

21.10.2022 - 07:52

DROPS Design answered:

Hej Inger, nej det har du ret i, vi skal høre med design, så bliver symbolen sikkert fjernet. Tak for info :)

25.10.2022 - 12:20

country flag Lisette Moormann wrote:

Er wordt, i.t.t. wat ik ik gewend ben, helaas geen maat-tekening van dit model gegeven. Indien het er wel is, zou u me dat dan kunnen toesturen? Bij voorbaat dank. Groetjes Lisette

07.10.2022 - 17:43

DROPS Design answered:

Dag Lisette,

Onderaan de beschrijving van het patroon en onderaan de telpatronen kun je een maattekening vinden. (Misschien werd deze afbeelding niet goed geladen om het moment dat het patroon bekeek.

08.10.2022 - 16:27

country flag Sylvie wrote:

Merci pour votre réponse

05.09.2022 - 15:10

country flag Sylvie wrote:

Bonjour J'ai l'impression que dans les diagrammes il manque des jetés. Merci

03.09.2022 - 18:50

DROPS Design answered:

Bonjour Sylvie, les augmentations des raglans (jetés) ne figurent effectivement pas dans les diagrammes, ces jetés doivent être faits comme indiqué dans les explications du pull, et se tricotent ensuite comme indiqué par les diagrammes A.1 et A.3. Bon tricot!

05.09.2022 - 09:11

country flag Krám Edit wrote:

Üdvözlöm! A ráhajtást nem találom a diagrammban.

01.09.2022 - 13:19

country flag Rikke Møller Hansen wrote:

Mangler der ikke markering af omslagene i mønsteret??

30.08.2022 - 10:55