DROPS Sky
DROPS Sky
74% Alpaca, 18% Polyamide, 8% Wool
from 5.10 £ /50g
Get the yarn to make this pattern from 30.60£.

The yarn cost is calculated from the pattern’s smallest size and the yarn’s cheapest product type. Looking for an even better price? You might find it on the DROPS Deals!

DROPS SS24

Silver Wreath

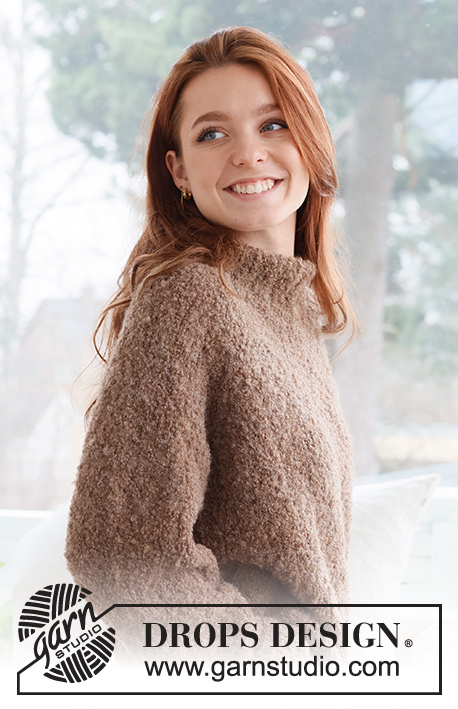
Crocheted jumper in DROPS Sky. The piece is worked top down, with round yoke, double neck, bobbles, relief-pattern and lace pattern. Sizes S - XXXL.

DROPS 237-34
DROPS Design: Pattern sk-172
Yarn group B
-------------------------------------------------------

SIZES:
S - M - L - XL - XXL - XXXL

MATERIALS:
DROPS SKY from Garnstudio (belongs to yarn group B)
300-350-350-400-450-500 g colour 02, pearl grey

CROCHET HOOK:
DROPS CROCHET HOOK SIZE 4.5 MM.

CROCHET TENSION:
16 treble crochets in width and 8 rows in height = 10 x 10 cm.
Hook size is only a guide. If you get too many stitches on 10 cm, change to a larger hook size. If you get too few stitches on 10 cm, change to a smaller hook size.

-------------------------------------------------------

Alternative Yarn – See how to change yarns here
Yarn Groups A to F – Use the same pattern and change the yarn here
Yarn usage using an alternative yarn – Use our yarn converter here

-------------------------------------------------------

DROPS Sky
DROPS Sky
74% Alpaca, 18% Polyamide, 8% Wool
from 5.10 £ /50g
Get the yarn to make this pattern from 30.60£.

The yarn cost is calculated from the pattern’s smallest size and the yarn’s cheapest product type. Looking for an even better price? You might find it on the DROPS Deals!

Pattern instructions

NOTE: This pattern is written in British English. All measurements in charts are in cm. For conversion from cm to inches - click here. There are different terms for crocheting in British and American English. If this pattern includes crochet, click for "crochet terms" here. For this pattern in American English, please click here.
-------------------------------------------------------

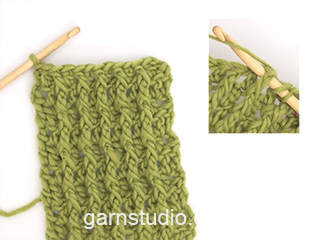
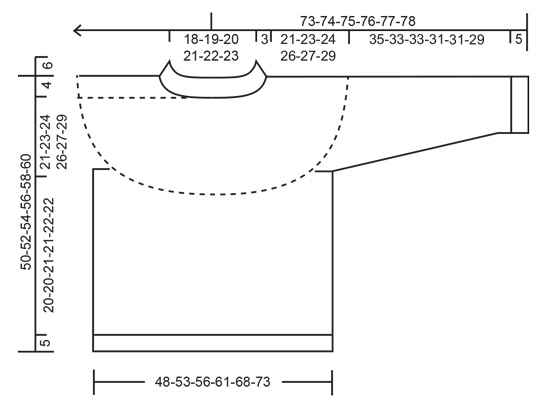
EXPLANATIONS FOR THE PATTERN:
-------------------------------------------------------

PATTERN:
See diagrams A.1 to A.4.

CROCHET INFORMATION:
Each round of treble crochets begins with 3 chain stitches (does not replace the first treble crochet) and finishes with 1 slip stitch in the 3rd chain stitch at the beginning of the round.
Each round of double crochets begins with 1 chain stitch (does not replace the first double crochet) and finishes with 1 slip stitch in the first chain stitch.

CHAIN STITCH:
If you work outermost on the hook the chain stitch will often be too tight; 1 chain stitch should be as long as 1 double/treble crochet is wide.

INCREASE TIP:
Increase 1 treble crochet by working 2 treble crochets in the same stitch.

DECREASE TIP (sleeves):
Start straight after the marker and work 1 treble crochet, work the next 2 treble crochets together as follows: * 1 yarn over, insert the hook through the next stitch, pick up the strand, 1 yarn over and pull it through the first 2 loops on the hook *, work from *-* 1 more time, 1 yarn over and pull it through all 3 loops on the hook (1 stitch decreased). Work until there are 3 stitches left on the round, work the next 2 treble crochets together as above and work 1 treble crochet in the last stitch.

-------------------------------------------------------

START THE PIECE HERE:

-------------------------------------------------------

JUMPER – SHORT OVERVIEW OF THE PIECE:
The neck and yoke are worked in the round, top down and from mid-back. The yoke is divided for the body and sleeves, which are finished separately in the round.

NECK:
Work 84-86-90-92-96-100 chain stitches with hook size 4.5 mm and DROPS Sky. Form them into a ring with 1 slip stitch in the first chain stitch. Work 1 treble crochet in each stitch – read CROCHET INFORMATION and CHAIN STITCH! Work like this for 12 cm. Insert 1 marker at the beginning of the round (mid-back), the yoke is measured from this marker!

YOKE:
Work A.1 over all stitches.
On round 2 in A.1 increase 32-38-38-40-40-44 treble crochets evenly spaced – read INCREASE TIP = 116-124-128-132-136-144 stitches.
Work A.2 over all stitches.
On round 3 in A.2 increase 28-36-36-36-36-40 treble crochets evenly spaced = 144-160-164-168-172-184 stitches.
On round 4 in A.2 increase 26-25-31-32-38-41 treble crochets evenly spaced = 170-185-195-200-210-225 stitches. REMEMBER THE CROCHET TENSION!
Work A.3 over all stitches.
On round 4 in A.3 increase 25-25-35-35-40-40 treble crochets evenly spaced = 195-210-230-235-250-265 stitches.
On round 9 in A.3 increase 16-17-16-29-31-34 treble crochets evenly spaced = 211-227-246-264-281-299 stitches.
On the last round in A.3 increase 13-17-14-28-27-33 treble crochets evenly spaced = 224-244-260-292-308-332 stitches.
Work 1 treble crochet in each stitch until the yoke measures 21-23-24-26-27-29 cm from the marker.
Now divide for the body and sleeves as follows:
Work 1 treble crochet in each of the first 34-38-40-44-48-52 stitches (half back piece), skip 44-46-50-58-58-62 stitches for the sleeve and work 8-8-10-10-12-12 chain stitches under the sleeve, work 1 treble crochet in each of the next 68-76-80-88-96-104 stitches (front piece), skip 44-46-50-58-58-62 stitches for the sleeve and work 8-8-10-10-12-12 chain stitches under the sleeve, work 1 treble crochet in each of the last 34-38-40-44-48-52 stitches (half back piece).

BODY:
= 152-168-180-196-216-232 stitches. Continue with 1 treble crochet in each stitch and, on the first round, in each chain stitch under the sleeve.
When the body measures 20-20-21-21-22-22 cm from the division, work A.4 over all stitches. When A.4 is finished in height, continue with 1 treble crochet in each stitch until the body measures 5 cm from the first round in A.4.
Cut and fasten the strand. The jumper measures approx. 50-52-54-56-58-60 cm from the shoulder down.

SLEEVES:
Work over the skipped stitches on one side of the piece as follows:
Crochet 1 slip stitch in the 4th-4th-5th-5th-6th-6th chain stitch under sleeve, 3 chain stitches, crochet 1 treble crochet in each of the next 3-3-4-4-5-5 chain stitches, 1 treble crochet in each of the next 44-46-50-58-58-62 skipped stitches, 1 treble crochet in each of the last 4-4-5-5-6-6 chain stitches under the sleeve = 52-54-60-68-70-74 stitches. Insert 1 marker in the middle of the 8-8-10-10-12-12 chain stitches under the sleeve. Start at the marker and work in the round with 1 treble crochet in each stitch for 3 cm.
Now decrease 2 stitches under the sleeve – read DECREASE TIP!
Decrease like this every 5-4-3½-2-2-2 cm a total of 6-6-8-12-12-13 times = 40-42-44-44-46-48 stitches.
When the sleeve measures 35-33-33-31-31-29 cm from the division, work A.4 over all stitches. When A.4 is finished in height, continue with 1 treble crochet in each stitch until the sleeve measures 5 cm from the first round in A.4. Cut and fasten the strand. Work the other sleeve in the same way.

ASSEMBLY:
Fold the neck double to the inside and sew a stitch in each side to keep it in place.

Diagram

symbols = this round already worked; it shows how the next round is worked in/around the stitches
symbols = 1 treble crochet in stitch below
symbols = 1 treble crochet around the stitch below (do not work in the loops but around the treble crochet itself) as follows: 1 yarn over, insert the hook around the next stitch from the back, i.e. the upper loop from the previous round lies on the right side, and work the treble crochet
symbols = increase-round – explained in text
symbols = one bobble: * Make 1 yarn over, insert the hook through the stitch below, make 1 yarn over and pull it through the stitch, extend both yarn overs (to avoid the bobble being small and compact, it is important to pull them until they stop by themselves, i.e. 1 treble crochet in height) *, work from *-* a total of 7 times, make 1 yarn over and pull it through all 15 loops on the hook
symbols = 1 double crochet around the stitch below (do not work in the loops but around the treble crochet itself) as follows: Insert the hook around the next stitch from the back, i.e. the upper loop from the previous round lies on the right side, and work the double crochet
symbols = 1 treble crochet around chain stitch below
symbols = 1 chain stitch
diagram
diagram
Do you have a question? See a list of frequently asked questions (FAQ)

Knitting tension is what determines the final measurements of your work, and is usually measured per 10 x 10 cm. It is provided like so: number of stitches in width x number of rows in height - eg: 19 stitches x 26 rows = 10 x 10 cm.

The knitting tension is very individual; some people knit/crochet loosely while others work tightly. You adjust the knitting tension with the needle size, which is why the suggested needle size is only meant as a guide! You need to adjust this (up or down) to ensure that YOUR knitting tension matches the knitting tension provided in the pattern. If you work with a different knitting tension than provided you will have a different yarn consumption, and your work will have different measurements than what the pattern suggests.

The knitting tension also determines which yarns can replace each other. As long as you achieve the same knitting tension you can replace one yarn with another.

See DROPS lesson: How to measure your tension/gauge

See DROPS video: How to make a gauge tension swatch

The required amount of yarn is provided in grams, eg: 450 g. To calculate how many balls you’ll need you first need to know how many grams are in 1 ball (25g, 50g or 100g). This information is available if you click on the individual yarn quality on our pages. Divide the amount required with the amount of each ball. For example, if each ball is 50g (the most common amount), the calculation will be as follows: 450 / 50 = 9 balls.

The important thing when changing from one yarn to another is that the knitting/crochet tension remains the same. This is so that the measurements of the finished piece will be the same as on the sketch provided. It is easier to achieve the same knitting tension using yarns from the same yarn group. It is also possible to work with multiple strands of a thinner yarn to achieve the knitting tension of a thicker one. Please try our yarn converter. We recommend you to always work a test swatch.

Please NOTE: when changing yarn the garment might have a different look and feel to the garment in the photo, due to individual properties and qualities of each yarn.

See DROPS lesson: Can I use a different yarn than the one mentioned in the pattern?

All our yarns are categorised into yarn groups (from A to F) according to thickness and knitting tension – group A contains the thinnest yarns and group F the thickest. This makes it easier for you to find alternative yarns to our patterns, should you wish to switch yarn. All yarns within the same group have a similar knitting tension and can easily replace each other. However, different yarn qualities have different structures and properties which will give the finished work a unique look and feel.

Click here for an overview of the yarns in each yarn group

At the top of all our patterns you’ll find a link to our yarn calculator, which is a helpful tool should you wish to use a different yarn than suggested. By filling in the yarn quality you wish to replace, the amount (in your size) and number of strands, the calculator will present good alternative yarns with the same knitting tension. Additionally it will tell you how much you’ll require in the new qualities and whether you’ll need to work with multiple strands. Most skeins are 50g (some are 25g or 100g).

If the pattern is worked with multiple colours, every colour will have to be calculated separately. Similarly, if the pattern is worked with several strands of different yarns (for example 1 strand Alpaca and 1 strand Kid-Silk) you will have to find alternatives for each, individually.

Click here to see our yarn calculator

Since different yarns have different qualities and textures we have chosen to keep the original yarn in our patterns. However, you can easily find options among our available qualities by using our yarn calculator, or simply pick a yarn from the same yarn group.

It is possible that some retailers still have discontinued yarns in stock, or that someone has a few skeins at home that they would like to find patterns for.

The yarn calculator will provide both alternative yarn as well as required amount in the new quality.

If you think it's hard to decide what size to make, it can be a good idea to measure a garment you own already and like the size of. Then you can pick the size by comparing those measures with the ones available in the pattern's size chart.

You'll find the size chart at the bottom of the pattern.

See DROPS lesson: How to read size chart

The needle size provided in the pattern serves only as a guide, the important thing is to follow the knitting tension. And since knitting tension is very individual, you will have to adjust the needle size to ensure that YOUR tension is the same as in the pattern – maybe you’ll have to adjust 1, or even 2 needle sizes, up or down to achieve the correct tension. For this, we recommend that you work test swatches.

Should you work with a different knitting tension than the one provided, the measurements of the finished garment might deviate from the measurement sketch.

See DROPS lesson: How to measure your tension/gauge

See DROPS video: How to make a tension/gauge swatch

Working a garment top-down provides more flexibility and room for personal adjustment. For example it is easier to try the garment on while working, as well as making adjustments to length of yoke and shoulder caps.

The instructions are carefully explaining every step, in the correct order. Diagrams are adjusted to the knitting direction and are worked as usual.

The diagram depicts all rows/rounds, and every stitch seen from the right side. It is read from bottom to top, from right to left. 1 square = 1 stitch.

When working back and forth, every other row is worked from the right side and every other row is worked from the wrong side. When working from the wrong side, the diagram will have to be worked reversed: from left to right, knit stitches are purled, purl stitches are knit etc.

When working in the round every round is worked from the right side and the diagram are worked from right to left on all rounds.

See DROPS lesson: How to read knitting diagrams

The diagram depicts all rows/rounds, and every stitch seen from the right side. It is worked from bottom to top, from right to left.

When working back and forth every other row is worked from the right side: from right to left and every other row is worked from the wrong side: from left to right.

When working in the round, every row in the diagram are worked from the right side, from right to left.

When working a circular diagram you start in the middle and work your way outwards, counter clockwise, row by row.

The rows usually start with a given number of chain stitches (equivalent to the height of the following stitch), this will either be depicted in the diagram or explained in the pattern.

See DROPS lesson: How to read crochet diagrams

Instructions for working several diagrams after each other on the same row/round, will often be written like so: “work A.1, A.2, A.3 a total of 0-0-2-3-4 times". This means you work A.1 once, then A.2 is worked once, and A.3 is repeated (in width) the number of times provided for your size – in this case like so: S = 0 times, M = 0 times, L=2 times, XL= 3 times and XXL = 4 times.

The diagrams are worked as usual: begin with the first row in A.1, then work the first row in A.2 etc.

See DROPS lesson: How to read knitting diagrams

See DROPS lesson: How to read crochet diagrams

The total width of the garment (from wrist-to-wrist) will be larger in the larger sizes, despite the actual sleeves being shorter. The larger sizes have longer sleeve caps and wider shoulders, so there will be a good fit in all sizes.

The measurement sketch/schematic drawing provides information regarding the full length of the garment. If it’s a jumper or a jacket the length is measured from the highest point on the shoulder closest to the neckline, and straight down to the bottom of the garment. It is NOT measured from the tip of shoulder. Similarly, the length of yoke is measured from the highest point on the shoulder and down to where yoke is split into body and sleeves.

On a jacket measures are never taken along bands, unless specifically stated. Always measure inside band stitches when measuring the length.

See DROPS lesson: How to read a schematic drawing

Diagrams are often repeated on the round or in height. 1 repeat is the diagram the way it appears in the pattern. If it says to work 5 repeats of A.1 in the round, then you work A.1 a total of 5 times after/next to each other in the round. If it says to work 2 repeats of A.1 vertically/in height you work the entire diagram once, then begin again at the start and work the entire diagram one more time.

Chain stitches are slightly narrower than other stitches and to avoid working the cast-on edge too tight, we simply chain more stitches to begin with. The stitch count will be adjusted on the following row to fit the pattern and measurement sketch.

The rib edge is more elastic and will contract slightly compared to, for example, stocking stitch. By increasing before the rib edge, you avoid a visible difference in width between the rib edge and the rest of the body.

It’s very easy to cast off too tightly, and by making yarn overs while casting off (and simultaneously casting these off) you avoid a too tight cast off edge.

See DROPS video: How to bind off with yarn overs (yo)

To achieve an even increase (or decrease) you can increase on, for example: every 3rd and 4th row alternately, like so: work 2 rows and increase on the 3rd row, work 3 rows and increase on the 4th. Repeat this until the increase is complete.

See DROPS lesson: Increase or decrease 1 st on every 3rd and 4th row alternately

Should you prefer to work in the round instead of back and forth, you may of course adjust the pattern. You’ll need to add steeks mid-front (usually 5 stitches), and follow the instructions. When you would normally turn and work from the wrong side, simply work across the steek and continue in the round. At the end you’ll cut the piece open, pick up stitches to work bands, and cover the cut edges.

See DROPS video: How to knit steeks and cut open

Should you prefer to work back and forth instead of in the round, you may of course adjust the pattern so you work the pieces separately and then assemble them at the end. Divide the stitches for the body in 2, add 1 edge stitch in each side (for sewing) and work the front and back pieces separately.

See DROPS lesson: Can I adapt a pattern for circular needles into straight needles?

Pattern repeats can vary slightly in the different sizes, in order to get the correct proportions. If you’re not working the exact same size as the garment in the photo, yours might deviate slightly. This has been carefully developed and adjusted so that the complete impression of the garment is the same in all sizes.

Make sure to follow instructions and diagrams for your size!

If you have found a pattern you like which is available in women’s size it’s not very difficult to convert it to men’s size. The biggest difference will be the length of sleeves and body. Start working on the women size that you think would fit across the chest. The additional length will be worked right before you cast off for the armhole/sleeve cap. If the pattern is worked top-down you can add the length right after the armhole or before the first decrease on sleeve.

Regarding additional yarn amount, this will depend on how much length you add, but it is better with a skein too many than too few.

All yarns will have excess fibres (from production) that might come off as lint or shedding. Brushed yarns (ie hairier yarns) have more of these loose, excess fibres, causing more shedding.

Shedding also depends on what is worn under or over the garment, and whether this pulls at the yarn fibres. It’s therefore not possible to guarantee that there will be no shedding

Below are some tips on how to get the best result when working with hairier yarns:

1. When the garment is finished (before you wash it) shake it vigorously so the looser hairs come off. NOTE: do NOT use a lint roller, brush or any method that pulls at the yarn.

2. Place the garment in a plastic bag and put it in your freezer - the temperature will cause the fibres to become less attached to each other, and excess fibres will come off easier.

3. Leave in the freezer for a few hours before taking it out and shaking it again.

4. Wash the garment according to the instructions on the yarn label.

Pilling is a natural process that happens to even the most exclusive of fibers. It's a natural sign of wear and tear that is hard to avoid, and that is most visible in high friction areas of your garment like a sweater's arms and cuffs.

You can make your garment look as new by removing the pilling, using a fabric comb or a pill/lint remover.

Still can't find the answer you need? Then scroll down and leave your question so one of our experts can try to help you. This will be done normally within 5 to 10 working days.
In the meantime, you can read the questions and answers that others have left to this pattern or join the DROPS Workshop on Facebook to get help from fellow knitters/crocheters!

You might also like...

Post a comment to pattern DROPS 237-34

We would love to hear what you have to say about this pattern!

If you want to leave a question, please make sure you select the correct category in the form below, to speed up the answering process. Required fields are marked *.

Comments / Questions (17)

country flag Linda wrote:

Hello, no answer in CZ so far...? I have a question: a 10 cm test sample should have 16 DS. I'm crocheting a stand, size XL - 92 starting DCs. In the size drawing of the sweater, the stand should be 21 cm (i.e. 42 cm in total) = according to the test sample, it comes out to 67.2 DS, not 92...? The result is that I have a stand about 27 cm wide (total circumference 54 cm) instead of the stated 21 cm (or 42 cm). Can you clarify this for me? Thank you. 02/07/2024 - 08:54

18.03.2024 - 21:52

DROPS Design answered:

Dear Linda, the 21 cm in the chart are for the width of neck, when jumper lies flat, the 92 sts will measure approx 58 cm circomference but these also include the shoulders (4 cm shoulders). So that you get: 58 - 16 cm shoulder / 2 = 21 cm. Happy crocheting!

19.03.2024 - 11:11

country flag Dagmar wrote:

Again trying to get the Silver Wreath going smoothly...... Was there a reason you decided not to include "in written pattern of yoke" all changes in pattern such as bobbles and mesh? Yes you have it on diagram IF you can understand it. However the Written pattern (especially yoke) does "not" match the picture. How very disappointing.....

10.02.2024 - 02:33

country flag Dagmar wrote:

Whew! All morning I have struggled with Silver Wreath pattern. What in the heck does "dc around stitch below mean"?? Your verbal explanation is not clear. And I looked for a tutorial but you have none. This is extremely frustrating!!

08.02.2024 - 23:32

country flag Dagmar wrote:

In conclusion in would be "far" more efficient rather than all the written and short videos to do "One Complete Video Tutorial" for sweater pattern as so many other people do. Sectioned off with time stamps for "particular stitches". To visually see is by far more efficient. I've spent hours on end trying to figure your instructions.

08.02.2024 - 21:34

country flag Dagmar wrote:

Your English interpretation is not clear and too complicated to understand. I am struggling with your patterns. It doesn't translate if you are thinking in your language and translating to English. Best to have an English speaker who speaks your language to do the translating.

08.02.2024 - 21:08

country flag Linda wrote:

Dobrý den, mám dotaz: zkušební vzorek 10 cm má mít 16 DS. Háčkuji stojáček, vel. XL - 92 počátečních ŘO. V nákresu velikosti svetru má mít stojáček 21 cm (tzn. celý 42 cm) = podle zkušebního vzorku to vychází 67, 2 DS, nikoli 92...? Výsledkem je, že mám stojáček široký asi 27 cm (celý obvod 54 cm) místo uvedených 21 cm (resp. 42 cm). Můžete mi to vyjasnit? Děkuji.

07.02.2024 - 08:54

country flag Gillian wrote:

Hi, I have 195 stitches after row 1 of A3 which is correct for size L. I then work the two shell rounds (2 trebles/chain/2 trebles) over 5 stitches, followed by the third round of A3 (5 trebles across each shell inc chain) with increases, but end up with 380 stitches instead of 230.

17.01.2024 - 18:47

DROPS Design answered:

Dear Gillian, A.3 is worked over 5 sts, this means you will repeat A.3 a total of 39 times in width, work A.3 as follows on 2nd row:( skip 2 sts, (2 tr, 1 ch, 2 tr) in the next st, skip 2 sts), repeat from (to) to the end of the round, you will have a total of 39 tr groups (1 in each repeat). On 4th round in A.3, work 1 tr in each stitch (= still 5 sts in each A.3) but increase evenly 35 sts = 195+35=230 sts. Hope it can help. Happy crocheting!

18.01.2024 - 08:48

country flag Eimante wrote:

Hello, I chained 84 stitches and joined them in a ring, and since it is supposed to be a neck, how can it be enough? My head doesn't fit. How loose the foundation chain is supposed to be?

18.11.2023 - 18:43

DROPS Design answered:

Dear Eimante, make sure you get the correct tension; then make sure the foundation chain will not be too tight, use a larger crochet if needed making sure this is loose enough, if you increase the number of stitches, the neck edge will be then too large around your own neck. Happy crocheting!

20.11.2023 - 10:12

country flag Esperanz wrote:

El jersey queda perfecto hasta la última vuelta de A.3. Después he hecho 14 vueltas para acabar el canesú pero, al no haber más aumentos, los hombros quedan encajados, no hay movilidad para los brazos. Debería ir aumentando puntos en esas 14 vueltas??

12.10.2023 - 13:50

DROPS Design answered:

Hola Esperanza, comprueba que la tensión del tejido esté correcta. Si se mantiene la tensión del tejido indicada arriba, después de A.3, deberían quedarte alrededor de 3 vueltas para que el canesú llegue a la medida final, antes de dividir. Ten en cuenta que la tensión es : 8 filas = 10cm, así que si trabajaras 14 vueltas significa que estás trabajando aprox. 20cm más, cuando el canesú debe medir entre 21 y 29cm (dependiendo de la talla) en total.

15.10.2023 - 23:49

country flag Nienke wrote:

Moet ik aan het begin van de trui doorgaan met 1 stokje per steek tot een hoogte van 12 cm? En dan aan de pas beginnen?

13.09.2023 - 17:01

DROPS Design answered:

Dag Nienke,

Ja klopt, je haakt 12 cm in de hoogte voor de hals en dan begin je aan de pas.

13.09.2023 - 20:09