
Popular categories
Looking for a yarn?


|
|
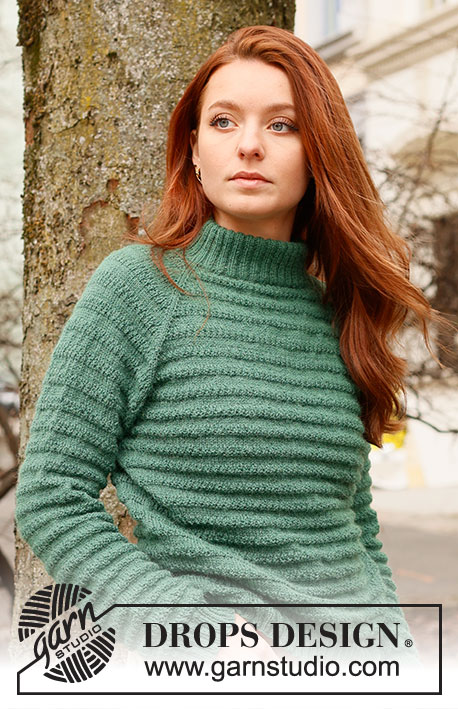
Autumn Ballade |
|
 |
 |
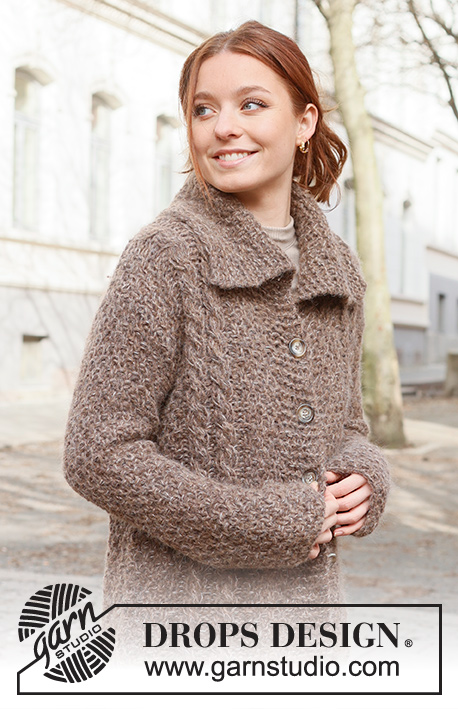
Knitted sweater in DROPS Soft Tweed and DROPS Kid-Silk. Piece is knitted top down in stockinette stitch with raglan. Size: S - XXXL
DROPS 235-26 |
|
|
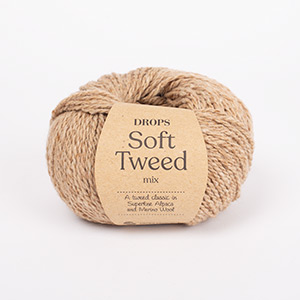
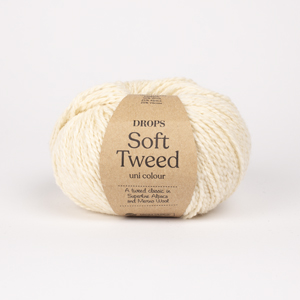
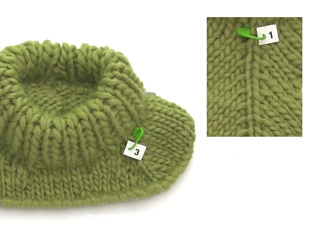
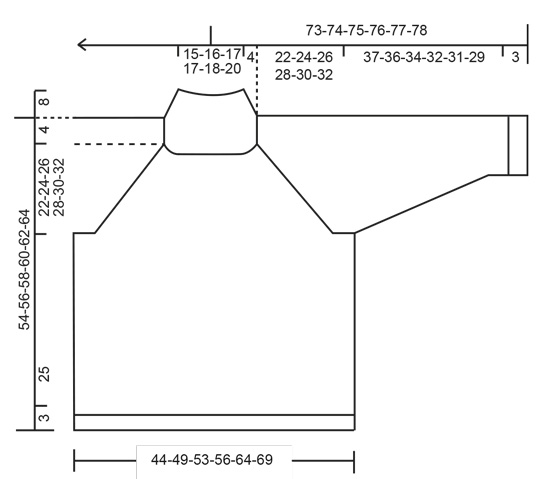
---------------------------------------------------------- EXPLANATION FOR THE PATTERN: ---------------------------------------------------------- GARTER STITCH (back and forth): Knit all rows. 1 ridge vertically = knit 2 rows. RAGLAN: Increase by making 1 yarn over on each side of stitch with marker in every transition between body and sleeves (8 stitches increased on round). On next round work yarn over twisted to avoid holes DECREASE TIP (applies to sleeves): Decrease 1 stitch on each side of marker thread as follows: Work until 3 stitches remain before marker thread and knit 2 together, knit 2 (marker thread is between these 2 stitches), slip 1 stitch knitwise, knit 1, pass slipped stitch over stitch worked. ---------------------------------------------------------- START THE PIECE HERE: ---------------------------------------------------------- SWEATER - SHORT OVERVIEW OF THE PIECE: Work neck edge and yoke in the round on circular needle from mid back, top down. Now divide yoke for body and sleeves. Work body in the round on circular needle, top down, before dividing the piece and work back and forth for vents. Work sleeves in the round on double pointed needles or a short circular needle. HIGH COLLAR: Cast on 78-82-84-86-90-94 stitches with 1 strand DROPS Soft Tweed and 1 strand DROPS Kid-Silk (2 strands) on a short circular needle size 4 MM = US 6. Work rib (knit 1/purl 1) in the round for 8 cm = 3⅛". Switch to circular needle size 5.5 MM = US 9. Knit 1 round while increasing 6-6-12-10-18-22 stitches evenly = 84-88-96-96-108-116 stitches. Now insert 4 markers in piece as explained below (without working the stitches). Use markers when increasing for raglan. Count 13-14-16-16-19-21 stitches (half back piece), insert 1st marker in next stitch, count 14 stitches (sleeve), insert 2nd marker in next stitch, count 26-28-32-32-38-42 stitches (front piece), insert 3rd marker in next stitch, count 14 stitches (sleeve), insert 4th marker in next stitch, 13-14-16-16-19-21 stitches remain on round (half back piece). Cut the yarn. NECK LINE: Now work neck line with short rows as explained below. Begin from right side, 3 stitches before 3rd marker (i.e. in left side of neck if wearing the garment). Work in stockinette stitch and increase for RAGLAN - read explanation above, until 3 stitches past 2nd marker have been worked (right side of neck at the front). Turn piece, tighten yarn and work from wrong side until 7 stitches have been worked past 3rd marker. Turn piece and work back from right side until 7 stitches have been worked past 2nd marker - remember increase for raglan. Turn piece, tighten yarn and work from wrong side until 11 stitches have been worked past 3rd marker. Turn piece and work back from right side until 11 stitches have been worked past 2nd marker - remember increase for raglan. Turn piece, tighten yarn and work from wrong side until 3 stitches have been worked past 3rd marker. Cut the yarn. Work yoke as explained below. YOKE: Begin mid back and continue increase for raglan every other round until increase has been done 10-13-14-16-20-21 times in total (including increase on the short rows). Then increase every 4th round 6-6-6-6-5-5 times = 212-240-256-272-308-324 stitches. REMEMBER THE KNITTING GAUGE! Work without increases until piece measures 22-24-26-28-30-32 cm = 8¾"-9½"-10¼"-11"-11¾"-12½" mid front (measured after neck) Now divide yoke for body and sleeves as follows: Work the first 32-36-39-41-47-50 stitches (half back piece), slip the next 42-48-50-54-60-62 stitches on a stitch holder for sleeve, and cast on 6-6-6-8-8-10 new stitches on needle (in the side under sleeve), work the next 64-72-78-82-94-100 stitches (front piece), slip the next 42-48-50-54-60-62 stitches on a thread for sleeve, and cast on 6-6-6-8-8-10 new stitches on needle (in the side under sleeve), work the remaining 32-36-39-41-47-50 stitches (half back piece). BODY: = 140-156-168-180-204-220 stitches. Begin round in the middle of the new stitches under one of the sleeves, and work in stockinette stitch in the round until piece measures 25 cm = 9¾". Keep the first 70-78-84-90-102-110 stitches on needle and slip the last 70-78-84-90-102-110 stitches on thread. Switch to circular needle size 4 MM = US 6. Knit 1 row from right side while increasing 5-5-5-7-7-7 stitches evenly = 75-83-89-97-109-117 stitches. Work next row as follows from wrong side: 1 stitch in GARTER STITCH - read explanation above, * purl 1, knit 1 *, repeat from *-* until 2 stitches remain, purl 1 and 1 stitch in garter stitch. Continue rib for 3 cm = 1⅛". Bind off. Slip stitches from thread on to circular needle size 4 MM = US 6, and work the same way. SLEEVE: Slip the 42-48-50-54-60-62 stitches from stitch holder in one side of piece on a short circular needle or double pointed needles size 5.5 MM = US 9 and pick in addition up 1 stitch in each of the 6-6-6-8-8-10 stitches cast on under sleeve = 48-54-56-62-68-72 stitches. Insert a marker thread in the middle of the new stitches. Work in stockinette stitch in the round. When piece measures 4 cm = 1½", decrease 2 stitches under sleeve - read DECREASE TIP. Decrease like this approx. every 10-6-6-3½-3-2½ cm = 4"-2⅜"-2⅜"-1¼"-1⅛"-1" 3-5-5-7-8-9 times in total = 42-44-46-48-52-54 stitches. Continue until piece measures 37-36-34-32-31-29 cm = 14½"-14¼"-13⅜"-12½"-12¼"-11⅜". Switch to double pointed needles size 4 MM = US 6. Work rib (knit 1/purl 1) for 3 cm = 1⅛". Bind off. Sleeve measures approx. 40-39-37-35-34-32 cm = 15¾"-15¼"-14½"-13¾"-13⅜"-12½" from division. Work the other sleeve the same way. |
|
|
|
|
Have you made this or any other of our designs? Tag your pictures in social media with #dropsdesign so we can see them! Do you need help with this pattern?You'll find tutorial videos, a Comments/Questions area and more by visiting the pattern on garnstudio.com. © 1982-2024 DROPS Design A/S. We reserve all rights. This document, including all its sub-sections, has copyrights. Read more about what you can do with our patterns at the bottom of each pattern on our site. |
|


With over 40 years in knitting and crochet design, DROPS Design offers one of the most extensive collections of free patterns on the internet - translated to 17 languages. As of today we count 304 catalogs and 11422 patterns - 11417 of which are translated into English (US/in).
We work hard to bring you the best knitting and crochet have to offer, inspiration and advice as well as great quality yarns at incredible prices! Would you like to use our patterns for other than personal use? You can read what you are allowed to do in the Copyright text at the bottom of all our patterns. Happy crafting!
Comments / Questions (12)
Hello :) this is my first top-down sweater and I'm stuck at the end of the high collar, I finished it and I am supposed to start the neck line but I'm a bit confused. so now my work (collar) is on my needles (I used dpn instead), I cut the yarn and what am I supposed to do? do I take out new needles to work the short rows? do they have to be circular needles or straight ones? Also, I'm planning on using a different colour for the ribbing, at what point do I switch to the main one?
09.09.2023 - 14:54DROPS Design answered:
Dear Emma, it's more confortable to use circular needles to work. You cut the yarn so that you can start at a previous stitch in the round. You rejoin the yarn 3 stitches before the 3rd marker and start working the short rows for the neck. Happy knitting!
10.09.2023 - 23:22Bonjour Je viens de commander cette laine Réf 18( idem que le modèle) car je voulais réaliser un ouvrage TWEED or je suis déçue car la laine reçue ( dyelot 218018 ) ne correspond pas à une laine tweed . Merci de faire remonter la remarque à votre fournisseur/ fabricant. Merci
13.03.2023 - 10:52DROPS Design answered:
Bonjour Annick, nous sommes désolés de lire que vous n'avez pas aimé cette laine, merci de bien vouloir remonter toutes les informations utiles à votre magasin qui pourra fort probablement vous aider et nous transmettra vos retours. Bon tricot!
13.03.2023 - 13:33Buona sera, sto lavorando il maglione nella taglia L ma ho riscontrato un problema: ho montato le 84 maglie, finito lo schema collo alto inizia il primo aumento, per la taglia L sono 12 maglie aumentate, per un totale di 96. Quando metto i segnapunti però rimangono 4 maglie fuori, perché secondo i vostri conti 16+14+32+14+16 il totale è 92. Potete correggere l’errore per favore, grazie!
15.02.2023 - 20:31DROPS Design answered:
Buonasera Federica, non ci sono errori nella spiegazione, è sicura di aver inserito i segnapunti NELLA maglia e non TRA le maglie? Buon lavoro!
16.02.2023 - 19:14Lees de berichten over de draad in de steek te doen maar dan is dat toch de steek waar je vóór en ná moet meerderen? Dan klopt toch het aantal steken helaas echt niet. Helaas heb ik nu 4 steken te weinig in het pand en teveel in mouw. Heb het wel opgelost door snel in het pand te meerderen, maar voor onervaren breiers zal dit niet zo logisch zijn. Erg omslachtig beschreven, wijkt af van een normale beschrijving, daarom ging het fout en ben niet de enige lees ik
02.02.2023 - 22:04Bonjour, taille M - fin du col montant 88 m pourriez vous dire combien de mailles au total à la fin de l'encolure et avant l'empiècement ? car je n'arrive pas à vos chiffres 212-240-256-272-308-324 mailles à la fin des augmentations de l'empiècement. merci
26.11.2022 - 20:32DROPS Design answered:
Bonjour Rose, vous augmentez 8 mailles pour le raglan, à chaque tour d'augmentations, autrement dit: 13 fois tous les 2 tours (13x8=104); puis 6 x tous les 4 tours (=6x8=48), vous aviez 88 m +104+48=240 mailles. Bon tricot!
28.11.2022 - 09:32Hello, I would like to ask whether size XXXL is suitable for 125 cm in bust? If not, how to modify this pattern to fit my size?
22.11.2022 - 01:48DROPS Design answered:
Dear Asia, you will find all finished measurements taken flat from side to side + for each size in the chart at the bottom of the pattern; compare a similar garment you have and like the shape to find out which size would match the best. Read more here. Happy knitting!
22.11.2022 - 10:19De markeerders zijn inderdaad tussen de steken geplaatst ipv IN de volgende steek. Dankjewel, ik kan weer verder.👍🏼
08.10.2022 - 16:57De verdeling van de steken na de meerdering klopt niet: er zijn 96 steken na het meerderen. De steken worden verdeeld: 16+14+32+14+16=92 steken. Hoe nu verder?
06.10.2022 - 21:44DROPS Design answered:
Dag José,
Heb je de markeerdraden in de steken geplaatst (en niet tussen 2 steken)? Dit kan namelijk het verschil van 4 steken verklaren.
08.10.2022 - 16:37De verdeling klopt niet: . Brei 1 naald recht en meerder 6-6-12-10-18-22 steken verdeeld = 84-88-96-96-108-116 steken. Voeg nu 4 markeerdraden in het werk zoals uitgelegd hieronder. Gebruik de markeerdraden bij het meerderen voor de raglan. Tel 13-14-16-16-19-21 steken (helft van het achterpand), voeg de 1e markeerdraad in de volgende steek, tel 14 steken (mouw), voeg de 2e markeerdraad in de volgende steek, tel 26-28-32-32-38-42 st Dit is in totaal 92 steken en geen 96
24.09.2022 - 09:39Buongiorno sto lavorando questo modello ma non mi torna il n delle maglie: voi indicate per la taglia s 64 maglie davanti 42 maniche e64 per il dietro. Ma avendo lavorato i ferri accotciati per lo scollo , le maglie del dietro sono più di quelle del davanti almeno 10 in più. Cosa devo fare? Se faccio aumeenti solo sul raglan davanti mi verrà una gobba . Che fare? Grazie
22.09.2022 - 12:04DROPS Design answered:
Buonasera Cinzia, alla fine degli aumenti per raglan ha ottenuto 212 maglie come indicato per la taglia S? Buon lavoro!
22.09.2022 - 16:17