DROPS Kid-Silk
DROPS Kid-Silk
75% Mohair, 25% Silk
from 5.05 € /25g
Get the yarn to make this pattern from 65.65€.

The yarn cost is calculated from the pattern’s smallest size and the yarn’s cheapest product type. Looking for an even better price? You might find it on the DROPS Deals!

DROPS SS24

Winter Feather

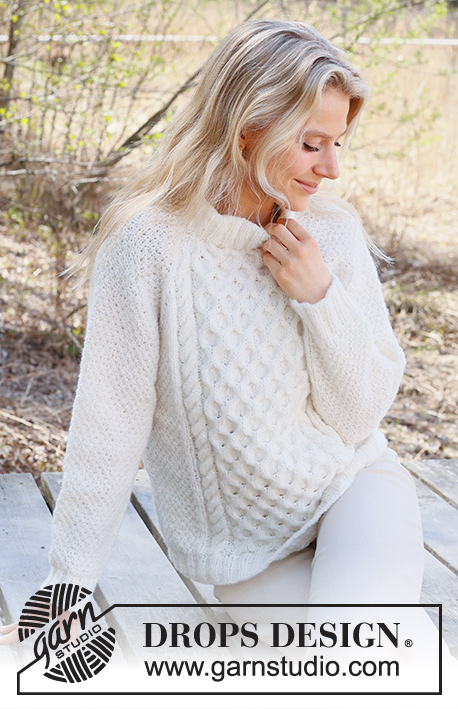
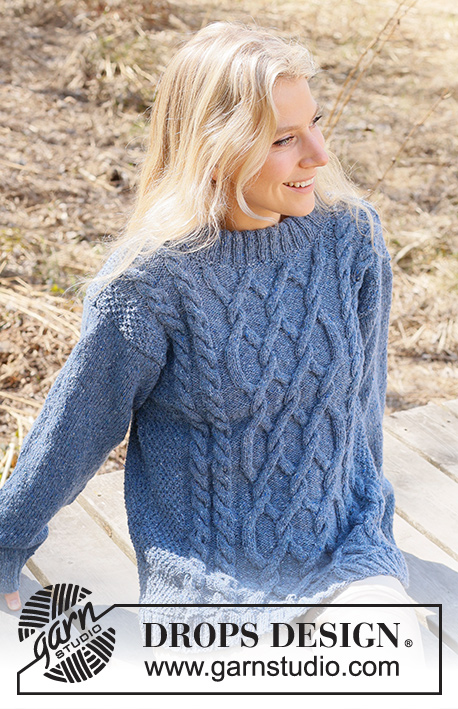
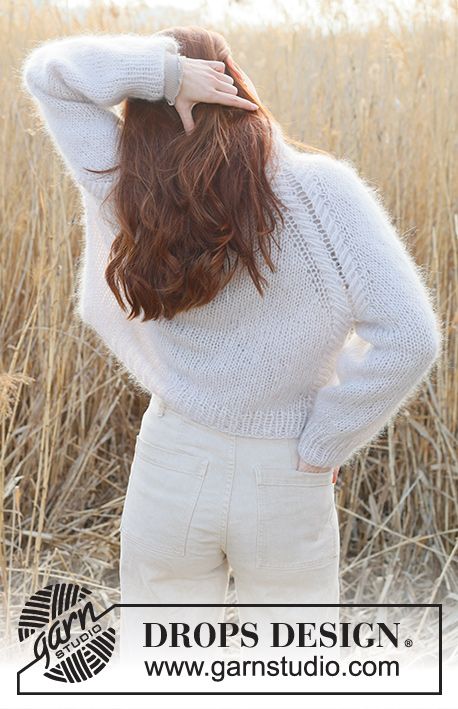
Knitted jumper in 5 strands DROPS Kid-Silk or 2 strands DROPS Brushed Alpaca Silk. Piece is knitted top down with raglan, cables and double neck edge. Size: S - XXXL

DROPS 236-1
DROPS design: Pattern ks-202
Yarn group A + A + A + A + A or E
----------------------------------------------------------

SIZE:
S - M - L - XL - XXL - XXXL

MATERIALS:
DROPS KID-SILK from Garnstudio (belongs to yarn group A)
325-350-400-425-475-525 g colour 38, chalk

Or use:
DROPS BRUSHED ALPACA SILK from Garnstudio (belongs to yarn group C)
175-200-200-225-250-275 g colour 01, off white

NEEDLES:
DROPS CIRCULAR NEEDLE SIZE 8 mm: Length 40 and 80 cm.
DROPS CIRCULAR NEEDLE SIZE 7 mm: Length 40 and 80 cm.
DROPS DOUBLE POINTED NEEDLES SIZE 8 mm
DROPS DOUBLE POINTED NEEDLES SIZE 7 mm
DROPS CABLE NEEDLE.
The technique MAGIC LOOP can be used – you then only need circular needle of 80 cm in each size.

KNITTING TENSION:
11 stitches in width and 15 rows vertically in stocking stitch and 5 strands DROPS Kid-Silk or 2 strands DROPS Brushed Alpaca Silk = 10 x 10 cm.
NOTE! Remember that needle size is only a suggestion. If you have too many stitches on 10 cm switch to larger needles. If you have too few stitches on 10 cm switch to smaller needles.

-------------------------------------------------------

Alternative Yarn – See how to change yarns here
Yarn Groups A to F – Use the same pattern and change the yarn here
Yarn usage using an alternative yarn – Use our yarn converter here

-------------------------------------------------------

DROPS Kid-Silk
DROPS Kid-Silk
75% Mohair, 25% Silk
from 5.05 € /25g
Get the yarn to make this pattern from 65.65€.

The yarn cost is calculated from the pattern’s smallest size and the yarn’s cheapest product type. Looking for an even better price? You might find it on the DROPS Deals!

Pattern instructions

----------------------------------------------------------

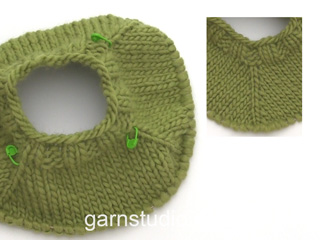
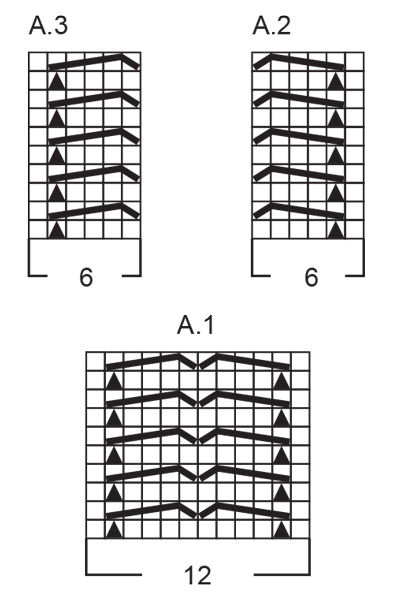
EXPLANATION FOR THE PATTERN:

----------------------------------------------------------

PATTERN:
See diagrams A.1 to A.3.

RAGLAN:
Increase 1 stitch by making 1 yarn over before/after A.1 as explained in pattern (in every transition between front piece/back piece and sleeves).
On next round work yarn overs as follows:
BEFORE A.1:
Slip yarn over on to right needle knitwise, slip it back on left needle, i.e. yarn over is twisted, knit yarn over in front loop of stitch (yarn over is twisted towards the right). It should not make a hole.
AFTER A.1:
Knit yarn over in back loop of stitch (yarn over is twisted towards the left). It should not make a hole.
Then work the increased stitches in stocking stitch.

DECREASE TIP-1 (applies to sides of body):
Decrease 1 stitch on each side of marker thread as follows: Work until 3 stitches remain before marker thread and knit 2 together, knit 2 (marker thread is between these 2 stitches), slip 1 stitch knitwise, knit 1, pass slipped stitch over stitch worked (2 stitches decreased).

DECREASE TIP-2 (applies to mid under sleeves):
Decrease 1 stitch on each side of marker thread as follows: Work until 4 stitches remain before marker thread and knit 2 together, knit 4 (marker thread is mid between these 4 stitches), slip 1 stitch knitwise, knit 1, pass slipped stitch over stitch worked.

----------------------------------------------------------

START THE PIECE HERE:

----------------------------------------------------------

JUMPER - SHORT OVERVIEW OF THE PIECE:
Work double neck edge and yoke in the round on circular needle from mid back, top down. Now divide yoke for body and sleeves. Work the body in the round on circular needle. Work sleeves in the round on double pointed needles/a short circular needle.

DOUBLE NECK EDGE:
Cast on 87-93-93-99-102-108 stitches on circular needle size 7 mm with 5 strands DROPS Kid-Silk or 2 strands DROPS Brushed Alpaca Silk. Work rib (= knit 1/purl 2).
When piece measures 2 cm, decrease all 2 purl stitches to 1 purl stitch by working knit 1/purl 2 together the entire round = 58-62-62-66-68-72 stitches. Continue rib with knit 1/purl 1.
When piece measures 20-20-20-22-22-22 cm, knit 1 round while increasing 22-22-22-26-28-28 stitches evenly = 80-84-84-92-96-100 stitches.
Insert 1 marker in middle of round. Work yoke as explained below - measure yoke from this marker!

YOKE:
Switch to circular needle size 8 mm. Work first round as follows: 7-8-8-9-10-11 stitches in stocking stitch (½ back piece), A.1, 2-2-2-4-4-4 stitches in stocking stitch (sleeve), A.1, 14-16-16-18-20-22 stitches in stocking stitch (front piece), A.1, 2-2-2-4-4-4 stitches in stocking stitch (sleeve), A.1, 7-8-8-9-10-11 stitches in stocking stitch (½ back piece).
Continue this pattern. REMEMBER THE KNITTING TENSION!
AT THE SAME TIME on next round increase for RAGLAN – see explanation above. Increase for raglan every other round 9-12-11-9-8-8 times in total = 152-180-172-164-160-164 stitches.

Then increase differently on body and sleeves, i.e. continue increase for raglan but on every other increase, increase only on body (4 stitches increased). I.e. increase on body every other round, and on sleeves every 4th round. Increase like this 4-2-4-8-10-12 times on body (2-1-2-4-5-6 times on sleeves). After all increases are done there are 176-192-196-212-220-236 stitches on needle.

Work without increases until piece measures 19-21-23-24-26-28 cm from marker at the neck. Now divide yoke for body and sleeves as follows: Work 20-22-23-26-28-31 stitches in stocking stitch, A.2, slip the next 36-40-40-42-42-44 stitches on a thread for sleeve, cast on 6-6-8-8-10-10 new stitches on needle (in the side under sleeve), work A.3, 40-44-46-52-56-62 stitches in stocking stitch, A.2, slip the next 36-40-40-42-42-44 stitches on a thread for sleeve, cast on 6-6-8-8-10-10 new stitches on needle (in the side under sleeve), work A.3 and work 20-22-23-26-28-31 stitches in stocking stitch.
Finish body and sleeves separately. Now measure piece from here!

BODY:
= 116-124-132-144-156-168 stitches. Insert 1 marker thread in each side on body– in the middle of the 6-6-8-8-10-10 stitches that were cast on under sleeves. Work in stocking, A.2 and A.3 in the round. When piece measures 6 cm from division, decrease 1 stitch on each side of both marker threads - read DECREASE TIP-1. Repeat decrease when piece measures 12 cm from division in all sizes = 108-116-124-136-148-160 stitches.
Work until piece measures 22 cm from division in all sizes.
Switch to circular needle size 7 mm. Work rib (knit 1/purl 1) for 4 cm. Loosely cast off. Jumper measures approx. 50-52-54-56-58-60 cm from shoulder.

SLEEVES:
Slip the 36-40-40-42-42-44 stitches from thread in one side of piece on double pointed needles or a short circular needle size 8 mm and pick in addition up 1 stitch in each of the 6-6-8-8-10-10 stitches cast on under sleeve = 42-46-48-50-52-54 stitches.
Insert 1 marker thread in the middle of the 6-6-8-8-10-10 stitches under sleeve and move the marker thread upwards when working.
Begin round at the marker thread and work stocking stitch in the round.
When sleeve measures 8-5-4-4-3-3 cm from division, decrease 2 stitches mid under sleeve - read DECREASE TIP-2. Decrease like this every 8-5-4-4-3-3 cm 2-3-4-4-5-5 times in total = 38-40-40-42-42-44 stitches.
Work until sleeve measures 40-38-37-37-35-33 cm from division. 6 cm remain until finished measurements. Try the jumper and work to desired length before rib.
Knit 1 round while decreasing 4 stitches evenly = 34-36-36-38-38-40 stitches.
Switch to double pointed needles size 7 mm. Work rib (knit 1/purl 1) for 6 cm. Loosely cast off. Sleeve measures approx. 46-44-43-43-41-39 cm. Work the other sleeve the same way.

ASSEMBLY:
Fold the rib in the neck in towards wrong side to form a double neck edge. Fasten the neck edge with 1 stitch in each side at each shoulder.

This pattern has been corrected.

Updated online: 13.09.2022
DECREASE TIP-1 (applies to sides of body):
Decrease 1 stitch on each side of marker thread as follows: Work until 3 stitches remain before marker thread ...

Diagram

symbols = knit
symbols = make 2 yarn overs, knit 1
symbols = drop the 2 yarn overs off the needle, slip 1 stitch on cable needle in front of piece (pull this stitch until it stops = approx. 3.5 cm long stitch), knit 4, knit 1 from cable needle
symbols = slip 4 stitches on cable needle behind piece, drop the 2 yarn overs off the needle, knit 1 (pull this stitch until it stops = 3.5 cm long stitch), knit 4 from cable needle
diagram
diagram

Each of our patterns has specific tutorial videos to help you.

Do you have a question? See a list of frequently asked questions (FAQ)

Knitting tension is what determines the final measurements of your work, and is usually measured per 10 x 10 cm. It is provided like so: number of stitches in width x number of rows in height - eg: 19 stitches x 26 rows = 10 x 10 cm.

The knitting tension is very individual; some people knit/crochet loosely while others work tightly. You adjust the knitting tension with the needle size, which is why the suggested needle size is only meant as a guide! You need to adjust this (up or down) to ensure that YOUR knitting tension matches the knitting tension provided in the pattern. If you work with a different knitting tension than provided you will have a different yarn consumption, and your work will have different measurements than what the pattern suggests.

The knitting tension also determines which yarns can replace each other. As long as you achieve the same knitting tension you can replace one yarn with another.

See DROPS lesson: How to measure your tension/gauge

See DROPS video: How to make a gauge tension swatch

The required amount of yarn is provided in grams, eg: 450 g. To calculate how many balls you’ll need you first need to know how many grams are in 1 ball (25g, 50g or 100g). This information is available if you click on the individual yarn quality on our pages. Divide the amount required with the amount of each ball. For example, if each ball is 50g (the most common amount), the calculation will be as follows: 450 / 50 = 9 balls.

The important thing when changing from one yarn to another is that the knitting/crochet tension remains the same. This is so that the measurements of the finished piece will be the same as on the sketch provided. It is easier to achieve the same knitting tension using yarns from the same yarn group. It is also possible to work with multiple strands of a thinner yarn to achieve the knitting tension of a thicker one. Please try our yarn converter. We recommend you to always work a test swatch.

Please NOTE: when changing yarn the garment might have a different look and feel to the garment in the photo, due to individual properties and qualities of each yarn.

See DROPS lesson: Can I use a different yarn than the one mentioned in the pattern?

All our yarns are categorised into yarn groups (from A to F) according to thickness and knitting tension – group A contains the thinnest yarns and group F the thickest. This makes it easier for you to find alternative yarns to our patterns, should you wish to switch yarn. All yarns within the same group have a similar knitting tension and can easily replace each other. However, different yarn qualities have different structures and properties which will give the finished work a unique look and feel.

Click here for an overview of the yarns in each yarn group

At the top of all our patterns you’ll find a link to our yarn calculator, which is a helpful tool should you wish to use a different yarn than suggested. By filling in the yarn quality you wish to replace, the amount (in your size) and number of strands, the calculator will present good alternative yarns with the same knitting tension. Additionally it will tell you how much you’ll require in the new qualities and whether you’ll need to work with multiple strands. Most skeins are 50g (some are 25g or 100g).

If the pattern is worked with multiple colours, every colour will have to be calculated separately. Similarly, if the pattern is worked with several strands of different yarns (for example 1 strand Alpaca and 1 strand Kid-Silk) you will have to find alternatives for each, individually.

Click here to see our yarn calculator

Since different yarns have different qualities and textures we have chosen to keep the original yarn in our patterns. However, you can easily find options among our available qualities by using our yarn calculator, or simply pick a yarn from the same yarn group.

It is possible that some retailers still have discontinued yarns in stock, or that someone has a few skeins at home that they would like to find patterns for.

The yarn calculator will provide both alternative yarn as well as required amount in the new quality.

If you think it's hard to decide what size to make, it can be a good idea to measure a garment you own already and like the size of. Then you can pick the size by comparing those measures with the ones available in the pattern's size chart.

You'll find the size chart at the bottom of the pattern.

See DROPS lesson: How to read size chart

The needle size provided in the pattern serves only as a guide, the important thing is to follow the knitting tension. And since knitting tension is very individual, you will have to adjust the needle size to ensure that YOUR tension is the same as in the pattern – maybe you’ll have to adjust 1, or even 2 needle sizes, up or down to achieve the correct tension. For this, we recommend that you work test swatches.

Should you work with a different knitting tension than the one provided, the measurements of the finished garment might deviate from the measurement sketch.

See DROPS lesson: How to measure your tension/gauge

See DROPS video: How to make a tension/gauge swatch

Working a garment top-down provides more flexibility and room for personal adjustment. For example it is easier to try the garment on while working, as well as making adjustments to length of yoke and shoulder caps.

The instructions are carefully explaining every step, in the correct order. Diagrams are adjusted to the knitting direction and are worked as usual.

The diagram depicts all rows/rounds, and every stitch seen from the right side. It is read from bottom to top, from right to left. 1 square = 1 stitch.

When working back and forth, every other row is worked from the right side and every other row is worked from the wrong side. When working from the wrong side, the diagram will have to be worked reversed: from left to right, knit stitches are purled, purl stitches are knit etc.

When working in the round every round is worked from the right side and the diagram are worked from right to left on all rounds.

See DROPS lesson: How to read knitting diagrams

The diagram depicts all rows/rounds, and every stitch seen from the right side. It is worked from bottom to top, from right to left.

When working back and forth every other row is worked from the right side: from right to left and every other row is worked from the wrong side: from left to right.

When working in the round, every row in the diagram are worked from the right side, from right to left.

When working a circular diagram you start in the middle and work your way outwards, counter clockwise, row by row.

The rows usually start with a given number of chain stitches (equivalent to the height of the following stitch), this will either be depicted in the diagram or explained in the pattern.

See DROPS lesson: How to read crochet diagrams

Instructions for working several diagrams after each other on the same row/round, will often be written like so: “work A.1, A.2, A.3 a total of 0-0-2-3-4 times". This means you work A.1 once, then A.2 is worked once, and A.3 is repeated (in width) the number of times provided for your size – in this case like so: S = 0 times, M = 0 times, L=2 times, XL= 3 times and XXL = 4 times.

The diagrams are worked as usual: begin with the first row in A.1, then work the first row in A.2 etc.

See DROPS lesson: How to read knitting diagrams

See DROPS lesson: How to read crochet diagrams

The total width of the garment (from wrist-to-wrist) will be larger in the larger sizes, despite the actual sleeves being shorter. The larger sizes have longer sleeve caps and wider shoulders, so there will be a good fit in all sizes.

The measurement sketch/schematic drawing provides information regarding the full length of the garment. If it’s a jumper or a jacket the length is measured from the highest point on the shoulder closest to the neckline, and straight down to the bottom of the garment. It is NOT measured from the tip of shoulder. Similarly, the length of yoke is measured from the highest point on the shoulder and down to where yoke is split into body and sleeves.

On a jacket measures are never taken along bands, unless specifically stated. Always measure inside band stitches when measuring the length.

See DROPS lesson: How to read a schematic drawing

Diagrams are often repeated on the round or in height. 1 repeat is the diagram the way it appears in the pattern. If it says to work 5 repeats of A.1 in the round, then you work A.1 a total of 5 times after/next to each other in the round. If it says to work 2 repeats of A.1 vertically/in height you work the entire diagram once, then begin again at the start and work the entire diagram one more time.

Chain stitches are slightly narrower than other stitches and to avoid working the cast-on edge too tight, we simply chain more stitches to begin with. The stitch count will be adjusted on the following row to fit the pattern and measurement sketch.

The rib edge is more elastic and will contract slightly compared to, for example, stocking stitch. By increasing before the rib edge, you avoid a visible difference in width between the rib edge and the rest of the body.

It’s very easy to cast off too tightly, and by making yarn overs while casting off (and simultaneously casting these off) you avoid a too tight cast off edge.

See DROPS video: How to bind off with yarn overs (yo)

To achieve an even increase (or decrease) you can increase on, for example: every 3rd and 4th row alternately, like so: work 2 rows and increase on the 3rd row, work 3 rows and increase on the 4th. Repeat this until the increase is complete.

See DROPS lesson: Increase or decrease 1 st on every 3rd and 4th row alternately

Should you prefer to work in the round instead of back and forth, you may of course adjust the pattern. You’ll need to add steeks mid-front (usually 5 stitches), and follow the instructions. When you would normally turn and work from the wrong side, simply work across the steek and continue in the round. At the end you’ll cut the piece open, pick up stitches to work bands, and cover the cut edges.

See DROPS video: How to knit steeks and cut open

Should you prefer to work back and forth instead of in the round, you may of course adjust the pattern so you work the pieces separately and then assemble them at the end. Divide the stitches for the body in 2, add 1 edge stitch in each side (for sewing) and work the front and back pieces separately.

See DROPS lesson: Can I adapt a pattern for circular needles into straight needles?

Pattern repeats can vary slightly in the different sizes, in order to get the correct proportions. If you’re not working the exact same size as the garment in the photo, yours might deviate slightly. This has been carefully developed and adjusted so that the complete impression of the garment is the same in all sizes.

Make sure to follow instructions and diagrams for your size!

If you have found a pattern you like which is available in women’s size it’s not very difficult to convert it to men’s size. The biggest difference will be the length of sleeves and body. Start working on the women size that you think would fit across the chest. The additional length will be worked right before you cast off for the armhole/sleeve cap. If the pattern is worked top-down you can add the length right after the armhole or before the first decrease on sleeve.

Regarding additional yarn amount, this will depend on how much length you add, but it is better with a skein too many than too few.

All yarns will have excess fibres (from production) that might come off as lint or shedding. Brushed yarns (ie hairier yarns) have more of these loose, excess fibres, causing more shedding.

Shedding also depends on what is worn under or over the garment, and whether this pulls at the yarn fibres. It’s therefore not possible to guarantee that there will be no shedding

Below are some tips on how to get the best result when working with hairier yarns:

1. When the garment is finished (before you wash it) shake it vigorously so the looser hairs come off. NOTE: do NOT use a lint roller, brush or any method that pulls at the yarn.

2. Place the garment in a plastic bag and put it in your freezer - the temperature will cause the fibres to become less attached to each other, and excess fibres will come off easier.

3. Leave in the freezer for a few hours before taking it out and shaking it again.

4. Wash the garment according to the instructions on the yarn label.

Pilling is a natural process that happens to even the most exclusive of fibers. It's a natural sign of wear and tear that is hard to avoid, and that is most visible in high friction areas of your garment like a sweater's arms and cuffs.

You can make your garment look as new by removing the pilling, using a fabric comb or a pill/lint remover.

Still can't find the answer you need? Then scroll down and leave your question so one of our experts can try to help you. This will be done normally within 5 to 10 working days.
In the meantime, you can read the questions and answers that others have left to this pattern or join the DROPS Workshop on Facebook to get help from fellow knitters/crocheters!

You might also like...

Post a comment to pattern DROPS 236-1

We would love to hear what you have to say about this pattern!

If you want to leave a question, please make sure you select the correct category in the form below, to speed up the answering process. Required fields are marked *.

Comments / Questions (37)

country flag Joy wrote:

Hello, I am a beginner at knitting and I would just like to clarify a couple points. -When the instructions say make 2 yarn overs, does this mean a double yarn over or 2 single yarn overs? -I am having trouble with A.1 for the yoke; on the section where you pull the dropped stitch and knit 4, how do you make the crossing yarn (1 1/4") taut? Whenever I attempt this section, the crossing yarn just looks loose and messy Thank you!

22.03.2024 - 22:54

DROPS Design answered:

Dear Joy, yes, that is a double yarnover. As for the pattern, a certain "looseness" is actually part of the pattern (see, the double yarnovers, to make bigger holes in the lacey part). Try blocking the piece, it should even out. Happy Knitting!

24.03.2024 - 14:34

country flag Tere wrote:

En las rondas de aumentos, cuando trabajo la hebra que he aumentado en ronda anterior, posteriormente continuo con el patron o lanzo otra hebra en la misma vuelta?

15.01.2024 - 20:52

country flag Nicole Bloise wrote:

Bonjour, pour faire ce modèle avec DROPS Brushed Alpaca Silk en taille S, donc avec 2 fils, combien faut il de pelotes? Merci

14.12.2023 - 09:44

DROPS Design answered:

Bonjour Mme Bloise, retrouvez les quantités pour chaque taille dans l'en-tête, soit en taille S, 175 g DROPS Brushed Alpaca Silk / 25 g la pelote = 7 pelotes. Tricotez ensuite avec 2 fils (pensez à bien vérifier votre tension). Bon tricot!

14.12.2023 - 16:09

country flag Robyn wrote:

Hi Drops, I’ve never purchased the Drops yarn before and would like to know if I’m buying correctly. Winter Feather in my size calls for 200g of Brushed Alpaca using 2 strands, will 8 balls be sufficient? I calculated the yardage with the Kid Silk and you use far more than the Brushed Alpaca. I don’t want to make a mistake purchasing the amount of wool required. Thank you kindly. Excited to start knitting with your wool.

08.12.2023 - 18:39

DROPS Design answered:

Dear Robyn, the yardage is similar. Take into account that you work with 2 threads of Brushed Alpaca or 5 threads of Kid-Silk. For the Kid-Silk version, you need 14 balls, divide it between 5 threads and multiply it by the yardage per ball (210m) and you have a yardage of 588m (for the 2nd size). Meanwhile, Brushed Alpaca would be 8 balls, divided by 2 threads and multiply it by the yardage of the yarn (140m), which would be a yardage of 560m in total. So they are both quite similar and the amounts are correct. Happy knitting!

10.12.2023 - 18:45

country flag Susane Schülli wrote:

Hallo liebes Team, wollte den Pullover von unten nach oben stricken, ohne Passe. Würd gern in Runden stricken, dann brauch ich kaum zusammen nähen. Wenn in Größe M gestrickt wird, sind dann die 116 Maschen die gesamte Anzahl fü das Bündchen oder nur ein Vorder oder Rückenteil? Ebenso die 192 Maschen nur Vorder oder Rückenteil? Vielen Dank für Antwort, die wunderschöne Wolle und die Fülle an Anleitungen. Es ist eine wahre Freude. Mit Grüßen Susanne schülli

08.11.2023 - 19:00

DROPS Design answered:

Liebe Frau Schülli, am Ende Rumpfteil sind es 116 Maschen in M (= 124 Maschen nach der Verteilung - 2 Maschen auf beiden SEiten insgesamt 2 Mal abgenommen = 116 Maschen). Viel Spaß beim stricken!

09.11.2023 - 08:18

country flag Candice wrote:

Combien de pelotes de laine dois-je prévoir pour ce modèle en taille L?

25.09.2023 - 12:58

DROPS Design answered:

Bonjour Candice, tout dépend de la qualité choisie: vous trouverez la quantité correspondante dans l'en-tête du modèle, autrement dit, si vous choisissez Kid-Silk, il vous faudra 400 g/25 g la pelote Kid-Silk = 16 pelotes et si vous choisissez Brushed Alpaca Silk, il vous faudra: 200 g / 25 g la pelote = 8 pelotes. Bon tricot!

25.09.2023 - 15:56

country flag Jadwiga wrote:

What size is the model on the picture wearing?

10.03.2023 - 23:19

DROPS Design answered:

Dear Jadwiga, our models usually wear a size medium. Please check the drawing for the exact measurments. (Since every person is different and different proportions, we also suggest that you look for a similar-style pattern and compare the measurements, so you can have a real idea about the fit.). Happy Crafting!

12.03.2023 - 15:42

country flag Åshild Gjuvsland Hjellbrekke wrote:

Hei. Finst det matchande produkt til denne genseren? Vottar, skjerf eller hue/panneband? Og om det ikkje finst, er det mogleg at det kjem?

22.01.2023 - 12:44

DROPS Design answered:

Hei Åshild. Du kan bruke søkemotoren og søke på flette og tilbehør, men vi har ikke pr dags dato noe som matcher helt. Men ditt ønske er videreformidlet. mvh DROPS Design

23.01.2023 - 13:53

country flag Patrizia wrote:

Buongiorno, quando faccio A1 sul 1° ferro del davanti, quando giro per il retro faccio un rovescio metto le 4 maglie sul ferro, ma come faccio a far cadere le maglie se sul ferro ausiliario ho una maglia a dritto, 2 maglie di gettato ed una maglia a dritto? grazie

07.01.2023 - 16:16

DROPS Design answered:

Buonasera Patrizia, questo modello è lavorato in tondo, non si deve girare il lavoro, deve lavorare come se fosse sempre sul diritto del lavoro. Buon lavoro!

07.01.2023 - 19:51

country flag Daenerys wrote:

Hei! Hvordan kan jeg strikke denne genseren uten høy hals?

28.12.2022 - 20:22

DROPS Design answered:

Hei Daenerys, Hvis du vil ha en litt løs hals, legge opp antall masker foreslått for din størrelse og strikk til lengden du ønsker, med 1 rett 2 vrang. Hvis du vil ha en trangere hals, legg opp antall masker foreslått i 2. avsnitt under halskant og strikk 1 rett, 1 vrang til ønsket lengde. Fortsett deretter fra den rettstrikket omgangen med økninger. God fornøyelse!

29.12.2022 - 10:05