
Popular categories
Looking for a yarn?


|
|
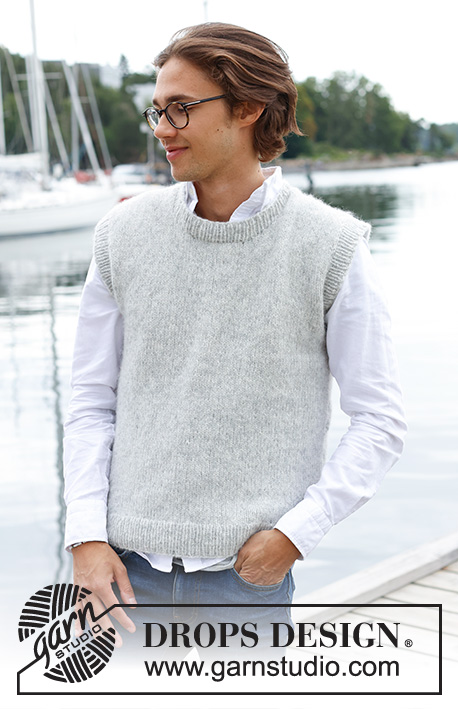
Lighthouse Vest |
|
 |
 |
Knitted vest for men in DROPS Air. The piece is worked bottom up in stockinette stitch. Sizes S - XXXL.
DROPS 233-7 |
|
|
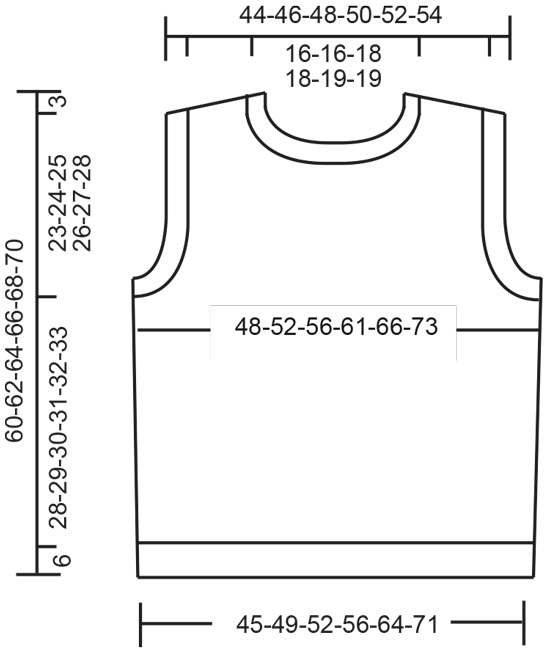
------------------------------------------------------- EXPLANATIONS FOR THE PATTERN: ------------------------------------------------------- INCREASE TIP (for sides of body): Work until there are 2 stitches left before the marker, make 1 yarn over, knit 4 (marker sits in the middle of these 4 stitches), 1 yarn over. On the next round knit the yarn overs twisted to avoid holes. Then work the new stitches in stockinette stitch. ------------------------------------------------------- START THE PIECE HERE: ------------------------------------------------------- VEST – SHORT OVERVIEW OF THE PIECE: The piece is worked in the round on circular needle, bottom up, as far as the armholes. It is divided for the front and back pieces which are finished separately, back and forth. The neck and sleeve-edges are worked in the round on circular needle to finish. BODY: Cast on 170-188-196-214-242-268 stitches with circular needle size 4 MM = US 6 and DROPS Air. Work rib in the round (knit 1, purl 1) for 6 cm = 2⅜". Knit 1 round and decrease 18-20-20-22-26-28 stitches evenly spaced = 152-168-176-192-216-240 stitches. Insert 1 marker at the beginning of the round and 1 marker after 76-84-88-96-108-120 stitches; allow the markers to follow your work onwards – the are used when increasing in the sides. Change to circular needle size 5 mm = US 8. Work in the round, in stockinette stitch. When the piece measures 10 cm = 4", increase 2 stitches in each side – read INCREASE TIP. Increase like this every 10-14-7-7-14-14 cm = 4"-5½"-2¾"-2¾"-5½"-5½" a total of 3-2-4-4-2-2 times = 164-176-192-208-224-248 stitches. Work until the piece measures 34-35-36-37-38-39 cm = 13⅜"-13¾"-14¼"-14½"-15"-15¼". On the next round bind off for the armholes as follows: Start 3-4-5-6-7-8 stitches before the first marker, bind off 6-8-10-12-14-16 stitches, work to 3-4-5-6-7-8 stitches before the second marker, bind off 6-8-10-12-14-16 stitches. Finish the front and back piece separately. Place the first 76-80-86-92-98-108 stitches on a thread for the front piece. BACK PIECE: = 76-80-86-92-98-108 stitches. Work stockinette stitch back and forth and bind off for the armholes at the beginning of each row as follows: 2 stitches 1-1-2-2-3-4 times, 1 stitch 4-4-3-5-4-5 times on each side = 64-68-72-74-78-82 stitches. Then bind off for the diagonal shoulders and neck as described below. DIAGONAL SHOULDER: When the piece measures 57-59-61-63-65-67 cm = 22½"-23¼"-24"-24¾"-25½"-26⅜", place stitches on a thread on each side for the shoulders (to avoid having to cut the strand, work the stitches before placing them on the thread): Place stitches from the side as follows: 5-6-6-6-7-8 stitches 2 times then place the last 8-8-9-10-9-9 stitches on the thread. Place all the stitches back on circular needle size 5 MM = US 8. Work 1 row of stockinette stitch over all stitches (to avoid a hole in the transitions between stitches placed on the thread, pick up the strand between the 2 stitches and work it twisted together with the next stitch on the left needle). Bind off. NECK: At the same time, when the piece measures 58-60-62-64-66-68 cm = 22¾"-23⅝"-24⅜"-25¼"-26"-26¾", bind off the middle 26-26-28-28-30-30 stitches for the neck and finish each shoulder separately. Bind off 1 stitch on the next row from the neck. When all stitches are bind off, the piece measures approx. 60-62-64-66-68-70 cm = 23⅝"-24⅜"-25¼"-26"-26¾"-27½" from the highest point on the shoulder. Repeat on the other shoulder. FRONT PIECE: = 76-80-86-92-98-108 stitches. Work stockinette stitch back and forth and bind off for the armholes at the beginning of each row as follows: 2 stitches 1-1-2-2-3-4 times, 1 stitch 4-4-3-5-4-5 times on each side = 64-68-72-74-78-82 stitches. When the piece measures 52-54-55-57-58-60 cm = 20½"-21¼"-21⅝"-22½"-22¾"-23⅝", place the middle 14-14-16-16-18-18 stitches on a thread for the neck and finish each shoulder separately. Bind off at the beginning of each row from the neck as follows: 3 stitches 1 time, 2 stitches 1 time and 1 stitch 2 times = 18-20-21-22-23-25 stitches on the shoulder. At the same time work the diagonal shoulders. DIAGONAL SHOULDER: When the piece measures 57-59-61-63-65-67 cm = 22½"-23¼"-24"-24¾"-25½"-26⅜", place stitches on a thread on each side for the shoulders in the same way as on the back piece; i.e. place 5-6-6-6-7-8 stitches on the thread 2 times then place the last 8-8-9-10-9-9 stitches on the thread. When all the stitches are on the thread place them back on the needle and work 1 row of stockinette stitch over all stitches, as on the back piece. Bind off. When all stitches are bind off, the piece measures approx. 60-62-64-66-68-70 cm = 23⅝"-24⅜"-25¼"-26"-26¾"-27½" from the highest point on the shoulder. Repeat on the other shoulder. ASSEMBLY: Sew the shoulder seams. NECK: Start on one shoulder, using short circular needle size 4 MM = US 6, and knit up 68 to 82 stitches around the neck (including the stitches from the thread, the stitch-number divisible by 2). Work rib in the round (knit 1, purl 1) for 3 cm = 1⅛". Bind off with knit over knit and purl over purl. SLEEVE-EDGES: Start at the bottom of the armhole, using short circular needle size 4 MM = US 6, and knit up approx. 78-82-86-88-92-96 stitches around the armhole (stitch-number divisible by 2). Work rib in the round (knit 1, purl 1) for 3 cm = 1⅛". Bind off with knit over knit and purl over purl. Work the other sleeve-edge in the same way |
|
|
|
|
Have you made this or any other of our designs? Tag your pictures in social media with #dropsdesign so we can see them! Do you need help with this pattern?You'll find tutorial videos, a Comments/Questions area and more by visiting the pattern on garnstudio.com. © 1982-2024 DROPS Design A/S. We reserve all rights. This document, including all its sub-sections, has copyrights. Read more about what you can do with our patterns at the bottom of each pattern on our site. |
|


With over 40 years in knitting and crochet design, DROPS Design offers one of the most extensive collections of free patterns on the internet - translated to 17 languages. As of today we count 304 catalogs and 11422 patterns - 11417 of which are translated into English (US/in).
We work hard to bring you the best knitting and crochet have to offer, inspiration and advice as well as great quality yarns at incredible prices! Would you like to use our patterns for other than personal use? You can read what you are allowed to do in the Copyright text at the bottom of all our patterns. Happy crafting!
Comments / Questions (29)
I’m very confused about how to proceed with the diagonal shoulder instructions. Even my knitting instructor couldn’t follow them. There is no mention of shirt rows in the pattern. Do you bind off the 28 stitches first, before putting the 6 stitches on threads? No mention of cutting the yarn. When is that done?
27.03.2024 - 13:12DROPS Design answered:
Dear Linda, HERE you can fine a few videos that can help you with how to knit the diagonal shoulders. I hope they would be of help. happy Knitting!
27.03.2024 - 14:29I am confused about the section after the diagonal shoulder, where i should complete each shoulder seperately. I am knitting size xl. I therefore have 21 stitches on each shoulder. Should I cast off one stitch in every row by the neck, or just do this once and then continue without casting off? And is it really correct that i only do this for 2cm before casting the whole shoulder off? This doesn't seem like it would be enough to create the shoulders. Thanks
09.02.2024 - 10:55DROPS Design answered:
Dear Rosa, you cast off the 28 middle stitch then 1 stitch by the neck on each shoulder. Then you have finished the decreases for the neck. Finish, if necessary, the shape of the diagonal shoulders: (Place stitches from the side as follows: 5-6-6-6-7-8 stitches 2 times then place the last 8-8-9-10-9-9 stitches on the thread. ......, pick up the strand between the 2 stitches and work it twisted together with the next stitch on the left needle). Once you have finished shaping both you should have reached the approx. 60-62-64-66-68-70 cm and you can cast off the whole shoulder. Happy knitting!
11.02.2024 - 23:54Bonjour, au tout début du pull, on compte pour la première augmentation de chaque côté ; après 10cm, en comptant les côtes ou non ? Merci..
17.12.2023 - 12:08DROPS Design answered:
Bonjour Mme Oreglia, on doit mesurer à partir du rang de montage, soit 4 cm après les côtes. Bon tricot!
18.12.2023 - 08:35Buonasera, Non capisco la sezione diagonale dell spalla e collo per la la taglia L. Lavoro 6 maglie, le metto in sospeso, finisco la riga, giro, lavoro 6 maglie le metto in sospeso, finisco la riga. Ripeto entrambe queste righe un’altra volta. Da qua in poi non capisco, mettere in sospeso le ultime 9 maglie? Quali ultime 9 maglie? Allo stesso tempo intrecciare per il collo? Allo stesso tempo quando? Grazie mille per l’aiuto.
22.11.2023 - 23:35DROPS Design answered:
Buonasera Anna, le ultime 9 maglie sono le maglie ai due lati del dietro. Gli intrecci per il collo vanno fatti quando si raggiunge la misura indicata. Buon lavoro!
30.12.2023 - 14:29Bonjour, Je ne trouve nul par le nombre de pelotes qu’il faut acheter pour faire ce modèle en taille L?
31.10.2023 - 09:41DROPS Design answered:
Bonjour Fanny, vous trouverez les quantités indiquées pour chaque taille, au poids, sous l'en-tête, il faut par ex ici en taille S et M: 250 g DROPS Air / 50 g la pelote = 5 pelotes dans ces 2 premières tailles. Bon tricot!
31.10.2023 - 16:08Hallo, Ihre Antwort vom 12.2.23 an Alice ist falsch! Es geht um die Zunahme am Rumpf in Größe L. In der Anleitung steht, daß bei Größe L insgesamt 4 mal zugenommen werden muß. Einmal nach 10 cm und dann 3 mal nach je 7 cm. Das sind 16 zugenommene Maschen und man kommt von 176 auf 192 Maschen. Sie schreiben in der Antwort an Alice aber fälschlicherweise, daß sie nach 10 cm und dann noch weitere 4 mal zunehemen soll! LG Alexandra
29.10.2023 - 14:24Je ne comprends pas: Mettre en attente en début de rang à partir du côté: 2 fois 5-6-6-6-7-8 mailles puis les 8-8-9-10-9-9 dernières mailles. Reprendre toutes les mailles sur l’aiguille circulaire 5 et tricoter 1 rang jersey sur toutes les mailles (pour éviter un trou aux transitions entre les mailles mises en attente, Pouvez-vous préciser ?
21.10.2023 - 23:42DROPS Design answered:
Bonjour, vous allez former ainsi le biais des épaules en tricotant davantage de rangs sur les mailles côté encolure: au début de chaque rang à partir de l'emmanchure (sur l'endroit: épaule droite du dos/gauche du devant et sur l'envers: épaule gauche du dos/droite du devant), tricotez les premières mailles et glissez les en attente, terminez le rang comme avant, tournez, tricotez le rang suivant, et répétez ces 2 rangs jusqu'à ce que toutes les mailles aient été mises en attente. Tricotez ensuite 1 rang sur toutes les mailles, pour éviter 1 trou, relever le fil avant la 1ère des mailles en attente et tricotez le torse avec cette maille. Bon tricot!
23.10.2023 - 09:56Jeg synes at delen med “skrå skulder” er virkelig uforståeligt.
17.10.2023 - 21:15Hallo. Es heißt bei der Anleitung beim stricken von Glatt rechts nach 10 cm Maschen zunehmen. Muss ich da die 6 cm vom Bund mit dazu zählen?
25.08.2023 - 11:13DROPS Design answered:
Liebe Chrissi, diese 10 cm messen Sie ab der Anschlagskante. Viel Spaß beim stricken!
25.08.2023 - 12:12Buenas tardes. No veo muy claro cómo hacer la sisa de la espalda.
19.07.2023 - 23:22DROPS Design answered:
Hola Graciela, Vas a cerrar al inicio de filas tanto por el lado derecho como por el lado revés. Primero cierras 2 pts al inicio de las siguientes 1-1-2-2-3-4 filas por el lado derecho y por el lado revés (es decir, cuando pone 1 vez significa 1 vez por el lado derecho y 1 vez por el lado revés). Después cierras 1 punto al inicio de cada fila 4-4-3-5-4-5 veces (igual que antes, serían en total 8 filas para la talla más pequeña, 4 por el lado derecho y 4 por el lado revés).
20.07.2023 - 11:58