DROPS Air
DROPS Air
65% Alpaca, 28% Polyamide, 7% Wool
from 4.80 £ /50g
Get the yarn to make this pattern from 33.60£.

The yarn cost is calculated from the pattern’s smallest size and the yarn’s cheapest product type. Looking for an even better price? You might find it on the DROPS Deals!

DROPS SS24

Blue Haze

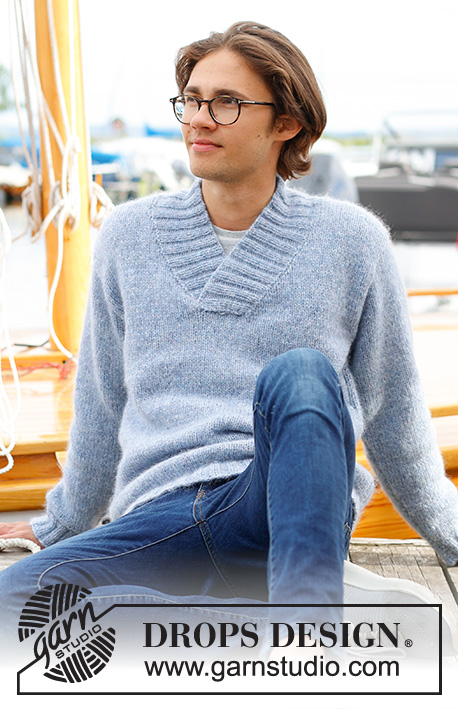
Knitted jumper for men in DROPS Air. The piece is worked bottom up, with shawl-collar. Sizes S - XXXL

DROPS 233-1
DROPS Design: Pattern ai-420
Yarn group C or A + A
-------------------------------------------------------

SIZES:
S - M - L - XL - XXL - XXXL

MATERIALS:
DROPS AIR from Garnstudio (belongs to yarn group C)
350-400-400-450-500-550 g colour 10, fog

NEEDLES:
DROPS CIRCULAR NEEDLE SIZE 5.5 MM: 80 cm.
DROPS CIRCULAR NEEDLE SIZE 4.5 MM: Length 80 cm.

KNITTING TENSION:
16 stitches in width and 20 rows in height with stocking stitch = 10 x 10 cm.
NOTE: Needle size is only a guide. If you get too many stitches on 10 cm, change to a larger needle size. If you get too few stitches on 10 cm, change to a smaller needle size.

-------------------------------------------------------

Alternative Yarn – See how to change yarns here
Yarn Groups A to F – Use the same pattern and change the yarn here
Yarn usage using an alternative yarn – Use our yarn converter here

-------------------------------------------------------

DROPS Air
DROPS Air
65% Alpaca, 28% Polyamide, 7% Wool
from 4.80 £ /50g
Get the yarn to make this pattern from 33.60£.

The yarn cost is calculated from the pattern’s smallest size and the yarn’s cheapest product type. Looking for an even better price? You might find it on the DROPS Deals!

Pattern instructions

NOTE: This pattern is written in British English. All measurements in charts are in cm. For conversion from cm to inches - click here. There are different terms for crocheting in British and American English. If this pattern includes crochet, click for "crochet terms" here. For this pattern in American English, please click here.
-------------------------------------------------------

EXPLANATIONS FOR THE PATTERN:
-------------------------------------------------------

RIDGE/GARTER STITCH (worked back and forth):
Knit all rows.
1 ridge = knit 2 rows.

DECREASE TIP (for V-neck):
All decreases are worked from the right side!
AT BEGINNING OF ROW:
Work 1 edge stitch in garter stitch, knit 2, slip 1 stitch as if to knit, knit 1 and pass the slipped stitch over the knitted stitch (1 stitch decreased).
AT END OF ROW:
Work until there are 5 stitches left, knit 2 together, knit 2 and 1 edge stitch in garter stitch (1 stitch decreased).

INCREASE TIP (for sleeves):
Make 1 yarn over inside the outermost 2 stitches on each side. On the next row work the yarn overs twisted to avoid holes. The new stitches are worked in stocking stitch.

-----------------------------------------------------

START THE PIECE HERE:

-------------------------------------------------------

JUMPER – SHORT OVERVIEW OF THE PIECE:
The piece is worked in sections back and forth then sewn together. The neck is worked back and forth and sewn together mid-front.

BACK PIECE:
Cast on 90-100-108-116-128-140 stitches with circular needle size 4.5 mm and DROPS Air.
Work rib as follows – first row is right side: 1 edge stitch in GARTER STITCH – read description above, * knit 2, purl 2 *, work from *-* and finish with 1 edge stitch in garter stitch. Work this rib back and forth for 6 cm. Knit 1 row from the right side and decrease 10-12-14-14-16-18 stitches evenly spaced = 80-88-94-102-112-122 stitches.
Change to circular needle size 5.5 mm. Continue with stocking stitch and 1 edge stitch in garter stitch on each side.
REMEMBER THE KNITTING TENSION!
When the piece measures 42-43-44-45-46-47 cm, cast off for the armholes at the beginning of each row as follows: 4 stitches 0-0-0-1-1-1 time, 3 stitches 0-0-1-0-0-0 time, 2 stitches 1-2-1-1-2-3 times and 1 stitch 0-1-1-3-4-6 on each side = 76-78-82-84-88-90 stitches. Continue with stocking stitch.
When the piece measures 62-64-66-68-70-72 cm, cast off the middle 34-34-36-38-38-40 stitches for the neck. Then cast off 1 stitch on the next row from the neck = 20-21-22-22-24-24 stitches on the shoulder. Continue with stocking stitch until the piece measures 64-66-68-70-72-74 cm. Cast off. Work the other shoulder in the same way.

FRONT PIECE:
Cast on and work in the same way as the back until the piece measures 42-43-44-45-46-47 cm.

Read the next section before continuing!
Now cast off for the armholes as on back piece, AT THE SAME TIME cast off the middle 14 stitches for the neck and finish the shoulders separately, On the first row cast on 1 edge stitch (which is then worked in garter stitch) where the stitches were cast off for the neck.
Read DECREASE TIP and decrease for the neck on each row from the right side 9-9-10-10-10-11 times, then every 2nd row from the right side 3-3-3-4-4-4 times. When all the decreases for armholes and neck are finished there are 20-21-22-22-24-24 stitches on the shoulder. Cast off when the piece measures 64-66-68-70-72-74 cm. Work the other shoulder in the same way.

SLEEVES:
Cast on 46-46-50-50-54-58 stitches with circular needle size 4.5 mm and DROPS Air.
Work rib as follows – first row is right side: 1 edge stitch in garter stitch, * knit 2, purl 2 *, work from *-* and finish with 1 edge stitch in garter stitch. Work this rib back and forth for 6 cm. Knit 1 row from the right side and decrease 4-2-6-4-6-8 stitches evenly spaced = 42-44-44-46-48-50 stitches.
Change to circular needle size 5.5 mm. Continue with stocking stitch and 1 edge stitch in garter stitch on each side.
When the sleeve measures 8-8-8-8-8-10 cm, increase 1 stitch inside the outermost 2 stitches on each side - read INCREASE TIP. Increase like this every 4-3½-3-2½-2-1½ cm a total of 11-12-13-15-16-17 times = 64-68-70-76-80-84 stitches. Work until the sleeve measures 52-50-50-49-47-45 cm. Cast off 4 stitches at the beginning of the next 2 rows. Then cast off for the sleeve cap at the beginning of each row: 3 stitches 0-0-1-1-1-1 time, 2 stitches 1-2-2-2-3-3 times, 1 stitch 1 time on each side. Then cast off 2 stitches on each side until the sleeve measures 56 cm in all sizes. Cast off 3 stitches on both sides, then cast off the remaining stitches. The sleeve measures 57 cm in all sizes. Work the other sleeve in the same way.

ASSEMBLY:
Sew the shoulder seams inside the cast-off edge. Sew in the sleeves. Sew the sleeve and side seams in one go, inside the 1 edge stitch.

NECK:
Start mid-front on the left-hand side of the stitches cast off for neck on mid front for the V-neck. Use circular needle size 4.5 mm and DROPS Air. Knit up approx. 46-48-50-51-54-55 stitches, inside the 1 edge stitch, as far as the shoulder then 36-36-38-40-40-42 stitches at the back and approx. 46-47-49-51-53-54 stitches from the shoulder down to the stitches cast off on mid front = approx. 128-131-137-142-147-151 stitches – do not knit up stitches over the cast-off stitches mid-front. Knit 1 row from the wrong side AT THE SAME TIME as the stitch-number is adjusted to 116-124-124-128-136-140 stitches.
Work rib as follows – first row is from the right side: 1 edge stitch in garter stitch, * knit 2, purl 2 *, work from *-* until there are 3 stitches left, knit 2 and 1 edge stitch in garter stitch. Continue this rib for 5 cm. Increase 1 stitch in each of the 14 middle purl sections, seen from the right side (back of neck) = 130-138-138-142-150-154 stitches. Continue working until the collar measures 9 cm. Cast off with knit over knit and purl over purl.

ASSEMBLY-2:
Fold the collar double so the left side lies on top of the right side, bottom mid-front. Sew the collar where stitches were cast off on mid- front, sew through both layers.

This pattern has been corrected.

Updated online: 12.10.2022
BACK PIECE:...cast off for the armholes at the beginning of each row as follows: 4 stitches 0-0-0-1-1-1 time, 3 stitches 0-0-1-0-0-0 time, 2 stitches 1-2-1-1-2-3 times and 1 stitch 0-1-1-3-4-6 on each side = 76-78-82-84-88-90 stitches.
Updated online: 19.10.2022
Correction decreases for armhole/V-neck.

Diagram

diagram measurements

Each of our patterns has specific tutorial videos to help you.

Do you have a question? See a list of frequently asked questions (FAQ)

Knitting tension is what determines the final measurements of your work, and is usually measured per 10 x 10 cm. It is provided like so: number of stitches in width x number of rows in height - eg: 19 stitches x 26 rows = 10 x 10 cm.

The knitting tension is very individual; some people knit/crochet loosely while others work tightly. You adjust the knitting tension with the needle size, which is why the suggested needle size is only meant as a guide! You need to adjust this (up or down) to ensure that YOUR knitting tension matches the knitting tension provided in the pattern. If you work with a different knitting tension than provided you will have a different yarn consumption, and your work will have different measurements than what the pattern suggests.

The knitting tension also determines which yarns can replace each other. As long as you achieve the same knitting tension you can replace one yarn with another.

See DROPS lesson: How to measure your tension/gauge

See DROPS video: How to make a gauge tension swatch

The required amount of yarn is provided in grams, eg: 450 g. To calculate how many balls you’ll need you first need to know how many grams are in 1 ball (25g, 50g or 100g). This information is available if you click on the individual yarn quality on our pages. Divide the amount required with the amount of each ball. For example, if each ball is 50g (the most common amount), the calculation will be as follows: 450 / 50 = 9 balls.

The important thing when changing from one yarn to another is that the knitting/crochet tension remains the same. This is so that the measurements of the finished piece will be the same as on the sketch provided. It is easier to achieve the same knitting tension using yarns from the same yarn group. It is also possible to work with multiple strands of a thinner yarn to achieve the knitting tension of a thicker one. Please try our yarn converter. We recommend you to always work a test swatch.

Please NOTE: when changing yarn the garment might have a different look and feel to the garment in the photo, due to individual properties and qualities of each yarn.

See DROPS lesson: Can I use a different yarn than the one mentioned in the pattern?

All our yarns are categorised into yarn groups (from A to F) according to thickness and knitting tension – group A contains the thinnest yarns and group F the thickest. This makes it easier for you to find alternative yarns to our patterns, should you wish to switch yarn. All yarns within the same group have a similar knitting tension and can easily replace each other. However, different yarn qualities have different structures and properties which will give the finished work a unique look and feel.

Click here for an overview of the yarns in each yarn group

At the top of all our patterns you’ll find a link to our yarn calculator, which is a helpful tool should you wish to use a different yarn than suggested. By filling in the yarn quality you wish to replace, the amount (in your size) and number of strands, the calculator will present good alternative yarns with the same knitting tension. Additionally it will tell you how much you’ll require in the new qualities and whether you’ll need to work with multiple strands. Most skeins are 50g (some are 25g or 100g).

If the pattern is worked with multiple colours, every colour will have to be calculated separately. Similarly, if the pattern is worked with several strands of different yarns (for example 1 strand Alpaca and 1 strand Kid-Silk) you will have to find alternatives for each, individually.

Click here to see our yarn calculator

Since different yarns have different qualities and textures we have chosen to keep the original yarn in our patterns. However, you can easily find options among our available qualities by using our yarn calculator, or simply pick a yarn from the same yarn group.

It is possible that some retailers still have discontinued yarns in stock, or that someone has a few skeins at home that they would like to find patterns for.

The yarn calculator will provide both alternative yarn as well as required amount in the new quality.

If you think it's hard to decide what size to make, it can be a good idea to measure a garment you own already and like the size of. Then you can pick the size by comparing those measures with the ones available in the pattern's size chart.

You'll find the size chart at the bottom of the pattern.

See DROPS lesson: How to read size chart

The needle size provided in the pattern serves only as a guide, the important thing is to follow the knitting tension. And since knitting tension is very individual, you will have to adjust the needle size to ensure that YOUR tension is the same as in the pattern – maybe you’ll have to adjust 1, or even 2 needle sizes, up or down to achieve the correct tension. For this, we recommend that you work test swatches.

Should you work with a different knitting tension than the one provided, the measurements of the finished garment might deviate from the measurement sketch.

See DROPS lesson: How to measure your tension/gauge

See DROPS video: How to make a tension/gauge swatch

Working a garment top-down provides more flexibility and room for personal adjustment. For example it is easier to try the garment on while working, as well as making adjustments to length of yoke and shoulder caps.

The instructions are carefully explaining every step, in the correct order. Diagrams are adjusted to the knitting direction and are worked as usual.

The diagram depicts all rows/rounds, and every stitch seen from the right side. It is read from bottom to top, from right to left. 1 square = 1 stitch.

When working back and forth, every other row is worked from the right side and every other row is worked from the wrong side. When working from the wrong side, the diagram will have to be worked reversed: from left to right, knit stitches are purled, purl stitches are knit etc.

When working in the round every round is worked from the right side and the diagram are worked from right to left on all rounds.

See DROPS lesson: How to read knitting diagrams

The diagram depicts all rows/rounds, and every stitch seen from the right side. It is worked from bottom to top, from right to left.

When working back and forth every other row is worked from the right side: from right to left and every other row is worked from the wrong side: from left to right.

When working in the round, every row in the diagram are worked from the right side, from right to left.

When working a circular diagram you start in the middle and work your way outwards, counter clockwise, row by row.

The rows usually start with a given number of chain stitches (equivalent to the height of the following stitch), this will either be depicted in the diagram or explained in the pattern.

See DROPS lesson: How to read crochet diagrams

Instructions for working several diagrams after each other on the same row/round, will often be written like so: “work A.1, A.2, A.3 a total of 0-0-2-3-4 times". This means you work A.1 once, then A.2 is worked once, and A.3 is repeated (in width) the number of times provided for your size – in this case like so: S = 0 times, M = 0 times, L=2 times, XL= 3 times and XXL = 4 times.

The diagrams are worked as usual: begin with the first row in A.1, then work the first row in A.2 etc.

See DROPS lesson: How to read knitting diagrams

See DROPS lesson: How to read crochet diagrams

The total width of the garment (from wrist-to-wrist) will be larger in the larger sizes, despite the actual sleeves being shorter. The larger sizes have longer sleeve caps and wider shoulders, so there will be a good fit in all sizes.

The measurement sketch/schematic drawing provides information regarding the full length of the garment. If it’s a jumper or a jacket the length is measured from the highest point on the shoulder closest to the neckline, and straight down to the bottom of the garment. It is NOT measured from the tip of shoulder. Similarly, the length of yoke is measured from the highest point on the shoulder and down to where yoke is split into body and sleeves.

On a jacket measures are never taken along bands, unless specifically stated. Always measure inside band stitches when measuring the length.

See DROPS lesson: How to read a schematic drawing

Diagrams are often repeated on the round or in height. 1 repeat is the diagram the way it appears in the pattern. If it says to work 5 repeats of A.1 in the round, then you work A.1 a total of 5 times after/next to each other in the round. If it says to work 2 repeats of A.1 vertically/in height you work the entire diagram once, then begin again at the start and work the entire diagram one more time.

Chain stitches are slightly narrower than other stitches and to avoid working the cast-on edge too tight, we simply chain more stitches to begin with. The stitch count will be adjusted on the following row to fit the pattern and measurement sketch.

The rib edge is more elastic and will contract slightly compared to, for example, stocking stitch. By increasing before the rib edge, you avoid a visible difference in width between the rib edge and the rest of the body.

It’s very easy to cast off too tightly, and by making yarn overs while casting off (and simultaneously casting these off) you avoid a too tight cast off edge.

See DROPS video: How to bind off with yarn overs (yo)

To achieve an even increase (or decrease) you can increase on, for example: every 3rd and 4th row alternately, like so: work 2 rows and increase on the 3rd row, work 3 rows and increase on the 4th. Repeat this until the increase is complete.

See DROPS lesson: Increase or decrease 1 st on every 3rd and 4th row alternately

Should you prefer to work in the round instead of back and forth, you may of course adjust the pattern. You’ll need to add steeks mid-front (usually 5 stitches), and follow the instructions. When you would normally turn and work from the wrong side, simply work across the steek and continue in the round. At the end you’ll cut the piece open, pick up stitches to work bands, and cover the cut edges.

See DROPS video: How to knit steeks and cut open

Should you prefer to work back and forth instead of in the round, you may of course adjust the pattern so you work the pieces separately and then assemble them at the end. Divide the stitches for the body in 2, add 1 edge stitch in each side (for sewing) and work the front and back pieces separately.

See DROPS lesson: Can I adapt a pattern for circular needles into straight needles?

Pattern repeats can vary slightly in the different sizes, in order to get the correct proportions. If you’re not working the exact same size as the garment in the photo, yours might deviate slightly. This has been carefully developed and adjusted so that the complete impression of the garment is the same in all sizes.

Make sure to follow instructions and diagrams for your size!

If you have found a pattern you like which is available in women’s size it’s not very difficult to convert it to men’s size. The biggest difference will be the length of sleeves and body. Start working on the women size that you think would fit across the chest. The additional length will be worked right before you cast off for the armhole/sleeve cap. If the pattern is worked top-down you can add the length right after the armhole or before the first decrease on sleeve.

Regarding additional yarn amount, this will depend on how much length you add, but it is better with a skein too many than too few.

All yarns will have excess fibres (from production) that might come off as lint or shedding. Brushed yarns (ie hairier yarns) have more of these loose, excess fibres, causing more shedding.

Shedding also depends on what is worn under or over the garment, and whether this pulls at the yarn fibres. It’s therefore not possible to guarantee that there will be no shedding

Below are some tips on how to get the best result when working with hairier yarns:

1. When the garment is finished (before you wash it) shake it vigorously so the looser hairs come off. NOTE: do NOT use a lint roller, brush or any method that pulls at the yarn.

2. Place the garment in a plastic bag and put it in your freezer - the temperature will cause the fibres to become less attached to each other, and excess fibres will come off easier.

3. Leave in the freezer for a few hours before taking it out and shaking it again.

4. Wash the garment according to the instructions on the yarn label.

Pilling is a natural process that happens to even the most exclusive of fibers. It's a natural sign of wear and tear that is hard to avoid, and that is most visible in high friction areas of your garment like a sweater's arms and cuffs.

You can make your garment look as new by removing the pilling, using a fabric comb or a pill/lint remover.

Still can't find the answer you need? Then scroll down and leave your question so one of our experts can try to help you. This will be done normally within 5 to 10 working days.
In the meantime, you can read the questions and answers that others have left to this pattern or join the DROPS Workshop on Facebook to get help from fellow knitters/crocheters!

You might also like...

Post a comment to pattern DROPS 233-1

We would love to hear what you have to say about this pattern!

If you want to leave a question, please make sure you select the correct category in the form below, to speed up the answering process. Required fields are marked *.

Comments / Questions (19)

country flag Coco wrote:

Hallo, ich komme beim Vorderteil bei den Schultern und dem Abnahmetipp nicht weiter: muss ich zunächst für die Schultern wie beim Rückenteil abketten und dann in der nächsten Reihe mit dem Abnahmetipp beginnen oder findet das gleichzeitig statt? Weil ich ja direkt die mittleren Maschen für den Kragen abkette und dann eine Randmasche aufnehme. Und dann beginne ich ja quasi mit dem Abnahmetipp habe aber in meinem Verständnis dann noch gar nicht alle Maschen für die Ärmel abgekettet.

19.04.2024 - 22:05

DROPS Design answered:

Liebe Coco, wenn die Arbeit 42-43-44-45-46-47 cm misst, dann ketten Sie für die Armausschnitt genauso wie beim Rückenteil ab, gleichzeitig bei der nächsten Hin-Reihe ketten Sie die mittleren 14 Maschen ab und stricken beide Schulter separat weiter. Bei der 1. Reihe bei der Schulter schlagen Sie 1 Randmasche für den Halsausschnitt an (Ende einer Rückreihe beim rechten Schulter/Anfang einer Hinreihe beim linken Schulter), dann nehmen Sie beidseitig für den Hals - siehe ABNAHMETIPP ab und ketten Sie für den Armausschnitt ab, wie beim Rückenteil. Viel Spaß beim Stricken!

22.04.2024 - 07:46

country flag Jytte Pettersson wrote:

Under opskriften under forstykket skriver I : nu skal der lukkes af til ærmegab på bagstykket - I mener vel forstykket, for aflukningen af bagstykket er jo beskrevet. Det må være en skrivefejl?

16.12.2023 - 07:26

DROPS Design answered:

Hei Jytte. Her manglet det et ord: SOM. Slik skal det stå: ...Nu skal der lukkes af til ærmegab som på bagstykket, SAMTIDIG lukkes.... mvh DROPS Design

18.12.2023 - 08:53

country flag Maria Luisa wrote:

No entiendo lo de aumentar un punto en el resorte del escote por la espalda 14 veces ya que se notara que ya no es 2dx2r sino 2dx3r no?

15.11.2023 - 18:32

DROPS Design answered:

Hola Maria Luisa, sí, pasa a ser 2d, 3r. Los reveses son siempre menos visibles por lo que no se nota tanto que se aumente 1 revés. Pero este aumento es necesario para la forma del cuello y se hacen sobre las 14 secciones centrales en la espalda, 7 a cada lado del centro.

26.11.2023 - 23:52

country flag Agnieszka wrote:

Czy górny wymiar od końca do końca ramienia jest prawidłowy? W przypadku rozmiaru S napisano 47 cm. Jak to możliwe skoro zaczęcie swetra jest 49 cm a podkroje pod pachy po 5 cm. I jeszcze moja druga uwaga te opisy wykonania są bardzo trudne do zrozumienia. Tłumacz chyba zupełnie nie związany z branżą. Proszę o informację odnośnie wymiaru

13.09.2023 - 08:58

DROPS Design answered:

Witaj, wymiary na rysunku są prawidłowe. Te 5 cm jest to długość główki rękawa, nie ma nic wspólnego z szerokością na górze tyłu/przodu). W pierwszym rozmiarze zamykamy tylko po 2 oczka z każdej strony na podkroje rękawów, czyli zostaje 76 oczek na drucie i szerokość na górze tyłu (47 cm) zgadza się. Pozdrawiamy!

13.09.2023 - 10:05

country flag Rebecca Westveer wrote:

For size L, the cast on st count seems off. Should I cast on 108 plus 2 for the edge st? 108 divides evenly by 4 for the ribbing, but adding the edge st on either side throws that count off and would result in uneven ribbing, I would think.

13.02.2023 - 17:22

DROPS Design answered:

Dear Rebecca, in our patterns we always give the total number of stitches, i.e. including edge stitches. So there is no need to add it and you will cast on 108 sts total. Happy knitting!

13.02.2023 - 18:32

country flag VC wrote:

Thank you for your answer! Just one more question. With sleeves - when casting off the first 4 stitches (“Work until the sleeve measures 52-50-50-49-47-45 cm. Cast off 4 stitches at the beginning of the next 2 rows”) is this done once on the R and once on the W (8 stitches casted off) side or twice - R W R W (16 stitches casted off)? Thank you!

06.02.2023 - 17:39

country flag VC wrote:

Hello. I am not sure how the collar looks at the back and I am confused with the instructions - if I add a stitch on each of the 14 purls on the back then I cannot continue to keep the k2 p2 ribs, since there is an extra stitch in the middle of purls? How should it be done? K2 p3? Also the instructions are to decrease a stitch at the end (is that on both R and W sides?) for 5 cm, and on the photo it looks as nothing is decreased - just regular square ribs. Thank you very much for your help.

04.02.2023 - 11:48

DROPS Design answered:

Dear VC, yes correct you will work these stitches in rib K2,P3 (K over K and P over P over all new stitches) and continue with rib K2, P2 over remaining stitches on each side. Happy knitting!

06.02.2023 - 15:34

country flag Coco wrote:

Genau, so weit bin ich bekommen, aber wie bekomme ich den Faden jetzt an die zweite Schulter?😅🙈 Vielen Dank für dir Hilfe und die rasche Antwort!:)

13.01.2023 - 09:00

DROPS Design answered:

Liebe Coco, die Maschen der 2. Schulter stricken Sie einfach mit dem Faden von Knäuel stricken - bei diesem Video zeigen wir, wie man eine neue Farbe strickt, aber genauso können Sie einfach stricken. Viel Spaß beim stricken!

13.01.2023 - 09:38

country flag Coco wrote:

Hallo, ich komme hier nicht weiter: Jede Schulter einzeln weiterstricken, dabei 1 Masche am Anfang der nächsten Reihe, die am Halsrand beginnt, abketten = 20-21-22-22-24-24 Maschen für die Schulter übrig. Wie stricke ich die Schultern denn einzeln weiter, ohne dann an einer Schulter ohne Faden dazustehen? Vielen Dank im Voraus.

12.01.2023 - 22:10

DROPS Design answered:

Liebe Coco, wenn Sie die Maschen für den Halsausschnitt abketten, werden Sie dann beide Schulter verteilen, dh zuerst stricken Sie die Maschen von der 1. Schulter (bei der nächste Reihe ab Hals ketten Sie 1 Masche ab = bei einer Hinreihe linke Schulter Rückenteil / Rückreihe rechte Schulter Rückentil) bis zur Ende, dann ketten Sie die Maschen dieser Schulter ab, schneiden Sie den Faden ab und dann stricken Sie die Maschen der 2. Schulter genauso. Viel Spaß beim stricken!

13.01.2023 - 08:44

country flag Angela wrote:

For the front piece, are you supposed to decrease for the armholes and the neck at the same time? Or first the armholes and then the neck?

18.12.2022 - 14:28

DROPS Design answered:

Dear Angela, you work the decreases for the armholes and the neck at the same time. Happy knitting!

18.12.2022 - 18:16