
Popular categories
Looking for a yarn?


|
|
Country Cheer |
|
 |
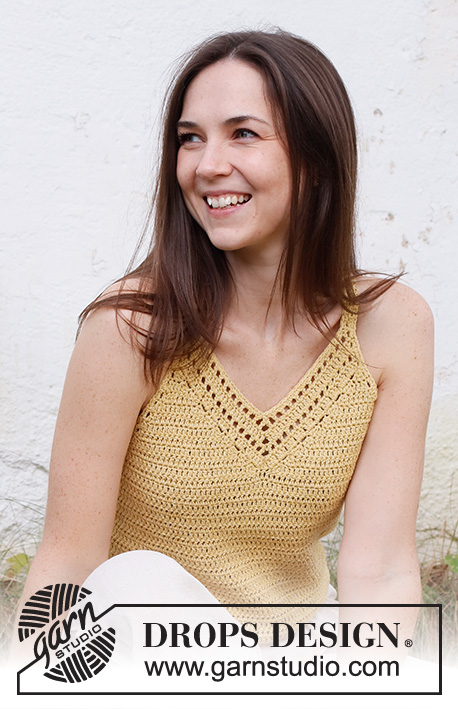 |
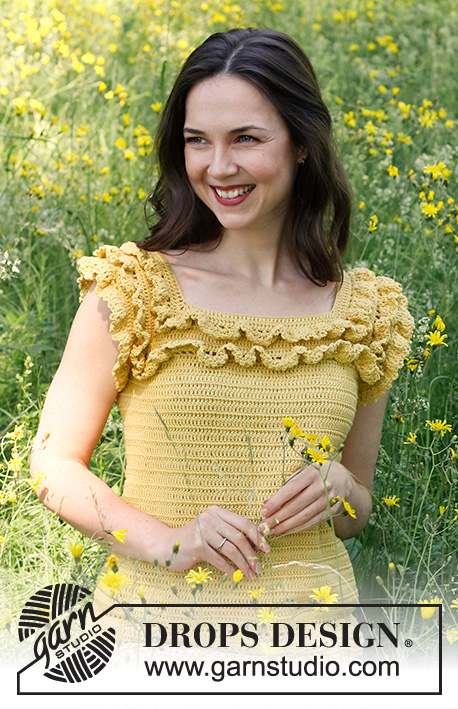
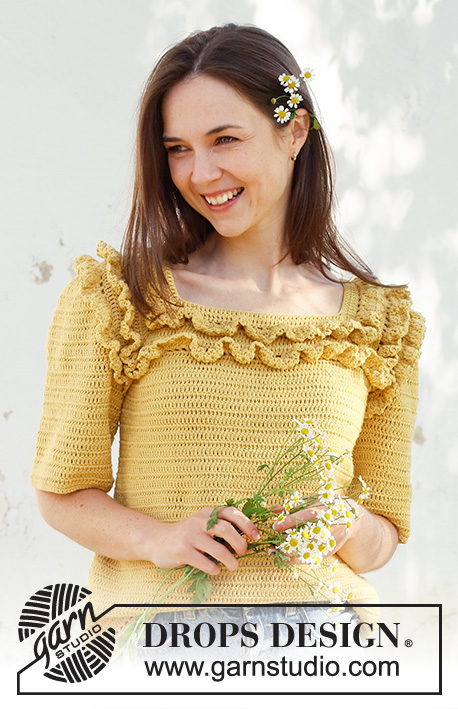
Crocheted top in DROPS Belle. Piece is worked bottom up. Size: S - XXXL
DROPS 231-41 |
|
|
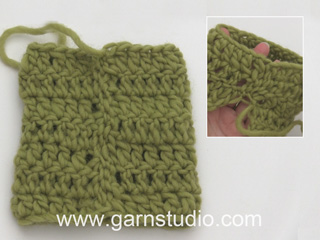
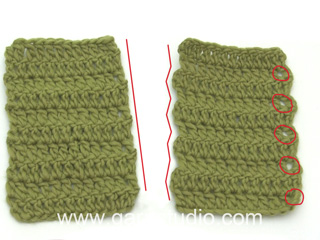
---------------------------------------------------------- EXPLANATION FOR THE PATTERN: ---------------------------------------------------------- CROCHET TIP FOR CHAIN STITCHES: If you work at the end of crochet hook the chain stitch will often be too tight. 1 chain stitch should be just as long as 1 double crochet/treble crochet is wide. CROCHET INFORMATION: At the beginning of every row with treble crochets work 3 chain stitches (they replace first treble crochet), i.e. skip first treble crochet from previous row. Work last treble crochet on row in 3rd chain stitch at the beginning of previous row. At the beginning of every row with double crochets work 1 chain stitch (to replace first double crochet) i.e. skip first stitch from previous row. Work last double crochet on row in 3rd chain stitch from beginning of previous row. INCREASE TIP (applies to sides on front and back piece): Increase 1 treble crochet by working 2 treble crochets in same treble crochet. Increase inside 1 treble crochet in each side. Continue the increased stitches in treble crochets. DECREASE TIP: WORK 2 TREBLE CROCHETS TOGETHER AS FOLLOWS: * Make 1 yarn over, insert hook in next stitch, get yarn, make 1 yarn over and pull yarn through the 2 first loops on hook *, crochet from *-* 2 times in total, make 1 yarn over and pull yarn through all 3 loops on hook (= 1 stitch decreased). WORK 3 TREBLE CROCHETS TOGETHER AS FOLLOWS: *Make 1 yarn over, insert hook in next stitch, get yarn, make 1 yarn over and pull yarn through the 2 first loops on hook *, crochet from *-* 3 times in total, make 1 yarn over and pull yarn through all 4 loops on hook (= 2 stitches decreased). ---------------------------------------------------------- START THE PIECE HERE: ---------------------------------------------------------- TOP - SHORT OVERVIEW OF THE PIECE: Work front and back piece back and forth separately, bottom up. Sew parts together when finished. BACK PIECE: Work 74-80-88-96-108-118 CHAIN STITCHES - read explanation above, on hook size 4 mm with DROPS Belle. Work 1 treble crochet in 4th chain stitch from hook (= 2 treble crochets) - read CROCHET INFO, work 1 treble crochet in each of the next 70-76-84-92-104-114 chain stitches = 72-78-86-94-106-116 treble crochets. Work 1 treble crochet in every treble crochet. REMEMBER THE CROCHET TENSION! When piece measures 8 cm, increase 1 treble crochet in each side - read INCREASE TIP! Increase like this every 4-4-4-5-5-5 cm 4 times in total = 80-86-94-102-114-124 stitches. When piece measures 22-23-24-25-26-27 cm, work an edge as follows: ROW 1: Work 3 chain stitches, 1 treble crochet in 2nd treble crochet, * 1 chain stitch, skip 1 treble crochet, 1 treble crochet in next treble crochet *, work from *-* the entire row. ROW 2: Work 1 treble crochet in every treble crochet and 1 treble crochet around every chain stitch. ROW 3: Work 3 chain stitches, 1 treble crochet in 2nd treble crochet, * 1 chain stitch, skip 1 treble crochet, 1 treble crochet in next treble crochet *, work from *-* the entire row. ROW 4: Work 1 double crochet in every treble crochet and 1 double crochet around every chain stitch. Cut and fasten the yarn. FRONT PIECE: Work 74-80-88-96-108-118 chain stitches on hook size 4 mm with DROPS Belle. Work 1 treble crochet in 4th chain stitch from hook (= 2 treble crochets) - read CROCHET INFO, work 1 treble crochet in each of the next 70-76-84-92-104-114 chain stitches = 72-78-86-94-106-116 treble crochets. Work 1 treble crochet in every treble crochet. REMEMBER THE CROCHET TENSION! When piece measures 8 cm, increase 1 treble crochet in each side - read INCREASE TIP! Increase like this every 4-4-4-5-5-5 cm 4 times in total = 80-86-94-102-114-124 stitches. When piece measures 26-27-28-29-30-31 cm, work next row as follows: Work slip stitches over the first 8-8-9-10-13-15 treble crochets on row, work until 8-8-9-10-13-15 treble crochets remain on row = 64-70-76-82-88-94 treble crochets. Turn piece. Now divide the front piece, and finish each part separately. LEFT FRONT PIECE (when garment is worn): Work from the side as follows: Work 1 treble crochet in first treble crochet, work the next 2 treble crochets together (= 1 treble crochet decreased) - read DECREASE TIP, work 1 treble crochet in each of the next 25-28-31-34-37-40 treble crochets, work the next 3 treble crochets together, work 1 treble crochet in last treble crochet. Turn and work from mid front, AT THE SAME TIME decrease 2 stitches towards mid front and 1 stitch towards the side on every row as explained above. Decrease like this way until 5 treble crochets remain. On next row work the first 2 treble crochets together into 1 treble crochet, and the last 3 treble crochets together into 1 treble crochet = 2 treble crochets. Cut and fasten the yarn. RIGHT FRONT PIECE (when garment is worn): Begin mid front where front piece was divided, work 1 treble crochet in first treble crochet, work the next 3 treble crochets together (= 2 treble crochets decreased), work 1 treble crochet in each of the next 25-28-31-34-37-40 treble crochets, work the next 2 treble crochets together (= 1 treble crochet decreased), work 1 treble crochet in last treble crochet. Turn and work from the side, AT THE SAME TIME decrease 2 stitches towards mid front and 1 stitch towards the side on every row as explained above. Decrease like this way until 5 treble crochets remain on row. On next row work the first 2 treble crochets together into 1 treble crochet, and the last 3 treble crochets together into 1 treble crochet = 2 treble crochets. Fasten off. CROCHET EDGE FRONT PIECE-1: Work 4 rows with treble crochets / treble crochets + chain stitch at the top in opening mid front. Begin at the top on left part of front piece, work down towards mid front and up along the side on right front piece. ROW 1: Begin at the top on left front piece. Work 3 chain stitch at the top in first treble crochet, 1-2-1-2-1-2 treble crochets in next treble crochet towards mid front (2-3-2-3-2-3 treble crochets have been worked in the 2 treble crochets from the tip on left front piece), then work 3 treble crochets around every row with treble crochets down until where piece was divided, work 2 treble crochets between parts (mid front), but work these treble crochets together into 1 treble crochet, then work 3 treble crochets around every row with treble crochets up to the top of right front piece, work 2-3-2-3-2-3 treble crochets at the top of right front piece = 32-36-38-42-44-48 treble crochets on each side of the middle treble crochet worked together and 65-73-77-85-89-97 treble crochets in total on row. Turn. ROW 2: Work 3 chain stitches, 1 treble crochet in 2nd treble crochet, * 1 chain stitch, skip 1 treble crochet, 1 treble crochet in next treble crochet *, work from *-* until 3 treble crochets remain mid front, skip the next 5 treble crochets (the middle of these is the 2 treble crochets worked together into 1), work 1 treble crochet in next treble crochet, * 1 chain stitch, skip 1 treble crochet, 1 treble crochet in next treble crochet *, work from *-* until 3 treble crochets remain on row, work 1 chain stitch and skip next treble crochet, work 1 treble crochet in each of the last 2 treble crochets = 60-68-72-80-84-92 stitches. ROW 3: Work 3 chain stitches, work 1 treble crochet in every treble crochet and 1 treble crochet in every chain stitch until 2 treble crochets remain towards mid front, skip the next 4 treble crochets, work 1 treble crochet in every treble crochet and 1 chain stitch in every chain stitch the entire row = 56-64-68-76-80-88 treble crochets. ROW 4: Work 3 chain stitches, 1 treble crochet in 2nd treble crochet, * 1 chain stitch, skip 1 treble crochet, 1 treble crochet in next treble crochet *, work from *-* until 2 treble crochets remain down to mid front, skip the next 4 treble crochets, work 1 treble crochet in next treble crochet, * 1 chain stitch, skip 1 treble crochet, 1 treble crochet in next treble crochet *, work from *-* until 3 treble crochets remain on row, work 1 chain stitch and skip next treble crochet, work 1 treble crochet in each of the last 2 treble crochets = 52-60-64-72-76-88 stitches. Cut the yarn. STRAPS: Begin at the top of tip on right front piece, work 3 chain stitches + 2 treble crochet around the outermost treble crochet (= 3 treble crochets). Continue back and forth with 1 treble crochet in every treble crochet (first treble crochet replace 3 chain stitches) until strap measures approx. 18-19-20-21-22-23 cm, try the top and adjust the length on strap. Cut the yarn, and work a similar strap on left front piece. CROCHET EDGE FRONT PIECE-2: Work a row with double crochets along the entire opening on front piece. Begin in right side where treble crochets were skipped for armhole (seen from the front when garment is flat), work up along left front piece/strap, over treble crochet at the top of strap, down the strap/left front piece, up along right front piece/strap, over treble crochets at the top of strap, down the strap/right front piece, and over treble crochets skipped for armhole on left side. Work 1 double crochet in every treble crochet and 2 double crochets around every row with treble crochets. Cut and fasten the yarn. ASSEMBLY: Sew side seams but leave 6 cm at the bottom in each side = vents. Sew straps from front piece to back piece. |
|

|
|
|
Have you made this or any other of our designs? Tag your pictures in social media with #dropsdesign so we can see them! Do you need help with this pattern?You'll find tutorial videos, a Comments/Questions area and more by visiting the pattern on garnstudio.com. © 1982-2024 DROPS Design A/S. We reserve all rights. This document, including all its sub-sections, has copyrights. Read more about what you can do with our patterns at the bottom of each pattern on our site. |
|


With over 40 years in knitting and crochet design, DROPS Design offers one of the most extensive collections of free patterns on the internet - translated to 17 languages. As of today we count 304 catalogues and 11422 patterns - 11422 of which are translated into English (UK/cm).
We work hard to bring you the best knitting and crochet have to offer, inspiration and advice as well as great quality yarns at incredible prices! Would you like to use our patterns for other than personal use? You can read what you are allowed to do in the Copyright text at the bottom of all our patterns. Happy crafting!
Comments / Questions (13)
Bonjour je comprend pas votre explication: «RANG 1: 1-2-1-2-1-2 brides dans la bride suivante côté encolure (on a ainsi 2-3-2-3-2-3 brides dans les 2 brides de la pointe du devant gauche), puis crocheter 3 brides autour de chaque rang de brides en descendant jusqu'à la pointe en bas de l'encolure, à la division de l'ouvrage, crocheter 2 brides entre les deux demi-devants (milieu devant),
12.10.2023 - 22:04DROPS Design answered:
Bonjour Mme Landre, commencez par 3 ml (= 1ère bride), puis 1 ou 2 brides (cf taille) dans la bride suivante en haut du devant (pour avoir 2 ou 3 brides à la pointe du devant gauche), crochetez ensuite 3 brides autour de la 1ère /de la dernière bride de chacun des rangs le long du devant gauche, entre les 2 devants (en bas de l'encolure), crochetez 2 brides écoulées ensemble, vous remontez ensuite le long du devant droit comme pour le devant gauche = 3 brides autour de chaque 1ère/dernière bride le long du devant droit et vous terminez par 2 ou 3 brides en haut du devant droit (comme au début du rang). Bon crochet!
13.10.2023 - 08:40Bonjour je bloque je ne comprend pas ce qu'il faut faire a ce moment là :"Tourner. Diviser maintenant le devant, et terminer chaque partie séparément." Est ce que c'est l'idée qu'il faut crocheter une demie partie du devant jusqu'à une bretelle ?
22.07.2023 - 14:29DROPS Design answered:
Bonjour Katell, vous allez maintenant former l'encolure et donc terminer chaque côté séparément: crocheter d'abord le devant gauche puis le devant droit. Bon crochet!
27.07.2023 - 11:51Bonjour, comment s\'explique le fait que côté gauche devant il y ait des mailles coulées mais pas côté droit devant ?\r\nMerci de votre réponse
25.06.2023 - 15:59DROPS Design answered:
Bonjour Mme Rouzic, c'est une technique fréquemment utilisées pour diminuer des mailles de chaque côté; retrouvez-en la démonstration dans cette vidéo; si vous ne souhaitez pas de mailles coulées, il vous faudra couper le fil, sauter le nombre de mailles indiquées au début du rang puis joindre le fil et continuer comme indiqué (sans crocheter les dernières mailles du rang pour former les emmanchures de la même façon de chaque côté). Bon crochet!
26.06.2023 - 09:18Fin oppskrift! Jeg skjønte ikke hellingen langs kanten, hekle 1-2-1-2, hva betyr det?😊
29.04.2023 - 07:59Beautiful pattern thanks Jeanette!!!!! Here are my photos and credit to you, you can use my photos: instagram.com/p/Chw2Zhos9GS/?igshid=YmMyMTA2M2Y=
31.08.2022 - 14:06DROPS Design answered:
Thank you very much Anna, please submit your pictures using that form here to our DROPS Gallery. Thanks again!
31.08.2022 - 15:15Beautiful pattern \r\nHere are my photos and credit to you\r\n instagram.com/p/Chw2Zhos9GS/?igshid=YmMyMTA2M2Y=
31.08.2022 - 14:05So in every row from the armpit side I start with 1 treble and after decreasing 2 stitches and for every mid side im decreasing 3 stitches and finishing with 1 treble stitch until to have 5? Or I should start with ch 3? Sorry for the spam!!
13.06.2022 - 15:20DROPS Design answered:
Dear Maria, you will decrease on every row: 2 sts towards neck (either after the first stitch (3 chains) at the beginning of the row from neck or before the last treble at the end of the row from armhole towards neck) and at the same time, decrease 1 stitch before the last stitch as the end of the row (from the neck towards armhole) or after the first stich (3 chains) at the beg of row from the armhole towards neck). Happy crocheting!
13.06.2022 - 16:31LEFT FRONT PIECE, Turn and work from mid front, AT THE SAME TIME decrease 2 stitches towards mid front and 1 stitch towards the side on every row( what do you mean here) as explained above. I can't understand this at all, am I doing any chain at the beginning of every row? And after this it's in every row at the beginning decrease 2 and at the end 3? Thank you 🙂
10.06.2022 - 22:58When measuring to do the next increase, do I measure from the bottom of the last increase row or the top of the last increase row?
06.06.2022 - 01:35DROPS Design answered:
Dear Cathleen, you measure from the beginning of the row. Happy knitting!
06.06.2022 - 13:31In the tension the width is correct but the height is wrong! (More than 10cm) I cant understand what im doing wrong 🙃
04.06.2022 - 10:43DROPS Design answered:
Dear Mariel, if you have more than 10 cm in 9 rows, it means you are working too loosely in height. You can calculate to work fewer rows than indicated, according to your gauge. Happy crocheting!
04.06.2022 - 18:13