
Popular categories
Looking for a yarn?


|
||||||||||||||||||||||||||||
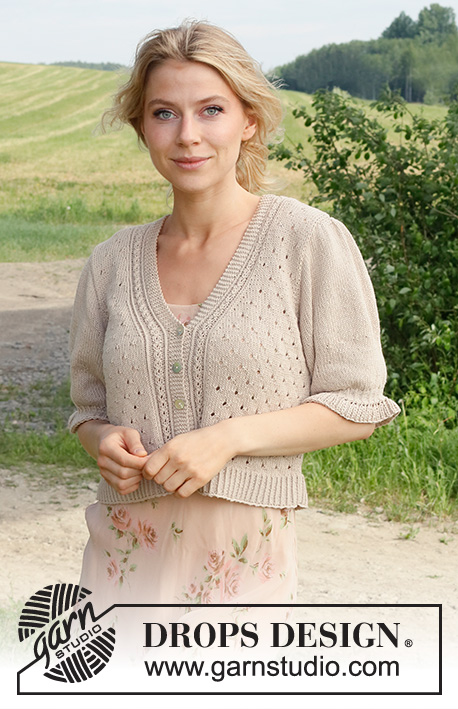
Charm Valley Cardigan |
||||||||||||||||||||||||||||
 |
 |
|||||||||||||||||||||||||||
Knitted jacket in DROPS Safran. Piece is knitted bottom up with lace pattern, V-neck pattern and short puffed sleeves. Size: S - XXXL
DROPS 232-31 |
||||||||||||||||||||||||||||
|
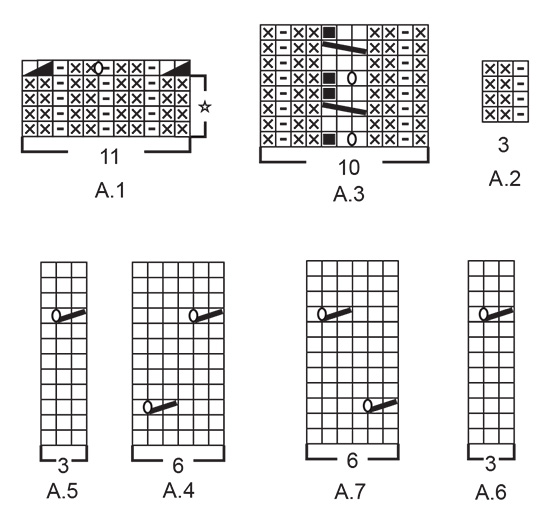
---------------------------------------------------------- EXPLANATION FOR THE PATTERN: ---------------------------------------------------------- GARTER STITCH (back and forth): Knit all rows. 1 ridge vertically = knit 2 rows. PATTERN: See diagrams A.1 to A.7. Diagrams show all rows in pattern seen from the right side. DECREASE TIP-1 (applies to V-neck): Decrease inside the outermost 16 stitches mid front, i.e. inside A.3 + band. All decreases are done from the right side! DECREASE AS FOLLOWS AFTER 16 STITCHES: Slip 1 stitch knitwise, knit 1, pass slipped stitch over stitch worked. DECREASE AS FOLLOWS BEFORE 16 STITCHES: Work until 2 stitches remain before the 16 stitches, and knit these 2 stitches together. DECREASE TIP-2 (applies to armholes): All decreases are done from the right side! Decrease 1 stitch towards the armholes while at the same time plaiting the stitches as follows: DECREASE 1 STITCH AT BEGINNING OF ROW: Work the first 2 stitches as before, slip 2 stitches on cable needle behind piece, knit 1, knit the 2 stitches from cable needle twisted together (= 1 stitch decreased). DECREASE 1 STITCH AT END OF ROW: Work until 5 stitches remain on needle, slip 1 stitch on cable needle in front of piece, knit 2 together, knit 1 from cable needle (= 1 stitch decreased), knit the last 2 stitches. BUTTONHOLES: Decrease for buttonholes on right band. Knit the first 3 stitches, make 1 yarn over. On next row (wrong side) knit the stitch before yarn over together with yarn over to make a hole. Decrease for buttonholes when piece measures: S: 5, 11, 17 and 23 cm M: 6, 12, 18 and 24 cm L: 5, 12, 19 and 25 cm XL: 6, 13, 20 and 26 cm XXL: 6, 13, 20 and 27 cm XXXL: 6, 13, 21 and 28 cm ---------------------------------------------------------- START THE PIECE HERE: ---------------------------------------------------------- JACKET - SHORT OVERVIEW OF THE PIECE: Body is worked back and forth on circular needle from mid front, bottom up. Cast off for armholes. Then finish back piece and front pieces back and forth on circular needle separately until finished measurements. Sleeve cap is worked back and forth on circular needle, top down. Then work the rest of sleeve in the round on a short circular needle/double pointed needles. Sew the piece together as explained in pattern. BODY: Cast on 278-302-326-353-389-422 stitches on circular needle size 2.5 mm with DROPS Safran. Purl 1 row from wrong side. Work next row as follows from right side: 6 band stitches in GARTER STITCH – read explanation above, A.1 , work A.2 until 18 stitches remain on needle, work first stitch in A.2, work A.1, 6 band stitches in garter stitch. Continue pattern as follows (only the first 4 rows in A.1 are repeated vertically). When piece measures 5 cm, work next row from right side as follows: 6 band stitches in garter stitch, work next row in A.1 over the stitches in A.1, work in stocking stitch until 17 stitches remain on needle decreasing at the same time 53-59-63-66-74-79 stitches evenly over these stitches, work next row in A.1 over the stitches in A.1 and 6 band stitches in garter stitch = 223-241-261-285-313-341 stitches on needle. Remember BUTTONHOLES on right band – read explanation above. Work next row from wrong side with garter stitch over garter stitch, knit over knit and purl over purl Insert 1 marker thread 59-63-68-74-81-88 stitches in from each side (105-115-125-137-151-165 stitches between marker threads on back piece). Move marker threads upwards when working. Switch to circular needle size 3 mm. Continue as follows over stitches on body (work first row from right side). Right front piece: 6 band stitches in garter stitch, A.3, 4-6-6-6-6-3 stitches in stocking stitch, work A.4 6-6-7-8-9-11 times in total, A.5, 0-2-1-1-2-0 stitches in stocking stitch, marker thread, continue over stitch on back piece as explained below. Back piece: 0-2-1-1-2-0 stitches in stocking stitch, work A.4 17-18-20-22-24-27 times in total, A.5, 0-2-1-1-2-0 stitches in stocking stitch, marker thread, continue over stitches on left front piece as explained below. Left front piece: 0-2-1-1-2-0 stitches in stocking stitch, A.6, work A.7 6-6-7-8-9-11 times in total, 4-6-6-6-6-3 stitches in stocking stitch, work A.3, and finish with 6 band stitches in garter stitch. Continue this pattern in the back and forth over all stitches. REMEMBER THE KNITTING TENSION! OVERVIEW OF NEXT SECTION: When piece measures 24-25-26-27-28-29 cm, begin decrease for V-neck. WHILE decreasing for V-neck begin decrease for armholes. Read section V-NECK and ARMHOLES before continuing. V-NECK: Begin from row from right side, work 1 ridge back and forth over the 6 stitches on right front piece (do not work the other stitches), work 1 row from right side as before over all stitches. Turn, work 1 ridge back and forth over the 6 band stitches on left front piece, turn, work back from wrong side as before over all stitches. This is done to avoid the ridge edge from bending, when decrease for V-neck begins. On next row from right side, decrease 1 stitch for V-neck - read DECREASE TIP-1. Decrease for V-neck every other row 15-13-14-14-15-16 times in total, and then every 6th row 5-6-6-6-6-6 times in total. NOTE! To avoid a hole pattern right up to the neckline, work in stocking stitch over these stitches when decreasing. ARMHOLE: When piece measures 27-28-29-30-31-32 cm, cast off for armholes - adjust to cast off from right side as follows: Work as before until 3-4-5-6-7-8 stitches remain before first marker thread, cast off 6-8-10-12-14-16 stitches, work as before until 3-4-5-6-7-8 stitches remain before next marker thread, cast off 6-8-10-12-14-16 stitches, work as before the rest of row. Finish each part separately. LEFT FRONT PIECE: Begin from wrong side and work pattern back and forth as before. Continue decrease for V-neck from right side as before. In addition to cast off for armhole from the side as follows: Cast off 2 stitches at beginning of every row from right side 1-2-3-4-5-6 times in total. Then decrease for armhole inside 2 stitches - read DECREASE TIP-2, i.e. Decrease 1 stitch at the beginning of every row from right side 6-7-7-9-12-15 times in total (replace holes in pattern that comes next to armhole with stocking stitch). After all decreases for V-neck and armholes, 28-29-30-31-31-31 stitches remain on needle. Continue to work until piece measures 46-48-50-52-54-56 cm. On next row from right side cast off the outermost 22-23-24-25-25-25 stitches on shoulder = 6 stitches in garter stitch remain on needle for neck edge. Work in garter stitch back and forth over these stitches for 5-5-5-5-6-6 cm. Cast off. RIGHT FRONT PIECE: Begin from wrong side and work pattern back and forth as before. Continue decrease for V-neck from right side as before. In addition to cast off for armhole from the side as follows: Cast off 2 stitches at beginning of every row from wrong side 1-2-3-4-5-6 times in total. Then decrease for armhole inside 2 stitches - remember DECREASE TIP-2, i.e. decrease 1 stitch at the end of every row from right side 6-7-7-9-12-15 times in total. After all decreases for V-neck and armholes, 28-29-30-31-31-31 stitches remain on needle. Continue to work until piece measures 46-48-50-52-54-56 cm. On next row from wrong side cast off the outermost 22-23-24-25-25-25 stitches on shoulder = 6 stitches in garter stitch remain on needle for neck edge. Work in garter stitch back and forth over these stitches for 5-5-5-5-6-6 cm. Cast off. BACK PIECE: = 99-107-115-125-137-149 stitches Begin from wrong side and work pattern back and forth as before. AT THE SAME TIME cast off 2 stitches for armholes at the beginning of every row 1-2-3-4-5-6 times in total in each side = 95-99-103-109-117-125 stitches. Then decrease 1 stitch in each side on every row from right side 6-7-7-9-12-15 times total - READ DECREASE TIP-2 = 83-85-89-91-93-95 stitches remain on needle. Continue to work until piece measures 43-45-47-49-51-53 cm. Now cast off the middle 33-33-35-35-37-39 stitches for neck and finish each shoulder separately. Continue pattern as before (replace holes that comes next to neck decrease with stocking stitch), and cast off for neck at the beginning of every row from neck as follows: Cast off 2 stitches 1 time and 1 stitch 1 time = 22-23-24-25-25-25 stitches remain on shoulder. Work until piece measures 46-48-50-52-54-56 cm. Cast off. Work the other shoulder the same way. SLEEVE: Cast on 28-30-32-34-36-38 stitches on circular needle size 3 mm with DROPS Safran. Purl 1 row from wrong side. Work next row as follows from right side: 5 stitches in stocking stitch, knit 1 in front and back loop of the next 18-20-22-24-26-28 stitches (= 18-20-22-24-26-28 stitches increased), work 5 stitches in stocking stitch = 46-50-54-58-62-66 stitches on needle. Work stocking stitch back and forth and cast on new stitches for sleeve cap at the end of every row in each side as follows: Cast on 3 stitches 1 time, 2 stitches 4-4-4-5-5-4 times, 1 stitch 4-5-8-7-11-16 times, 2 stitches 4-5-4-5-4-4 times and 3 stitches 1 time in each side = 98-108-114-124-132-142 stitches. Put piece together, insert 1 marker at the beginning of round = mid under sleeve, and work in stocking stitch in the round on a short circular needle size 3 mm. When sleeve measures 18-18-19-20-22-24 cm from cast-on edge, decrease 18-20-22-24-26-28 stitches evenly = 80-88-92-100-106-114 stitches. Work until sleeve measures 26-27-27-27-28-28 cm from cast-on edge. On next round decrease 8-13-14-19-22-24 stitches evenly = 72-75-78-81-84-90 stitches. Switch to double pointed needles size 2.5 mm. Work rib in the round (knit 1 twisted/purl 2) for 3 cm. Work next round as follows: * In the stitch below the twisted knit stitch knit 1, make 1 yarn over, knit 1 (2 stitches increased), then purl 2 stitches together *, work from *-* the entire round = 96-100-104-108-112-120 stitches. Continue to work English rib with yarn overs in the round over all stitches as follows: ROUND 1: * Make 1 yarn over, slip 1 stitch purlwise, purl 1 *, work from *-* the entire round. ROUND 2: * Knit yarn over and the slipped stitch together, make 1 yarn over, slip 1 stitch purlwise *, repeat from *-* the entire round. ROUND 3: * Make 1 yarn over, slip 1 stitch purlwise, purl yarn over and slipped stitch together *, repeat from *-* the entire round. Repeat rounds 2 and 3 until edge in English rib measures approx. 3 cm. Loosely cast off stitches with knit over knit and purl over purl. Sleeve measures approx. 32-33-33-33-34-34 cm from cast-on edge. Work the other sleeve the same way. ASSEMBLY: Sew shoulder seams inside cast-off edge. Sew in sleeves inside 1 edge stitch - distribute any extra fabric at the top of sleeve cap nicely over the middle 10 cm at the top of armhole. Sew neck edge together mid back, and sew on to neck line at the back of neck. Sew the buttons on to the left band. |
||||||||||||||||||||||||||||
Diagram explanations |
||||||||||||||||||||||||||||
|
||||||||||||||||||||||||||||
|
||||||||||||||||||||||||||||

|
||||||||||||||||||||||||||||
|
Have you made this or any other of our designs? Tag your pictures in social media with #dropsdesign so we can see them! Do you need help with this pattern?You'll find tutorial videos, a Comments/Questions area and more by visiting the pattern on garnstudio.com. © 1982-2024 DROPS Design A/S. We reserve all rights. This document, including all its sub-sections, has copyrights. Read more about what you can do with our patterns at the bottom of each pattern on our site. |
||||||||||||||||||||||||||||


With over 40 years in knitting and crochet design, DROPS Design offers one of the most extensive collections of free patterns on the internet - translated to 17 languages. As of today we count 304 catalogues and 11422 patterns - 11422 of which are translated into English (UK/cm).
We work hard to bring you the best knitting and crochet have to offer, inspiration and advice as well as great quality yarns at incredible prices! Would you like to use our patterns for other than personal use? You can read what you are allowed to do in the Copyright text at the bottom of all our patterns. Happy crafting!
Comments / Questions (20)
Liebes Team, für die Halsblende hinten werden an den Vorderteilen je 5cm (=insgesamt 10cm) über 6M kraus rechts gestrickt, die am Rückenteil angenäht werden sollen. Der Halsausschnitt am Rücken ist jedoch breiter, auch laut Muster sind es 16cm, nicht 10cm. Liegt hier ein Fehler vor oder soll das Rückenteil gerafft an die Halsblende genäht werden? Vielen Dank für Ihre Antwort.
07.10.2023 - 00:20DROPS Design answered:
Liebe Lina, die 16 cm in der Maßskizze entsprechen die abgeketteten Maschen am Halsausschnitt für Rückenteil (z.B. in S: 33 Maschen + beidseitig 2+1 Masche = 39 Maschen - ca 16 cm. Die Halsblende beidseitig werden etwas gezogen und dann am Halsausschnitt angenäht damit der Halsausschnitt nicht zu weit wird. Vile Spaß beim stricken!
09.10.2023 - 08:23För att det ska bli samma avstånd till hålen så borde diagram A5 ha omslag och hoptagning på varv 3, på samma varv som första hålet på A4 och inte på varv 9. Gör man ändringen i A5 så blir det på höger framstycke att man stickar A6 istället för A5.
09.09.2023 - 13:21Bonjour, je fais la taille S de ce modèle. Lorsque j’arrive à la rangée n°9, à la fin du devant D et au début du dos (A5 puis A4) on doit tricoter 2 mailles ensemble, 1 jeté, 1 maille endroit, 2 mailles ensemble, 1 jeté puis on continue A4. Et c’est la même situation pour la fin du dos (A5) et le début du devant Gauche (A6). Est-ce normal d’avoir 2 trous aussi rapprochés ? N’y a t’il pas une erreur ? Merci beaucoup pour votre aide.
25.07.2023 - 20:56DROPS Design answered:
Bonjour, entre les diagrammes A.5 et A.4 (transition entre le devant droit et le dos) vous avez 2 mailles endroit entre les jetes. C'est correct. Suivez les explications. Bon tricot!
26.07.2023 - 15:24Wat ik me afvraag; als er staat: ‘als de mouw 18 cm meet vanaf de opzetrand’ dan gaat dat om de mouwkop? En dus niet vanaf het punt waar je de steken samen brengt tot een rond geheel? Ik maak het vast moeilijker dan het is, maar ik kom er even niet uit. Het lijkt zo kort dan? Alvast bedankt. Vriendelijke groet Frederike
18.07.2023 - 08:37DROPS Design answered:
Dag Frederike,
Dit is inderdaad vanaf de mouwkop en niet vanaf het punt waarop je de steken hebt samengebracht en verder in de rondte bent gaan breien.
18.07.2023 - 20:50Hallo, Als ik alle meerderingen bij de mouw doe kom ik niet op 124 steken (maat xl). 1x3, 5x2, 7x1, 5x2, 1x3 maakt 33 meerderingen. Moet ik alles dan nog een keer doen. Alvast bedankt. Maaike
25.06.2023 - 07:10DROPS Design answered:
Dag Maaike,
Je doet dit meerderen aan beide kanten van de mouw, dus in totaal meerder je dan 66 steken, waardoor je op 124 steken komt.
25.06.2023 - 17:54Jeg forstår ikke hvad man gør med den maske i diagrammet som er “sort firkant/masken eksisterer ikke, gå videre til næste symbol i diagrammet\r\nHvad gør jeg med den maske fra vrangsiden,?
19.05.2023 - 15:45Hallo gibt es auch Drops desinge auch in Koreanischer Sprache?
06.11.2022 - 12:56DROPS Design answered:
Liebe Frau Clemens, leider noch nicht - es sind doch viele anderen Sprachen erhältlich: klicken Sie auf dem drop-down Menu unter dem Foto. Viel Spaß beim stricken!
07.11.2022 - 09:08Stickar strl. XL och 353 m och ska minska 66 m till 285 men jag får det till 287 m. Vad är det rätta maskantalet
20.06.2022 - 16:34DROPS Design answered:
Hej Solveig. På sista varvet i A.1 så ökar du 1 maska (omslag) och minskar 2 maskor (2 aviga tillsammans i början och slutet). Så du har 1 minskad maska per A.1, dvs 353-66-1-1= 285 m. Mvh DROPS Design
21.06.2022 - 11:47Begin ik het achterpand nou in A4 of A7 (in het patroon staat A4 maar dan sluit het patroon niet goed aan) ikzelf ben met A7 begonnen op het achterpand en gewoon hier mee doorgegaan tot het linker voorpand en dan nog 4 steken tricot en dan is het net zoals op de foto
13.06.2022 - 03:12DROPS Design answered:
Dag Aly,
Als je af hebt gekant voor de armsgaten en je breit het achterpand verder, dan ze je het patroon voort zodat de gaatjes op dezelfde manier boven elkaar komen als daarvoor.
25.08.2022 - 11:47Hallo, das heisst ich nehme am V Ausschnitt vorne auch gleichzeitig für den Armausschnitt ab. Alos nicht erst am Ende des Vorderteils wo der Armausschnitt normalerwiese wäre.
09.06.2022 - 14:24DROPS Design answered:
Liebe Frau Ehret, wenn die Arbeit verteilt wird, sind die Halsausschnitt noch nicht fertig, also diese sollen Sie wie zuvor weiterstricken (siehe ABNAHMETIPP-1 (gilt für den V-Ausschnitt):) und nach der Verteilung stricken Sie gleichzeitig die Abketten/Abnahmen für den Armausschnitt und die Abnahmen für den Halsausschnitt wie zuvor. Viel Spaß beim stricken!
09.06.2022 - 16:03