DROPS Safran
DROPS Safran
100% Cotton
from 1.30 £ /50g
Get the yarn to make this pattern from 10.40£.

The yarn cost is calculated from the pattern’s smallest size and the yarn’s cheapest product type. Looking for an even better price? You might find it on the DROPS Deals!

DROPS SS24

Summer Date

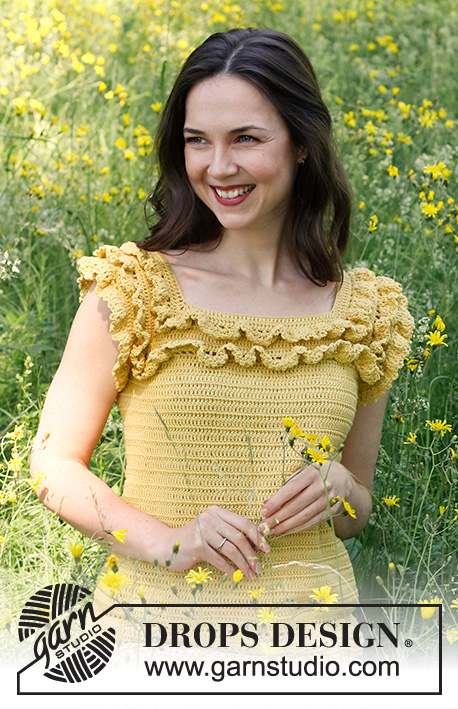
Crocheted jumper with short sleeves in DROPS Safran. Piece is worked top down with raglan and flounces. Size: S - XXXL

DROPS 231-44
DROPS design: Pattern e-333
Yarn group A
----------------------------------------------------------

SIZE:
S - M - L - XL - XXL - XXXL

MATERIALS:
DROPS SAFRAN from Garnstudio (belongs to yarn group A)
400-450-500-550-600-650 g colour 62, lemon

CROCHET HOOK:
DROPS CROCHET HOOK SIZE 3.5 mm.

CROCHET TENSION:
22 treble crochets in width and 12 rows vertically = 10 x 10 cm.
NOTE! Remember that hook size is only a suggestion. If you have too many stitches on 10 cm switch to larger hook. If you have too few stitches on 10 cm switch to smaller hook.

-------------------------------------------------------

Alternative Yarn – See how to change yarns here
Yarn Groups A to F – Use the same pattern and change the yarn here
Yarn usage using an alternative yarn – Use our yarn converter here

-------------------------------------------------------

DROPS Safran
DROPS Safran
100% Cotton
from 1.30 £ /50g
Get the yarn to make this pattern from 10.40£.

The yarn cost is calculated from the pattern’s smallest size and the yarn’s cheapest product type. Looking for an even better price? You might find it on the DROPS Deals!

Pattern instructions

NOTE: This pattern is written in British English. All measurements in charts are in cm. For conversion from cm to inches - click here. There are different terms for crocheting in British and American English. If this pattern includes crochet, click for "crochet terms" here. For this pattern in American English, please click here.
----------------------------------------------------------

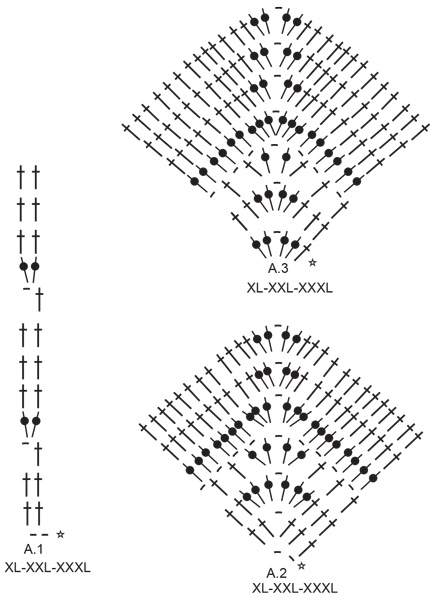
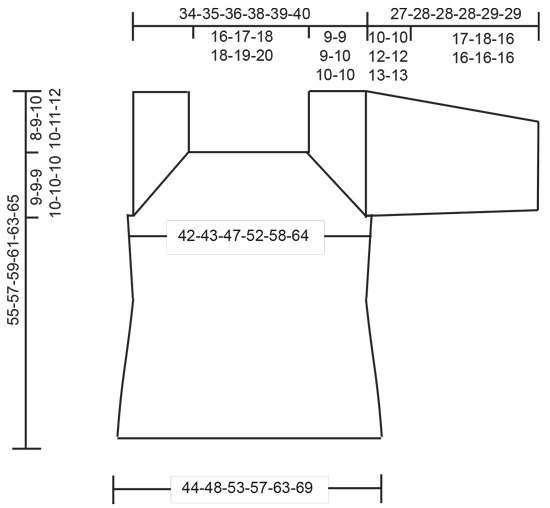
EXPLANATION FOR THE PATTERN:

----------------------------------------------------------

PATTERN:
See diagrams A.1 to A.4. Choose diagram for your size.

CROCHET TIP:
Work first round from right side. Turn piece and work next round from wrong side of piece. Turn piece and work next round from right side of piece.
Work back and forth like this, alternately one round from right side and one round from wrong side.

CROCHET INFORMATION:
On every round with treble crochets replace first treble crochet with 3 chain stitches. Finish round with 1 slip stitch in 3rd chain stitch at beginning of round.
On every row/round with double crochet replace first double crochet with 1 chain stitch. Work last double crochet on row in first chain stitch from previous row. Finish round with 1 slip stitch in first chain stitch.

CHAIN STITCHES:
If you work at the end of crochet hook the chain stitch will often be too tight.
1 chain stitch should be just as long as 1 treble crochet is wide.

INCREASE TIP-1 (evenly spaced):
Increase 1 treble crochet by working 2 treble crochets in same treble crochet.

INCREASE TIP-2 (applies to sides of body):
Work until 2 treble crochets remain before marker, work 2 treble crochets in next stitch, 1 treble crochet in each of the next 2 stitches, work 2 treble crochets in next stitch.

----------------------------------------------------------

START THE PIECE HERE:

----------------------------------------------------------

JUMPER - SHORT OVERVIEW OF THE PIECE:
Work yoke in the round but turn for every round to work from both right side and wrong side, top down. Now divide yoke for body and sleeves. Continue body in the round, from right side and wrong side. Work sleeves back and forth and sew them together when finished.

YOKE:
Work 152-164-176-176-188-200 CHAIN STITCHES - read explanation above, on hook size 3.5 mm with DROPS Safran - read CROCHET INFORMATION and CROCHET TIP.

Now work pattern and increase for raglan as follows:
Work A.1 over 18-20-20-20-20-22 stitches (half back piece), A.2, A.1 over 36-40-44-44-48-52 stitches (sleeve), A.2, A.1 over 36-38-40-40-42-44 stitches (front piece), A.2, A.1 over 36-40-44-44-48-52 stitches (sleeve), A.2, A.1 over 18-18-20-20-22-22 stitches (half back piece).
Continue pattern like this. REMEMBER THE CROCHET TENSION!
On 4th row in A.1 and A.2 increase as follows:
Work over stitches from half back piece and increase 0-0-6-0-6-12 stitches evenly – read INCREASE TIP-1, A.2 as before, work over sleeve and next A.2 as before, work front piece and increase 0-2-10-0-12-22 stitches evenly, work A.2 as before, work over sleeve and next A.2 work the last stitches on back piece and increase 0-0-4-0-6-12 stitches evenly. Work the increased stitches in A.1.
When entire A.2 has been worked, there are 248-262-292-288-324-358 stitches on last round.
Work A.3 over the middle stitches of A.2, work the remaining stitches in A.1.
When entire A.1 has been worked there are 316-330-360-388-424-458 stitches on last row. Piece measures approx. 9-9-9-10-10-10 cm.

Now divide piece for body and sleeves as follows:
Work 1 treble crochet in each of the first 41-43-49-52-58-66 stitches, skip the next 76-80-84-90-94-98 stitches for sleeve, work 8 chain stitches under sleeve, 1 treble crochet in each of the next 82-86-96-104-118-130 stitches, skip the next 76-80-84-90-94-98 stitches for sleeve, work 8 chain stitches under sleeve, work 1 treble crochet in each of the last 41-41-47-52-60-66 stitches.

BODY:
= 180-186-208-224-252-278 stitches.
Work 1 treble crochet in every treble crochet and 1 treble crochet in chain stitch under sleeve. Insert 1 marker in the middle of the 8 new stitches under the sleeve.
When body measures 12-13-14-15-16-17 cm from where piece was divided, increase 1 treble crochet on each side of every marker – read INCREASE TIP-2! Increase like this every 5-2-2-2-2-2 cm 3-6-6-6-6-6 times in total = 192-210-232-248-276-302 stitches.
When body measures approx. 27-28-29-28-29-30 cm, work A.1 over all stitches.
Fasten off when A.1 has been worked 1 time vertically.

FLOUNCE YOKE:
Work a flounce in first row with lace pattern on yoke, begin from right side as follows:
Work 1 slip stitch around the first treble crochet mid back seen from right side, 1 chain stitch (replaces first double crochet), * work 3 chain stitches, 1 double crochet around next treble crochet *, work from *-* around the entire yoke and finish with 1 slip stitch in first chain stitch.
Work A.4 around every chain space, back and forth but work every row together. Fasten off when A.4 has been worked 1 time vertically.
Work a flounce in second row with lace pattern on yoke the same time.

FLOUNCE SLEEVE EDGE:
Now work a flounce over stitches skipped for sleeve, begin from right side, as follows:
Work 1 double crochet in first skipped over sleeve, * 3 chain stitches, skip 1 stitch, work 1 double crochet in next stitch *, work from *-* over all stitches skipped for sleeve and finish with 1 double crochet in first stitch worked under sleeve = 38-40-42-45-47-49 chain spaces. Work A.4 back and forth around every chain space.
Fasten off when A.4 has been worked 1 time vertically.
Work a flounce along the other sleeve edge the same way.

SLEEVES:
Begin by working an edge around the sleeve opening as follows:
Fold the flounce back so that you can crochet on the wrong side of the first row of flounce edge and work around the first row on the flounce outermost on the sleeve-edge (i.e. row with 1 double crochet, 3 chain stitches).
Fasten thread with 1 slip stitch in the 5th stitch mid under sleeve, work 1 chain stitch (replace first double crochet), * 1 chain stitch, skip 1 stitch, 1 double crochet in next stitch *, work from *-* over the next 4 stitches under sleeve, work * 1 chain stitch, 1 double crochet around next chain stitch *, work from *-* over 1 row of the flounce edge work 1 chain stitch, skip 1 stitch, 1 double crochet in next stitch, 1 chain stitch, skip 1 stitch and finish round with 1 slip stitch in first chain stitch on round = 42-44-46-49-51-53 chain spaces.
Cut the yarn.
Work as follows from right side:
Begin in the 6th chain stitch down from shoulder seen from right side (i.e. fold piece at the shoulder and count 6 chain spaces down from the top). Work 1 double crochet around chain stitch, work 2 treble crochets around next chain stitch (i.e. up towards shoulder), work 2 treble crochets around each of the next 9 chain stitches, and finish with 1 slip stitch around next chain stitch = 20 treble crochets.
Turn and work as follows from wrong side:
Work 3 chain stitch, 1 slip stitch around next chain stitch, 2 treble crochets in every treble crochet and finish with 1 slip stitch around next chain stitch in the other side of piece = 40 treble crochets.
Turn.
Work 3 chain stitches, 1 slip stitch around next chain stitch, 2 treble crochets in first treble crochet, 1 treble crochet in every treble crochet until 1 treble crochet remains, 2 treble crochets in next treble crochet and finish with 1 slip stitch around next chain stitch = 42 treble crochets.
Continue like this and increase 1 treble crochet in each side on every row 10-10-12-12-14-14 times in total = 60-60-64-64-68-68 stitches.
There is a total of 8-10-8-11-9-11 chain spaces left.

SIZE S-M-L:
On next row work 1 treble crochet in every treble crochet and alternately 1 treble crochet and 2 treble crochets around each of the last chain stitches down to the middle stitch under sleeve. Turn and work 1 treble crochet in every treble crochet and alternately 1 treble crochet and 2 treble crochets around the remaining chain stitches in the other side of piece = 72-75-76 treble crochets.

SIZE L/XL - XL-XXL-XXXL:
On next row work 1 treble crochet in every treble crochet and 2 treble crochets around each of the last chain stitches down to the middle stitch under sleeve. Turn and work 1 treble crochet in every treble crochet and 2 treble crochets around the remaining chain stitches in the other side of piece = 86-86-90 treble crochets.

ALL SIZES:
On next row adjust number of stitches to 66-72-80-86-92-98 treble crochets.
Work back and forth with 1 treble crochet in every treble crochet until piece measures 16-17-15-15-15-15 cm on the shortest. Work 2 rows with double crochets. Cut and fasten the yarn.

Work the other sleeve the same way.

NECK EDGE:
Work an edge and begin mid back from right side as follows:
Work 1 double crochet in every stitch around the neck. Cut and fasten the yarn.

ASSEMBLY:
Sew sleeve seams.

Diagram

symbols = treble crochet in stitch below
symbols = treble crochet around chain stitch/chain space
symbols = chain stitch - if you work at the end of crochet hook the chain stitch will often be too tight 1 chain stitch should be just as long as 1 treble crochet is wide.
symbols = double crochet in stitch
symbols = double crochet around chain stitch
symbols = 1 double crochet, 3 chain stitches, 1 double crochet in double crochet
symbols = this row has already been worked, it only shows how next row should be worked in/around stitches
diagram
diagram
diagram
diagram
Do you have a question? See a list of frequently asked questions (FAQ)

Knitting tension is what determines the final measurements of your work, and is usually measured per 10 x 10 cm. It is provided like so: number of stitches in width x number of rows in height - eg: 19 stitches x 26 rows = 10 x 10 cm.

The knitting tension is very individual; some people knit/crochet loosely while others work tightly. You adjust the knitting tension with the needle size, which is why the suggested needle size is only meant as a guide! You need to adjust this (up or down) to ensure that YOUR knitting tension matches the knitting tension provided in the pattern. If you work with a different knitting tension than provided you will have a different yarn consumption, and your work will have different measurements than what the pattern suggests.

The knitting tension also determines which yarns can replace each other. As long as you achieve the same knitting tension you can replace one yarn with another.

See DROPS lesson: How to measure your tension/gauge

See DROPS video: How to make a gauge tension swatch

The required amount of yarn is provided in grams, eg: 450 g. To calculate how many balls you’ll need you first need to know how many grams are in 1 ball (25g, 50g or 100g). This information is available if you click on the individual yarn quality on our pages. Divide the amount required with the amount of each ball. For example, if each ball is 50g (the most common amount), the calculation will be as follows: 450 / 50 = 9 balls.

The important thing when changing from one yarn to another is that the knitting/crochet tension remains the same. This is so that the measurements of the finished piece will be the same as on the sketch provided. It is easier to achieve the same knitting tension using yarns from the same yarn group. It is also possible to work with multiple strands of a thinner yarn to achieve the knitting tension of a thicker one. Please try our yarn converter. We recommend you to always work a test swatch.

Please NOTE: when changing yarn the garment might have a different look and feel to the garment in the photo, due to individual properties and qualities of each yarn.

See DROPS lesson: Can I use a different yarn than the one mentioned in the pattern?

All our yarns are categorised into yarn groups (from A to F) according to thickness and knitting tension – group A contains the thinnest yarns and group F the thickest. This makes it easier for you to find alternative yarns to our patterns, should you wish to switch yarn. All yarns within the same group have a similar knitting tension and can easily replace each other. However, different yarn qualities have different structures and properties which will give the finished work a unique look and feel.

Click here for an overview of the yarns in each yarn group

At the top of all our patterns you’ll find a link to our yarn calculator, which is a helpful tool should you wish to use a different yarn than suggested. By filling in the yarn quality you wish to replace, the amount (in your size) and number of strands, the calculator will present good alternative yarns with the same knitting tension. Additionally it will tell you how much you’ll require in the new qualities and whether you’ll need to work with multiple strands. Most skeins are 50g (some are 25g or 100g).

If the pattern is worked with multiple colours, every colour will have to be calculated separately. Similarly, if the pattern is worked with several strands of different yarns (for example 1 strand Alpaca and 1 strand Kid-Silk) you will have to find alternatives for each, individually.

Click here to see our yarn calculator

Since different yarns have different qualities and textures we have chosen to keep the original yarn in our patterns. However, you can easily find options among our available qualities by using our yarn calculator, or simply pick a yarn from the same yarn group.

It is possible that some retailers still have discontinued yarns in stock, or that someone has a few skeins at home that they would like to find patterns for.

The yarn calculator will provide both alternative yarn as well as required amount in the new quality.

If you think it's hard to decide what size to make, it can be a good idea to measure a garment you own already and like the size of. Then you can pick the size by comparing those measures with the ones available in the pattern's size chart.

You'll find the size chart at the bottom of the pattern.

See DROPS lesson: How to read size chart

The needle size provided in the pattern serves only as a guide, the important thing is to follow the knitting tension. And since knitting tension is very individual, you will have to adjust the needle size to ensure that YOUR tension is the same as in the pattern – maybe you’ll have to adjust 1, or even 2 needle sizes, up or down to achieve the correct tension. For this, we recommend that you work test swatches.

Should you work with a different knitting tension than the one provided, the measurements of the finished garment might deviate from the measurement sketch.

See DROPS lesson: How to measure your tension/gauge

See DROPS video: How to make a tension/gauge swatch

Working a garment top-down provides more flexibility and room for personal adjustment. For example it is easier to try the garment on while working, as well as making adjustments to length of yoke and shoulder caps.

The instructions are carefully explaining every step, in the correct order. Diagrams are adjusted to the knitting direction and are worked as usual.

The diagram depicts all rows/rounds, and every stitch seen from the right side. It is read from bottom to top, from right to left. 1 square = 1 stitch.

When working back and forth, every other row is worked from the right side and every other row is worked from the wrong side. When working from the wrong side, the diagram will have to be worked reversed: from left to right, knit stitches are purled, purl stitches are knit etc.

When working in the round every round is worked from the right side and the diagram are worked from right to left on all rounds.

See DROPS lesson: How to read knitting diagrams

The diagram depicts all rows/rounds, and every stitch seen from the right side. It is worked from bottom to top, from right to left.

When working back and forth every other row is worked from the right side: from right to left and every other row is worked from the wrong side: from left to right.

When working in the round, every row in the diagram are worked from the right side, from right to left.

When working a circular diagram you start in the middle and work your way outwards, counter clockwise, row by row.

The rows usually start with a given number of chain stitches (equivalent to the height of the following stitch), this will either be depicted in the diagram or explained in the pattern.

See DROPS lesson: How to read crochet diagrams

Instructions for working several diagrams after each other on the same row/round, will often be written like so: “work A.1, A.2, A.3 a total of 0-0-2-3-4 times". This means you work A.1 once, then A.2 is worked once, and A.3 is repeated (in width) the number of times provided for your size – in this case like so: S = 0 times, M = 0 times, L=2 times, XL= 3 times and XXL = 4 times.

The diagrams are worked as usual: begin with the first row in A.1, then work the first row in A.2 etc.

See DROPS lesson: How to read knitting diagrams

See DROPS lesson: How to read crochet diagrams

The total width of the garment (from wrist-to-wrist) will be larger in the larger sizes, despite the actual sleeves being shorter. The larger sizes have longer sleeve caps and wider shoulders, so there will be a good fit in all sizes.

The measurement sketch/schematic drawing provides information regarding the full length of the garment. If it’s a jumper or a jacket the length is measured from the highest point on the shoulder closest to the neckline, and straight down to the bottom of the garment. It is NOT measured from the tip of shoulder. Similarly, the length of yoke is measured from the highest point on the shoulder and down to where yoke is split into body and sleeves.

On a jacket measures are never taken along bands, unless specifically stated. Always measure inside band stitches when measuring the length.

See DROPS lesson: How to read a schematic drawing

Diagrams are often repeated on the round or in height. 1 repeat is the diagram the way it appears in the pattern. If it says to work 5 repeats of A.1 in the round, then you work A.1 a total of 5 times after/next to each other in the round. If it says to work 2 repeats of A.1 vertically/in height you work the entire diagram once, then begin again at the start and work the entire diagram one more time.

Chain stitches are slightly narrower than other stitches and to avoid working the cast-on edge too tight, we simply chain more stitches to begin with. The stitch count will be adjusted on the following row to fit the pattern and measurement sketch.

The rib edge is more elastic and will contract slightly compared to, for example, stocking stitch. By increasing before the rib edge, you avoid a visible difference in width between the rib edge and the rest of the body.

It’s very easy to cast off too tightly, and by making yarn overs while casting off (and simultaneously casting these off) you avoid a too tight cast off edge.

See DROPS video: How to bind off with yarn overs (yo)

To achieve an even increase (or decrease) you can increase on, for example: every 3rd and 4th row alternately, like so: work 2 rows and increase on the 3rd row, work 3 rows and increase on the 4th. Repeat this until the increase is complete.

See DROPS lesson: Increase or decrease 1 st on every 3rd and 4th row alternately

Should you prefer to work in the round instead of back and forth, you may of course adjust the pattern. You’ll need to add steeks mid-front (usually 5 stitches), and follow the instructions. When you would normally turn and work from the wrong side, simply work across the steek and continue in the round. At the end you’ll cut the piece open, pick up stitches to work bands, and cover the cut edges.

See DROPS video: How to knit steeks and cut open

Should you prefer to work back and forth instead of in the round, you may of course adjust the pattern so you work the pieces separately and then assemble them at the end. Divide the stitches for the body in 2, add 1 edge stitch in each side (for sewing) and work the front and back pieces separately.

See DROPS lesson: Can I adapt a pattern for circular needles into straight needles?

Pattern repeats can vary slightly in the different sizes, in order to get the correct proportions. If you’re not working the exact same size as the garment in the photo, yours might deviate slightly. This has been carefully developed and adjusted so that the complete impression of the garment is the same in all sizes.

Make sure to follow instructions and diagrams for your size!

If you have found a pattern you like which is available in women’s size it’s not very difficult to convert it to men’s size. The biggest difference will be the length of sleeves and body. Start working on the women size that you think would fit across the chest. The additional length will be worked right before you cast off for the armhole/sleeve cap. If the pattern is worked top-down you can add the length right after the armhole or before the first decrease on sleeve.

Regarding additional yarn amount, this will depend on how much length you add, but it is better with a skein too many than too few.

All yarns will have excess fibres (from production) that might come off as lint or shedding. Brushed yarns (ie hairier yarns) have more of these loose, excess fibres, causing more shedding.

Shedding also depends on what is worn under or over the garment, and whether this pulls at the yarn fibres. It’s therefore not possible to guarantee that there will be no shedding

Below are some tips on how to get the best result when working with hairier yarns:

1. When the garment is finished (before you wash it) shake it vigorously so the looser hairs come off. NOTE: do NOT use a lint roller, brush or any method that pulls at the yarn.

2. Place the garment in a plastic bag and put it in your freezer - the temperature will cause the fibres to become less attached to each other, and excess fibres will come off easier.

3. Leave in the freezer for a few hours before taking it out and shaking it again.

4. Wash the garment according to the instructions on the yarn label.

Pilling is a natural process that happens to even the most exclusive of fibers. It's a natural sign of wear and tear that is hard to avoid, and that is most visible in high friction areas of your garment like a sweater's arms and cuffs.

You can make your garment look as new by removing the pilling, using a fabric comb or a pill/lint remover.

Still can't find the answer you need? Then scroll down and leave your question so one of our experts can try to help you. This will be done normally within 5 to 10 working days.
In the meantime, you can read the questions and answers that others have left to this pattern or join the DROPS Workshop on Facebook to get help from fellow knitters/crocheters!

You might also like...

Post a comment to pattern DROPS 231-44

We would love to hear what you have to say about this pattern!

If you want to leave a question, please make sure you select the correct category in the form below, to speed up the answering process. Required fields are marked *.

Comments / Questions (12)

country flag Jazmin Muñoz wrote:

Beatifull

23.05.2023 - 15:00

country flag Daniela wrote:

Buonasera, non riesco a capire bene le istruzioni per dividere il corpo e le maniche: le 8 catenelle sotto la manica devono essere "attaccate" nella catenella che c'è nella maglia centrale dell'ultima riga di A3, in modo che venga "spigolo con spigolo"? Grazie

22.05.2023 - 21:12

DROPS Design answered:

Buonasera Daniela, le 8 catenelle rappresentano la parte sotto lo scalfo, saltando le catenelle delle maniche. Buon lavoro!

22.05.2023 - 21:54

country flag Annica Larsson wrote:

Vad betyder ”Virka 1 framkant …”? Är det fast maska/stolpe/ något annat? Kommer inte vidare😬

30.11.2022 - 20:49

DROPS Design answered:

Hej Annica, det skal stå 1 stolpe og det er rettet - tak for info :)

01.12.2022 - 13:58

country flag Monika wrote:

Wzór świetny i bardzo twarzowy. Dobrze opisany i łatwy. Jedyną uwagę mam do fasonu rękawów. wg mnie w drugim rzędzie rękawa dodawane jest za duzo oczek i z tego powodu rękaw nieładnie się fałduje. Dodałam tylko 4 oczka zamiast 20 (w dwóch pierwszych i w dwóch ostatnich słupkach) i rękaw teraz ładnie i gładko leży a wciąż jest wystarczająco szeroki. Dekolt mógłby byc nieco mniejszy ale zrobiłam szersze wykończenie (2 rzędy słupków) i teraz jest idealny

25.07.2022 - 09:02

DROPS Design answered:

Witaj Moniko, miło nam jest to słyszeć. Dziękujemy za zainteresowanie naszymi wzorami. Koniecznie udostępnij link do Twojego sweterka w naszej galerii TUTAJ. Pozdrawiamy!

25.07.2022 - 17:09

country flag Aleksandra wrote:

Witam, ile oczek należy dodać w schemacie A3? Że schematu wynika, że 16, ale w opisie wychodzi, że po przerobieniu schematu A1 i A3 będzie 330 oczek, czyli o 4 oczka więcej niż wynikałoby z obliczeń dla rozmiaru m. Czy zatem gdzieś w okrążeniach trzeba dodać 4 oczka?

12.06.2022 - 11:55

DROPS Design answered:

Witaj Olu, przed rozpoczęciem schematu A.3, który przerabiasz na 6 oczkach schematu A.2, 10 oczek z każdej strony schematu A.2 wchodzi teraz do przodu tyłu i rękawów i są one przerabiane wg schematu A.1. Schemat A.3 kończy się 23 oczkami. Łącznie po zakończeniu schematu A.3 powinno być 330 oczek. Pozdrawiamy!

13.06.2022 - 19:00

country flag Annie wrote:

Magnifique

22.02.2022 - 09:04

country flag Carol wrote:

Flirty frills

19.01.2022 - 06:09

country flag Maria wrote:

Ruffle love

14.01.2022 - 22:34

country flag Olga wrote:

Romería

14.01.2022 - 21:21

country flag DelphineS wrote:

Prim Waves

14.01.2022 - 15:08