DROPS Muskat
DROPS Muskat
100% Cotton
from 2.80 $ /50g
Get the yarn to make this pattern from 22.40$.

The yarn cost is calculated from the pattern’s smallest size and the yarn’s cheapest product type. Looking for an even better price? You might find it on the DROPS Deals!

DROPS SS24

Race the Wind

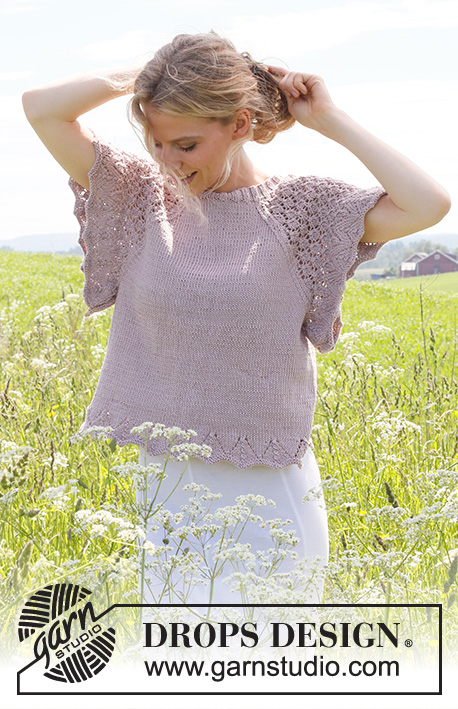
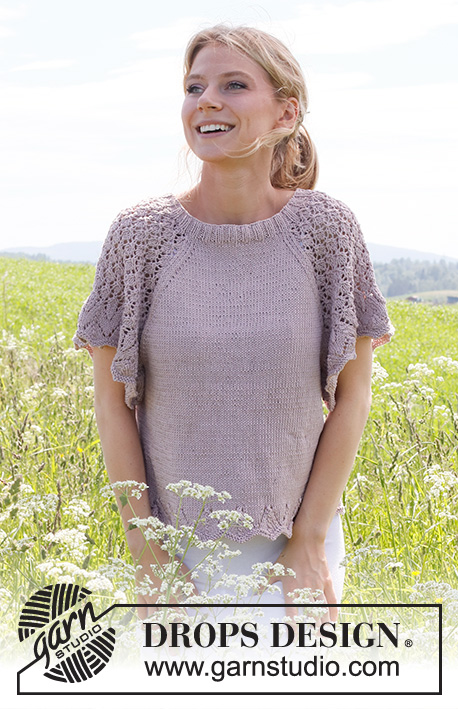
Knitted top in DROPS Muskat. Piece is knitted bottom up with raglan, lace pattern and short wing sleeves. Size: S - XXXL

DROPS 232-18
DROPS design: Pattern r-795
Yarn group B
----------------------------------------------------------

SIZE:
S - M - L - XL - XXL – XXXL

Finished measurements:
Chest measurements: 88-96-104-114-126-138 cm = 34 5/8"-37 3/4"-41"-45"-49 1/2"-54 1/4"
Full length: 48-50-52-54-56-58 cm = 19"-19 3/4"-20 1/2"-21 1/4"-22"-22 3/4"
All measurements in charts are in cm.

MATERIALS:
DROPS MUSKAT from Garnstudio (belongs to yarn group B)
400-400-450-500-550-600 g color 82, silver orchid

NEEDLES:
DROPS CIRCULAR NEEDLE SIZE 4 MM = US 6: Length: 80 cm = 32”
DROPS CIRCULAR NEEDLE SIZE 3 MM = US 2.5: Length: 40 cm = 16”

KNITTING GAUGE:
21 stitches in width and 28 rows vertically in stockinette stitch = 10 x 10 cm = 4” x 4”.
NOTE! Remember that needle size is only a suggestion. If you have too many stitches on 10 cm = 4” switch to larger needles. If you have too few stitches on 10 cm = 4” switch to smaller needles.

-------------------------------------------------------

Alternative Yarn – See how to change yarns here
Yarn Groups A to F – Use the same pattern and change the yarn here
Yarn usage using an alternative yarn – Use our yarn converter here

-------------------------------------------------------

DROPS Muskat
DROPS Muskat
100% Cotton
from 2.80 $ /50g
Get the yarn to make this pattern from 22.40$.

The yarn cost is calculated from the pattern’s smallest size and the yarn’s cheapest product type. Looking for an even better price? You might find it on the DROPS Deals!

Pattern instructions

NOTE: This pattern is written in American English. All measurements in charts are in cm. For conversion from inches to cm - click here. There are different terms for crocheting in American and British English. If this pattern includes crochet, click for "crochet terms" here. For this pattern in British English, please click here.
----------------------------------------------------------

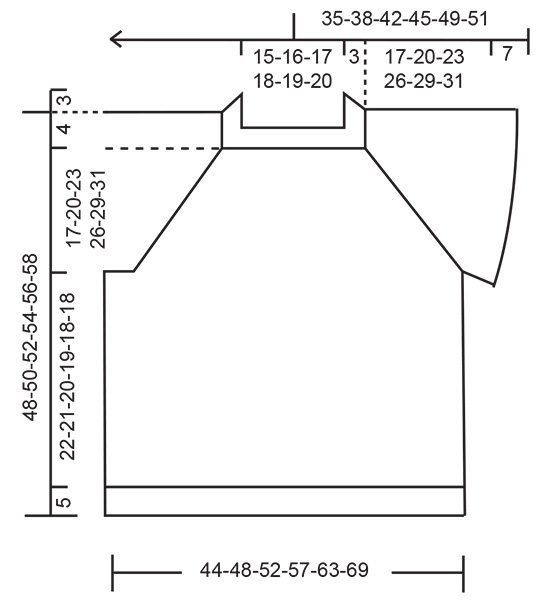
EXPLANATION FOR THE PATTERN:

----------------------------------------------------------

PATTERN:
See diagrams A.1 to A.5. Diagrams show all rows in pattern seen from the right side.

RAGLAN:
The decrease on body and sleeves are uneven. On sleeves decreases are shown in A.3 and A.5. Decrease as follows on body:
Decrease 1 stitch before marker thread as follows:
Work until 3 stitches remain before marker thread, knit the next 2 stitches together, knit next stitch, marker thread.
Decrease 1 stitch after marker thread as follows: Marker thread, knit 1, slip next stitch knitwise, knit 1 and pass slipped stitch over.
Decrease 4 stitches on every other round (2 stitches on each front piece and 2 stitches on back piece). Decreases on sleeves are in addition to these.

----------------------------------------------------------

START THE PIECE HERE:

----------------------------------------------------------

TOP - SHORT OVERVIEW OF THE PIECE:
Work body in the round on circular needle, from the bottom and up to armholes. Then work sleeve edge back and forth on circular needle up to armholes. Then slip sleeves on to same circular needle as body. Yoke and neck edge are worked in the round. Do not sew the sleeve edge together, i.e. there is a vent under sleeve.

BODY:
Cast on 266-280-308-336-378-406 stitches on circular needle size 4 MM = US 6 with DROPS Muskat. Work A.1 in the round. When A.1 has been worked, there are 190-200-220-240-270-290 stitches on needle. Work 1 round while decreasing 6-0-0-0-6-2 stitches evenly = 184-200-220-240-264-288 stitches. Insert 2 marker threads in piece; 1 at the beginning of round and 1 after 92-100-110-120-132-144 stitches (sides). Continue in stockinette stitch. REMEMBER THE KNITTING GAUGE! Work until piece measures 27-26-25-24-23-23 cm = 10 5/8"-10 1/4"-9 3/4"-9 1/2"-9"-9".

Work next round as follows: Bind off the first 4 stitches on round for armhole, work the next 84-92-102-112-124-136 stitches (front piece), bind off the next 8 stitches for armhole, work the next 84-92-102-112-124-136 stitches (back piece), bind off the last 4 stitches on needle for armhole. Cut the yarn. Put piece aside and work the sleeves.

SLEEVE:
Work sleeves back and forth on needle. Cast on 159-171-183-195-207-219 stitches on circular needle size 4 MM = US 6. Work as follows - from right side: 1 edge stitch in garter stitch, work A.2 until 2 stitches remains, work 1 stitch in stockinette stitch and 1 stitch in garter stitch. Work last row in A.2 as follows – from wrong side (there are now 81-87-93-99-105-111 stitches on needle): Bind off the first 8 stitches on needle, work until 8 remain, bind off these stitches = 65-71-77-83-89-95 stitches. Cut the yarn.
Put piece aside and knit the other sleeve the same way.

YOKE:
Slip sleeves on to same circular needle as body where armholes were bind off = 298-326-358-390-426-462 stitches. Now insert 4 marker threads in the piece. Insert marker threads 1 stitch in on front piece and back piece. Beginning round mid back. READ ALL OF THE FOLLOWING SECTION BEFORE CONTINUING!
Read RAGLAN. On first round begin decrease for raglan, AT THE SAME TIME work as follows: Work in stockinette stitch over stitches from body as before. Work stitches on sleeves as follows: A.3, work A.4 6-7-8-9-10-11 times, work A.5. Every time A.3 and A.5 have been worked 1 time vertically, there are 2 repetitions less of A.4 on each sleeve. On front piece and back piece decrease for raglan as explained above every other round 24-28-32-36-40-44 times in total = 130-130-134-138-146-154 stitches. When all decreases for raglan on front piece and back piece are done, piece measures approx. 17-20-23-26-29-31 cm = 6 3/4"-8"-9"-10 1/4"-11 3/8"-12 1/4" from where body and sleeves were put together.
Work 1 round while decreasing 18-14-14-10-14-16 stitches evenly = 112-116-120-128-132-138 stitches. Then work neck edge as explained below.

NECK EDGE:
Switch to a short circular needle size 3 MM = US 2.5. Work rib (= knit 2/purl 2). Continue rib like this for 3 cm = 1 1/8". Bind off stitches with knit over knit and purl over purl. Top measures approx. 48-50-52-54-56-58 cm = 19"-19 3/4"-20 1/2"-21 1/4"-22"-22 3/4" from shoulder and down.

Diagram

All measurements in charts are in cm.

symbols = knit from the right side, purl from the wrong side
symbols = purl from the right side, knit from the wrong side
symbols = between 2 stitches make 1 yarn over
symbols = knit 2 together
symbols = slip 1 stitch knitwise, knit 1, pass slipped stitch over stitch worked
symbols = slip 1 stitch knitwise, knit 2 stitches together, pass slipped stitch over stitches worked together
diagram
diagram

Each of our patterns has specific tutorial videos to help you.

Do you have a question? See a list of frequently asked questions (FAQ)

Knitting tension is what determines the final measurements of your work, and is usually measured per 10 x 10 cm. It is provided like so: number of stitches in width x number of rows in height - eg: 19 stitches x 26 rows = 10 x 10 cm.

The knitting tension is very individual; some people knit/crochet loosely while others work tightly. You adjust the knitting tension with the needle size, which is why the suggested needle size only serve as a guide! You need to adjust this (up or down) to ensure that YOUR knitting tension matches the knitting tension provided in the pattern. If you work with a different knitting tension than provided you will have a different yarn consumption, and your work will have different measurements than what the pattern suggests.

The knitting tension also determines which yarns can replace each other. As long as you achieve the same knitting tension you can replace one yarn with another.

See DROPS lesson: How to measure your tension/gauge

See DROPS video: How to make a gauge tension swatch

The required amount of yarn is provided in grams, eg: 450 g. To calculate how many balls you’ll need you first need to know how many grams are in 1 ball (25g, 50g or 100g). This information is available if you click on the individual yarn quality on our pages. Divide the amount required with the amount of each ball. For example, if each ball is 50g (the most common amount), the calculation will be as follows: 450 / 50 = 9 balls.

The important thing when changing from one yarn to another is that the knitting/crochet tension remains the same. This is so that the measurements of the finished piece will be the same as on the sketch provided. It is easier to achieve the same knitting tension using yarns from the same yarn group. It is also possible to work with multiple strands of a thinner yarn to achieve the knitting tension of a thicker one. Please try our yarn converter. We recommend you to always work a test swatch.

Please NOTE: when changing yarn the garment might have a different look and feel to the garment in the photo, due to individual properties and qualities of each yarn.

See DROPS lesson: Can I use a different yarn than the one mentioned in the pattern?

All our yarns are categorised into yarn groups (from A to F) according to thickness and knitting tension – group A contains the thinnest yarns and group F the thickest. This makes it easier for you to find alternative yarns to our patterns, should you wish to switch yarn. All yarns within the same group have a similar knitting tension and can easily replace each other. However, different yarn qualities have different structures and properties which will give the finished work a unique look and feel.

Click here for an overview of the yarns in each yarn group

At the top of all our patterns you’ll find a link to our yarn converter, which is a helpful tool should you wish to use a different yarn than suggested. By filling in the yarn quality you wish to replace, the amount (in your size) and number of strands, the converter will present good alternative yarns with the same knitting tension. Additionally it will tell you how much you’ll require in the new qualities and whether you’ll need to work with multiple strands. Most skeins are 50g (some are 25g or 100g).

If the pattern is worked with multiple colours, every colour will have to be converted separately. Similarly, if the pattern is worked with several strands of different yarns (for example 1 strand Alpaca and 1 strand Kid-Silk) you will have to find alternatives for each, individually.

Click here to see our yarn converter

Since different yarns have different qualities and textures we have chosen to keep the original yarn in our patterns. However, you can easily find options among our available qualities by using our yarn converter, or simply pick a yarn from the same yarn group.

It is possible that some retailers still have discontinued yarns in stock, or that someone has a few skeins at home that they would like to find patterns for.

The yarn converter will provide both alternative yarn as well as required amount in the new quality.

If you think it's hard to decide what size to make, it can be a good idea to measure a garment you own already and like the size of. Then you can pick the size by comparing those measures with the ones available in the pattern's size chart.

You'll find the size chart at the bottom of the pattern.

See DROPS lesson: How to read size chart

The needle size provided in the pattern serves only as a guide, the important thing is to follow the knitting tension. And since knitting tension is very individual, you will have to adjust the needle size to ensure that YOUR tension is the same as in the pattern – maybe you’ll have to adjust 1, or even 2 needle sizes, up or down to achieve the correct tension. For this, we recommend that you work test swatches.

Should you work with a different knitting tension than the one provided, the measurements of the finished garment might deviate from the measurement sketch.

See DROPS lesson: How to measure your tension/gauge

See DROPS video: How to make a gauge tension swatch

Working a garment top-down provides more flexibility and room for personal adjustment. For example it is easier to try the garment on while working, as well as making adjustments to length of yoke and shoulder caps.

The instructions are carefully explaining every step, in the correct order. Diagrams are adjusted to the knitting direction and are worked as usual.

The diagram depicts all rows/rounds, and every stitch seen from the right side. It is read from bottom to top, from right to left. 1 square = 1 stitch.

When working back and forth, every other row is worked from the right side and every other row is worked from the wrong side. When working from the wrong side, the diagram will have to be worked reversed: from left to right, knit stitches are purled, purl stitches are knit etc.

When working in the round every round is worked from the right side and the diagram are worked from right to left on all rounds.

See DROPS lesson: How to read knitting diagrams

The diagram depicts all rows/rounds, and every stitch seen from the right side. It is worked from bottom to top, from right to left.

When working back and forth every other row is worked from the right side: from right to left and every other row is worked from the wrong side: from left to right.

When working in the round, every row in the diagram are worked from the right side, from right to left.

When working a circular diagram you start in the middle and work your way outwards, counter clockwise, row by row.

The rows usually start with a given number of chain stitches (equivalent to the height of the following stitch), this will either be depicted in the diagram or explained in the pattern.

See DROPS lesson: How to read crochet diagrams

Instructions for working several diagrams after each other on the same row/round, will often be written like so: “work A.1, A.2, A.3 a total of 0-0-2-3-4 times". This means you work A.1 once, then A.2 is worked once, and A.3 is repeated (in width) the number of times provided for your size – in this case like so: S = 0 times, M = 0 times, L=2 times, XL= 3 times and XXL = 4 times.

The diagrams are worked as usual: begin with the first row in A.1, then work the first row in A.2 etc.

See DROPS lesson: How to read knitting diagrams

See DROPS lesson: How to read crochet diagrams

The total width of the garment (from wrist-to-wrist) will be larger in the larger sizes, despite the actual sleeves being shorter. The larger sizes have longer sleeve caps and wider shoulders, so there will be a good fit in all sizes.

The measurement sketch/schematic drawing provides information regarding the full length of the garment. If it’s a jumper or a jacket the length is measured from the highest point on the shoulder (usually closest to the neckline), and straight down to the bottom of the garment. It is NOT measured from the tip of shoulder. Similarly, the length of yoke is measured from the highest point on the shoulder and down to where yoke is split into body and sleeves.

See DROPS lesson: How to read a schematic drawing

Diagrams are often repeated on the round or in height. 1 repeat is the diagram the way it appears in the pattern. If it says to work 5 repeats of A.1 in the round, then you work A.1 a total of 5 times after/next to each other in the round. If it says to work 2 repeats of A.1 vertically/in height you work the entire diagram once, then begin again at the start and work the entire diagram one more time.

Chain stitches are slightly narrower than other stitches and to avoid working the cast-on edge too tight, we simply chain more stitches to begin with. The stitch count will be adjusted on the following row to fit the pattern and measurement sketch.

The rib edge is more elastic and will contract slightly compared to, for example, stocking stitch. By increasing before the rib edge, you avoid a visible difference in width between the rib edge and the rest of the body.

It’s very easy to cast off too tightly, and by making yarn overs while casting off (and simultaneously casting these off) you avoid a too tight cast off edge.

See DROPS video: How to bind off with yarn overs (yo)

To achieve an even increase (or decrease) you can increase on, for example: every 3rd and 4th row alternately, like so: work 2 rows and increase on the 3rd row, work 3 rows and increase on the 4th. Repeat this until the increase is complete.

See DROPS lesson: Increase or decrease 1 st on every 3rd and 4th row alternately

Should you prefer to work in the round instead of back and forth, you may of course adjust the pattern. You’ll need to add steeks mid-front (usually 5 stitches), and follow the instructions. When you would normally turn and work from the wrong side, simply work across the steek and continue in the round. At the end you’ll cut the piece open, pick up stitches to work bands, and cover the cut edges.

See DROPS video: How to knit steeks and cut open

Should you prefer to work back and forth instead of in the round, you may of course adjust the pattern so you work the pieces separately and then assemble them at the end. Divide the stitches for the body in 2, add 1 edge stitch in each side (for sewing) and work the front and back pieces separately.

See DROPS lesson: Can I adapt a pattern for circular needles into straight needles?

Pattern repeats can vary slightly in the different sizes, in order to get the correct proportions. If you’re not working the exact same size as the garment in the photo, yours might deviate slightly. This has been carefully developed and adjusted so that the complete impression of the garment is the same in all sizes.

Make sure to follow instructions and diagrams for your size!

If you have found a pattern you like which is available in women’s size it’s not very difficult to convert it to men’s size. The biggest difference will be the length of sleeves and body. Start working on the women size that you think would fit across the chest. The additional length will be worked right before you cast off for the armhole/sleeve cap. If the pattern is worked top-down you can add the length right after the armhole or before the first decrease on sleeve.

Regarding additional yarn amount, this will depend on how much length you add, but it is better with a skein too many than too few.

All yarns will have excess fibres (from production) that might come off as lint or shedding. Brushed yarns (ie hairier yarns) have more of these loose, excess fibres, causing more shedding.

Shedding also depends on what is worn under or over the garment, and whether this pulls at the yarn fibres. It’s therefore not possible to guarantee that there will be no shedding

Below are some tips on how to get the best result when working with hairier yarns:

1. When the garment is finished (before you wash it) shake it vigorously so the looser hairs come off. NOTE: do NOT use a lint roller, brush or any method that pulls at the yarn.

2. Place the garment in a plastic bag and put it in your freezer - the temperature will cause the fibres to become less attached to each other, and excess fibres will come off easier.

3. Leave in the freezer for a few hours before taking it out and shaking it again.

4. Wash the garment according to the instructions on the yarn label.

Pilling is a natural process that happens to even the most exclusive of fibers. It's a natural sign of wear and tear that is hard to avoid, and that is most visible in high friction areas of your garment like a sweater's arms and cuffs.

You can make your garment look as new by removing the pilling, using a fabric comb or a pill/lint remover.

Still can't find the answer you need? Then scroll down and leave your question so one of our experts can try to help you. This will be done normally within 5 to 10 working days.
In the meantime, you can read the questions and answers that others have left to this pattern or join the DROPS Workshop on Facebook to get help from fellow knitters/crocheters!

You might also like...

Post a comment to pattern DROPS 232-18

We would love to hear what you have to say about this pattern!

If you want to leave a question, please make sure you select the correct category in the form below, to speed up the answering process. Required fields are marked *.

Comments / Questions (13)

country flag Deutschland wrote:

Hallo, Wenn ich 266 Maschen aufnehme ( bei Maschen Probe 21 Maschen ist gleich 10 cm) dann komme ich nach meinen Berechnungen auf 63,3 cm Breie von unterem Rand bei Gr. S und nicht auf 44cm. Irgendwas stimmt hier nicht?

14.02.2024 - 16:11

DROPS Design answered:

Hallo, über die 266 Maschen stricken Sie das Diagram A.1 (von 14 bis 10 abgenommen), dh nach A.1 + 1 Runde Anbahmen, sind es nur noch 184 M in der Runde, dh ca 88 cm Umfang und 44 cm flach gelegen. Viel Spaß beim stricken!

14.02.2024 - 16:34

country flag Manni Cheung wrote:

I am working on the pattern 795. I want to ask some questions about the yoke. The instructions guided us to put the markers 1 stitch in on the front and back pieces. I suppose it meant the markers would be inserted 1 stitch after the armhole of the front piece and back piece. However, when I decrease the stitches after the markers, I will decrease the stitches from the sleeves instead of the body. It didn't sound right.... can you explain where the marker should be insert?

27.01.2024 - 23:46

DROPS Design answered:

Dear Manni, insert the markers as follows: sleeve, 1 stitch of the front piece, insert marker 1 between the stitches, front piece until 1 stitch remains, insert marker 2 between the stitches, 1 stitch, sleeve, 1 stitch of the back piece, insert marker 3 between the stitches, back piece until 1 stitch remains, insert marker 4 between stitches, 1 stitch, sleeve. Decrease always towards the body piece. For example, as numbered in the answer, decrease after marker 1 but before marker 2 and after marker 3 but after marker 4. Happy knitting!

29.01.2024 - 00:13

country flag Marianne Kristensen wrote:

Er det rigtig forstået at diagram A3 og A4 skal strikkes 6 gange over ærmerne? og derefter strikker man diagram A5 ? Mvh. Marianne

27.07.2023 - 10:07

country flag Györgyi wrote:

A minta címsorában már hiba van és ez később is zavaró; nem fentről lefelé készül… Ha nem tudnám a német változatot olvasni,már feladtam volna😒

17.02.2023 - 19:18

country flag Ann-Christin wrote:

Jag stickar på oket och undrar över ärmarna. Man ska sticka A3, A4 stickas 7 gånger,sticka A5. Ska man sticka A4 mönstret 7 gånger. Det är ju 16 varv x7. Är det rätt?

02.09.2022 - 16:41

DROPS Design answered:

Hei Ann-Christin. Når du skriver 7 ganger, tar jeg utgansgspunkt at du strikker str. M. Så da skal A.4 strikkes 7 ganger etter hverandre (7 rapporter) første gang du strikker diagram A.3, A.4 og A.5 i høyden. Du startet med 71 masker og når du har strikket diagrammene 1 gang i høyden / 16 pinner har du 59 masker (det felles til raglan i diagram A.3 og A.5). For hver gang A.3 og A.5 er strikket 1 gang i høyden, er det felt masker slik at det er plass til 2 rapporter mindre av A.4 på hvert erme. mvh DROPS Design

05.09.2022 - 10:34

country flag Brenda wrote:

Vraag over vastnaaien van de mouw: In het pand wordt voor elke mouw 8 steken afgekant. En bij de mouw 2x8 steken, dus 16 steken. Bij het vastnaaien moet dit op elkaar passen, maar bevat het okselgedeelte van de mouw dus 2x het aantal steken als waar het op vastgenaaid moet worden. Wat zijn de instructies hiervoor?

30.07.2022 - 09:33

country flag Ann-Christin wrote:

Varför blir längden upp till ärmhålen kortare ju större storleken är.

29.07.2022 - 18:50

DROPS Design answered:

Hej Ann-Christin, det for fordi ærmegabet bliver større. Du ser målene i måleskitsen nederst i opskriften :)

02.08.2022 - 15:56

country flag Carla Roodenburg wrote:

Mijn vraag is over patroon 795. Ik heb als antwoord gekregen op mijn vraag over de pas en met name het telpatroon van van 16 toeren dat ik het patroon gewoon verder moet breien, maar vanaf welke toer moet ik dan herhalen en gaat het afkanten dan ook door?

24.07.2022 - 17:44

DROPS Design answered:

Dag Carla,

Je herhaalt het patroon in de hoogte, dus als je de laatste naald in het telpatroon hebt gebreid, begin je weer bij de eerste naald in het telpatroon. Verder brei je de minderingen inderdaad zo verder zoals aangegeven in het patroon.

16.08.2022 - 21:32

country flag Carla Roodenburg wrote:

Ik ben bezig met dropshot patroon 795. Er staat bij de beschrijving van de pas, dat je voor de raglan voor maat L 32 keer in totaal afkant. De telrekening is 16 naalden hoe komen ze dan bij 32 keer en er staat bij de uitleg van raglan iedere 2 de naald. Wat is nu de bedoeling? Ik snap het niet meer. Graag hoor ik hoe en wat nu de bedoeling is.

09.07.2022 - 20:10

DROPS Design answered:

Dag Carla,

Het is de bedoeling dat je het patroon van A.3, A.4 en A.5 in de hoogte voortzet. Dus je breit niet alleen de 16 naalden van het patroon, maar je gaat gewoon verder tot de gewenste lengte van de pas zoals beschreven in de tekst.

24.07.2022 - 13:05

country flag Marlinde wrote:

Wouldn't it be of great benefit if you were to note the amount of positive ease? This pattern for example is very loosely fitted, but others seem more form fitting. If you give an indication of the positive ease people can easily determine which size chart to follow.

07.07.2022 - 11:03