
Popular categories
Looking for a yarn?


|
|||||||||||||||||||
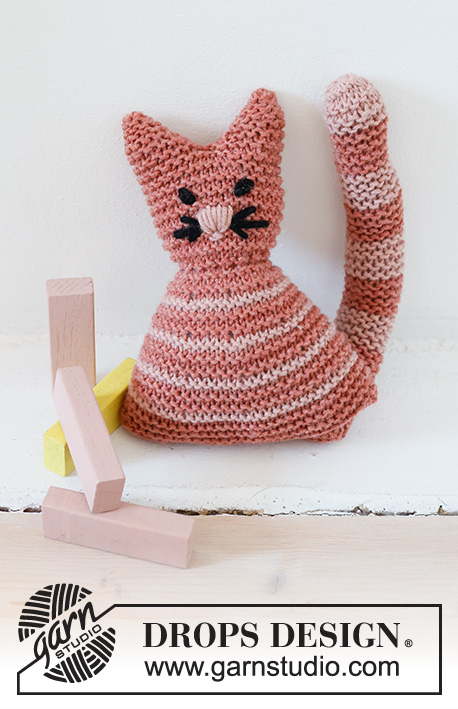
Cleo the Cat |
|||||||||||||||||||
 |
 |
||||||||||||||||||
Knitted cat for babies and children in DROPS Merino Extra Fine. Theme: Soft toys.
DROPS Baby 43-22 |
|||||||||||||||||||
|
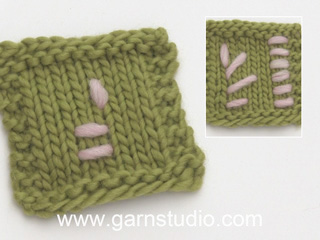
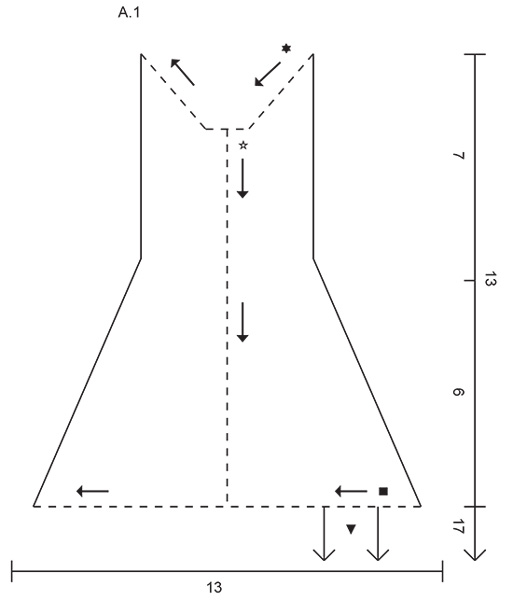
------------------------------------------------------- EXPLANATIONS FOR THE PATTERN: ------------------------------------------------------- RIDGE/GARTER STITCH (worked back and forth): Knit all rows. 1 ridge = knit 2 rows. PATTERN: See diagrams A.1, A and B. Diagram A.1 shows the finished cat and how it is sewn together. Diagrams A and B show how the stitches are worked. ------------------------------------------------------- START THE PIECE HERE: ------------------------------------------------------- CAT – SHORT OVERVIEW OF THE PIECE: The piece is worked back and forth, top down. The ears are worked first, then joined together before working the head and body. The piece is sewn together and filled with wadding. The face is embroidered and the tail worked to finish. EAR: Use 2 double pointed needles (cast on with one and work with the other). Cast on 4 stitches with double pointed needles size 3 mm and colour blush DROPS Merino Extra Fine. The whole cat is worked in GARTER STITCH – read description above. ROW 1: Knit. ROW 2: Knit 1, 1 yarn over, knit 2, 1 yarn over, knit 1 = 6 stitches. ROW 3: Knit (the yarn overs are knitted twisted to avoid holes). ROW 4: Knit 1, 1 yarn over, knit until 1 stitch remain, make 1 yarn over and knit 1 = 8 stitches. ROW 5: Knit (the yarn overs are knitted twisted to avoid holes). REMEMBER THE KNITTING TENSION! Repeat rows 4 and 5 until there are 14 stitches on the needle and the piece measures approx. 2 cm. Cut the strand, lay the piece to one side and work the second ear in the same way. HEAD AND NECK: The ears are joined before working the head. Use circular needle size 3 mm and cast on 1 stitch, work the stitches from the first ear, cast on 2 stitches, work the stitches from the second ear and cast on 1 stitch = 32 stitches. Continue with garter stitch back and forth until the head measures 5 cm (approx. 12 ridges); the piece measures 7 cm with the ears. BODY: Continue with garter stitch, stripes and increase as follows: ROW 1: Knit with colour desert rose and increase 7 stitches evenly spaced. ROW 2: Knit with colour desert rose, the yarn overs are knitted twisted to avoid holes. ROWS 3-6: Knit with colour blush. Repeat rows 1-6 three more times = 60 stitches. Work 2 ridges with colour blush (4 ridges with colour blush after the last stripe with colour desert rose). The body measures approx. 6 cm (14 ridges), the piece 13 cm with the ears. Cast off. ASSEMBLY: Fold the piece double so the ears are folded on each side and the sides meet mid-back. Sew together from ear to ear - see arrow and black star in diagram A.1. Sew the sides together mid-back, sewing in the outermost loop of the outermost ridge, from the head down to the cast-off edge – see arrow and white star in diagram A.1. Fill with wadding. Lay the piece flat so the seam is in the middle. Sew together along the cast-off edge – see arrow and black square in diagram A.1. Now form the neck. Use 1 strand of colour blush, tack the thread through the stitches in the 3rd ridge up from the first stripe in colour desert rose. Tighten the strand slightly to form the neck. Make a knot and fasten the strand. EMBROIDERY: The nose, whiskers and eyes are embroidered. Use colour desert rose for the nose, black for the whiskers and eyes. The nose has 2 horizontal short flat stitches, approx. ½ cm long and 7 vertical flat stitches, approx. 1½ cm long. The vertical stitches go up from the horizontal stitches. The whiskers are 3 flat stitches on each side of the nose, 1½, 2 and 1½ cm long - start by the nose and sew out to the side. Each eye consists of 1 chain stitch positioned on either side of the nose, approx. 1 cm above the nose and sewn diagonally. See diagrams A and B and the picture of the cat. TAIL: Cast on 14 stitches with double pointed needles size 3 mm and colour blush. Work garter stitch back and forth and stripes as follows: * 4 ridges with colour blush, 4 ridges with colour desert rose *, work from *-* a total of 5 times. The tail measures approx. 17 cm. Cut the strand, pull it through the stitches, tighten and fasten well. Fold the tail lengthwise and sew together into a long tube, sewing in the outermost loop of the outermost ridge. Fill with wadding and attach to the bottom of the cat, approx. 3 cm in from the one side – see black triangle in diagram A.1. |
|||||||||||||||||||
Diagram explanations |
|||||||||||||||||||
|
|||||||||||||||||||
|
|||||||||||||||||||

|
|||||||||||||||||||

|
|||||||||||||||||||
|
Have you made this or any other of our designs? Tag your pictures in social media with #dropsdesign so we can see them! Do you need help with this pattern?You'll find tutorial videos, a Comments/Questions area and more by visiting the pattern on garnstudio.com. © 1982-2024 DROPS Design A/S. We reserve all rights. This document, including all its sub-sections, has copyrights. Read more about what you can do with our patterns at the bottom of each pattern on our site. |
|||||||||||||||||||


With over 40 years in knitting and crochet design, DROPS Design offers one of the most extensive collections of free patterns on the internet - translated to 17 languages. As of today we count 304 catalogues and 11422 patterns - 11422 of which are translated into English (UK/cm).
We work hard to bring you the best knitting and crochet have to offer, inspiration and advice as well as great quality yarns at incredible prices! Would you like to use our patterns for other than personal use? You can read what you are allowed to do in the Copyright text at the bottom of all our patterns. Happy crafting!