DROPS Alpaca
DROPS Alpaca
100% Alpaca
from 3.65 € /50g
Get the yarn to make this pattern from 3.65€.

The yarn cost is calculated from the pattern’s smallest size and the yarn’s cheapest product type. Looking for an even better price? You might find it on the DROPS Deals!

DROPS SS24

Sweet Primrose Bonnet

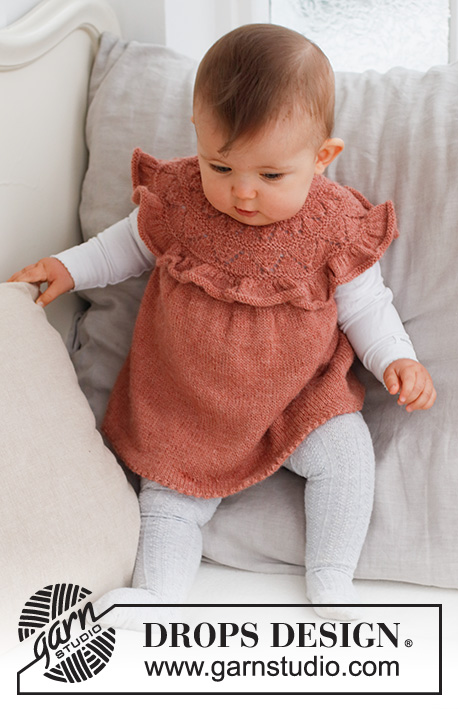
Knitted hat / bonnet for baby in DROPS Alpaca. The piece is worked with lace pattern. Sizes 0 – 2 years.

DROPS Baby 43-16
DROPS Design: Pattern z-107-by
Yarn group A
-----------------------------------------------------------

SIZES:
0/6 - 6/12 - 12/18 months (2) years
Fits head-size in cm:
40/42 - 42/44 - 44/46 (48/50)

MATERIALS:
DROPS ALPACA from Garnstudio (belongs to yarn group A)
50-50-50 (50) g colour 9026, blush

NEEDLES:
DROPS CIRCULAR NEEDLE SIZE 3 MM: Length 40 cm.
DROPS CIRCULAR NEEDLE SIZE 2.5 MM: Length 40 cm.

KNITTING TENSION:
24 stitches in width and 32 rows in height with stocking stitch = 10 x 10 cm.
NOTE: Needle size is only a guide. If you get too many stitches on 10 cm, change to a larger needle size. If you get too few stitches on 10 cm, change to a smaller needle size

-------------------------------------------------------

Alternative Yarn – See how to change yarns here
Yarn Groups A to F – Use the same pattern and change the yarn here
Yarn usage using an alternative yarn – Use our yarn converter here

-------------------------------------------------------

DROPS Alpaca
DROPS Alpaca
100% Alpaca
from 3.65 € /50g
Get the yarn to make this pattern from 3.65€.

The yarn cost is calculated from the pattern’s smallest size and the yarn’s cheapest product type. Looking for an even better price? You might find it on the DROPS Deals!

Pattern instructions

-------------------------------------------------------

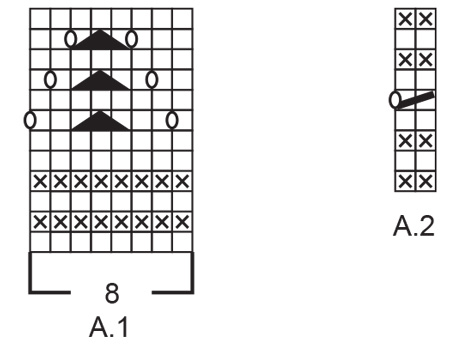
EXPLANATIONS FOR THE PATTERN:

-------------------------------------------------------

RIDGE/GARTER STITCH (worked back and forth):
Knit all rows.
1 ridge = knit 2 rows.

PATTERN:
See diagrams A.1 and A.2. The diagrams show all rows in the pattern from the right side.

DECREASE TIP-1:
All decreases are worked from the right side!
BEFORE THE MID-SECTION:
Knit together the last stitch from the thread/extra needle and the first stitch from the mid-section.
AFTER THE MID-SECTION:
Knit twisted together the last stitch from the mid-section and the first stitch from the thread/extra needle.

DECREASE TIP-2:
All decreases are worked from the right side!
AT THE BEGINNING OF THE MID-SECTION:
Work the outermost stitch of mid-section together with the next stitch from thread/extra needle as before, knit the next 2 stitches together.
AT THE END OF THE MID-SECTION:
Work until there are 3 stitches left on the mid-section, knit 2 twisted together, knit the last stitch together with the next stitch from thread/extra needle as before.

-------------------------------------------------------

START THE PIECE HERE:

-------------------------------------------------------

HAT – SHORT OVERVIEW OF THE PIECE:
The piece is worked back and forth with circular needle from mid-front. Side stitches are placed on a thread and the mid-section is worked separately, then knitted together with the stitches on the threads. A lace edge is worked around the hat and a twisted cord threaded through the holes to finish.

HAT:
Cast on 75-83-91 (99) stitches with circular needle size 3 mm and DROPS Alpaca.
Change to circular needle size 2.5 mm and work 4 rows of stocking stitch with 1 stitch in GARTER STITCH on each side – read description above.
Work the next row from the right side as follows: 1 stitch in garter stitch, * knit 2 together, 1 yarn over *, work from *-* until there are 2 stitches left, knit 1 and 1 stitch in garter stitch (folding edge).
Work 5 rows of stocking stitch with 1 stitch in garter stitch on each side.
Change to circular needle size 3 mm.
Work the next row from the right side as follows: 1 stitch in garter stitch, work A.1, 9-10-11 (12) times, work the first stitch in A.1 so the pattern is symmetrical and 1 stitch in garter stitch. Continue this pattern back and forth. REMEMBER THE KNITTING TENSION!
Work until the piece measures approx. 11-12-13 (14) cm from the folding edge – finish after row 4 or 12 in A.1.
Place the outermost 27-30-33-36 stitches on each side on separate threads/extra needles. There are 21-23-25-27 stitches on the needle (mid-section). Cut the strand.
Start from the right side and work garter stitch back and forth over the mid-section – AT THE SAME TIME on each row from the right side work together the outermost stitch on each thread/extra needle with its nearest stitch from the mid-section – read DECREASE TIP-1.
AT THE SAME TIME when the mid-section measures 4-4-5 (5) cm decrease 1 stitch on each side of the mid-section – read DECREASE TIP-2. Repeat this decrease when the mid-section measures 7-7-8 (9) cm and 10-10-11 (13) cm = 15-17-19 (21) stitches on the mid-section.
Continue working until all the stitches from the threads/extra needles have been worked together with the mid-section. Keep the stitches on the needle.

ASSEMBLY:
Fold the edge of the hat to the wrong side and sew down, giving a double edge. To avoid the edge being tight and rolling outwards it is important that the seam is elastic.

LACE EDGE:
Start from the right side at the bottom, using circular needle size 2.5 mm and knit up 28-31-34 (35) stitches inside the 1 edge stitch from the folded edge and up to the mid-section, knit the 15-17-19 (21) stitches from the mid-section and knit up 28-31-34 (35) stitches inside the 1 edge stitch from the mid-section to the folded edge = 71-79-87 (91) stitches (the number of stitches should be divisible by 4 + 3).
Start from the wrong side and work A.2 (on row 5 in A.2 work the symbols from the wrong side, i.e. knit 2 together, 1 yarn over).
When A.2 is finished change to circular needle size 3 mm. Cast off.

TWISTED CORD:
Cut 2 strands DROPS Alpaca of 3 metres. Twist them together until they begin to resist, fold the cord double and it will continue to twist. Tie a knot in each end. Thread the cord through the row of holes along the edge.

Diagram

symbols = knit from right side, purl from wrong side
symbols = knit from wrong side
symbols = between 2 stitches make 1 yarn over
symbols = knit 2 together
symbols = slip 1 stitch as if to knit, knit 2 together and pass the slipped stitch over the knitted together stitches
diagram

Each of our patterns has specific tutorial videos to help you.

Do you have a question? See a list of frequently asked questions (FAQ)

Knitting tension is what determines the final measurements of your work, and is usually measured per 10 x 10 cm. It is provided like so: number of stitches in width x number of rows in height - eg: 19 stitches x 26 rows = 10 x 10 cm.

The knitting tension is very individual; some people knit/crochet loosely while others work tightly. You adjust the knitting tension with the needle size, which is why the suggested needle size is only meant as a guide! You need to adjust this (up or down) to ensure that YOUR knitting tension matches the knitting tension provided in the pattern. If you work with a different knitting tension than provided you will have a different yarn consumption, and your work will have different measurements than what the pattern suggests.

The knitting tension also determines which yarns can replace each other. As long as you achieve the same knitting tension you can replace one yarn with another.

See DROPS lesson: How to measure your tension/gauge

See DROPS video: How to make a gauge tension swatch

The required amount of yarn is provided in grams, eg: 450 g. To calculate how many balls you’ll need you first need to know how many grams are in 1 ball (25g, 50g or 100g). This information is available if you click on the individual yarn quality on our pages. Divide the amount required with the amount of each ball. For example, if each ball is 50g (the most common amount), the calculation will be as follows: 450 / 50 = 9 balls.

The important thing when changing from one yarn to another is that the knitting/crochet tension remains the same. This is so that the measurements of the finished piece will be the same as on the sketch provided. It is easier to achieve the same knitting tension using yarns from the same yarn group. It is also possible to work with multiple strands of a thinner yarn to achieve the knitting tension of a thicker one. Please try our yarn converter. We recommend you to always work a test swatch.

Please NOTE: when changing yarn the garment might have a different look and feel to the garment in the photo, due to individual properties and qualities of each yarn.

See DROPS lesson: Can I use a different yarn than the one mentioned in the pattern?

All our yarns are categorised into yarn groups (from A to F) according to thickness and knitting tension – group A contains the thinnest yarns and group F the thickest. This makes it easier for you to find alternative yarns to our patterns, should you wish to switch yarn. All yarns within the same group have a similar knitting tension and can easily replace each other. However, different yarn qualities have different structures and properties which will give the finished work a unique look and feel.

Click here for an overview of the yarns in each yarn group

At the top of all our patterns you’ll find a link to our yarn calculator, which is a helpful tool should you wish to use a different yarn than suggested. By filling in the yarn quality you wish to replace, the amount (in your size) and number of strands, the calculator will present good alternative yarns with the same knitting tension. Additionally it will tell you how much you’ll require in the new qualities and whether you’ll need to work with multiple strands. Most skeins are 50g (some are 25g or 100g).

If the pattern is worked with multiple colours, every colour will have to be calculated separately. Similarly, if the pattern is worked with several strands of different yarns (for example 1 strand Alpaca and 1 strand Kid-Silk) you will have to find alternatives for each, individually.

Click here to see our yarn calculator

Since different yarns have different qualities and textures we have chosen to keep the original yarn in our patterns. However, you can easily find options among our available qualities by using our yarn calculator, or simply pick a yarn from the same yarn group.

It is possible that some retailers still have discontinued yarns in stock, or that someone has a few skeins at home that they would like to find patterns for.

The yarn calculator will provide both alternative yarn as well as required amount in the new quality.

If you think it's hard to decide what size to make, it can be a good idea to measure a garment you own already and like the size of. Then you can pick the size by comparing those measures with the ones available in the pattern's size chart.

You'll find the size chart at the bottom of the pattern.

See DROPS lesson: How to read size chart

The needle size provided in the pattern serves only as a guide, the important thing is to follow the knitting tension. And since knitting tension is very individual, you will have to adjust the needle size to ensure that YOUR tension is the same as in the pattern – maybe you’ll have to adjust 1, or even 2 needle sizes, up or down to achieve the correct tension. For this, we recommend that you work test swatches.

Should you work with a different knitting tension than the one provided, the measurements of the finished garment might deviate from the measurement sketch.

See DROPS lesson: How to measure your tension/gauge

See DROPS video: How to make a tension/gauge swatch

Working a garment top-down provides more flexibility and room for personal adjustment. For example it is easier to try the garment on while working, as well as making adjustments to length of yoke and shoulder caps.

The instructions are carefully explaining every step, in the correct order. Diagrams are adjusted to the knitting direction and are worked as usual.

The diagram depicts all rows/rounds, and every stitch seen from the right side. It is read from bottom to top, from right to left. 1 square = 1 stitch.

When working back and forth, every other row is worked from the right side and every other row is worked from the wrong side. When working from the wrong side, the diagram will have to be worked reversed: from left to right, knit stitches are purled, purl stitches are knit etc.

When working in the round every round is worked from the right side and the diagram are worked from right to left on all rounds.

See DROPS lesson: How to read knitting diagrams

The diagram depicts all rows/rounds, and every stitch seen from the right side. It is worked from bottom to top, from right to left.

When working back and forth every other row is worked from the right side: from right to left and every other row is worked from the wrong side: from left to right.

When working in the round, every row in the diagram are worked from the right side, from right to left.

When working a circular diagram you start in the middle and work your way outwards, counter clockwise, row by row.

The rows usually start with a given number of chain stitches (equivalent to the height of the following stitch), this will either be depicted in the diagram or explained in the pattern.

See DROPS lesson: How to read crochet diagrams

Instructions for working several diagrams after each other on the same row/round, will often be written like so: “work A.1, A.2, A.3 a total of 0-0-2-3-4 times". This means you work A.1 once, then A.2 is worked once, and A.3 is repeated (in width) the number of times provided for your size – in this case like so: S = 0 times, M = 0 times, L=2 times, XL= 3 times and XXL = 4 times.

The diagrams are worked as usual: begin with the first row in A.1, then work the first row in A.2 etc.

See DROPS lesson: How to read knitting diagrams

See DROPS lesson: How to read crochet diagrams

The total width of the garment (from wrist-to-wrist) will be larger in the larger sizes, despite the actual sleeves being shorter. The larger sizes have longer sleeve caps and wider shoulders, so there will be a good fit in all sizes.

The measurement sketch/schematic drawing provides information regarding the full length of the garment. If it’s a jumper or a jacket the length is measured from the highest point on the shoulder closest to the neckline, and straight down to the bottom of the garment. It is NOT measured from the tip of shoulder. Similarly, the length of yoke is measured from the highest point on the shoulder and down to where yoke is split into body and sleeves.

On a jacket measures are never taken along bands, unless specifically stated. Always measure inside band stitches when measuring the length.

See DROPS lesson: How to read a schematic drawing

Diagrams are often repeated on the round or in height. 1 repeat is the diagram the way it appears in the pattern. If it says to work 5 repeats of A.1 in the round, then you work A.1 a total of 5 times after/next to each other in the round. If it says to work 2 repeats of A.1 vertically/in height you work the entire diagram once, then begin again at the start and work the entire diagram one more time.

Chain stitches are slightly narrower than other stitches and to avoid working the cast-on edge too tight, we simply chain more stitches to begin with. The stitch count will be adjusted on the following row to fit the pattern and measurement sketch.

The rib edge is more elastic and will contract slightly compared to, for example, stocking stitch. By increasing before the rib edge, you avoid a visible difference in width between the rib edge and the rest of the body.

It’s very easy to cast off too tightly, and by making yarn overs while casting off (and simultaneously casting these off) you avoid a too tight cast off edge.

See DROPS video: How to bind off with yarn overs (yo)

To achieve an even increase (or decrease) you can increase on, for example: every 3rd and 4th row alternately, like so: work 2 rows and increase on the 3rd row, work 3 rows and increase on the 4th. Repeat this until the increase is complete.

See DROPS lesson: Increase or decrease 1 st on every 3rd and 4th row alternately

Should you prefer to work in the round instead of back and forth, you may of course adjust the pattern. You’ll need to add steeks mid-front (usually 5 stitches), and follow the instructions. When you would normally turn and work from the wrong side, simply work across the steek and continue in the round. At the end you’ll cut the piece open, pick up stitches to work bands, and cover the cut edges.

See DROPS video: How to knit steeks and cut open

Should you prefer to work back and forth instead of in the round, you may of course adjust the pattern so you work the pieces separately and then assemble them at the end. Divide the stitches for the body in 2, add 1 edge stitch in each side (for sewing) and work the front and back pieces separately.

See DROPS lesson: Can I adapt a pattern for circular needles into straight needles?

Pattern repeats can vary slightly in the different sizes, in order to get the correct proportions. If you’re not working the exact same size as the garment in the photo, yours might deviate slightly. This has been carefully developed and adjusted so that the complete impression of the garment is the same in all sizes.

Make sure to follow instructions and diagrams for your size!

If you have found a pattern you like which is available in women’s size it’s not very difficult to convert it to men’s size. The biggest difference will be the length of sleeves and body. Start working on the women size that you think would fit across the chest. The additional length will be worked right before you cast off for the armhole/sleeve cap. If the pattern is worked top-down you can add the length right after the armhole or before the first decrease on sleeve.

Regarding additional yarn amount, this will depend on how much length you add, but it is better with a skein too many than too few.

All yarns will have excess fibres (from production) that might come off as lint or shedding. Brushed yarns (ie hairier yarns) have more of these loose, excess fibres, causing more shedding.

Shedding also depends on what is worn under or over the garment, and whether this pulls at the yarn fibres. It’s therefore not possible to guarantee that there will be no shedding

Below are some tips on how to get the best result when working with hairier yarns:

1. When the garment is finished (before you wash it) shake it vigorously so the looser hairs come off. NOTE: do NOT use a lint roller, brush or any method that pulls at the yarn.

2. Place the garment in a plastic bag and put it in your freezer - the temperature will cause the fibres to become less attached to each other, and excess fibres will come off easier.

3. Leave in the freezer for a few hours before taking it out and shaking it again.

4. Wash the garment according to the instructions on the yarn label.

Pilling is a natural process that happens to even the most exclusive of fibers. It's a natural sign of wear and tear that is hard to avoid, and that is most visible in high friction areas of your garment like a sweater's arms and cuffs.

You can make your garment look as new by removing the pilling, using a fabric comb or a pill/lint remover.

Still can't find the answer you need? Then scroll down and leave your question so one of our experts can try to help you. This will be done normally within 5 to 10 working days.
In the meantime, you can read the questions and answers that others have left to this pattern or join the DROPS Workshop on Facebook to get help from fellow knitters/crocheters!

You might also like...

Post a comment to pattern DROPS Baby 43-16

We would love to hear what you have to say about this pattern!

If you want to leave a question, please make sure you select the correct category in the form below, to speed up the answering process. Required fields are marked *.

Comments / Questions (10)

country flag Adelgunde Baier wrote:

Hallo, wenn ich diese Mütze in kraus rechts stricke muss ich die Abnahmen auch auf diese Weise stricken? Mit freundlichen Grüßen Adelgunde Baier

07.04.2024 - 09:06

DROPS Design answered:

Liebe Frau Baier, bei diesem Modell wird das hintere Teil von der Mütze (das mit den Abnahmen) krausrechts gestrickt. Viel Spaß beim Stricken!

08.04.2024 - 08:12

country flag Raffaela wrote:

Ho eeli realizzato la cuffietta come da descrizione. Complimenti per le descrizioni che sono veramente accurate e precise. Unica domanda è questa: i cordini arrotolati girano tutti intorno alla cuffia o solo nel bordo del collo? Cioè anche intorno alla testa? Grazie per una risposta e complimenti ancora ciao

13.03.2024 - 18:07

DROPS Design answered:

Buongiorno Raffaella, i cordini sono inseriti nel bordo traforato. Buon lavoro!

16.03.2024 - 18:55

country flag Maria Hilitos wrote:

Me encanto esta precioso. Muchas gracias por el tutorial.

06.03.2024 - 16:50

country flag Brigitte Flamand wrote:

Au moment des diminutions 2 je dois continuer à tricoter les mailles laissées sur les côtés ou pas ? contrairement au diminution 1

17.03.2023 - 21:03

DROPS Design answered:

Bonjour Mme Flamand, la diminution-1 est expliquée dans la diminution-2, autrement dit, vous tricotez la m suivante en attente avant la partie centrale avec la 1ère m de la partie centrale, tricotez 2 m ens à l'end, tricotez jusqu'à ce qu'il reste 3 m de la partie centrale, tricotez 2 m ens torse à l'end et tricotez ensemble à l'end la dernière m de la partie centrale et la m suivante en attente. Bon tricot!

20.03.2023 - 09:49

country flag Annick LECLAIR wrote:

Bonjour. j'ai des problèmes avec le diagramme, il y a plus de jetés que de maille ensemble diminuées, comment faire pour garder le même nombre de mailles?

06.03.2023 - 11:49

DROPS Design answered:

Bonjour Mme Leclair, dans les deux diagrammes A.1 et A.2 vous devez avoir le même nombre de jetés que de mailles à diminuer - dans A.1, vous diminuez 2 m au milieu (= glissez 1 m, tricotez 2 m et passez la m glissée par-dessus la m tricotée) et faites 2 jetés (1 avant et 1 après cette diminution); dans A.2, on diminue 1 m (= 2 m ens à l'end) et on fait 1 jeté ; autrement dit le nombre de mailles va toujours rester le même. Pour A.1, n'hésitez pas à mettre un marqueur après chaque diagramme, vous pourrez ainsi contrôler que vous avez toujours bien 8 mailles. Bon tricot!

06.03.2023 - 14:58

country flag Anna wrote:

Ik begrijp niet hoe de kantrand gemaakt moet worden. Ik heb 71 steken op mijn naald (ik maak de kleinste maat). Wordt A2 herhaald tot alle steken op de naald gebreid zijn? Maar dan kom ik toch niet uit met oneven steken? Met vriendelijke groet, Anna

02.02.2023 - 19:48

country flag Anne wrote:

”Se tricote en aller et retour sur aiguilles circulaires” Donc, on ne tricote pas en rond en fermant le tricot. Du coup, peut le tricoter aux aiguilles droites? Merci beaucoup de votre réponse.

19.12.2022 - 19:21

DROPS Design answered:

Bonjour Anne, tout à fait, vous pouvez utiliser des aiguilles droites si vous êtes plus à l'aise - retrouvez ici d'autres infos sur les aiguilles circulaires. Bon tricot!

20.12.2022 - 08:59

country flag PEMANA wrote:

El gráfico A1 hay que empezarlo por abajo no? Para que el dibujo quede como en la foto .

08.10.2022 - 13:03

DROPS Design answered:

Hola PEMANA, los diagramas se leen siempre de abajo arriba y de derecha a izquierda (en las filas por el lado derecho) o de izquierda a derecha (en las filas por el lado revés).

09.10.2022 - 18:55

country flag Steph wrote:

Hi, I’m very confused about how to knit the back of the head. Do you have a picture of the back and how it’s constructed? An example of how to knit the stitches from the side threads into the midsection would be very helpful. Thank you!

27.09.2022 - 00:46

DROPS Design answered:

Dear Steph, you will work the stitches on mid back in garter stitch, and at the same time you will work at the beginning of every row from the right side the first stitch on row + the next stitch on the side together and at the end of the same row you will work the last stitch on mid back with the next stitch on the side together. see DECREASE TIP-1:. Happy knitting!

27.09.2022 - 09:15

country flag Wilma Vinton wrote:

I would like to make this pattern, but I don't quite understand what is meant by the section "Place the outer most 27... stitched on each side on separate threads/extra needles.... through to the end. Do you only knit the sides, when you are decreasing? Thanks Wilma

12.06.2022 - 09:07

DROPS Design answered:

Dear Mrs Vinton, you will now work the back of the head, so you slip the first and last 27 stitches on a thread and work now the remaining 21 stitches on needle (middle of piece), and now work garter stitch and at the same time, work the last of these 21 stiches together with the next stitch slipped on a thread at the end of every row until all the 27 stitches on each side have been worked together with the edge stitches of the middle section (and then decrease at the middle of this section) Happy knitting!

13.06.2022 - 09:28