DROPS Paris
DROPS Paris
100% Cotton
from 1.10 £ /50g
Get the yarn to make this pattern from 23.10£.

The yarn cost is calculated from the pattern’s smallest size and the yarn’s cheapest product type. Looking for an even better price? You might find it on the DROPS Deals!

DROPS SS24

Summer Sunset

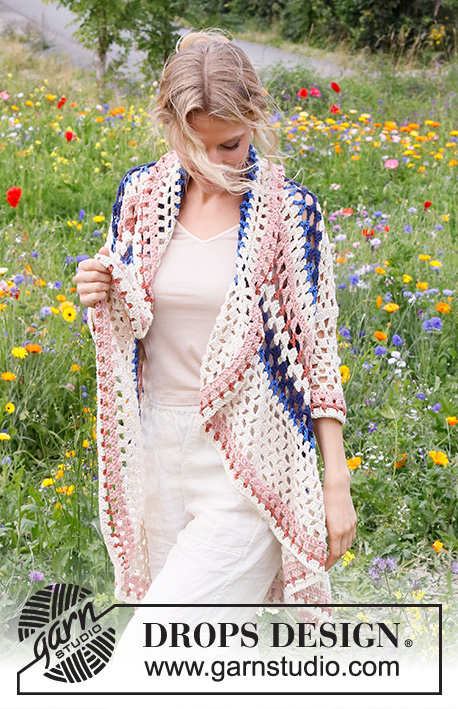
Crocheted circle jacket in DROPS Paris. Piece is crocheted with stripes and lace pattern. Size: S - XXXL

DROPS 230-33
DROPS design: Pattern w-873
Yarn group C or A + A
----------------------------------------------------------

SIZE:
S/M - L/XL - XXL/ XXXL

MATERIALS:
DROPS PARIS from Garnstudio (belongs to yarn group C)
200-200-250 g colour 63, desert rose
100-100-100 g colour 65, rust
600-650-700 g colour 17, off white
100-100-100 g colour 28, navy blue
50-50-50 g colour 09, royal blue

CROCHET HOOK:
DROPS CROCHET HOOK SIZE 5.5 mm.

CROCHET TENSION:
13 treble crochets in width and 8 rows vertically = 10 x 10 cm.
Approx. 13 stitches and 6 rows vertically with pattern = 10 x 10 cm.
NOTE! Remember that hook size is only a suggestion. If you have too many stitches on 10 cm switch to larger hook. If you have too few stitches on 10 cm switch to smaller hook.

-------------------------------------------------------

Alternative Yarn – See how to change yarns here
Yarn Groups A to F – Use the same pattern and change the yarn here
Yarn usage using an alternative yarn – Use our yarn converter here

-------------------------------------------------------

DROPS Paris
DROPS Paris
100% Cotton
from 1.10 £ /50g
Get the yarn to make this pattern from 23.10£.

The yarn cost is calculated from the pattern’s smallest size and the yarn’s cheapest product type. Looking for an even better price? You might find it on the DROPS Deals!

Pattern instructions

NOTE: This pattern is written in British English. All measurements in charts are in cm. For conversion from cm to inches - click here. There are different terms for crocheting in British and American English. If this pattern includes crochet, click for "crochet terms" here. For this pattern in American English, please click here.
----------------------------------------------------------

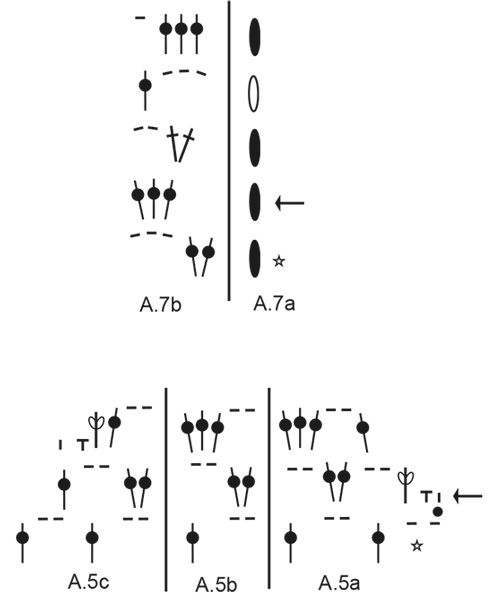
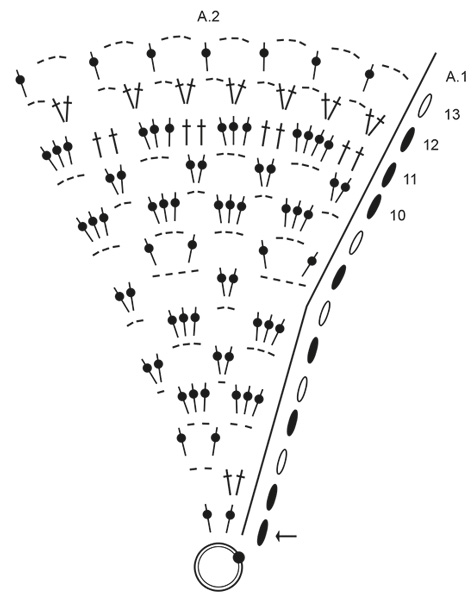
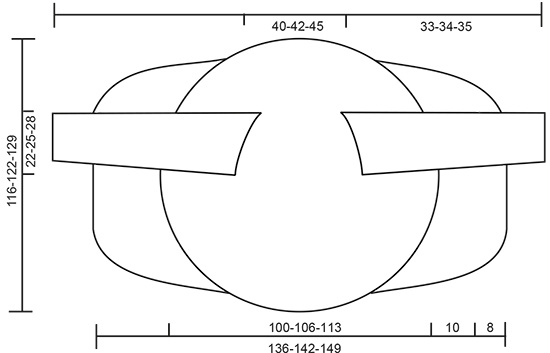
EXPLANATION FOR THE PATTERN:

----------------------------------------------------------

CHAIN STITCH:
If you work at the end of crochet hook the chain stitch will often be too tight.
1 chain stitch should be just as long as 1 double crochet/half treble crochet/treble crochet is wide.

PATTERN:
See diagrams A.1 to A.7.

STRIPES:
ROUNDS 1-2: Work with colour desert rose.
ROUND 3: Work with colour rust.
ROUNDS 4-5: Work with desert rose.
ROUNDS 6-7: Work with colour navy blue.
ROUND 8: Work with royal blue.
ROUNDS 9-10: Work with off white.
ROUNDS 11-20: Work as 1st-10th round.
ROUNDS 21-30: Work as 1st-10th round.

DECREASE TIP (evenly):
To calculate how to decrease evenly, use the total number of stitches on row (e.g. 336 treble crochets), and divide stitches by number of decreases to be done (e.g. 12) = 28.
In this example decrease by working every 27th and 28th treble crochet into 1 treble crochet.
Decrease 1 treble crochet as follows:
* Work 1 treble crochet but wait with last yarn over and pull through, work 1 more treble crochet but on last pull through, pull yarn through all loops on hook.(= 1 treble crochet decreased).

----------------------------------------------------------

START THE PIECE HERE:

----------------------------------------------------------

CIRCLE JACKET – SHORT OVERVIEW OF THE PIECE:
Piece is worked in the round from the middle of circle (= mid back). When circle is done, work right and left side piece. Work side pieces back and forth. Then work an edge around the entire circle and side pieces. Then work the sleeves in the round, top down.

CIRCLE:
Work 5 chain stitches – read CROCHET TIP FOR CHAIN STITCH, on hook size 5.5 mm with colour desert rose in DROPS Paris, and form a ring with 1 slip stitch in 5th chain stitch. Then work STRIPES – read explanation above, and pattern as follows:
Work A.1 (shows how round begins and ends), work A.2 8 times in total on round. REMEMBER THE CROCHET TENSION!
When A.1 and A.2 have been worked vertically, there are 56 chain spaces on round (= 224 stitches) and piece measures approx. 42 cm in diameter.

Now work arm holes as follows:
Work 1 slip stitch around next chain space, then work A.3a (shows how round begins and ends), work A.3b around the first 7-8-8 chain spaces, work 28-32-36 loose chain stitches and skip the next 7-8-9 chain spaces for armhole, work A.3b until 14-15-17 chain spaces remain on round, work 28-32-36 loose chain stitches and skip the next 7-8-9 chain spaces for armhole, work A.3b over the last 7-7-8 chain spaces.
Continue in the round with A.3a and A.3b, but over the 28-32-36 loose chain stitches work 7-8-9 repetitions with A.3b. On last round decrease at the same time on 12 treble crochets evenly - read DECREASE TIP = 324 treble crochets.
Now work as follows: Work A.4a (shows how round begins and ends), A.4b the entire round. When A.4a and A.4b are done, there are 162 chain spaces on round. Piece measures approx. 100 cm in diameter.
Size S/M is now done - work as explained below. Continue as explained in size L/XL and XXL/XXXL if you want the piece to be longer (an edge of approx. 8 cm remain mid back). Cut the yarn.
In size L/XL and XXL/XXXL work as follows:

SIZE L/XL AND XXL/XXXL:
Continue with colour off white.
Work A.5b on round – every round begins with 3 chain stitches and ends with 1 slip stitch in 3rd chain stitch at the beginning of round (= replaces first treble crochet on first round and last treble crochet on last round).
Work the last 2 rounds in diagram 1-2 times vertically in total. Piece measures approx. 106-113 cm in diameter. Cut the yarn.

ALL SIZES:
Now only work over 49 chain spaces in each side. Insert 4 marker threads in piece as follows without working: Skip the first 16-17-17 chain spaces (= up towards the neck), insert a marker thread in next chain space, skip the next 47 chain spaces, insert a marker thread in next chain space (= left side), skip the next 32-31-30 chain spaces (= down on body), insert a marker thread in next chain space, skip the next 47 chain spaces, insert a marker thread in next chain space (= right side), 16-16-17 chain spaces remain on round after last marker thread (= up towards the neck).

LEFT SIDE:
= 49 chain spaces. Work the entire left side in colour off white and work back and forth. Begin from right side in chain space with marker thread, fasten strand with 1 slip stitch in first chain stitch in chain space and work as follows:
Work A.5a over the first 2 chain spaces, A.5b over the next 45 chain spaces, A.5c over the last 2 chain spaces.
Continue back and forth like this. When diagrams have been worked vertically, repeat the last 2 rows vertically 2 more times (= 6 rows in total vertically). Cut and fasten the yarn.

RIGHT SIDE:
Work the same way as on left side - begin from right side in chain space with marker thread.

EDGE:
Work an edge from right side, around the entire circle and side pieces. Begin with colour off white and fasten strand with 1 slip stitch at the beginning of round from crochet circle.
ROUND 1: Work as shown on 10th round in A.1 and A.2 (= A.1 shows how round begins and ends). Along the side diagrams on right and left side (i.e. A.5a and A.5c) work approx. 5 repetitions with (2 treble crochets + 3 chain stitches = the first 5 stitches on 10th round in A.2) evenly = approx. 170 chain spaces on round.
ROUNDS 2-3: Switch to colour desert rose and work A.7a and A.7b.
ROUND 4: Switch to colour rust. Work next round in A.7a and A.7b.
ROUND 5: Switch to colour off white. Work last round in A.7a and A.7b. Cut and fasten the yarn.

SLEEVES:
Work sleeves in the round from armhole and down with colour off white and on hook size 5.5 mm.
Fasten strand with 1 slip stitch mid under right sleeve and work as follows: Work A.6a (= shows how round begins and ends) over the first 2 chain spaces, A.6b around each of the next 5-6-7 chain spaces up to top of sleeve, continue with 5-6-7 repetitions of A.6b around chain spaces worked for armholes, and finish with A.6c around the last 2 chain spaces = 14-16-18 groups with 3 treble crochets + 1 chain stitch for sleeve. Continue like this in the round - decrease as shown in A.6a and A.6c. On round with star in diagrams (= round with treble crochets) decrease 4-8-8 treble crochets evenly on round – remember DECREASE TIP = 42-46-54 treble crochets on round. When entire diagram has been worked vertically, work diagrams from round with arrow up to round before round with star. Then repeat the last 2 rounds before the round with star until sleeve measures approx. 26-27-28 cm - or desired length (an edge of approx. 7 cm remain before finished measurements). Adjust to finish after round before round with star, so that pattern worked on edge fits.
Now work an edge as follows:
ROUND 1: Switch to colour desert rose. Work round with star in A.6a to A.6c = 34-38-46 treble crochets.
ROUND 2: Work next to last round in A.6a to A.6c.
ROUND 3: Switch to colour rust. Work last round in A.6a to A.6c.
ROUND 4: Switch to colour off white. Work round with arrow in A.6a to A.6c.
Cut and fasten the yarn. Sleeve measures approx. 33-34-35 cm. Work the other sleeve the same way

This pattern has been corrected.

Updated online: 08.03.2023
Correction yarn amount: 100-100-100 g colour 28, navy blue
50-50-50 g colour 09, royal blue
Updated online: 21.04.2023
SLEEVES: .. On round with star in diagrams (= round with treble crochets) decrease 4-8-8 treble crochets evenly on round – remember DECREASE TIP = 42-46-54 treble crochets on round.

Diagram

symbols = begin here - this chain stitch ring is explained in pattern Continue on symbol over point on circle and work towards the left.
symbols = 1 chain stitch - if you work at the end of crochet hook the chain stitch will often be too tight 1 chain stitch should be just as long as 1 double crochet/half treble crochet/treble crochet is wide.
symbols = 1 treble crochet around chain space/chain stitch ring
symbols = 1 treble crochet in stitch below
symbols = at beginning of round work 3 chain stitches. These 3 chain stitches replace first treble crochet on round. Finish round with 1 slip stitch in 3rd chain stitch from beginning of round.
symbols = at beginning of round work 3 chain stitches. These 3 chain stitches replace last treble crochet on round. Finish round with 1 slip stitch in 3rd chain stitch from beginning of round.
symbols = at beginning of round work 3 chain stitches (= do not replace first treble crochet). Finish round with 1 slip stitch in 3rd chain stitch from beginning of round
symbols = Begin on this round/row. Previous round/row has already been worked
symbols = work 2 treble crochets together around chain space as follows: Work 1 treble crochet around chain space, but wait with last yarn over and pull through, work 1 treble crochet in same chain space, but on yarn over and last pull through pull yarn through all 3 loops on hook (= 1 stitch decreased).
symbols = 1 half treble crochet
symbols = 1 double crochet around chain stitch
symbols = 1 slip stitch in stitch
symbols = begin on next round, this round has already been worked
diagram
diagram
diagram
diagram
diagram
Do you have a question? See a list of frequently asked questions (FAQ)

Knitting tension is what determines the final measurements of your work, and is usually measured per 10 x 10 cm. It is provided like so: number of stitches in width x number of rows in height - eg: 19 stitches x 26 rows = 10 x 10 cm.

The knitting tension is very individual; some people knit/crochet loosely while others work tightly. You adjust the knitting tension with the needle size, which is why the suggested needle size is only meant as a guide! You need to adjust this (up or down) to ensure that YOUR knitting tension matches the knitting tension provided in the pattern. If you work with a different knitting tension than provided you will have a different yarn consumption, and your work will have different measurements than what the pattern suggests.

The knitting tension also determines which yarns can replace each other. As long as you achieve the same knitting tension you can replace one yarn with another.

See DROPS lesson: How to measure your tension/gauge

See DROPS video: How to make a gauge tension swatch

The required amount of yarn is provided in grams, eg: 450 g. To calculate how many balls you’ll need you first need to know how many grams are in 1 ball (25g, 50g or 100g). This information is available if you click on the individual yarn quality on our pages. Divide the amount required with the amount of each ball. For example, if each ball is 50g (the most common amount), the calculation will be as follows: 450 / 50 = 9 balls.

The important thing when changing from one yarn to another is that the knitting/crochet tension remains the same. This is so that the measurements of the finished piece will be the same as on the sketch provided. It is easier to achieve the same knitting tension using yarns from the same yarn group. It is also possible to work with multiple strands of a thinner yarn to achieve the knitting tension of a thicker one. Please try our yarn converter. We recommend you to always work a test swatch.

Please NOTE: when changing yarn the garment might have a different look and feel to the garment in the photo, due to individual properties and qualities of each yarn.

See DROPS lesson: Can I use a different yarn than the one mentioned in the pattern?

All our yarns are categorised into yarn groups (from A to F) according to thickness and knitting tension – group A contains the thinnest yarns and group F the thickest. This makes it easier for you to find alternative yarns to our patterns, should you wish to switch yarn. All yarns within the same group have a similar knitting tension and can easily replace each other. However, different yarn qualities have different structures and properties which will give the finished work a unique look and feel.

Click here for an overview of the yarns in each yarn group

At the top of all our patterns you’ll find a link to our yarn calculator, which is a helpful tool should you wish to use a different yarn than suggested. By filling in the yarn quality you wish to replace, the amount (in your size) and number of strands, the calculator will present good alternative yarns with the same knitting tension. Additionally it will tell you how much you’ll require in the new qualities and whether you’ll need to work with multiple strands. Most skeins are 50g (some are 25g or 100g).

If the pattern is worked with multiple colours, every colour will have to be calculated separately. Similarly, if the pattern is worked with several strands of different yarns (for example 1 strand Alpaca and 1 strand Kid-Silk) you will have to find alternatives for each, individually.

Click here to see our yarn calculator

Since different yarns have different qualities and textures we have chosen to keep the original yarn in our patterns. However, you can easily find options among our available qualities by using our yarn calculator, or simply pick a yarn from the same yarn group.

It is possible that some retailers still have discontinued yarns in stock, or that someone has a few skeins at home that they would like to find patterns for.

The yarn calculator will provide both alternative yarn as well as required amount in the new quality.

If you think it's hard to decide what size to make, it can be a good idea to measure a garment you own already and like the size of. Then you can pick the size by comparing those measures with the ones available in the pattern's size chart.

You'll find the size chart at the bottom of the pattern.

See DROPS lesson: How to read size chart

The needle size provided in the pattern serves only as a guide, the important thing is to follow the knitting tension. And since knitting tension is very individual, you will have to adjust the needle size to ensure that YOUR tension is the same as in the pattern – maybe you’ll have to adjust 1, or even 2 needle sizes, up or down to achieve the correct tension. For this, we recommend that you work test swatches.

Should you work with a different knitting tension than the one provided, the measurements of the finished garment might deviate from the measurement sketch.

See DROPS lesson: How to measure your tension/gauge

See DROPS video: How to make a tension/gauge swatch

Working a garment top-down provides more flexibility and room for personal adjustment. For example it is easier to try the garment on while working, as well as making adjustments to length of yoke and shoulder caps.

The instructions are carefully explaining every step, in the correct order. Diagrams are adjusted to the knitting direction and are worked as usual.

The diagram depicts all rows/rounds, and every stitch seen from the right side. It is read from bottom to top, from right to left. 1 square = 1 stitch.

When working back and forth, every other row is worked from the right side and every other row is worked from the wrong side. When working from the wrong side, the diagram will have to be worked reversed: from left to right, knit stitches are purled, purl stitches are knit etc.

When working in the round every round is worked from the right side and the diagram are worked from right to left on all rounds.

See DROPS lesson: How to read knitting diagrams

The diagram depicts all rows/rounds, and every stitch seen from the right side. It is worked from bottom to top, from right to left.

When working back and forth every other row is worked from the right side: from right to left and every other row is worked from the wrong side: from left to right.

When working in the round, every row in the diagram are worked from the right side, from right to left.

When working a circular diagram you start in the middle and work your way outwards, counter clockwise, row by row.

The rows usually start with a given number of chain stitches (equivalent to the height of the following stitch), this will either be depicted in the diagram or explained in the pattern.

See DROPS lesson: How to read crochet diagrams

Instructions for working several diagrams after each other on the same row/round, will often be written like so: “work A.1, A.2, A.3 a total of 0-0-2-3-4 times". This means you work A.1 once, then A.2 is worked once, and A.3 is repeated (in width) the number of times provided for your size – in this case like so: S = 0 times, M = 0 times, L=2 times, XL= 3 times and XXL = 4 times.

The diagrams are worked as usual: begin with the first row in A.1, then work the first row in A.2 etc.

See DROPS lesson: How to read knitting diagrams

See DROPS lesson: How to read crochet diagrams

The total width of the garment (from wrist-to-wrist) will be larger in the larger sizes, despite the actual sleeves being shorter. The larger sizes have longer sleeve caps and wider shoulders, so there will be a good fit in all sizes.

The measurement sketch/schematic drawing provides information regarding the full length of the garment. If it’s a jumper or a jacket the length is measured from the highest point on the shoulder closest to the neckline, and straight down to the bottom of the garment. It is NOT measured from the tip of shoulder. Similarly, the length of yoke is measured from the highest point on the shoulder and down to where yoke is split into body and sleeves.

On a jacket measures are never taken along bands, unless specifically stated. Always measure inside band stitches when measuring the length.

See DROPS lesson: How to read a schematic drawing

Diagrams are often repeated on the round or in height. 1 repeat is the diagram the way it appears in the pattern. If it says to work 5 repeats of A.1 in the round, then you work A.1 a total of 5 times after/next to each other in the round. If it says to work 2 repeats of A.1 vertically/in height you work the entire diagram once, then begin again at the start and work the entire diagram one more time.

Chain stitches are slightly narrower than other stitches and to avoid working the cast-on edge too tight, we simply chain more stitches to begin with. The stitch count will be adjusted on the following row to fit the pattern and measurement sketch.

The rib edge is more elastic and will contract slightly compared to, for example, stocking stitch. By increasing before the rib edge, you avoid a visible difference in width between the rib edge and the rest of the body.

It’s very easy to cast off too tightly, and by making yarn overs while casting off (and simultaneously casting these off) you avoid a too tight cast off edge.

See DROPS video: How to bind off with yarn overs (yo)

To achieve an even increase (or decrease) you can increase on, for example: every 3rd and 4th row alternately, like so: work 2 rows and increase on the 3rd row, work 3 rows and increase on the 4th. Repeat this until the increase is complete.

See DROPS lesson: Increase or decrease 1 st on every 3rd and 4th row alternately

Should you prefer to work in the round instead of back and forth, you may of course adjust the pattern. You’ll need to add steeks mid-front (usually 5 stitches), and follow the instructions. When you would normally turn and work from the wrong side, simply work across the steek and continue in the round. At the end you’ll cut the piece open, pick up stitches to work bands, and cover the cut edges.

See DROPS video: How to knit steeks and cut open

Should you prefer to work back and forth instead of in the round, you may of course adjust the pattern so you work the pieces separately and then assemble them at the end. Divide the stitches for the body in 2, add 1 edge stitch in each side (for sewing) and work the front and back pieces separately.

See DROPS lesson: Can I adapt a pattern for circular needles into straight needles?

Pattern repeats can vary slightly in the different sizes, in order to get the correct proportions. If you’re not working the exact same size as the garment in the photo, yours might deviate slightly. This has been carefully developed and adjusted so that the complete impression of the garment is the same in all sizes.

Make sure to follow instructions and diagrams for your size!

If you have found a pattern you like which is available in women’s size it’s not very difficult to convert it to men’s size. The biggest difference will be the length of sleeves and body. Start working on the women size that you think would fit across the chest. The additional length will be worked right before you cast off for the armhole/sleeve cap. If the pattern is worked top-down you can add the length right after the armhole or before the first decrease on sleeve.

Regarding additional yarn amount, this will depend on how much length you add, but it is better with a skein too many than too few.

All yarns will have excess fibres (from production) that might come off as lint or shedding. Brushed yarns (ie hairier yarns) have more of these loose, excess fibres, causing more shedding.

Shedding also depends on what is worn under or over the garment, and whether this pulls at the yarn fibres. It’s therefore not possible to guarantee that there will be no shedding

Below are some tips on how to get the best result when working with hairier yarns:

1. When the garment is finished (before you wash it) shake it vigorously so the looser hairs come off. NOTE: do NOT use a lint roller, brush or any method that pulls at the yarn.

2. Place the garment in a plastic bag and put it in your freezer - the temperature will cause the fibres to become less attached to each other, and excess fibres will come off easier.

3. Leave in the freezer for a few hours before taking it out and shaking it again.

4. Wash the garment according to the instructions on the yarn label.

Pilling is a natural process that happens to even the most exclusive of fibers. It's a natural sign of wear and tear that is hard to avoid, and that is most visible in high friction areas of your garment like a sweater's arms and cuffs.

You can make your garment look as new by removing the pilling, using a fabric comb or a pill/lint remover.

Still can't find the answer you need? Then scroll down and leave your question so one of our experts can try to help you. This will be done normally within 5 to 10 working days.
In the meantime, you can read the questions and answers that others have left to this pattern or join the DROPS Workshop on Facebook to get help from fellow knitters/crocheters!

You might also like...

Post a comment to pattern DROPS 230-33

We would love to hear what you have to say about this pattern!

If you want to leave a question, please make sure you select the correct category in the form below, to speed up the answering process. Required fields are marked *.

Comments / Questions (27)

country flag Ginette Merckx wrote:

Country flag Gigi wrote: Ik begrijp de boord afwerking niet ! Boord een en terug is gedaan… maar dan Hoe moet ik de boord afwerken ? En waar beginnen als je 6 toeren heen een terug hebt ????

18.04.2024 - 09:11

country flag Gigi wrote:

Country flag Gigi wrote: Ik begrijp de boord afwerking niet ! Boord een en terug is gedaan… maar dan Hoe moet ik de boord afwerken ? En waar beginnen als je 6 toeren heen een terug hebt ????

17.04.2024 - 13:09

country flag Marianne Kristoffersen wrote:

Hej, när jag har gjort min ring med fem luftmaskor så kan jag inte hitta hur många maskor det ska vara runt ringen. Komplicerat mönster, Mvh Marianne Kristoffersen

14.04.2024 - 17:53

DROPS Design answered:

Hei Marianne. Du starter med å hekle 5 luftmasker og setter de en en ring. For å finne ut hvilken farger du skal hekle med, les STRIPER. Når du har satt de 5 luftmaskene i en ring hekler du etter diagram A.1 (A.1 viser hvordan omgangen starter og slutter), deretter hekles A.2 totalt 8 ganger rundt på omgangen / rundt ringen. Altså, hekle 3 luftmasker(=1 stav), deretter hekles det 2x8 staver (=16 staver om ringen). Avslutt omgangen med 1 kjedemaske i 3. luftmaske på begynnelsen av omgangen. mvh DROPS Design

15.04.2024 - 14:33

country flag MARIANNE KRISOTFFERSEN wrote:

Varför finns det en förklaring med luftmaskan?? --- VAD ÄR DET FÖR UPPDATERING med garnet marinblå och blå? DET ÄR JU LIKADANT som i beskrivningen!!! Uppdaterad online: 08.03.2023 Rättelse GARNÅTGÅNG: ... 100-100-100 g färg 28, marinblå 50-50-50 g färg 09, kungsblå

12.04.2024 - 18:34

DROPS Design answered:

Hei Marianne. Det fins en forklaring på 1 luftmaske slik at man hekler den riktig. Det er fort gjort å hekle for stramt, lar "løkken" bli like stram som hakket rett under kroken istedenfor tykkelsen på selve heklenålen (den lange delen). Da oppskriften ble publisert var det en annen garnmengde, og dersom noen har skrevet ut oppskriften med feil garnmengde kan de se at garnmengden er blitt forandret 08.03.2023. Etter denne datoen vil riktig garnmengde stå i selve oppskriften og under rettelse linken. mvh DROPS Design

15.04.2024 - 13:14

country flag Ineke wrote:

Het aantal steken klopt niet

13.07.2023 - 14:56

country flag Ineke wrote:

Mijn cirkel is af, maar ik heb veel meer steken. 240 Hoe moet ik dan beginnen met de zijkanten? Welke steken verhouding? Ik heb deze vraag een paar weken geleden ook al gesteld!

13.07.2023 - 14:55

DROPS Design answered:

Dag Ineke,

Komt jouw stekenverhouding in de breedte verder wel overeen met die van het patroon? Dan zou je het te veel aan steken evenredig kunnen verdelen over de steken tussen de armsgaten, dus aan de bovenkant bij de hals en aan de onderkant van de cirkel. Het aantal te haken lossen en steken die over slaat voor de armsgaten blijft wel gelijk.

13.07.2023 - 19:40

country flag Pate wrote:

Piirroksen a6 tähdellä merkityn pylväskerroksen jälkeen pylväitä on s-koossa 44, mutta seuraavan kerroksen lopetus ei sovi tähän pylväsmäärään, vaan se on sovitettu 46 pylvääseen. Tämä vaikuttaa koko loppuhihan pylväsmääriin, ja hihasta tulee leveämpi kuin ohjeessa. Onko ohjeessa virhe ja miten hiha kuuluu virkata 44:n pylvään kerroksen jälkeen?

06.03.2023 - 15:28

DROPS Design answered:

Hei, tarkistamme ohjeen ja teemme siihen tarvittaessa korjauksen.

16.03.2023 - 19:13

country flag Lisa wrote:

Als je naar het originele patroon kijkt moet toer 4 en 5 naturel zijn en niet woestijnroos. Tip;,Mocht je breed geschouderd zijn raad ik je aan om de grootste maat te haken. Die valt bij mij normaal (misschienntikkienstrak terwijl ik maat L/XL heb shirt/vest maat. Erg leuk patroon met veel afwisseling. Mijn eerste patroon die ik volg en probeer en het is met een beetje puzzelen goed te doen. Ik ben nu bij toer 21, dus nog wel een stuk te gaan :)

21.01.2023 - 00:45

country flag Silvia wrote:

Goedendag, \r\n\r\nIn het patroon onder het kopje strepen staat toer 4-5 woestijnroos, maar als je naar de foto kijkt dan is toer 4-5 naturel.\r\nDit klopt ook met het aantal bollen garen denk ik, want naturel heb ik het meeste van gekocht!!!!

29.10.2022 - 23:51

country flag Jeannine wrote:

Guten Tag, wie viele Stäbchen gehören in den Ring? Finde nirgends eine Angabe. Häkelschrift kann ich lesen, aber werde auch leider aus dieser nicht schlau. Lg

19.09.2022 - 10:26

DROPS Design answered:

Liebe Jeannine, A.2 wird 8 Mal in der Runde gehäkelt, bei der 1. Runde in A.2 häkeln Sie 2 Stäbchen x 8 Rapporte = 16 Stb nach der 1. Runde. Viel Spaß beim häkeln!

19.09.2022 - 11:28