DROPS Paris
DROPS Paris
100% Cotton
from 1.10 £ /50g
Get the yarn to make this pattern from 13.20£.

The yarn cost is calculated from the pattern’s smallest size and the yarn’s cheapest product type. Looking for an even better price? You might find it on the DROPS Deals!

DROPS SS24

Echo Mountain Cardigan

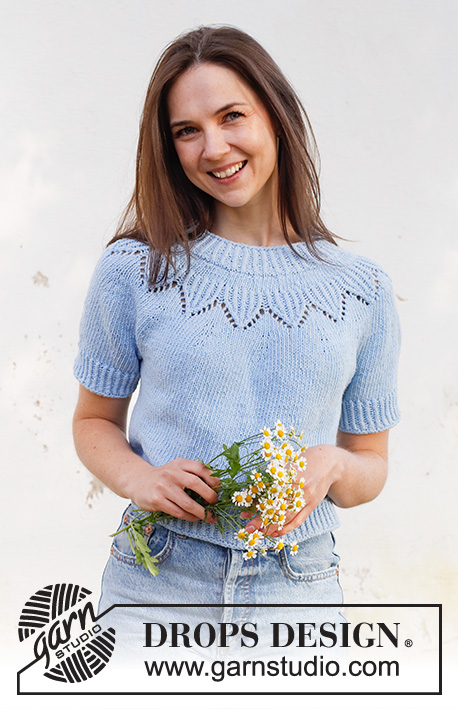
Knitted jacket in DROPS Paris. Piece is knitted top down with round yoke and lace pattern. Size: S - XXXL

DROPS 230-17
DROPS design: Pattern w-863
Yarn group C or A + A
----------------------------------------------------------

SIZE:
S - M - L - XL - XXL - XXXL

MATERIALS:
DROPS PARIS from Garnstudio (belongs to yarn group C)
600-650-700-750-800-850 g colour 100, light wash

DROPS BUTTON NO 522: 6-6-7-7-7-7 pieces

NEEDLES:
DROPS CIRCULAR NEEDLE SIZE 5 mm: Length 40 and 80 cm.
DROPS CIRCULAR NEEDLE SIZE 3.5 mm: Length: 80 cm
DROPS DOUBLE POINTED NEEDLES SIZE 5 mm
DROPS DOUBLE POINTED NEEDLES SIZE 3.5 mm
The technique MAGIC LOOP can be used – you then only need circular needle of 80 cm in each size.

KNITTING TENSION:
17 stitches in width and 22 rows vertically in stocking stitch = 10 x 10 cm.
NOTE! Remember that needle size is only a suggestion. If you have too many stitches on 10 cm switch to larger needles. If you have too few stitches on 10 cm switch to smaller needles.

-------------------------------------------------------

Alternative Yarn – See how to change yarns here
Yarn Groups A to F – Use the same pattern and change the yarn here
Yarn usage using an alternative yarn – Use our yarn converter here

-------------------------------------------------------

DROPS Paris
DROPS Paris
100% Cotton
from 1.10 £ /50g
Get the yarn to make this pattern from 13.20£.

The yarn cost is calculated from the pattern’s smallest size and the yarn’s cheapest product type. Looking for an even better price? You might find it on the DROPS Deals!

Pattern instructions

NOTE: This pattern is written in British English. All measurements in charts are in cm. For conversion from cm to inches - click here. There are different terms for crocheting in British and American English. If this pattern includes crochet, click for "crochet terms" here. For this pattern in American English, please click here.
----------------------------------------------------------

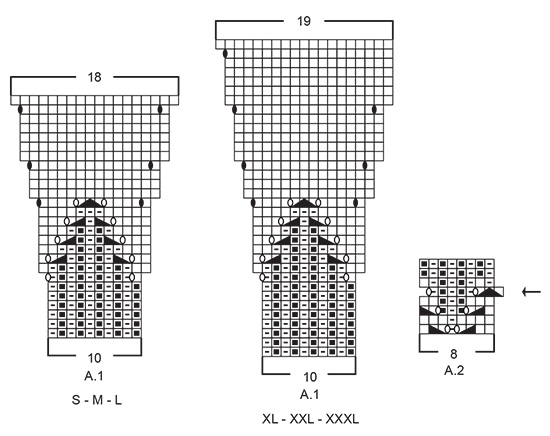
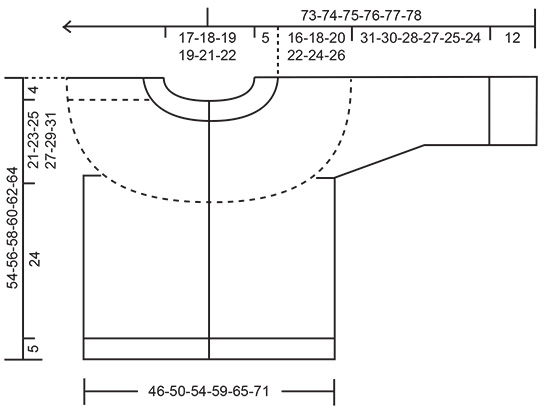
EXPLANATION FOR THE PATTERN:

----------------------------------------------------------

GARTER STITCH (back and forth):
Knit all rows.
1 ridge vertically = knit 2 rows.

ELEVATION:
To make the jacket higher in the back of neck when working round yoke, knit an elevation. Skip this paragraph if you do not want an elevation.
Begin from wrong side, work until 16-16-18-18-20-20 stitches remain on needle, turn piece, tighten yarn and work until 16-16-18-18-20-20 stitches remain in the other side.
Turn piece, tighten yarn and work until 32-32-36-36-40-40 stitches remain on needle, turn piece, tighten yarn and work until 32-32-36-36-40-40 stitches remain in the other side.
Turn piece, tighten yarn and work until 48-48-54-54-60-60 stitches remain on needle, turn piece, tighten yarn and work until 48-48-54-54-60-60 stitches remain in the other side.
Turn piece, tighten yarn and work from wrong side the rest of the row. Then work yoke as explained in pattern.

PATTERN:
See diagrams A.1 and A.2. Choose diagram for your size (applies to A.1). Diagrams show all rows in pattern seen from the right side.

DECREASE TIP (applies to mid under sleeves):
Decrease 1 stitch on each side of marker thread as follows: Work until 3 stitches remain before marker thread and knit 2 together, knit 2 (marker thread is between these 2 stitches), slip 1 stitch knitwise, knit 1, pass slipped stitch over stitch worked.

BUTTONHOLES:
Decrease for buttonholes on right band (when garment is worn). Decrease from right side when 4 stitches remain on row as follows: Make 1 yarn over, knit the next 2 stitches together, knit the last 2 stitches. On next row (wrong side) knit the yarn over to make a hole.
Decrease first buttonhole when rib in neck measures approx. 2 cm. Then decrease the next 5-5-6-6-6-6 buttonholes, approx. 9-9-8-8-8½-9 cm apart.

----------------------------------------------------------

START THE PIECE HERE:

----------------------------------------------------------

JACKET - SHORT OVERVIEW OF THE PIECE:
Work neck edge and yoke back and forth on circular needle from mid front, work top down. Work an elevation at the back of neck if you want. Now divide yoke for body and sleeves. Work body back and forth on circular needle. Work sleeves in the round on double pointed needles/a short circular needle.

NECK EDGE:
Cast on 97-101-105-105-109-113 stitches on circular needle size 3.5 mm with DROPS Paris.
Purl 1 row from wrong side. Then work rib as follows:
ROW 1 (= right side): 6 band stitches in GARTER STITCH - read explanation above - * knit 1 twisted, purl 1 *, work from *-* until 7 stitches remain on needle, knit 1 twisted and 6 band stitches in garter stitch.
ROW 2 (= wrong side): 6 band stitches in garter stitch, * purl 1 twisted, knit 1 *, repeat from *-* until 7 stitches remain, purl 1 twisted and 6 band stitches in garter stitch.
Repeat rows 1 and 2 – remember BUTTONHOLES on right band – read explanation above.
When rib measures 4 cm, increase every other 1 purl stitch (seen from right side) to 2 purl stitches by making 1 yarn over after every other purl stitch = 118-123-128-128-133-138 stitches.
Continue rib - NOTE: On first row work yarn overs twisted to avoid holes.
When rib measures 5 cm, knit 1 row from right side while at the same time increasing 9-10-11-15-18-21 stitches evenly (do not increase over bands) = 127-133-139-143-151-159 stitches.
Now work an ELEVATION at the back of neck - read explanation above. When elevation has been worked, work yoke as explained below.
If you don’t want an elevation, move on to yoke.

YOKE:
Switch to circular needle size 5 mm. Work in stocking stitch back and forth with 6 band stitches in garter stitch in each side towards mid front for 2-3-3-4-4-5 cm – AT THE SAME TIME on last row increase 16-20-24-30-32-34 stitches evenly (do not increase over bands) = 143-153-163-173-183-193 stitches.
Work next row as follows from right side: 6 band stitches in garter stitch, work A.1 13-14-15-16-17-18 times in total, work first stitch in A.1 (without increasing) so that pattern begins and ends the same, and finish with 6 band stitches in garter stitch.
Continue pattern back and forth like this, and increase as shown in diagram.
When A.1 has been worked vertically, there are 247-265-283-317-336-355 stitches on needle.
Then work in stocking stitch with 6 band stitches in garter stitch in each side – AT THE SAME TIME on first row increase 6-8-10-8-5-6 stitches evenly = 253-273-293-325-341-361 stitches.
Work until piece measures 21-23-25-27-29-31 cm from cast-on edge. Now divide yoke for body and sleeves as follows: Work as before over the first 42-45-48-52-56-60 stitches (front piece), slip the next 48-52-56-64-64-66 stitches on a thread for sleeve, cast on 6-6-8-8-10-12 new stitches on needle (in the side under sleeve), work 73-79-85-93-101-109 stitches (back piece), slip the next 48-52-56-64-64-66 stitches on a thread for sleeve, cast on 6-6-8-8-10-12 new stitches on needle (in the side under sleeve), and work as before over the last 42-45-48-52-56-60 stitches (front piece).
Finish body and sleeves separately. NOW MEASURE PIECE FROM HERE!

BODY:
= 169-181-197-213-233-253 stitches. Work in stocking stitch back and forth with 6 band stitches in garter stitch in each side towards mid front until piece measures 24 cm from division.
Knit 1 row from right side while increasing 34-36-40-42-46-50 stitches evenly (do not increase over bands) 203-217-237-255-279-303 stitches.
Switch to circular needle size 3.5 mm. Work rib as follows:
ROW 1 (= wrong side): 6 band stitches in garter stitch, * purl 1 twisted, knit 1 *, repeat from *-* until 7 stitches remain, purl 1 twisted and 6 band stitches in garter stitch.
ROW 2 (= right side): 6 band stitches in garter stitch, * knit 1 twisted, purl 1 *, work from *-* until 7 stitches remain, knit 1 twisted and 6 band stitches in garter stitch.
Repeat 1st and 2nd row until rib measures 5 cm. Cast off somewhat loosely by knitting from the right side.
Jacket measures approx. 54-56-58-60-62-64 cm from shoulder.

SLEEVES:
Slip the 48-52-56-64-64-66 stitches from thread in one side of piece on double pointed needles or a short circular needle size 5 mm and pick in addition up 1 stitch in each of the 6-6-8-8-10-12 new stitches cast on under sleeve = 54-58-64-72-74-78 stitches.
Insert 1 marker thread in the middle of the 6-6-8-8-10-12 stitches under sleeve. Move marker thread upwards when working. Use marker thread later when decreasing stitches mid under sleeve.
Begin round at the marker thread, and work stocking stitch in the round.
When sleeve measures 3-3-2-2-2-2 cm from division, decrease 2 stitches mid under sleeve - read DECREASE TIP. Decrease like this every 4-3-2-2-1½-1½ cm 3-5-8-8-9-11 times in total = 48-48-48-56-56-56 stitches.
Work until sleeve measures 31-30-28-27-25-24 cm from division. 12 cm remain until finished measurements. Try the jacket and work to desired length before lace pattern and rib.
Work A.2 6-6-6-7-7-7 times in total in the round on sleeve. When A.2 has been worked, switch to double pointed needles size 3.5 mm. Continue with rib – knit 1 twisted/purl 1 – AT THE SAME TIME on first round increase every other 1 purl stitch to 2 purl stitches = 60-60-60-70-70-70 stitches.
Work until sleeve measures 43-42-40-39-37-36 cm from division. Cast off somewhat loosely by knitting.
Work the other sleeve the same way.

ASSEMBLY:
Sew the buttons on to the left band.

Diagram

symbols = knit from the right side, purl from the wrong side
symbols = knit twisted from right side, purl twisted from wrong side
symbols = purl from the right side, knit from the wrong side
symbols = between 2 stitches make 1 yarn over, on next row purl yarn/on next round knit yarn over to make hole
symbols = between 2 stitches make 1 yarn over, on next row purl yarn over twisted to avoid holes
symbols = slip 1 stitch knitwise, knit 1 twisted, pass slipped stitch over stitch worked
symbols = slip 1 stitch knitwise, slip next stitch and put it twisted on left needle, slip the first slipped stitch twisted back on left needle, and knit these 2 stitches together
symbols = slip 1 stitch knitwise, knit 2 stitches twisted together, pass slipped stitch over stitches worked together
symbols = displace beginning of round 1 stitch to the right (only applies to this round)
symbols = this stitch doesn't exist beacuse the beginning of the round has been displaced
diagram
diagram

Each of our patterns has specific tutorial videos to help you.

Do you have a question? See a list of frequently asked questions (FAQ)

Knitting tension is what determines the final measurements of your work, and is usually measured per 10 x 10 cm. It is provided like so: number of stitches in width x number of rows in height - eg: 19 stitches x 26 rows = 10 x 10 cm.

The knitting tension is very individual; some people knit/crochet loosely while others work tightly. You adjust the knitting tension with the needle size, which is why the suggested needle size is only meant as a guide! You need to adjust this (up or down) to ensure that YOUR knitting tension matches the knitting tension provided in the pattern. If you work with a different knitting tension than provided you will have a different yarn consumption, and your work will have different measurements than what the pattern suggests.

The knitting tension also determines which yarns can replace each other. As long as you achieve the same knitting tension you can replace one yarn with another.

See DROPS lesson: How to measure your tension/gauge

See DROPS video: How to make a gauge tension swatch

The required amount of yarn is provided in grams, eg: 450 g. To calculate how many balls you’ll need you first need to know how many grams are in 1 ball (25g, 50g or 100g). This information is available if you click on the individual yarn quality on our pages. Divide the amount required with the amount of each ball. For example, if each ball is 50g (the most common amount), the calculation will be as follows: 450 / 50 = 9 balls.

The important thing when changing from one yarn to another is that the knitting/crochet tension remains the same. This is so that the measurements of the finished piece will be the same as on the sketch provided. It is easier to achieve the same knitting tension using yarns from the same yarn group. It is also possible to work with multiple strands of a thinner yarn to achieve the knitting tension of a thicker one. Please try our yarn converter. We recommend you to always work a test swatch.

Please NOTE: when changing yarn the garment might have a different look and feel to the garment in the photo, due to individual properties and qualities of each yarn.

See DROPS lesson: Can I use a different yarn than the one mentioned in the pattern?

All our yarns are categorised into yarn groups (from A to F) according to thickness and knitting tension – group A contains the thinnest yarns and group F the thickest. This makes it easier for you to find alternative yarns to our patterns, should you wish to switch yarn. All yarns within the same group have a similar knitting tension and can easily replace each other. However, different yarn qualities have different structures and properties which will give the finished work a unique look and feel.

Click here for an overview of the yarns in each yarn group

At the top of all our patterns you’ll find a link to our yarn calculator, which is a helpful tool should you wish to use a different yarn than suggested. By filling in the yarn quality you wish to replace, the amount (in your size) and number of strands, the calculator will present good alternative yarns with the same knitting tension. Additionally it will tell you how much you’ll require in the new qualities and whether you’ll need to work with multiple strands. Most skeins are 50g (some are 25g or 100g).

If the pattern is worked with multiple colours, every colour will have to be calculated separately. Similarly, if the pattern is worked with several strands of different yarns (for example 1 strand Alpaca and 1 strand Kid-Silk) you will have to find alternatives for each, individually.

Click here to see our yarn calculator

Since different yarns have different qualities and textures we have chosen to keep the original yarn in our patterns. However, you can easily find options among our available qualities by using our yarn calculator, or simply pick a yarn from the same yarn group.

It is possible that some retailers still have discontinued yarns in stock, or that someone has a few skeins at home that they would like to find patterns for.

The yarn calculator will provide both alternative yarn as well as required amount in the new quality.

If you think it's hard to decide what size to make, it can be a good idea to measure a garment you own already and like the size of. Then you can pick the size by comparing those measures with the ones available in the pattern's size chart.

You'll find the size chart at the bottom of the pattern.

See DROPS lesson: How to read size chart

The needle size provided in the pattern serves only as a guide, the important thing is to follow the knitting tension. And since knitting tension is very individual, you will have to adjust the needle size to ensure that YOUR tension is the same as in the pattern – maybe you’ll have to adjust 1, or even 2 needle sizes, up or down to achieve the correct tension. For this, we recommend that you work test swatches.

Should you work with a different knitting tension than the one provided, the measurements of the finished garment might deviate from the measurement sketch.

See DROPS lesson: How to measure your tension/gauge

See DROPS video: How to make a tension/gauge swatch

Working a garment top-down provides more flexibility and room for personal adjustment. For example it is easier to try the garment on while working, as well as making adjustments to length of yoke and shoulder caps.

The instructions are carefully explaining every step, in the correct order. Diagrams are adjusted to the knitting direction and are worked as usual.

The diagram depicts all rows/rounds, and every stitch seen from the right side. It is read from bottom to top, from right to left. 1 square = 1 stitch.

When working back and forth, every other row is worked from the right side and every other row is worked from the wrong side. When working from the wrong side, the diagram will have to be worked reversed: from left to right, knit stitches are purled, purl stitches are knit etc.

When working in the round every round is worked from the right side and the diagram are worked from right to left on all rounds.

See DROPS lesson: How to read knitting diagrams

The diagram depicts all rows/rounds, and every stitch seen from the right side. It is worked from bottom to top, from right to left.

When working back and forth every other row is worked from the right side: from right to left and every other row is worked from the wrong side: from left to right.

When working in the round, every row in the diagram are worked from the right side, from right to left.

When working a circular diagram you start in the middle and work your way outwards, counter clockwise, row by row.

The rows usually start with a given number of chain stitches (equivalent to the height of the following stitch), this will either be depicted in the diagram or explained in the pattern.

See DROPS lesson: How to read crochet diagrams

Instructions for working several diagrams after each other on the same row/round, will often be written like so: “work A.1, A.2, A.3 a total of 0-0-2-3-4 times". This means you work A.1 once, then A.2 is worked once, and A.3 is repeated (in width) the number of times provided for your size – in this case like so: S = 0 times, M = 0 times, L=2 times, XL= 3 times and XXL = 4 times.

The diagrams are worked as usual: begin with the first row in A.1, then work the first row in A.2 etc.

See DROPS lesson: How to read knitting diagrams

See DROPS lesson: How to read crochet diagrams

The total width of the garment (from wrist-to-wrist) will be larger in the larger sizes, despite the actual sleeves being shorter. The larger sizes have longer sleeve caps and wider shoulders, so there will be a good fit in all sizes.

The measurement sketch/schematic drawing provides information regarding the full length of the garment. If it’s a jumper or a jacket the length is measured from the highest point on the shoulder closest to the neckline, and straight down to the bottom of the garment. It is NOT measured from the tip of shoulder. Similarly, the length of yoke is measured from the highest point on the shoulder and down to where yoke is split into body and sleeves.

On a jacket measures are never taken along bands, unless specifically stated. Always measure inside band stitches when measuring the length.

See DROPS lesson: How to read a schematic drawing

Diagrams are often repeated on the round or in height. 1 repeat is the diagram the way it appears in the pattern. If it says to work 5 repeats of A.1 in the round, then you work A.1 a total of 5 times after/next to each other in the round. If it says to work 2 repeats of A.1 vertically/in height you work the entire diagram once, then begin again at the start and work the entire diagram one more time.

Chain stitches are slightly narrower than other stitches and to avoid working the cast-on edge too tight, we simply chain more stitches to begin with. The stitch count will be adjusted on the following row to fit the pattern and measurement sketch.

The rib edge is more elastic and will contract slightly compared to, for example, stocking stitch. By increasing before the rib edge, you avoid a visible difference in width between the rib edge and the rest of the body.

It’s very easy to cast off too tightly, and by making yarn overs while casting off (and simultaneously casting these off) you avoid a too tight cast off edge.

See DROPS video: How to bind off with yarn overs (yo)

To achieve an even increase (or decrease) you can increase on, for example: every 3rd and 4th row alternately, like so: work 2 rows and increase on the 3rd row, work 3 rows and increase on the 4th. Repeat this until the increase is complete.

See DROPS lesson: Increase or decrease 1 st on every 3rd and 4th row alternately

Should you prefer to work in the round instead of back and forth, you may of course adjust the pattern. You’ll need to add steeks mid-front (usually 5 stitches), and follow the instructions. When you would normally turn and work from the wrong side, simply work across the steek and continue in the round. At the end you’ll cut the piece open, pick up stitches to work bands, and cover the cut edges.

See DROPS video: How to knit steeks and cut open

Should you prefer to work back and forth instead of in the round, you may of course adjust the pattern so you work the pieces separately and then assemble them at the end. Divide the stitches for the body in 2, add 1 edge stitch in each side (for sewing) and work the front and back pieces separately.

See DROPS lesson: Can I adapt a pattern for circular needles into straight needles?

Pattern repeats can vary slightly in the different sizes, in order to get the correct proportions. If you’re not working the exact same size as the garment in the photo, yours might deviate slightly. This has been carefully developed and adjusted so that the complete impression of the garment is the same in all sizes.

Make sure to follow instructions and diagrams for your size!

If you have found a pattern you like which is available in women’s size it’s not very difficult to convert it to men’s size. The biggest difference will be the length of sleeves and body. Start working on the women size that you think would fit across the chest. The additional length will be worked right before you cast off for the armhole/sleeve cap. If the pattern is worked top-down you can add the length right after the armhole or before the first decrease on sleeve.

Regarding additional yarn amount, this will depend on how much length you add, but it is better with a skein too many than too few.

All yarns will have excess fibres (from production) that might come off as lint or shedding. Brushed yarns (ie hairier yarns) have more of these loose, excess fibres, causing more shedding.

Shedding also depends on what is worn under or over the garment, and whether this pulls at the yarn fibres. It’s therefore not possible to guarantee that there will be no shedding

Below are some tips on how to get the best result when working with hairier yarns:

1. When the garment is finished (before you wash it) shake it vigorously so the looser hairs come off. NOTE: do NOT use a lint roller, brush or any method that pulls at the yarn.

2. Place the garment in a plastic bag and put it in your freezer - the temperature will cause the fibres to become less attached to each other, and excess fibres will come off easier.

3. Leave in the freezer for a few hours before taking it out and shaking it again.

4. Wash the garment according to the instructions on the yarn label.

Pilling is a natural process that happens to even the most exclusive of fibers. It's a natural sign of wear and tear that is hard to avoid, and that is most visible in high friction areas of your garment like a sweater's arms and cuffs.

You can make your garment look as new by removing the pilling, using a fabric comb or a pill/lint remover.

Still can't find the answer you need? Then scroll down and leave your question so one of our experts can try to help you. This will be done normally within 5 to 10 working days.
In the meantime, you can read the questions and answers that others have left to this pattern or join the DROPS Workshop on Facebook to get help from fellow knitters/crocheters!

You might also like...

Post a comment to pattern DROPS 230-17

We would love to hear what you have to say about this pattern!

If you want to leave a question, please make sure you select the correct category in the form below, to speed up the answering process. Required fields are marked *.

Comments / Questions (12)

country flag Elze Ten Berge wrote:

Hey, hoe vertaal ik een patroon?

05.04.2024 - 16:28

DROPS Design answered:

Dag Elze,

Onderaan de materialenlijst en vlak boven de instructies voor het het patroon zie je de taal staan. Klik op het driehoekje ernaast om een andere taal te kiezen.

07.04.2024 - 17:59

country flag Irene Torsvik wrote:

Kunne dere sende denne oppskriften til meg. Lettere for meg å lese den på papir. Har kjøpt garnet tidligere. Tusen takk for hjelpen

04.04.2024 - 12:32

DROPS Design answered:

Hej Irene, det kan vi ikke, men du kan sikkert få hjælp til at skrive opskriften ud i butikken hvor du har købt garnet eller på biblioteket :)

04.04.2024 - 15:39

country flag Sylvie wrote:

Bonjour, peut-on remplacer les 6 m mousse de bordure devant par 6 m en côtes torses (comme le col)? Et est-ce que ce sera joli? Merci beaucoup pour votre réponse

19.03.2023 - 14:46

DROPS Design answered:

Bonjour Sylvie, faites un essai pour voir si cela vous convient, c'est la meilleure façon de le savoir. Bon tricot!

20.03.2023 - 09:05

country flag Pia wrote:

Jeg strikker i str. xl Når jeg er nået til bærestykket bliver jeg lidt forvirret. Jeg har 143 masker på pinden og skal tage 30 masker ud til 173 masker. Når jeg så skal til at strikke mønster A.1 kan jeg ikke få maskerne til at gå op i mønster. Man skal strikke 6 kant masker og så A.1 start med 10 masker som man så skal strikke 16 gange (10x16 = 160) så 6 kant masker og når jeg så regner det samme så er det 172 masker. Hvor skal den sidste maske strikkes.

30.11.2022 - 18:09

DROPS Design answered:

Hej Pia, det lyder til at du har glemt den ene maske inden de sidste 6 kantmasker. Sådan her står det i opskriften: ..... strik første maske i A.1 (uden at tage ud) så mønsteret starter og slutter ens, og afslut med 6 kantmasker retstrik.

01.12.2022 - 14:14

country flag Sabrina wrote:

What does "work A.2 6-6-6-7-7 times in total" (EN) or in DE: "A.2 insgesamt 6-6-6-7-7-7 x in der Runde stricken" mean when knitting the sleeves? Does that mean that I work the first six rows of A.2? Or do I really knit a total of 48 rows (8 rows of A.2 six times) for size M?

02.08.2022 - 12:59

DROPS Design answered:

Dear Sabrina, this means you have to repeat the 8 sts in A.2 a total of 6-6-6-7-7-7 times over the 48-48-48-56-56-56 stitches on the round. Start reading diagram from the right corner on the bottom and read every round towards the left from the first towards the last row. Happy knitting!

02.08.2022 - 13:23

country flag Maria wrote:

Bom dia. Muito obrigada pela resposta, mas desculpe insistir: o canelado das mangas passa a ser uma liga, uma meia, duas liga , uma meia, sempre alternadas? Faz-se como as malhas se apresentam depois do aumento e, deste modo , fica com uma liga e a seguir com duas ligas? tentei ver pela fotografia do modelo, mas não consegui perceber... Muito obrigada.

06.07.2022 - 10:49

DROPS Design answered:

Bom dia, Sim, o canelado do corpo e das mangas passa a ser: 1 malha liga, 1 malha meia, 2 malhas liga, 1 malha meia (repete-se sempre este motivo). Estes aumentos servem para preparar a largura do encaixe. O canelado acaba pouco depois, pelo que se não se consegue ver os aumentos nas fotos. Bons Tricôs!

08.07.2022 - 08:25

country flag Maria wrote:

Boa tarde O modelo é muito bonito e estou a fazê-lo e surgiu-me um problema: nas mangas, quando diz para fazer um aumento de mais uma malha liga para dar 60 malhas, o canelado não coincide, porque passar de ula liga, outra meia para depois de forma alternada fica uma meia e duas de liga. É isso? Muito obrigada

04.07.2022 - 17:34

DROPS Design answered:

Bom dia, Sim, o canelado passa a ter 2 malhas liga. Bons tricôs!

06.07.2022 - 10:00

country flag Cornelia Becker wrote:

Hallo, ich kann im Moment keine Anleitung auf mein Smartphone runterladen! Es erscheinen nur leere Textspalten! Bei den Bildern der Strickobjekte geht das! Woran kann das liegen?

07.06.2022 - 11:50

DROPS Design answered:

Liebe Frau Becker, versuchen Sie den Cache zu leeren und die Cookies zu löschen, sollte es nicht helfen, dann sagen Sie uns bescheid, welche Browser Sie benutzen (seien Sie auch sicher, daß alle update sind). Hoffentlich kann das helfen.

07.06.2022 - 16:39

country flag Carol McMillan wrote:

Is the Knit 1 twisted the same as knit through back loop?

12.05.2022 - 17:51

DROPS Design answered:

Dear Carol, yes, it is. Happy Knitting!

13.05.2022 - 04:04

country flag Carol McMillan wrote:

What is a knit twisted stitch? Do you have an instructions with pictures or video?

12.05.2022 - 17:38